2008 CHEVROLET AVEO light
[x] Cancel search: lightPage 231 of 384
When replacing the fuel cap, turn it clockwise until it
clicks. Make sure the cap is fully installed. The
diagnostic system can determine if the fuel cap has
been left off or improperly installed. This would allow fuel
to evaporate into the atmosphere. SeeMalfunction
Indicator Lamp on page 3-49.
{CAUTION:
If a �re starts while you are refueling, do not
remove the nozzle. Shut off the �ow of fuel by
shutting off the pump or by notifying the
station attendant. Leave the area immediately.
Notice:If you need a new fuel cap, be sure to get
the right type. Your dealer/retailer can get one
for you. If you get the wrong type, it may not �t
properly. This may cause your malfunction indicator
lamp to light and may damage your fuel tank and
emissions system. SeeMalfunction Indicator Lamp
on page 3-49.
Filling a Portable Fuel Container
{CAUTION:
Never �ll a portable fuel container while it is in
your vehicle. Static electricity discharge from
the container can ignite the fuel vapor.
You can be badly burned and your vehicle
damaged if this occurs. To help avoid injury to
you and others:
Dispense fuel only into approved
containers.
Do not �ll a container while it is inside a
vehicle, in a vehicle’s trunk, pickup bed, or
on any surface other than the ground.
Bring the �ll nozzle in contact with the
inside of the �ll opening before operating
the nozzle. Contact should be maintained
until the �lling is complete.
Do not smoke while pumping fuel.
Do not use a cellular phone while
pumping fuel.
5-9
Page 235 of 384
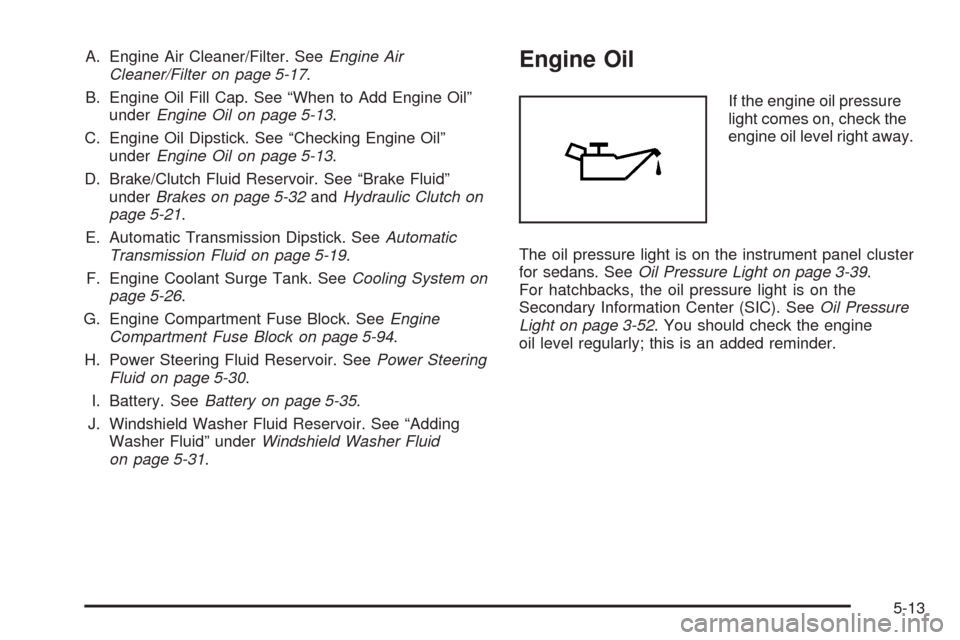
A. Engine Air Cleaner/Filter. SeeEngine Air
Cleaner/Filter on page 5-17.
B. Engine Oil Fill Cap. See “When to Add Engine Oil”
underEngine Oil on page 5-13.
C. Engine Oil Dipstick. See “Checking Engine Oil”
underEngine Oil on page 5-13.
D. Brake/Clutch Fluid Reservoir. See “Brake Fluid”
underBrakes on page 5-32andHydraulic Clutch on
page 5-21.
E. Automatic Transmission Dipstick. SeeAutomatic
Transmission Fluid on page 5-19.
F. Engine Coolant Surge Tank. SeeCooling System on
page 5-26.
G. Engine Compartment Fuse Block. SeeEngine
Compartment Fuse Block on page 5-94.
H. Power Steering Fluid Reservoir. SeePower Steering
Fluid on page 5-30.
I. Battery. SeeBattery on page 5-35.
J. Windshield Washer Fluid Reservoir. See “Adding
Washer Fluid” underWindshield Washer Fluid
on page 5-31.Engine Oil
If the engine oil pressure
light comes on, check the
engine oil level right away.
The oil pressure light is on the instrument panel cluster
for sedans. SeeOil Pressure Light on page 3-39.
For hatchbacks, the oil pressure light is on the
Secondary Information Center (SIC). SeeOil Pressure
Light on page 3-52. You should check the engine
oil level regularly; this is an added reminder.
5-13
Page 240 of 384
When to Inspect the Engine
Air Cleaner/Filter
Inspect the engine air cleaner/filter every
15,000 miles (25 000 km) and replace it every
30,000 miles (50 000 km). If you are driving in
dusty/dirty conditions, inspect the filter at each
engine oil change.
How to Inspect the Engine
Air Cleaner/Filter
To inspect the engine air cleaner/filter remove the filter
from the vehicle and lightly shake the filter to release
loose dust and dirt. If the filter remains caked with dirt,
a new filter is required.
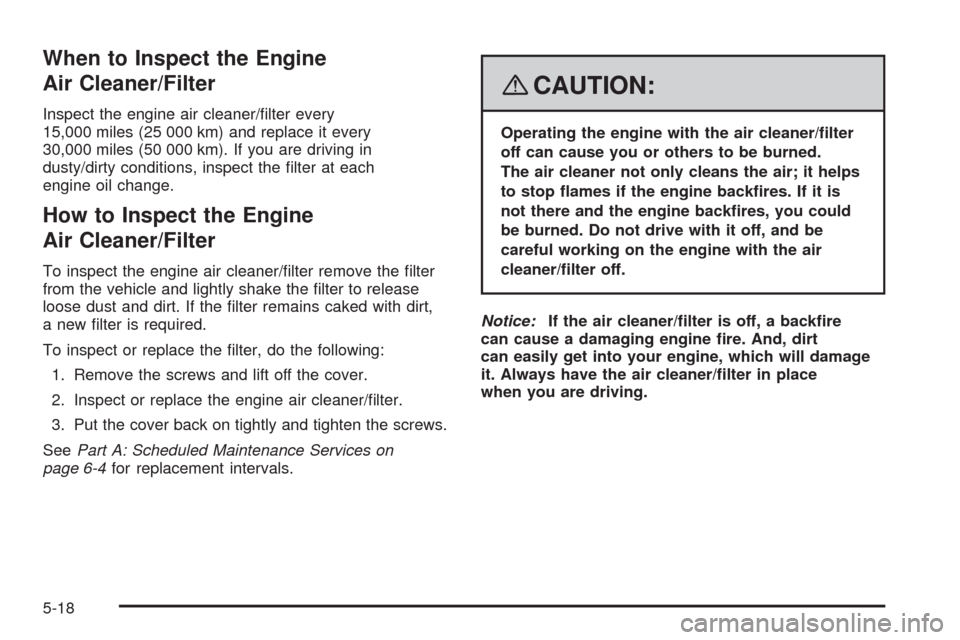
To inspect or replace the filter, do the following:
1. Remove the screws and lift off the cover.
2. Inspect or replace the engine air cleaner/filter.
3. Put the cover back on tightly and tighten the screws.
SeePart A: Scheduled Maintenance Services on
page 6-4for replacement intervals.
{CAUTION:
Operating the engine with the air cleaner/�lter
off can cause you or others to be burned.
The air cleaner not only cleans the air; it helps
to stop �ames if the engine back�res. If it is
not there and the engine back�res, you could
be burned. Do not drive with it off, and be
careful working on the engine with the air
cleaner/�lter off.
Notice:If the air cleaner/�lter is off, a back�re
can cause a damaging engine �re. And, dirt
can easily get into your engine, which will damage
it. Always have the air cleaner/�lter in place
when you are driving.
5-18
Page 244 of 384

How to Check and Add Fluid
To check the fluid level, look on the side of the reservoir.
If the fluid reaches the MAX (A) mark on the reservoir,
the fluid level is correct. If the fluid does not reach
the MIN (B) mark on the reservoir, then fluid needs
to be added. The reservoir is located near the back
of the engine compartment on the driver’s side of the
vehicle. SeeEngine Compartment Overview on
page 5-12for more information on location.
Engine Coolant
The cooling system in your vehicle is filled with
DEX-COOL®engine coolant. This coolant is designed
to remain in your vehicle for five years or 150,000 miles
(240 000 km), whichever occurs first, if you add only
DEX-COOL
®extended life coolant.
The following explains your cooling system and how
to add coolant when it is low. If you have a problem with
engine overheating, seeEngine Overheating
on page 5-25.
A 50/50 mixture of clean, drinkable water and
DEX-COOL
®coolant will:
•Give freezing protection down to−34°F (−37°C).
•Give boiling protection up to 265°F (129°C).
•Protect against rust and corrosion.
•Help keep the proper engine temperature.
•Let the warning lights and gages work as they
should.
Notice:Using coolant other than DEX-COOL
®may
cause premature engine, heater core, or radiator
corrosion. In addition, the engine coolant may
require changing sooner, at the �rst maintenance
service after each 30,000 miles (50 000 km) or
24 months, whichever occurs �rst. Any repairs
would not be covered by your warranty. Always use
DEX-COOL
®(silicate-free) coolant in your vehicle.
5-22
Page 255 of 384
It is not a good idea to top off the brake fluid. Adding
brake fluid will not correct a leak. If fluid is added when
the linings are worn, there will be too much fluid
when new brake linings are installed. Add or remove
brake fluid, as necessary, only when work is done on the
brake hydraulic system.
{CAUTION:
If your vehicle has too much brake �uid, it can
spill on the engine. The �uid will burn if the
engine is hot enough. You or others could be
burned, and your vehicle could be damaged.
Add brake �uid only when work is done on the
brake and/or clutch hydraulic system.
When the brake fluid falls to a low level, the brake
warning light will come on. SeeBrake System Warning
Light on page 3-33.
What to Add
When you do need brake fluid, use only DOT-3 brake
fluid. Use new brake fluid from a sealed container
only. SeePart D: Recommended Fluids and Lubricants
on page 6-23.Always clean the brake fluid reservoir cap and the area
around the cap before removing it. This helps keep
dirt from entering the reservoir.
{CAUTION:
With the wrong kind of �uid in the brake or
clutch hydraulic system, the brakes or clutch
might not work well. This could cause a crash.
Always use the proper brake �uid.
Notice:
Using the wrong �uid can badly damage brake
or clutch hydraulic system parts. For example,
just a few drops of mineral-based oil, such
as engine oil, in the brake or clutch hydraulic
system can damage brake or clutch hydraulic
system parts so badly that they will have
to be replaced. Do not let someone put in the
wrong kind of �uid.
If you spill brake �uid on your vehicle’s painted
surfaces, the paint �nish can be damaged.
Be careful not to spill brake �uid on your
vehicle. If you do, wash it off immediately.
SeeWashing Your Vehicle on page 5-83.
5-33
Page 256 of 384

Brake Wear
Your vehicle has front disc brakes and could have rear
drum brakes or rear disc brakes.
Disc brake pads have built-in wear indicators that make
a high-pitched warning sound when the brake pads
are worn and new pads are needed. The sound
can come and go or be heard all the time your vehicle
is moving, except when you are pushing on the
brake pedal firmly.
{CAUTION:
The brake wear warning sound means that
soon the brakes will not work well. That could
lead to an accident. When you hear the brake
wear warning sound, have your vehicle
serviced.
Notice:Continuing to drive with worn-out brake
pads could result in costly brake repair.Some driving conditions or climates can cause a brake
squeal when the brakes are first applied or lightly
applied. This does not mean something is wrong with
the brakes.
Properly torqued wheel nuts are necessary to help
prevent brake pulsation. When tires are rotated, inspect
brake pads for wear and evenly tighten wheel nuts in
the proper sequence to torque specifications in
Capacities and Specifications on page 5-99.
If you have rear drum brakes, they do not have wear
indicators, but if you ever hear a rear brake rubbing
noise, have the rear brake linings inspected immediately.
Also, the rear brake drums should be removed and
inspected each time the tires are removed for rotation or
changing. When you have the front brake pads
replaced, have the rear brakes inspected, too.
Brake linings should always be replaced as complete
axle sets.
SeeBrake System Inspection on page 6-22.
5-34
Page 259 of 384
2. Get the vehicles close enough so the jumper cables
can reach, but be sure the vehicles are not touching
each other. If they are, it could cause a ground
connection you do not want. You would not be able
to start your vehicle, and the bad grounding
could damage the electrical systems.
To avoid the possibility of the vehicles rolling, set
the parking brake firmly on both vehicles involved
in the jump start procedure. Put an automatic
transmission in PARK (P) or a manual transmission
in NEUTRAL before setting the parking brake.
Notice:If you leave your radio or other accessories
on during the jump starting procedure, they could
be damaged. The repairs would not be covered
by your warranty. Always turn off your radio and
other accessories when jump starting your vehicle.
3. Turn off the ignition on both vehicles. Unplug
unnecessary accessories plugged into the cigarette
lighter or the accessory power outlet. Turn off
the radio and all lamps that are not needed.
This will avoid sparks and help save both batteries.
And it could save the radio!4. Open the hoods and locate the batteries. Find the
positive (+) and negative (−) terminal locations on
each vehicle. Your vehicle’s positive (+) terminal is
located under a red tethered cap on the battery.
SeeEngine Compartment Overview on page 5-12
for more information on location.
Flip the cap up to access the positive (+) terminal.
{CAUTION:
An electric fan can start up even when the
engine is not running and can injure you.
Keep hands, clothing and tools away from any
underhood electric fan.
5-37
Page 260 of 384
{CAUTION:
Using a match near a battery can cause battery
gas to explode. People have been hurt doing
this, and some have been blinded. Use a
�ashlight if you need more light.
Be sure the battery has enough water. You do
not need to add water to the battery installed
in your new vehicle. But if a battery has �ller
caps, be sure the right amount of �uid is there.
If it is low, add water to take care of that �rst.
If you don’t, explosive gas could be present.
Battery �uid contains acid that can burn you.
Do not get it on you. If you accidentally get it
in your eyes or on your skin, �ush the place
with water and get medical help immediately.
{CAUTION:
Fans or other moving engine parts can injure
you badly. Keep your hands away from moving
parts once the engine is running.
5. Check that the jumper cables do not have loose or
missing insulation. If they do, you could get a
shock. The vehicles could be damaged too.
Before you connect the cables, here are some
things you should know. Positive (+) will go
to positive (+) or to a remote positive (+) terminal if
the vehicle has one. Negative (−) will go to a
heavy, unpainted metal engine part or to a remote
negative (−) terminal if the vehicle has one.
Do not connect positive (+) to negative (−)oryou
will get a short that would damage the battery
and maybe other parts too. And do not connect the
negative (−) cable to the negative (−) terminal on
the dead battery because this can cause sparks.
5-38