2008 CADILLAC XLR change language
[x] Cancel search: change languagePage 3 of 470

GENERAL MOTORS, GM, the GM Emblem, CADILLAC,
the CADILLAC Crest & Wreath, and the name XLR are
registered trademarks of General Motors Corporation.
This manual includes the latest information at the time it
was printed. We reserve the right to make changes
after that time to the product without notice. For vehicles
�rst sold in Canada, substitute the name “General
Motors of Canada Limited” for Cadillac Motor Car
Division whenever it appears in this manual.
This manual describes features that may be available in
this model, but your vehicle may not have all of them.
For example, more than one entertainment system may
be offered or your vehicle may have been ordered
without a front passenger or rear seats.
Keep this manual in the vehicle for quick reference.
Canadian Owners
A French language copy of this manual can be obtained
from your dealer/retailer or from:
Helm, Incorporated
P.O. Box 07130
Detroit, MI 48207
1-800-551-4123
www.helminc.com
Propriétaires Canadiens
On peut obtenir un exemplaire de ce guide en français
auprès de concessionnaire ou à l’adresse suivante:
Helm Incorporated
P.O. Box 07130
Detroit, MI 48207
1-800-551-4123
www.helminc.com
Litho in U.S.A.
Part No. 15865987 A First Printing
©2007 General Motors Corporation. All Rights Reserved.
iii
Page 202 of 470

Language
This feature allows you to select the language the
DIC and Head-Up Display (HUD), uses to display
messages.
The DIC will display ENGLISH, FRENCH, GERMAN,
ITALIAN, JAPANESE, or SPANISH. Press the
OPTIONS button to change the setting.
If you become stuck in a language that you do not
understand, hold the OPTIONS and RESET buttons
for �ve seconds. The DIC will scroll through all
available languages for as long as the buttons are held.
Each language option will display in its own language.
For example, English will be displayed as ENGLISH,
Spanish as ESPANOL, etc. When the desired language
is available, release the buttons and the DIC will
set to this language.
Trip Computer
Oil Life Indicator
This feature lets you know when to change the engine
oil. It is based on the engine oil temperatures and
your driving patterns.
To see the display, press the information button several
times until OIL LIFE appears. If you see 99% OIL
LIFE, 99 percent of your current oil life remains.
The DIC may display a CHANGE OIL NOW message.
If you see CHANGE OIL NOW, it means the oil life
is gone. For more information, seeScheduled
Maintenance on page 7-4andEngine Oil on page 6-16.
When the oil is changed, you will need to reset the
system. SeeEngine Oil Life System on page 6-20.
Always keep a written record of the mileage and date
when you changed your oil.
3-80
Page 214 of 470

You should always be alert and obey traffic and roadway
laws and instructions, regardless of the guidance from
the navigation system. The navigation system uses
street map information that does not include all traffic
restrictions or the latest road changes, it may suggest
using a road that is now closed for construction or a
turn that is prohibited by signs at the intersection.
The system uses limited information, you must always
evaluate whether following the system’s directions
is safe and legal for the current conditions.
When getting started you may set the navigation system
to your preference or delete information you may
have entered using various options. To do so, reference
the following topics:
To adjust screen appearance, language, clock,
English/metric measurements, or other options,
see “Main Audio Menu” underNavigation Audio
System on page 4-54.
To adjust voice guidance volume or other navigation
settings, seeSetup Menu on page 4-13.
Deleting Personal Information
This navigation system can record and store
destinations. At times, such as when you are disposing
of your vehicle, you may want to delete these
destinations. Refer to the following sections to delete
the destination information that has been stored.
See “Deleting Single Memory Points”, “Deleting All
Memory Points”, “Preset Dests.” (Destinations), “Home”
and “Previous Dest.” (Destination) underEdit Memory
Point on page 4-20for deleting stored destinations.
Storing Radio Station Presets
To set preset radio stations, do the following:
1. Press the PWR/VOL knob to turn the system on.
2. Press the audio source screen button (AM, FM1,
FM2, etc.) and select the desired band (AM, FM1,
FM2, XM1, or XM2 (if equipped), or WX (weather)
(if equipped)).
3. Use the TUNE/SEEK arrows to tune to the
desired station.
4. Press and hold one of the six preset screen buttons,
at the bottom of the screen, until you hear a beep or
see the station displayed on the selected preset
button.
5. Repeat the steps for each preset.
See “Preset Station Menu” underNavigation Audio
System on page 4-54for more information.
4-6
Page 249 of 470

Once the map DVD is inserted correctly, you will have
the following two choices:
LANGUAGE
I AGREE
You can change the language at this time.
See “Language” underNavigation Audio System on
page 4-54for more information on choosing a language.
Once a language has been selected, touch I AGREE
to plan a route. The map will appear showing your
current vehicle position.
DVD Map Disc Messages
If an error appears on the display and/or the map disc
comes out, it could be for one of the following reasons:
If the map disc was installed into the CD slot.
See “Installing the DVD Map Disc” previously.
It is very hot, when the temperature returns to
normal, the map disc should play.
You are driving on a very rough road. When
the road becomes smoother, the map disc
should play.
The map disc is dirty, scratched, wet, or
upside down.
If any error occurs repeatedly or if an error cannot be
corrected, contact your dealer/retailer.
Ejecting the DVD Map Disc
When the DVD map disc is not loaded, you will not be
able to use the navigation portion of the system.
1. Turn the ignition on.
2. With the vehicle in PARK (P), press and hold the
TILT key until a beep is heard. The system’s
faceplate will open.
3. The map DVD will eject from the slot. Pull the
disc out.
4. Press and release the TILT key to close the
faceplate.
Notice:Shifting out of PARK (P) with the system’s
faceplate open will cause the faceplate to close
automatically. This could cause damage to a
CD, DVD or the system if it is partially loaded. Before
shifting out of PARK (P), make sure that the DVD
or CD is loaded properly. The vehicle must be
shifted back into PARK (P) to close the faceplate.
4-41
Page 266 of 470

Language
Your vehicle has been set for the English language.
If you wish to change the language, you must do
so through the Driver Information Center (DIC).
SeeDriver Information Center (DIC) on page 3-60
for more information.
If the language is changed from English, a majority of the
voice guidance prompts and screen text will change to
the selected language. Remember, the menu screens will
not match word-for-word as they appear in this manual.
Playing the Radio
PWR-VOL (Power-Volume):Press this knob to turn
the audio and navigation systems on and off. Turn the
knob to increase or decrease the volume to the
audio system.
«TUNE/SEEKª:Press the up or down arrow to go
to the next or previous station and stay there.
BAND:Press this key to switch between AM, FM1,
FM2, XM1, XM 2, or WX, if equipped. If you are on a
map screen and press this key, the screen will not
change but the audio source will.
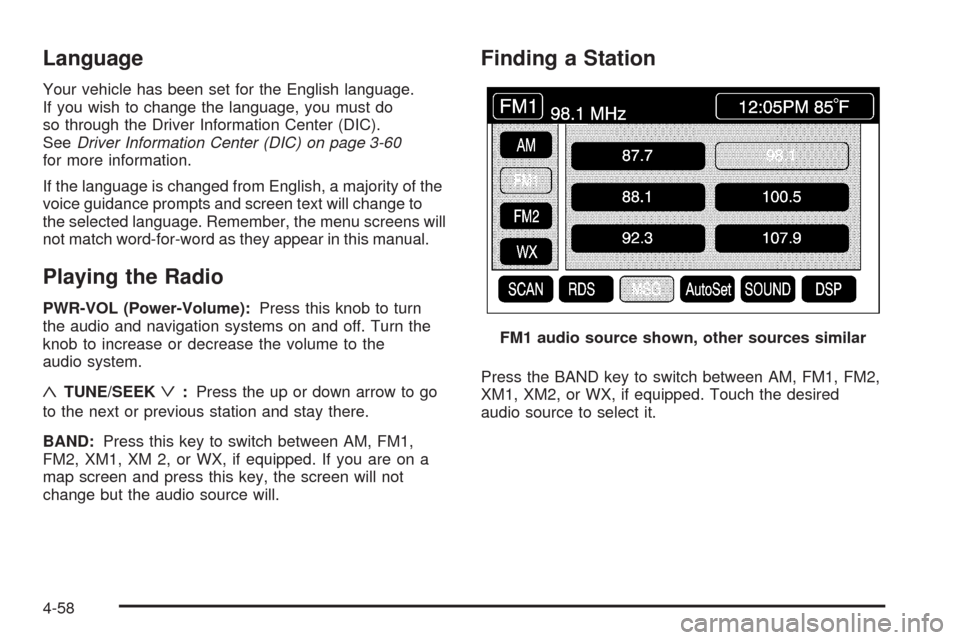
Finding a Station
Press the BAND key to switch between AM, FM1, FM2,
XM1, XM2, or WX, if equipped. Touch the desired
audio source to select it.FM1 audio source shown, other sources similar
4-58
Page 281 of 470

DVD Menu Options
To display the menu choices while a DVD is playing,
touch anywhere on the screen and the menu will appear.
IMAGE:Touch this button to either start playing a DVD
or to remove the DVD menu screen.
AUDIO PROGRAM:Touch this button to change the
audio language heard.VIEWING ANGLE:Touch this button to adjust the
viewing angle of the DVD. Some DVDs allow you to
change the camera angle. This may not be available on
all DVDs. Depending on the type of DVD you are
using, this button may or may not be available.
SUBTITLE:Touch this button to playback the video
with subtitles. This may not be available on all DVDs.
Depending on the type of DVD you are using, this button
may or may not be available.
SCREEN ADJUST:Touch this button to adjust the
brightness, contrast and red/green color adjustments.
CURSOR:Touch this button to access the left/right and
up/down cursors on the screen. The cursors allow
you to navigate menu options on the screen.
MENU:Touch this button to access the DVDs menu
options. Depending on the type of DVD you are
using, this button may or may not be available. Touch
the button labeled one, two or blank to change the
image size displayed on the screen.
TITLE:Touch this button to display the title of the DVD.
Depending on the type of DVD you are using, this
button may or may not be available.
4-73
Page 282 of 470

If TITLE is available, this button will allow you to
navigate through chapters or the DVD features.
Once the appropriate title or track has been selected,
press the Return button then the IMAGE button on
the DVD menu to view the movie in full screen.
SETTING:Touch this button to adjust the following:
LANGUAGE PREFERENCES
PARENTAL LOCKUnder LANGUAGE PREFERENCES, you can select
different languages for AUDIO, SUBTITLE and
DVD MENUS.
1. To change languages, �rst select the option you
wish to change.
2. Select a language from the list given.
3. Touch RETURN to end out the menu.
Your language is now saved.
Under PARENTAL LOCK, you can select SET RATING
LIMIT and SET PIN.
To SET RATING, �rst touch the button. Then, make
your selection. Touch RETURN to end out the menu.
Your selection is now saved.
To use PARENTAL LOCK, �rst touch the button.
Then, enter a four-digit numeric password.
Touch RETURN to end out the menu.
SEARCH:Touch this button to search to a certain
scene on the DVD. Depending on the type of DVD you
are using, this button may or may not be available.
r(Rewind):Touch this button to rewind through a
scene during playback.
r(Resume):Touch this button to resume playing
a DVD.
4-74