2008 CADILLAC ESCALADE EXT navigation
[x] Cancel search: navigationPage 135 of 496
OnStar service is provided to you subject to the
OnStar Terms and Conditions. You may cancel your
OnStar service at any time by contacting OnStar.
A complete OnStar Owner’s Guide and the OnStar
Terms and Conditions are included in the vehicle’s
OnStar Subscriber glove box literature. For more
information, visit onstar.com or onstar.ca, contact
OnStar at 1-888-4-ONSTAR (1-888-466-7827) or
TTY 1-877-248-2080, or press the OnStar button
to speak with an OnStar advisor 24 hours a day,
7 days a week.
Not all OnStar features are available on all vehicles.
To check if your vehicle is equipped to provide the
services described below, or for a full description of
OnStar services and system limitations, see the OnStar
Owner’s Guide in your glove box or visit onstar.com.
OnStar Services
For new vehicles with OnStar, the Safe & Sound Plan,
or the Directions & Connections Plan is included for
one year from the date of purchase. You can extend
this plan beyond the �rst year, or upgrade to the
Directions & Connections Plan. For more information,
press the OnStar button to speak with an advisor.
Some OnStar services (such as Remote Door Unlock
or Stolen Vehicle Location Assistance) may not be
available until you register with OnStar.
Available Services with Safe & Sound Plan
Automatic Noti�cation of Airbag Deployment
Advanced Automatic Crash Noti�cation (AACN)
(If equipped)
Link to Emergency Services
Roadside Assistance
Stolen Vehicle Location Assistance
AccidentAssist
Remote Door Unlock/Vehicle Alert
OnStar Vehicle Diagnostics
GM Goodwrench®On Demand Diagnostics
OnStar Hands-Free Calling with
30 complimentary minutes
OnStar Virtual Advisor (U.S. Only)
Available Services included with
Directions & Connections Plan
All Safe and Sound Plan Services
Driving Directions - Advisor delivered or
OnStar Turn-by-Turn Navigation (If equipped)
RideAssist
Information and Convenience Services
2-57
Page 168 of 496

Malfunction Indicator Lamp.............................3-40
Oil Pressure Light.........................................3-42
Security Light...............................................3-43
Fog Lamp Light............................................3-43
Lights On Reminder......................................3-43
Cruise Control Light......................................3-44
Highbeam On Light.......................................3-44
Tow/Haul Mode Light....................................3-44
Fuel Gage...................................................3-44
Driver Information Center (DIC).......................3-45
DIC Operation and Displays...........................3-45
DIC Warnings and Messages.........................3-50
DIC Vehicle Customization.............................3-57Audio System(s).............................................3-66
Setting the Clock..........................................3-67
Radio(s)......................................................3-68
Using an MP3..............................................3-86
XM Radio Messages.....................................3-90
Navigation/Radio System...............................3-91
Rear Seat Entertainment (RSE) System...........3-91
Rear Seat Audio (RSA)................................3-101
Theft-Deterrent Feature................................3-102
Audio Steering Wheel Controls......................3-103
Radio Reception.........................................3-104
Fixed Mast Antenna....................................3-105
XM™ Satellite Radio Antenna System............3-105
Section 3 Instrument Panel
3-2
Page 171 of 496

The main components of your instrument panel are the following:
A. Air Outlets. SeeOutlet Adjustment on page 3-28.
B. Turn Signal/Multifunction Lever. SeeTurn
Signal/Multifunction Lever on page 3-7.
C. Hazard Warning Flasher Button. SeeHazard
Warning Flashers on page 3-6.
D. Instrument Panel Cluster. SeeInstrument Panel
Cluster on page 3-30.
E. Shift Lever/Tow/Haul Selector Button. SeeAutomatic
Transmission Operation on page 2-36andTow/Haul
Mode on page 2-40.
F. Analog Clock. SeeAnalog Clock on page 3-23.
G. Audio System. SeeAudio System(s) on page 3-66.
Navigation/Radio System (if equipped). See
Navigation/Radio System on page 3-91.
H. Exterior Lamps Control. SeeExterior Lamps on
page 3-14.
I. Dome Override Button. SeeDome Lamp Override
on page 3-20.
J. Cruise Control Buttons. SeeCruise Control
on page 3-11.
K. Tilt Lever. SeeTilt Wheel on page 3-6.L. Horn. SeeHorn on page 3-6.
M. Audio Steering Wheel Buttons. SeeAudio Steering
Wheel Controls on page 3-103.
N. Driver Information Center (DIC) Buttons. SeeDriver
Information Center (DIC) on page 3-45.
O. Pedal Adjust Button. SeeAdjustable Throttle and
Brake Pedal on page 2-34. Heated Windshield
Washer Fluid Button (If Equipped). SeeWindshield
Washer on page 3-10. Power Running Boards
Disable Button (If Equipped). SeePower Running
Boards on page 2-23.
P. Dual Automatic Climate Controls. SeeDual
Automatic Climate Control System on page 3-24.
Heated Seats (If Equipped). SeeHeated Seats
on page 1-4. Heated and Cooled Seats (If Equipped).
SeeHeated and Cooled Seats on page 1-5.
Q. StabiliTrak
®Disable Button. See.StabiliTrak®
System on page 4-6.Ultrasonic Rear Parking Assist
Disable Button. See.Ultrasonic Rear Parking
Assist (URPA) on page 2-54.
R. Glove Box. SeeGlove Box on page 2-67.
3-5
Page 248 of 496

Playing a DVD Video
F1 (Play/Pause):Press to turn on the video screen,
if your vehicle has this feature, and begin playing
the DVD. Press to pause the DVD if it is playing. Press
Play (F1) to restart the DVD if it is paused.
F2 (Stop):Press once to stop the DVD and retain the
current position. Press it again from the stopped
state to return to the beginning of the disc.
F3 (Reverse):Press and hold, if the DVD is playing,
to enter fast reverse mode. Hold to play in reverse
at four times the normal speed. Hold it for more than
four seconds to play in reverse at 32 times the normal
speed. Release to return to normal play mode.
F4 (Forward):If the DVD player is playing, press and
hold to enter fast forward mode. Hold to play at
four times the normal speed. Hold it for more than
four seconds to play at 32 times the normal speed.
Release to return to normal play mode.
Press and hold, if the DVD is playing, to enter slow
forward mode. Hold to play at half the normal speed.
Hold it for more than four seconds to play at an
eighth the normal speed. Release to return to the
pause state.F6 (Menu):Press to go to the DVD root menu and to
bring up the menu navigation arrows. Pressing keys
F1 through F4 moves the cursor to navigate the DVD
menu. Press F6 to enter your selection.
©¨(Seek):Press the left arrow to go to the start
of the current chapter. Press it again to go to the
previous chapter, or press the right arrow to go to the
next chapter. Press and hold to change chapter at a rate
of one per second.
w(Tune/Select):Turn to the left one notch to go
to the start of the current chapter. Turn it again to go to
the previous chapter, or turn to the right one notch to
go to the next chapter.
INFO:Press the programmed INFO soft key, or press
the
w(tune/select) knob and turn until INFO is
shown, and then press the tune/select knob. Pressing
INFO brings up the Information display. It shows
the current Title number, Chapter number and elapsed
time of the DVD, and additional menu items.
F1 SUB:Press to view the Subtitle Language Menu.
F2 ANGLE:Press to view the Angle Menu.
F6 BACK:Press to return to the previous screen.
3-82
Page 257 of 496
Navigation/Radio System
Your vehicle may have a navigation radio system.
The navigation system has built-in features intended
to minimize driver distraction. Technology alone,
no matter how advanced, can never replace your
own judgment. See the Navigation System manual for
some tips to help you reduce distractions while driving.
Rear Seat Entertainment (RSE)
System
Your vehicle may have a DVD Rear Seat
Entertainment (RSE) system. The RSE system works
with the vehicle’s audio system. The DVD player
is part of the front radio. The RSE system includes
a radio with a DVD player, a video display screen,
and if your vehicle has a third row seat, it could have
a second video display screen, audio/video jacks,
two wireless headphones, and a remote control.
SeeRadio(s) on page 3-68for more information on
the vehicle’s audio/DVD system.
Driver Control of the Audio System
The driver has basic control of the whole audio system.
Press and hold the
O(power) knob for more than
two seconds to turn off the radio, RSE (rear seat
entertainment), and the RSA (rear seat audio).
SeeRadio(s) on page 3-68for more information.
If your vehicle has the navigation system, see the
Navigation System manual for more information.
Before You Drive
The RSE is designed for rear seat passengers only.
The driver cannot safely view the video screen
while driving and should not try to do so.
In severe or extreme weather conditions the RSE
system might not work until the temperature is
within the operating range. The operating range
for the RSE system is above−4°F (−20°C) or below
140°F (60°C). If the temperature of your vehicle is
outside of this range, heat or cool the vehicle until
the temperature is within the operating range of
the RSE system.
3-91
Page 260 of 496
To use the auxiliary inputs of the RSE system, connect
an external auxiliary device to the color-coded A/V jacks
and turn both the auxiliary device and the video screen
power on. If the video screen is in the DVD player mode,
pressing the AUX (auxiliary) button on the remote control
switches the video screen from the DVD player mode
to the auxiliary device. The radio plays the audio of the
connected auxiliary device by sourcing to auxiliary.
SeeRadio(s) on page 3-68for more information.
For optimal sound quality, increase the portable audio
device’s volume to the loudest level. Higher levels
of volume decreases audio distortion.
It is always best to power your portable audio device
through its own battery while playing.
How to Change the RSE Video Screen
Settings
The screen display mode (normal, full, and zoom),
screen brightness, and setup menu language can be
changed from the on screen setup menu. To change
any feature, perform the following:
1. Press the
z(display menu) button on the
remote control.
2. Use the remote control
Q,R,q,rnavigation
arrows and the
rbutton to use the setup menu.
3. Press the
zmenu button again to remove
the setup menu from the screen.
Audio Output
Audio from the DVD player or auxiliary inputs can be
heard through the following possible sources:
Wireless Headphones
Vehicle Speakers
Vehicle wired headphone jacks on the rear seat
audio system, if your vehicle has this feature.
The RSE system always transmits the audio signal to the
wireless headphones, if there is audio available. See
“Headphones” earlier in this section for more information.
The DVD player is capable of outputting audio to the
wired headphone jacks on the RSA system, if your
vehicle has this feature. The DVD player can be selected
as an audio source on the RSA system. SeeRear Seat
Audio (RSA) on page 3-101for more information.
When a device is connected to the radio’s auxiliary
input jack, if your vehicle has this feature, or A/V jacks,
the rear seat passengers are be able to hear audio
from the auxiliary device through the wireless or wired
headphones. The front seat passengers are able to
listen to playback from this device through the vehicle
speakers by selecting AUX as the source on the radio.
3-94
Page 262 of 496
Remote Control Buttons
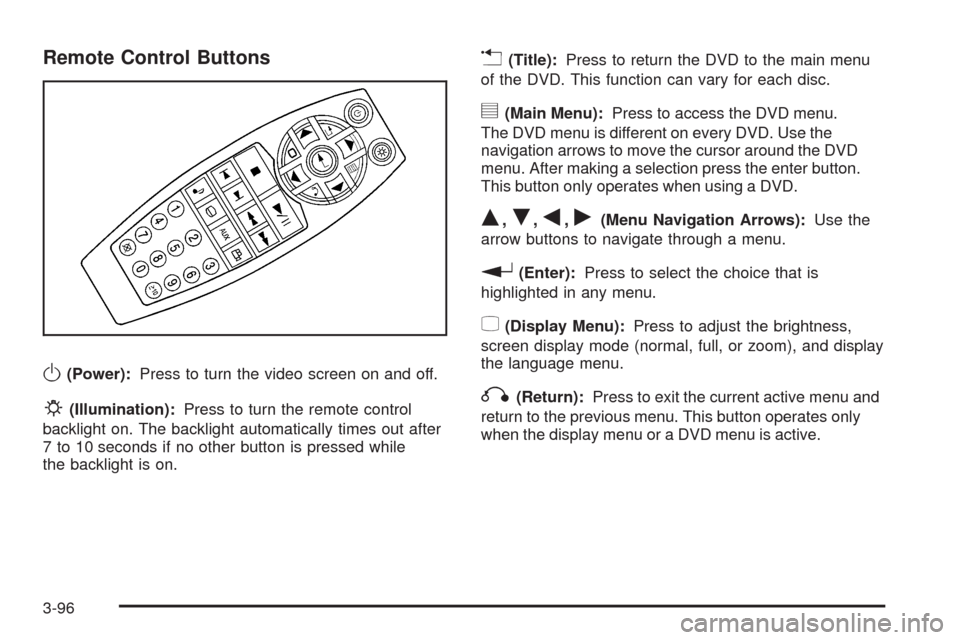
O(Power):Press to turn the video screen on and off.
P(Illumination):Press to turn the remote control
backlight on. The backlight automatically times out after
7 to 10 seconds if no other button is pressed while
the backlight is on.
v(Title):Press to return the DVD to the main menu
of the DVD. This function can vary for each disc.
y(Main Menu):Press to access the DVD menu.
The DVD menu is different on every DVD. Use the
navigation arrows to move the cursor around the DVD
menu. After making a selection press the enter button.
This button only operates when using a DVD.
Q,R,q,r(Menu Navigation Arrows):Use the
arrow buttons to navigate through a menu.
r(Enter):Press to select the choice that is
highlighted in any menu.
z(Display Menu):Press to adjust the brightness,
screen display mode (normal, full, or zoom), and display
the language menu.
q(Return):Press to exit the current active menu and
return to the previous menu. This button operates only
when the display menu or a DVD menu is active.
3-96
Page 269 of 496
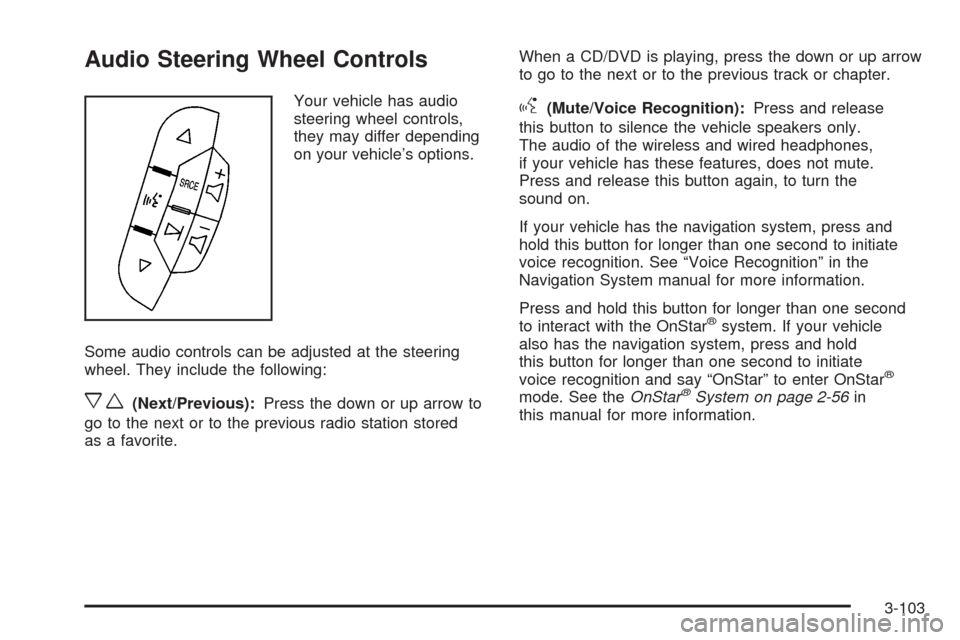
Audio Steering Wheel Controls
Your vehicle has audio
steering wheel controls,
they may differ depending
on your vehicle’s options.
Some audio controls can be adjusted at the steering
wheel. They include the following:
xw(Next/Previous):Press the down or up arrow to
go to the next or to the previous radio station stored
as a favorite.When a CD/DVD is playing, press the down or up arrow
to go to the next or to the previous track or chapter.
g(Mute/Voice Recognition):Press and release
this button to silence the vehicle speakers only.
The audio of the wireless and wired headphones,
if your vehicle has these features, does not mute.
Press and release this button again, to turn the
sound on.
If your vehicle has the navigation system, press and
hold this button for longer than one second to initiate
voice recognition. See “Voice Recognition” in the
Navigation System manual for more information.
Press and hold this button for longer than one second
to interact with the OnStar
®system. If your vehicle
also has the navigation system, press and hold
this button for longer than one second to initiate
voice recognition and say “OnStar” to enter OnStar
®
mode. See theOnStar®System on page 2-56in
this manual for more information.
3-103