Page 101 of 165
Checking brake-fluid
level, rear brakes
A low fluid level in the
brake reservoir can al-
low air to penetrate the brake
system. This significantly re-
duces braking efficiency.
Apply the brakes in good
time.
Make sure the ground is
level and firm and place the
motorcycle on its stand.
Check the brake fluid level
through aperture Ain the
right side panel. Check the brake fluid level
in reservoir
1.
The brake fluid level in
the brake fluid reser-
voir drops as the brake pads
wear.
Brake fluid level, rear DOT4 brake fluid
Do not permit the brake flu-
id level to drop below the
MIN mark.
If the brake fluid level drops
below the permitted level: Have the fault rectified as
soon as possible by a spe-
cialist workshop, preferably
an authorised BMW Motor-
rad dealer.
with OE BMW Motorrad Integ-
ral ABS:
Check the brake fluid level
in reservoir 1.
799zMaintenance
Page 102 of 165
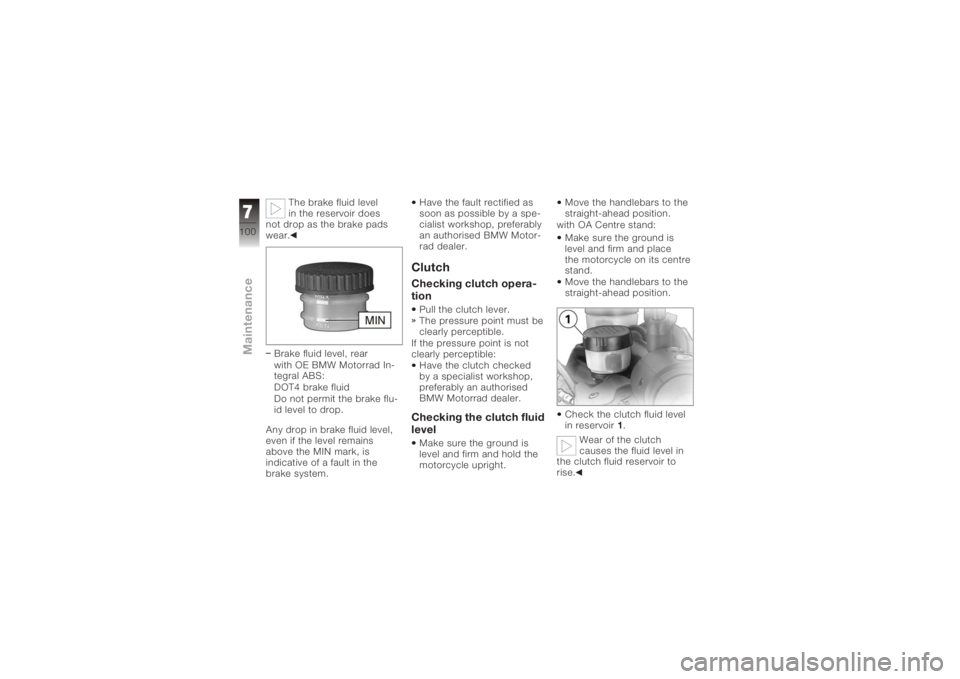
The brake fluid level
in the reservoir does
not drop as the brake pads
wear.
Brake fluid level, rear
with OE BMW Motorrad In-
tegral ABS:
DOT4 brake fluid
Do not permit the brake flu-
id level to drop.
Any drop in brake fluid level,
even if the level remains
above the MIN mark, is
indicative of a fault in the
brake system. Have the fault rectified as
soon as possible by a spe-
cialist workshop, preferably
an authorised BMW Motor-
rad dealer.
ClutchChecking clutch opera-
tionPull the clutch lever.
The pressure point must be
clearly perceptible.
If the pressure point is not
clearly perceptible: Have the clutch checked
by a specialist workshop,
preferably an authorised
BMW Motorrad dealer.Checking the clutch fluid
levelMake sure the ground is
level and firm and hold the
motorcycle upright. Move the handlebars to the
straight-ahead position.
with OA Centre stand:
Make sure the ground is
level and firm and place
the motorcycle on its centre
stand.
Move the handlebars to the
straight-ahead position.
Check the clutch fluid level
in reservoir 1.
Wear of the clutch
causes the fluid level in
the clutch fluid reservoir to
rise.
7100zMaintenance
Page 104 of 165
workshop, preferably an
authorised BMW Motorrad
dealer.WheelsApproved wheels and
tyresFor each size of tyre BMW
Motorrad tests certain makes,
and approves those that it
certifies as roadworthy. If
BMW Motorrad has not ap-
proved the wheels and tyres,
it cannot assess their suitab-
ility or provide any guarantee
of road safety.
Use only wheels and tyres
approved by BMW Motorrad
for your type of motorcycle.
You can obtain detailed in-
formation from your author-
ised BMW Motorrad dealer or
on the Internet at www.bmw-
motorrad.com.
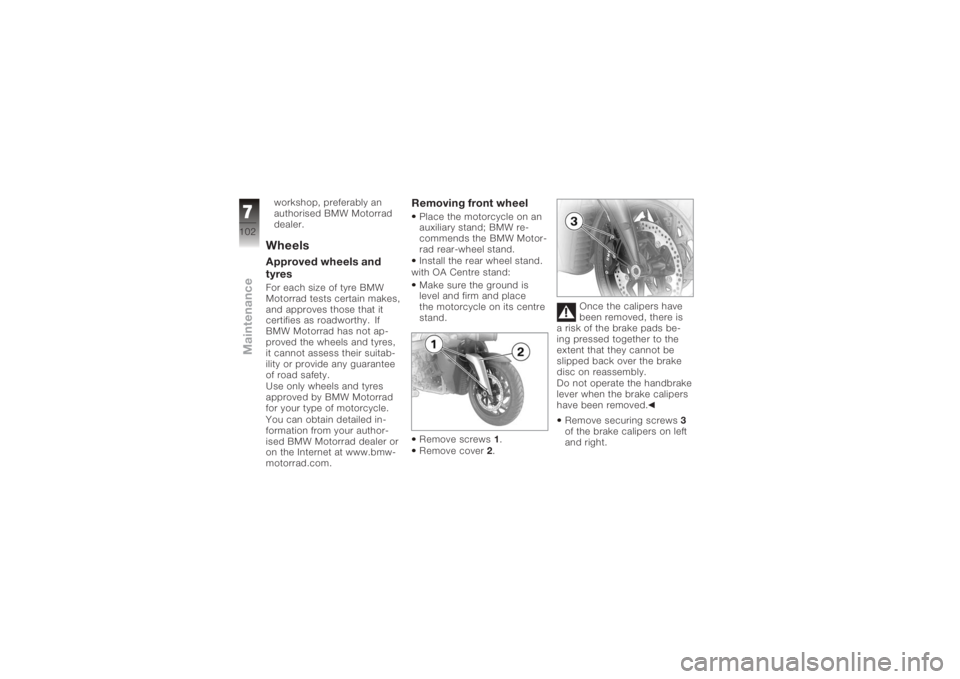
Removing front wheelPlace the motorcycle on an
auxiliary stand; BMW re-
commends the BMW Motor-
rad rear-wheel stand.
Install the rear wheel stand.
with OA Centre stand:
Make sure the ground is
level and firm and place
the motorcycle on its centre
stand.
Remove screws 1.
Remove cover 2. Once the calipers have
been removed, there is
a risk of the brake pads be-
ing pressed together to the
extent that they cannot be
slipped back over the brake
disc on reassembly.
Do not operate the handbrake
lever when the brake calipers
have been removed.
Remove securing screws 3
of the brake calipers on left
and right.
7102zMaintenance
Page 105 of 165
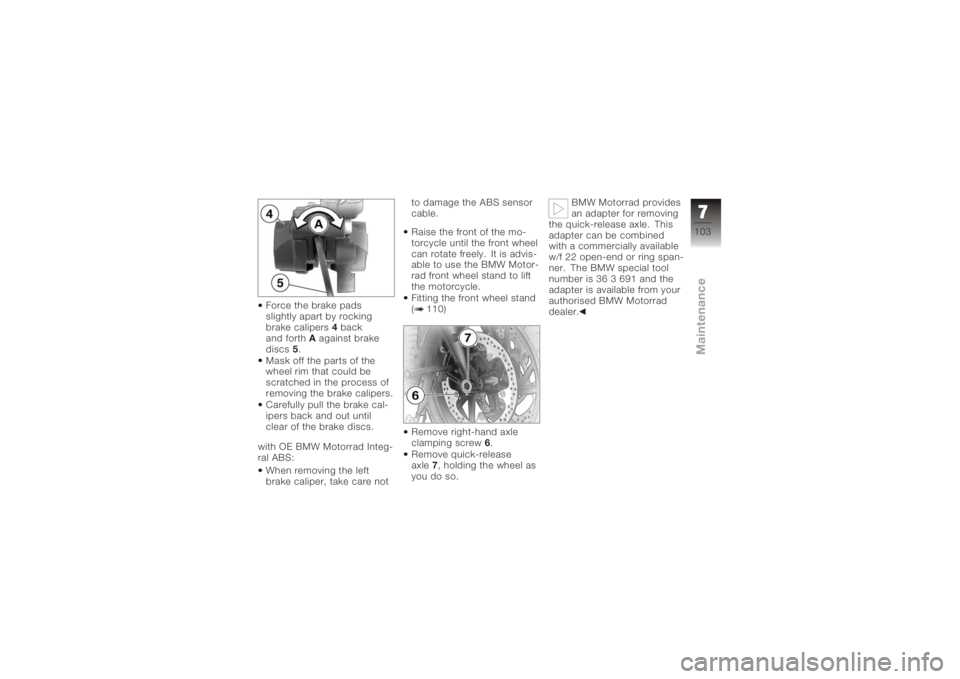
Force the brake pads
slightly apart by rocking
brake calipers4back
and forth Aagainst brake
discs 5.
Mask off the parts of the
wheel rim that could be
scratched in the process of
removing the brake calipers.
Carefully pull the brake cal-
ipers back and out until
clear of the brake discs.
with OE BMW Motorrad Integ-
ral ABS: When removing the left
brake caliper, take care not to damage the ABS sensor
cable.
Raise the front of the mo-
torcycle until the front wheel
can rotate freely. It is advis-
able to use the BMW Motor-
rad front wheel stand to lift
the motorcycle.
Fitting the front wheel stand
( 110)
Remove right-hand axle
clamping screw
6.
Remove quick-release
axle 7, holding the wheel as
you do so. BMW Motorrad provides
an adapter for removing
the quick-release axle. This
adapter can be combined
with a commercially available
w/f 22 open-end or ring span-
ner. The BMW special tool
number is 36 3 691 and the
adapter is available from your
authorised BMW Motorrad
dealer.
7103zMaintenance
Page 128 of 165
Care productsWe recommend that you
use the cleaning and care
products you can obtain
from your authorised
BMW Motorrad dealer. The
substances in BMW Care
Products have been tested in
laboratories and in practice;
they provide optimised
care and protection for the
materials used in your vehicle.The use of unsuitable
cleaning and care
products can result in
damage to motorcycle
components.
Do not use solvents such as
cellulose thinners, cold clean-
ers, fuel or the like, and do
not use cleaning products
that contain alcohol.
Washing the motor-
cycleWe recommend that you
use BMW insect remover to
soften and wash off insects
and resilient dirt on painted
parts prior to washing the
motorcycle.
To prevent stains, do
not wash the motorcycle
immediately after it has been
exposed to strong sunlight
and do not wash it in the sun.
Make sure that the motor-
cycle is washed frequently,
especially during the winter
months.
To remove road salt, clean
the motorcycle with cold wa-
ter immediately after every
trip.
After the motorcycle has
been washed, ridden
through water or ridden in
the rain, the brake discs and pads might be wet and the
brakes might not take effect
immediately.
Apply the brakes in good time
until the brakes have dried
out.
Warm water intensifies
the effect of salt.
Use only cold water to wash
off road salt.
The high pressure of
steam cleaners can
damage seals, the hydraulic
brake system, the electrical
system and the seat.
Do not use a steam jet or
high-pressure cleaning equip-
ment.
8126zCare
Page 140 of 165
BrakesFront brake, typeHydraulically operated twin disc brake with 4-
piston fixed calipers and floating brake discs
Front brake pads, material Sintered metal
Rear brake, type Hydraulically operated disc brake with
2-piston floating caliper and fixed disc
Rear brake pads, material Organic materialWheels and tyresFront wheel, typeCast aluminium, MT H2
Front wheel, rim size 3.50" x 17"
Front wheel, tyre designation 120/70 ZR17
Rear wheel, type Cast aluminium, MT H2
Rear wheel, rim size 5.50" x 17"
with OE Sports wheel: 6.00" x 17"
Rear wheel, tyre designation 180/55 ZR17
with OE Sports wheel: 190/50 ZR17
Tyre pressures
Front wheel, tyre pressure 2.5 bar, When cold
Rear wheel, tyre pressure 2.9 bar, When cold
9138zTechnical data
Page 156 of 165
A
Abbreviations and symbols, 6
Anti-theft alarm, 18
B
BatteryBattery compartment, 13
Charging battery when
connected, 120
Charging the battery when
disconnected, 121
Installation, 123
Removal, 121
Warning, battery charge
current, 28
Brake fluid Checking level, front, 97
Checking level, rear, 99
Brake lever Adjusting the handbrake
lever, 48
Brake pads Checking front, 96
Checking rear, 96 Brakes
Checking operation, 95
Fluid reservoir, 13
Fluid reservoir, front, 13
Fluid reservoir, rear, 13
Technical data, 138
Bulbs General instructions, 113
Replacing brake-light
bulbs, 116
Replacing front turn
indicator bulb, 117
Replacing high-beam
headlight bulb, 114
Replacing low-beam
headlight bulb, 114
Replacing parking-light
bulb, 115
Replacing rear light
bulbs, 116
Replacing rear turn indicator
bulb, 117
Technical data, 140
Warning, bulb failure, 28, 29 C
Case
Adapting, 90
Adjusting, 88
Closing, 88
Installing, 90
Opening, 88
Removing, 89
Centre stand Placing motorcycle on
centre stand, 75
Removing motorcycle from
centre stand, 77
Clock, 22 Adjusting, 18, 46
Clutch Adjusting the clutch
lever, 48
Checking operation, 100
Fluid reservoir, 11
Technical data, 136
Confirmation of maintenance work, 147
11154zIndex