2008 BMW 760I ECU
[x] Cancel search: ECUPage 3 of 254

750i
750Li
760i
760LiOwner's Manual for Vehicle
Congratulations, and thank you for choosing a BMW.
Thorough familiarity with your vehicle will provide you with
enhanced control and security when you drive it. We therefore
have this request:
Please take the time to read this Owner's Manual and familiarize
yourself with the information that we have compiled for you
before starting off in your new vehicle. It contains important data
and instructions intended to assist you in gaining maximum use
and satisfaction from your BMW's unique range of technical fea-
tures. The manual also contains information on maintenance
designed to enhance operating safety and contribute to main-
taining the value of your BMW throughout an extended service
life.
This manual is supplemented by a Service and Warranty Informa-
tion Booklet for US models or a Warranty and Service Guide
Booklet for Canadian models.
We wish you an enjoyable driving experience.
BMW AG
Page 34 of 254

Opening and closing
32 Each time the central locking system is locked
or unlocked from outside the vehicle, this simul-
taneously engages or disengages the anti-theft
system. The alarm system is also armed or dis-
armed. The remote control also switches the
interior lamps on and off.
For additional details on alarm system
refer to
page37.
In an accident of corresponding severity, the
central locking system automatically unlocks
the vehicle. In addition, the hazard warning
flashers and interior lamps switch on.
Opening and closing: from
outside
Using remote control
Persons or animals left unattended in a
parked vehicle can lock the doors from
the inside. For this reason, bring the remote
control with you whenever you leave the vehicle
so that you will always be able to unlock the
vehicle from outside.<
1Unlocking, comfort opening, and deactivat-
ing alarm system
2Locking and securing, arming alarm sys-
tem, switching off tilt alarm sensor and inte-
rior motion sensor, switching on interior
lamps and perimeter lighting
3Opening luggage compartment lid
4Switching on interior lamps and pathway
lighting, activating panic mode
*. You can
find details about pathway lighting on
page100.If it is no longer possible to lock the vehi-
cle with a remote control, its battery is
discharged. Use this remote control during an
extended drive; this will recharge the battery,
refer to page30.
In the event of malfunctions, please contact
your BMW center. which is also your source for
replacement keys.<
Unlocking
1. Press the button. The hazard warning
flashers blink twice.
Driver's door and fuel filler door are
unlocked.
2.Press the button again.
All other doors and the luggage compart-
ment lid are unlocked.
The interior lamps and the door-mounted
perimeter lamps come on.
Comfort opening
Press the button longer. The windows and
the glass sunroof open. The glass sunroof will
not move if it is already in its raised position.
Engaging locks
Press the button. The hazard warning
flashers blink once.
Do not lock the vehicle from the outside
when people are in it since they will be
unable to unlock it from inside if they do not
know the special procedure.<
Switching on interior lamps and
perimeter lighting
Press the button if the vehicle is
locked.
Switching on interior lamps
Press the button.
You can also use this function to locate your
vehicle in parking garages etc.
Page 56 of 254
Transporting children safely
54
Transporting children safely
The right place for children
Do not leave children unattended in the
vehicle; otherwise, they could endanger
themselves and other persons, e.g. by opening
the doors.<
Children always in the rear
Accident research shows that the safest place
for children is in the back seat.
Children younger than 13 years of age or
with a height under 5 ft/150 cm may only
be transported in the rear in child restraint sys-
tems which correspond to the age, weight and
height of the child. Otherwise, there is an
increased danger of injury in an accident.<
Children 13 years of age or older must wear a
safety belt as soon as a suitable child restraint
system can no longer be used due to their age,
size, and weight.
Exception for front passenger seat
Should it be necessary to use a child
restraint system on the front passenger
seat, the front, knee and side airbag on the front
passenger side must be deactivated. Other-
wise, there is an increased risk of injury for the
child if the airbags are triggered, even with a
child restraint system. <
More information on Automatic deactivation of
front passenger airbags, refer to page95.
Installing child restraint
systems
Follow the child restraint system manu-
facturer's instructions when selecting,
installing and using child restraint systems.
Otherwise the protective effect may be dimin-
ished.<
In the front passenger seat
Before installing a child restraint system
in the front passenger seat, make sure
that the front, knee, and side airbags on the
passenger side are deactivated. Otherwise,
there is an increased risk of injury when the air-
bags are triggered.<
Backrest width*
The passenger seat backrest width set-
ting must be open all the way. After
installing the child's seat, no memory position
may be called up; otherwise, the stability of the
child's seat on the front passenger seat is
reduced.<
1.Open backrest width completely, refer to
Front comfort seat adjustment on page44.
2.Mount child's seat.
Child seat security
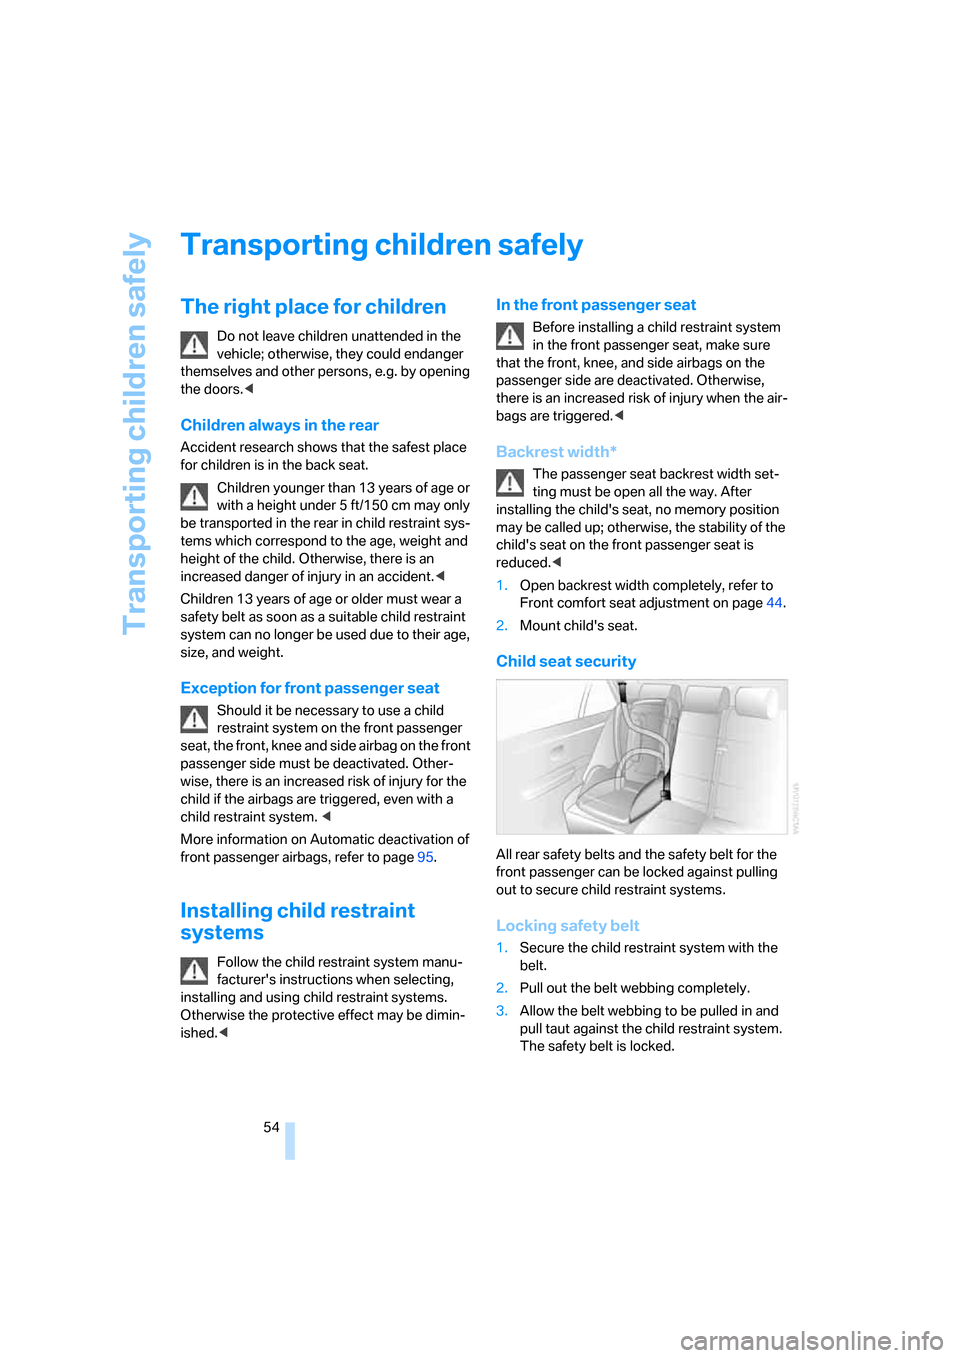
All rear safety belts and the safety belt for the
front passenger can be locked against pulling
out to secure child restraint systems.
Locking safety belt
1.Secure the child restraint system with the
belt.
2.Pull out the belt webbing completely.
3.Allow the belt webbing to be pulled in and
pull taut against the child restraint system.
The safety belt is locked.
Page 58 of 254
Transporting children safely
56
Routing of the tether strap
Make sure that the tether strap is not
routed over sharp edges and does not
twist on its way to the attachment point; other-
wise, the belt can fail to properly secure the
child restraint system in the event of an acci-
dent.<
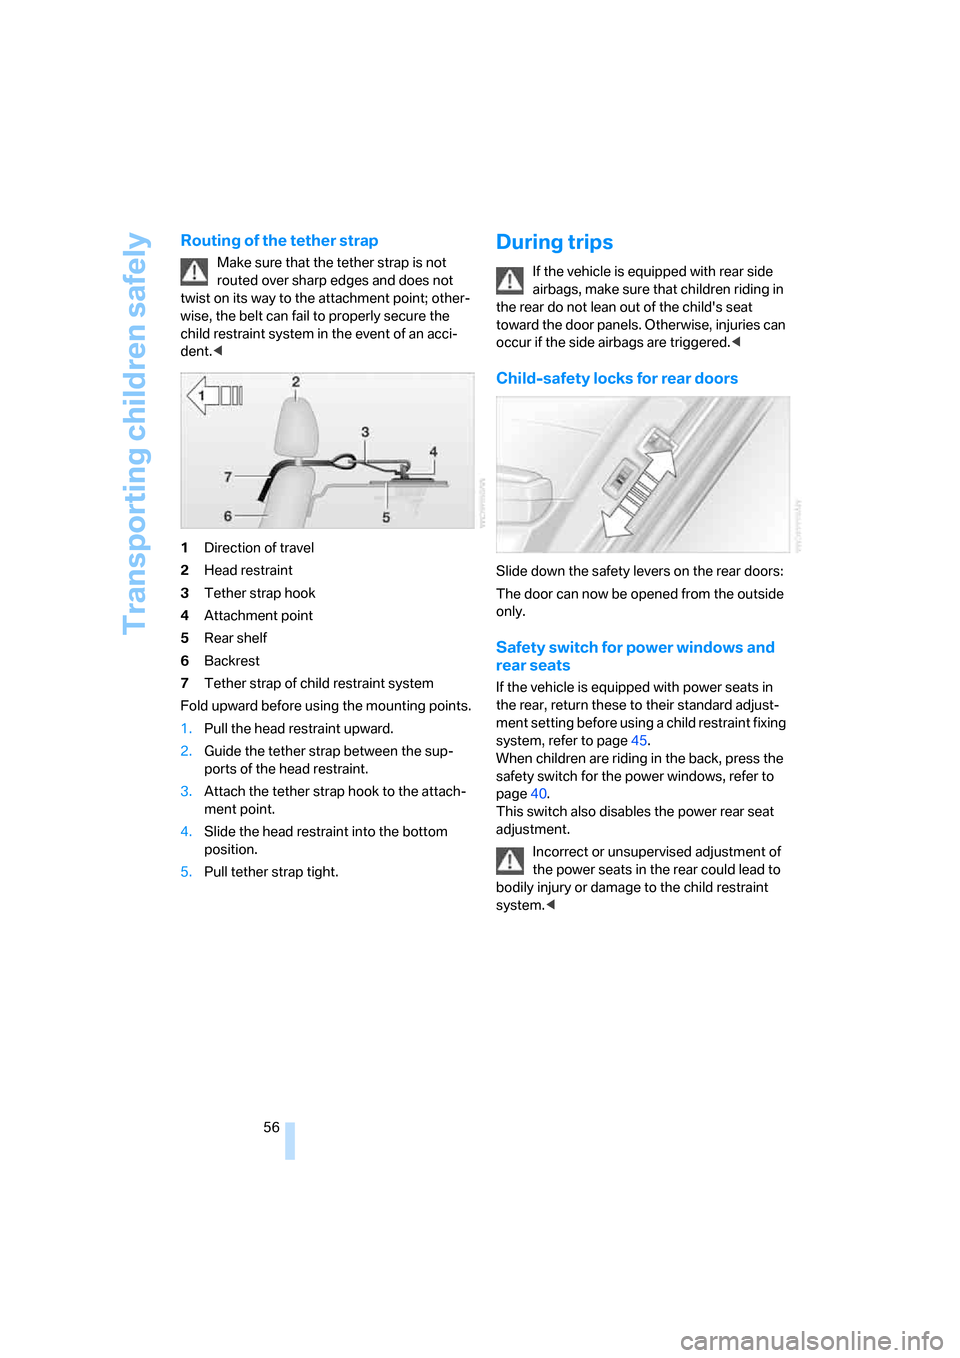
1Direction of travel
2Head restraint
3Tether strap hook
4Attachment point
5Rear shelf
6Backrest
7Tether strap of child restraint system
Fold upward before using the mounting points.
1.Pull the head restraint upward.
2.Guide the tether strap between the sup-
ports of the head restraint.
3.Attach the tether strap hook to the attach-
ment point.
4.Slide the head restraint into the bottom
position.
5.Pull tether strap tight.
During trips
If the vehicle is equipped with rear side
airbags, make sure that children riding in
the rear do not lean out of the child's seat
toward the door panels. Otherwise, injuries can
occur if the side airbags are triggered.<
Child-safety locks for rear doors
Slide down the safety levers on the rear doors:
The door can now be opened from the outside
only.
Safety switch for power windows and
rear seats
If the vehicle is equipped with power seats in
the rear, return these to their standard adjust-
ment setting before using a child restraint fixing
system, refer to page45.
When children are riding in the back, press the
safety switch for the power windows, refer to
page40.
This switch also disables the power rear seat
adjustment.
Incorrect or unsupervised adjustment of
the power seats in the rear could lead to
bodily injury or damage to the child restraint
system.<
Page 63 of 254
Controls
61Reference
At a glance
Driving tips
Communications
Navigation
Entertainment
Mobility
What you will need
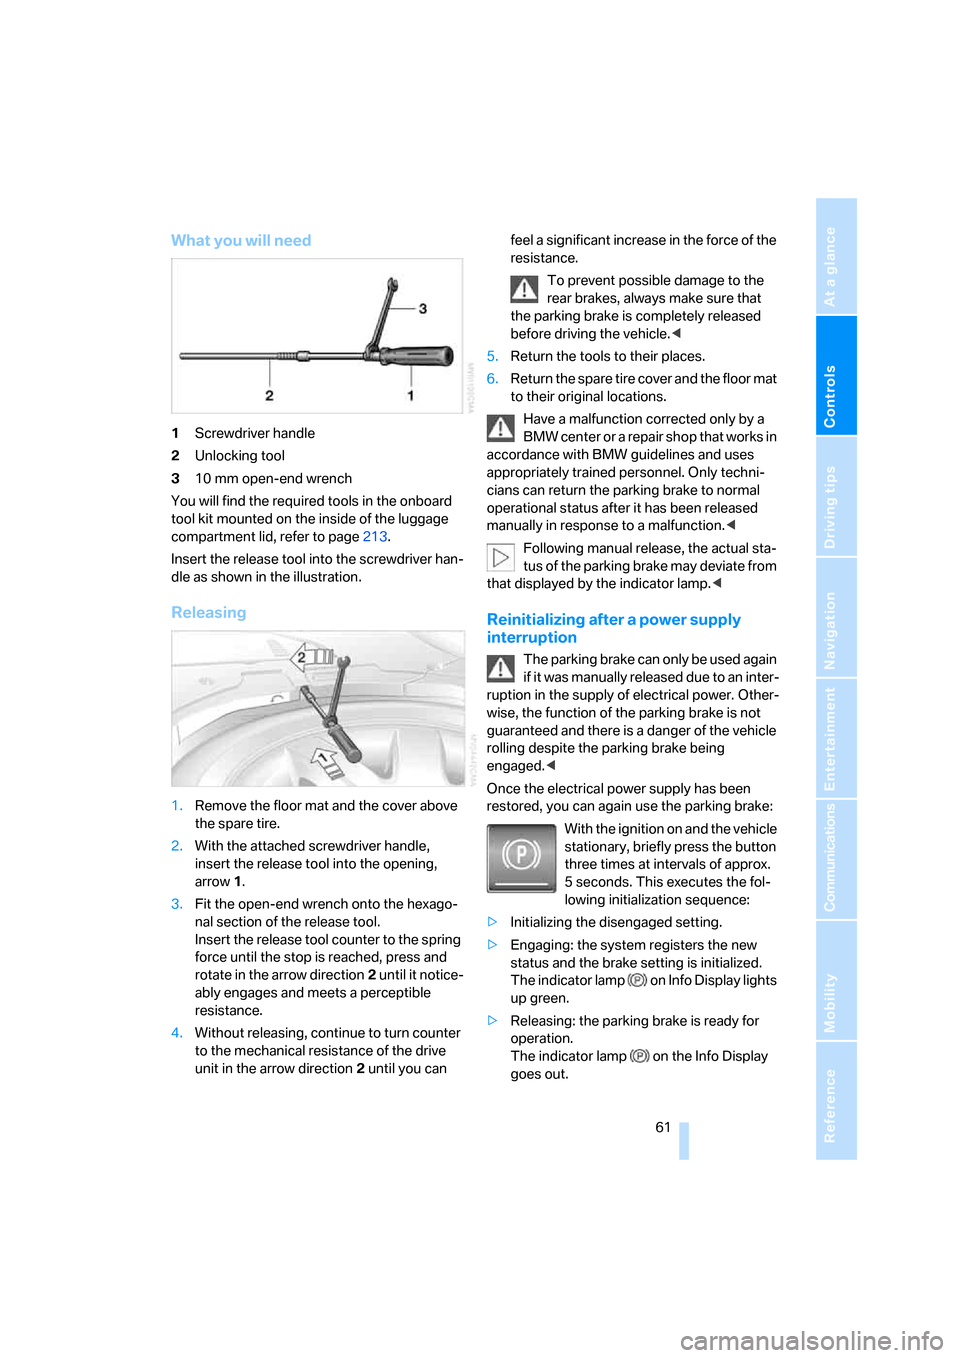
1Screwdriver handle
2Unlocking tool
310 mm open-end wrench
You will find the required tools in the onboard
tool kit mounted on the inside of the luggage
compartment lid, refer to page213.
Insert the release tool into the screwdriver han-
dle as shown in the illustration.
Releasing
1.Remove the floor mat and the cover above
the spare tire.
2.With the attached screwdriver handle,
insert the release tool into the opening,
arrow1.
3.Fit the open-end wrench onto the hexago-
nal section of the release tool.
Insert the release tool counter to the spring
force until the stop is reached, press and
rotate in the arrow direction2 until it notice-
ably engages and meets a perceptible
resistance.
4.Without releasing, continue to turn counter
to the mechanical resistance of the drive
unit in the arrow direction 2 until you can feel a significant increase in the force of the
resistance.
To prevent possible damage to the
rear brakes, always make sure that
the parking brake is completely released
before driving the vehicle.<
5.Return the tools to their places.
6.Return the spare tire cover and the floor mat
to their original locations.
Have a malfunction corrected only by a
BMW center or a repair shop that works in
accordance with BMW guidelines and uses
appropriately trained personnel. Only techni-
cians can return the parking brake to normal
operational status after it has been released
manually in response to a malfunction.<
Following manual release, the actual sta-
tus of the parking brake may deviate from
that displayed by the indicator lamp.<
Reinitializing after a power supply
interruption
The parking brake can only be used again
if it was manually released due to an inter-
ruption in the supply of electrical power. Other-
wise, the function of the parking brake is not
guaranteed and there is a danger of the vehicle
rolling despite the parking brake being
engaged.<
Once the electrical power supply has been
restored, you can again use the parking brake:
With the ignition on and the vehicle
stationary, briefly press the button
three times at intervals of approx.
5 seconds. This executes the fol-
lowing initialization sequence:
>Initializing the disengaged setting.
>Engaging: the system registers the new
status and the brake setting is initialized.
The indicator lamp on Info Display lights
up green.
>Releasing: the parking brake is ready for
operation.
The indicator lamp on the Info Display
goes out.
Page 64 of 254
Driving
62
Automatic transmission with
Steptronic
In addition to fully automatic operation, you can
also shift manually using the buttons on the
steering wheel, refer to page63.
Transmission range selection
P R N D
Displays on Info Display
P R N D S or M1 to M6
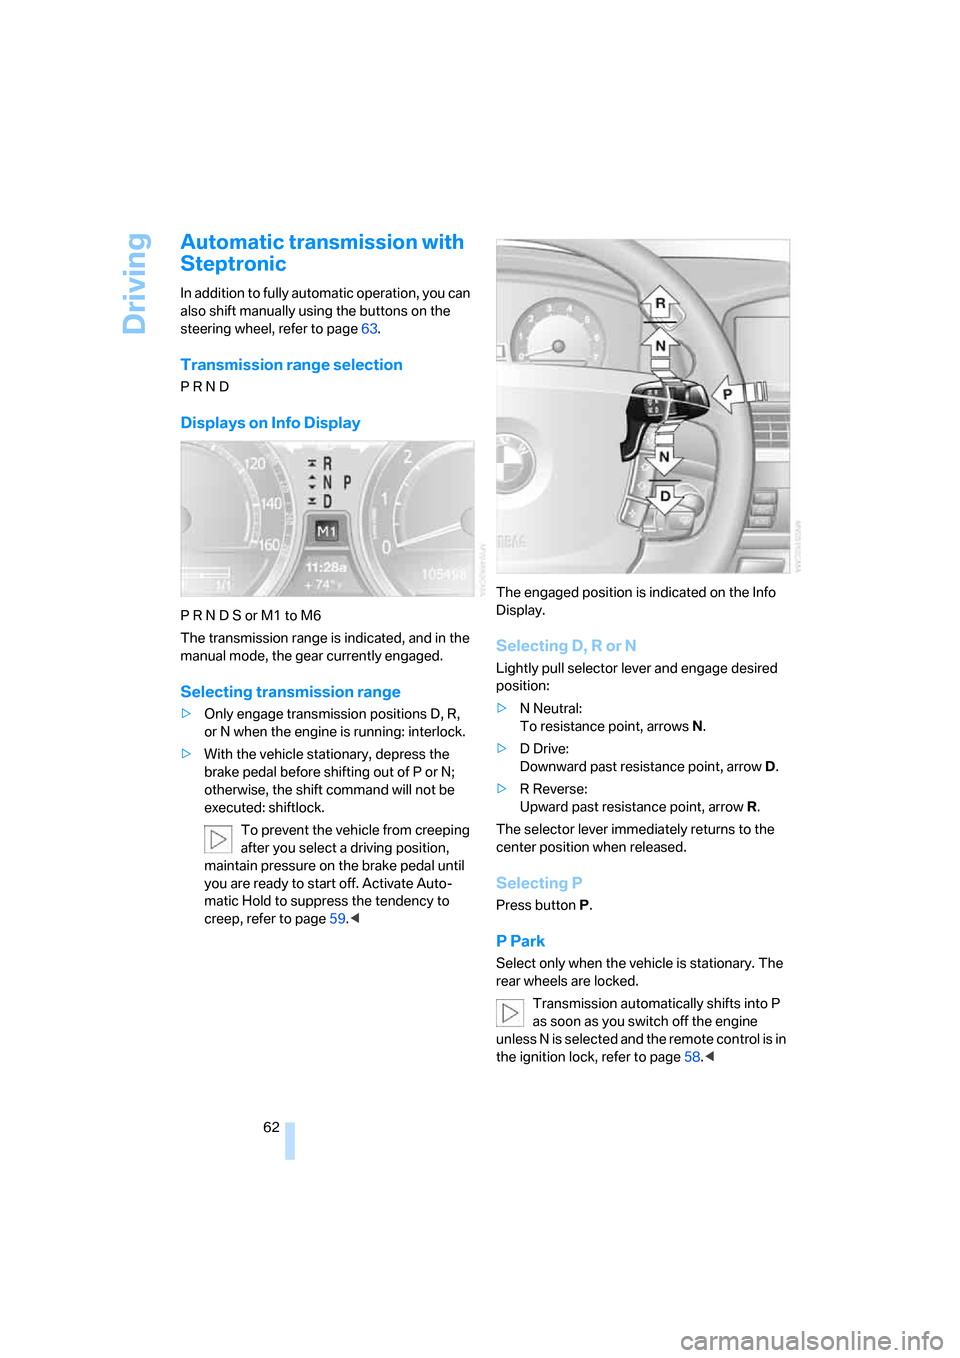
The transmission range is indicated, and in the
manual mode, the gear currently engaged.
Selecting transmission range
>Only engage transmission positions D, R,
or N when the engine is running: interlock.
>With the vehicle stationary, depress the
brake pedal before shifting out of P or N;
otherwise, the shift command will not be
executed: shiftlock.
To prevent the vehicle from creeping
after you select a driving position,
maintain pressure on the brake pedal until
you are ready to start off. Activate Auto-
matic Hold to suppress the tendency to
creep, refer to page59.
Selecting D, R or N
Lightly pull selector lever and engage desired
position:
>N Neutral:
To resistance point, arrowsN.
>D Drive:
Downward past resistance point, arrowD.
>R Reverse:
Upward past resistance point, arrowR.
The selector lever immediately returns to the
center position when released.
Selecting P
Press button P.
P Park
Select only when the vehicle is stationary. The
rear wheels are locked.
Transmission automatically shifts into P
as soon as you switch off the engine
unless N is selected and the remote control is in
the ignition lock, refer to page58.<
Page 65 of 254
Controls
63Reference
At a glance
Driving tips
Communications
Navigation
Entertainment
Mobility
R Reverse
Select only when the vehicle is stationary.
N Neutral
You can select this position, for example, in car
washes. The vehicle can roll.
Transmission remains in N even after the
ignition is switched off whenever you
leave the remote control in the ignition lock.
This function is useful in automatic car washes,
etc.
After approx. 30 minutes the system automati-
cally shifts into position P. Pay attention to the
messages on the Info Display.
Switching off engine, refer to page58.<
D Drive, automatic position
This is the mode recommended for normal
vehicle operation. All forward gears are avail-
able.
Under normal operating conditions, the fuel
consumption is lowest when driving in
position D.
Kick-down
The kick-down mode provides you with maxi-
mum acceleration.
Press the accelerator pedal beyond the full-
throttle resistance point.
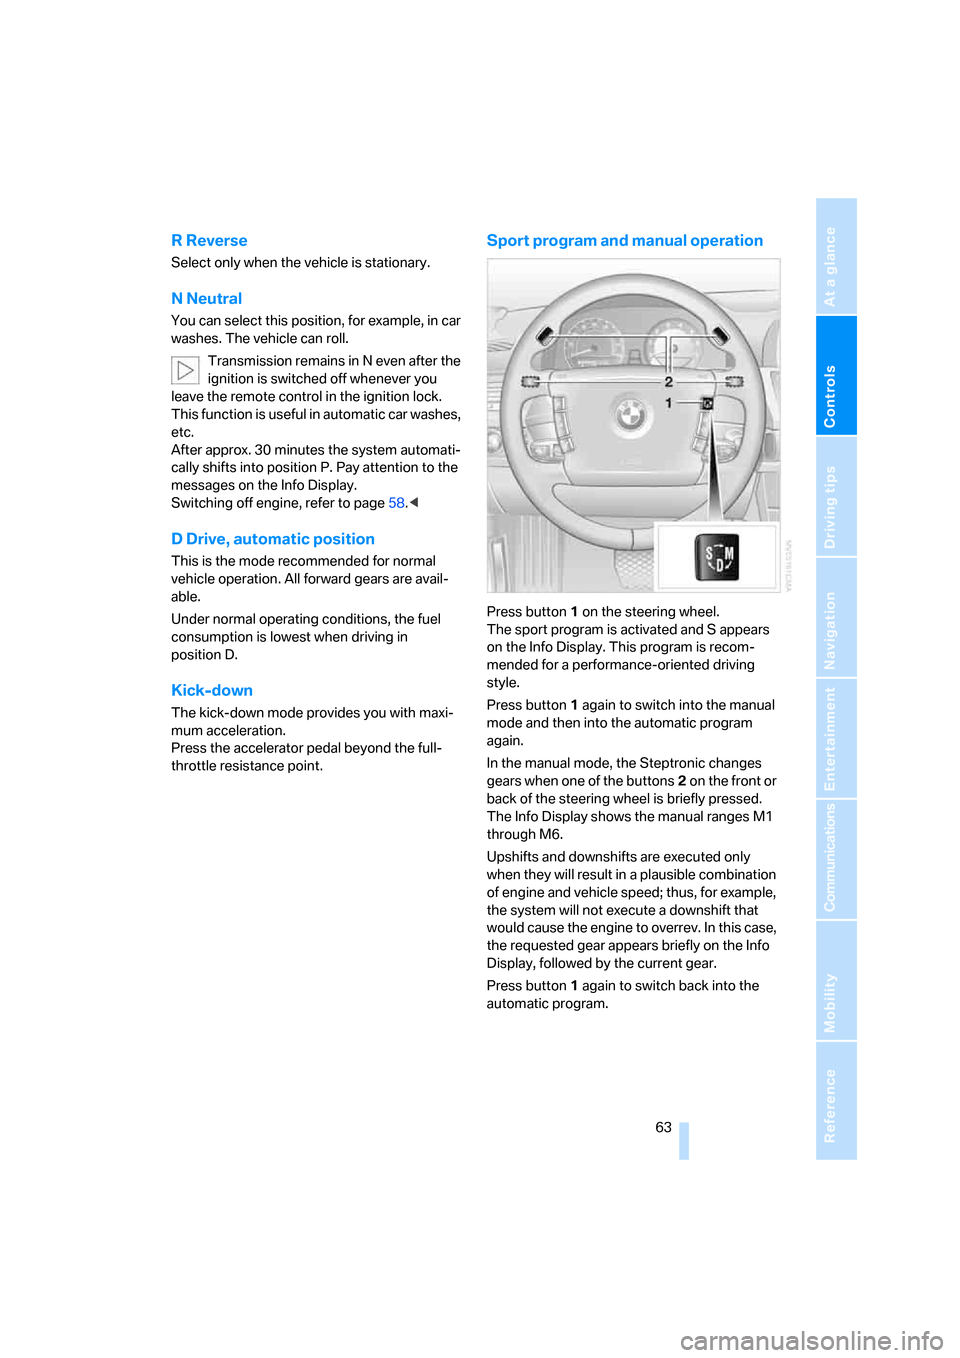
Sport program and manual operation
Press button1 on the steering wheel.
The sport program is activated and S appears
on the Info Display. This program is recom-
mended for a performance-oriented driving
style.
Press button1 again to switch into the manual
mode and then into the automatic program
again.
In the manual mode, the Steptronic changes
gears when one of the buttons2 on the front or
back of the steering wheel is briefly pressed.
The Info Display shows the manual ranges M1
through M6.
Upshifts and downshifts are executed only
when they will result in a plausible combination
of engine and vehicle speed; thus, for example,
the system will not execute a downshift that
would cause the engine to overrev. In this case,
the requested gear appears briefly on the Info
Display, followed by the current gear.
Press button1 again to switch back into the
automatic program.
Page 84 of 254
Everything under control
82 4.Select a message and press the controller.
To exit the menu:
The arrow is selected. Press the controller.
Display of malfunction urgency
Depending on the status of the monitored
systems, the symbol in the status line is dis-
played in different colors.
Yellow or red
Malfunctions are present in the monitored sys-
tems. Depending upon how serious the prob-
lem is, a supplementary message may also
appear on the Control Display.
The symbol also indicates the status of the ser-
vice requirements, refer to Symbols on
page79.
Displays after trip completion
Selected malfunction reports generated during
the trip are shown again consecutively when
you switch off the ignition.
Even with the ignition and display off, you can
display the messages on the Info Display:
Press the CHECK button for approx. 8 seconds,
refer to page81. The stored status reports
appear again in the display. If several messages
are present, you can continue to briefly press
the CHECK button to view them in succession.
The Check Control function is terminated:
>automatically after a brief period
>if you press the CHECK button again for
approx. 8 seconds.
Speed limit
You can enter a speed and a Check Control
message will indicate when you have reached
this speed. This enables you, for example, to
receive warnings if you exceed a speed limit in
an urban area.
You are only warned of reaching this speed a
second time if your speed has dropped to at
least 3 mph/5 km/h slower than this speed limit
since the last warning.
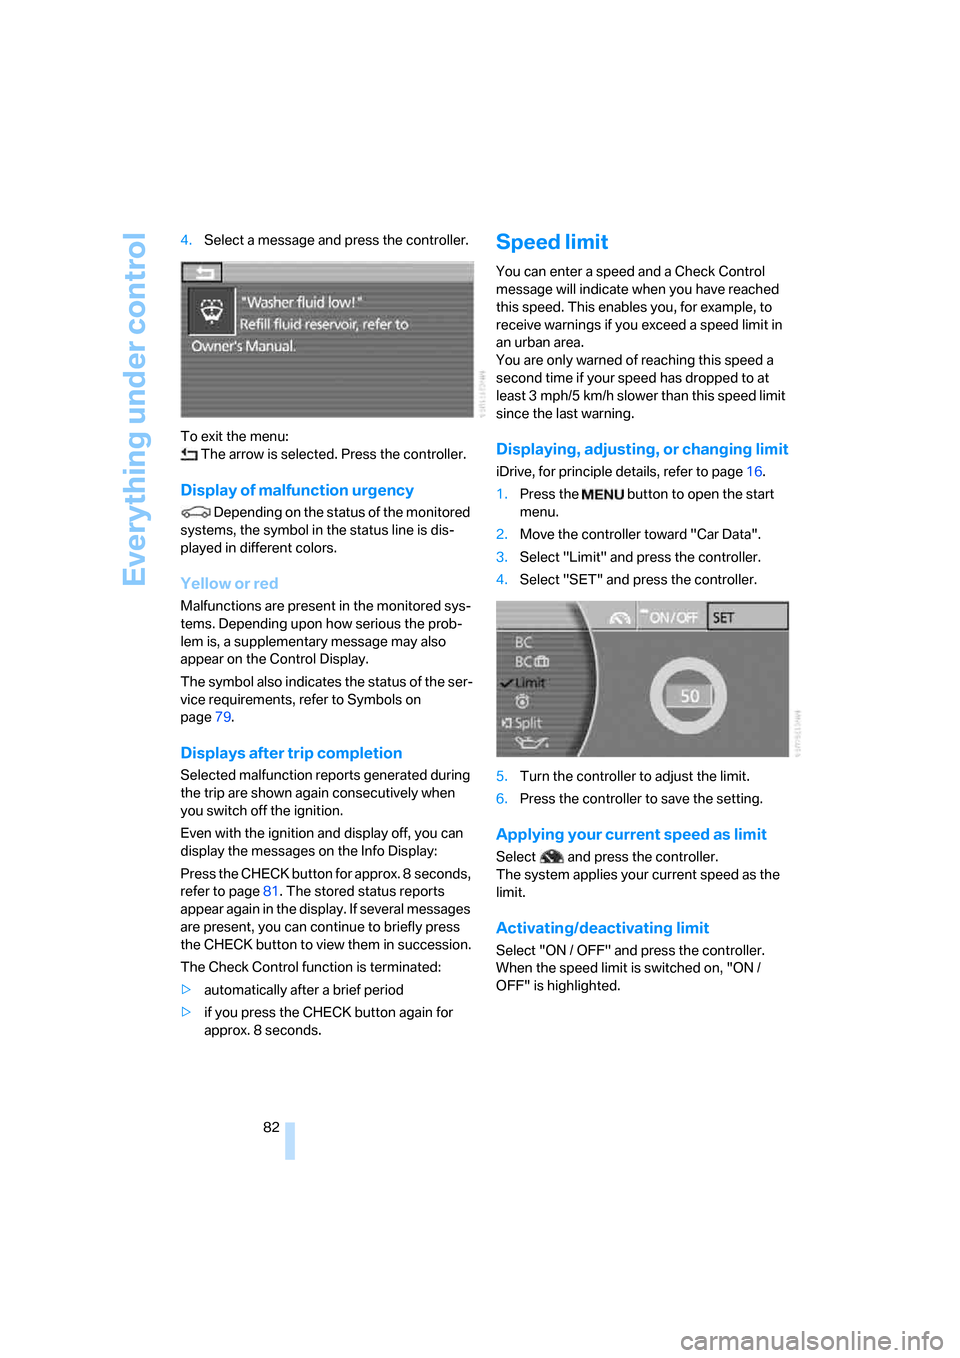
Displaying, adjusting, or changing limit
iDrive, for principle details, refer to page16.
1.Press the button to open the start
menu.
2.Move the controller toward "Car Data".
3.Select "Limit" and press the controller.
4.Select "SET" and press the controller.
5.Turn the controller to adjust the limit.
6.Press the controller to save the setting.
Applying your current speed as limit
Select and press the controller.
The system applies your current speed as the
limit.
Activating/deactivating limit
Select "ON / OFF" and press the controller.
When the speed limit is switched on, "ON /
OFF" is highlighted.