2008 BMW 760I ECU
[x] Cancel search: ECUPage 97 of 254
Controls
95Reference
At a glance
Driving tips
Communications
Navigation
Entertainment
Mobility
Airbags
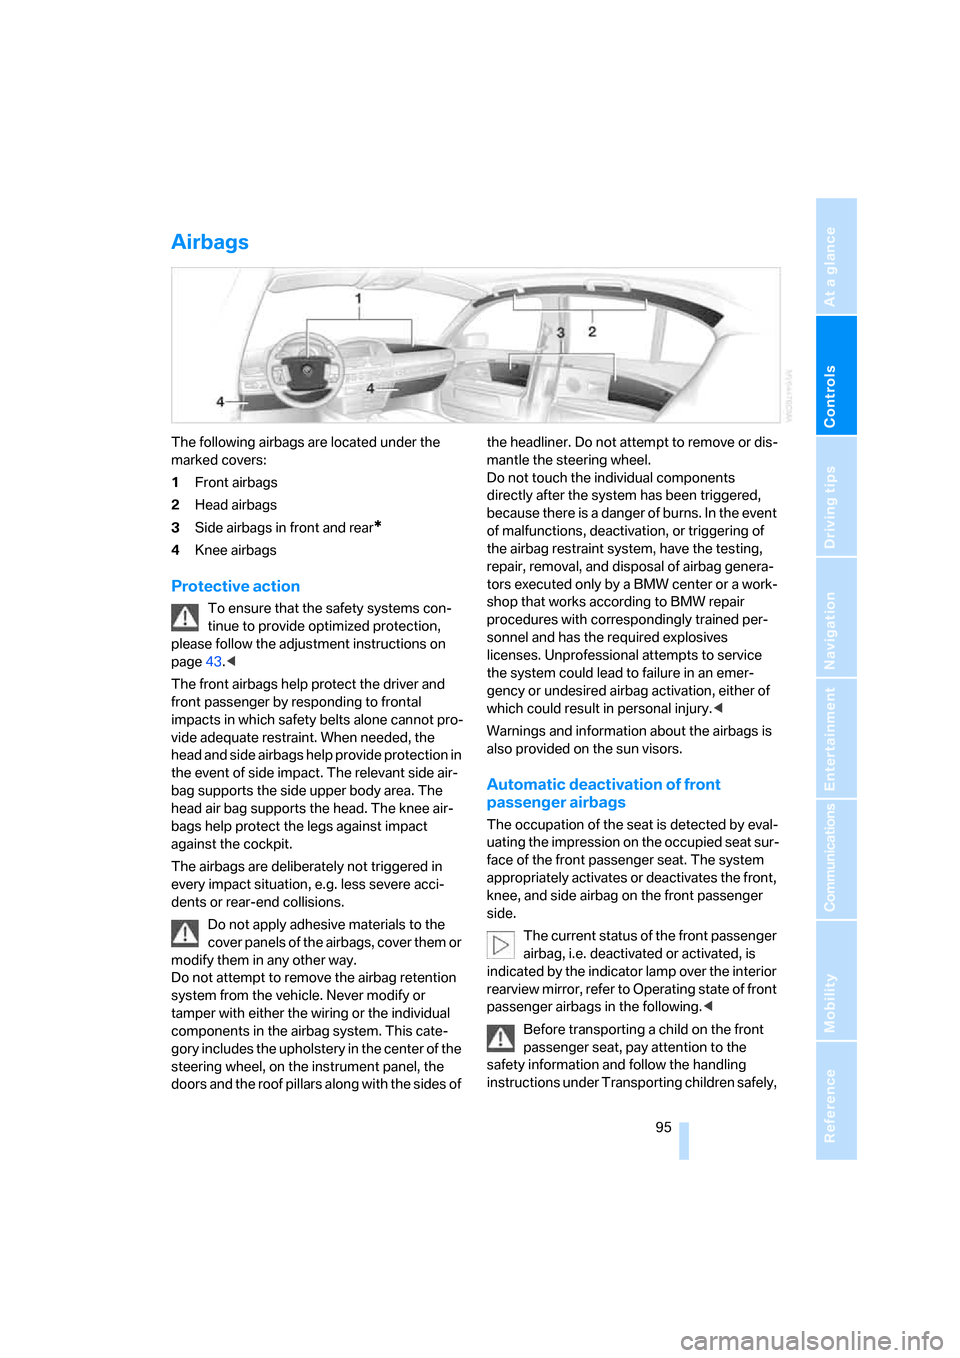
The following airbags are located under the
marked covers:
1Front airbags
2Head airbags
3Side airbags in front and rear
*
4Knee airbags
Protective action
To ensure that the safety systems con-
tinue to provide optimized protection,
please follow the adjustment instructions on
page43.<
The front airbags help protect the driver and
front passenger by responding to frontal
impacts in which safety belts alone cannot pro-
vide adequate restraint. When needed, the
head and side airbags help provide protection in
the event of side impact. The relevant side air-
bag supports the side upper body area. The
head air bag supports the head. The knee air-
bags help protect the legs against impact
against the cockpit.
The airbags are deliberately not triggered in
every impact situation, e.g. less severe acci-
dents or rear-end collisions.
Do not apply adhesive materials to the
cover panels of the airbags, cover them or
modify them in any other way.
Do not attempt to remove the airbag retention
system from the vehicle. Never modify or
tamper with either the wiring or the individual
components in the airbag system. This cate-
gory includes the upholstery in the center of the
steering wheel, on the instrument panel, the
doors and the roof pillars along with the sides of the headliner. Do not attempt to remove or dis-
mantle the steering wheel.
Do not touch the individual components
directly after the system has been triggered,
because there is a danger of burns. In the event
of malfunctions, deactivation, or triggering of
the airbag restraint system, have the testing,
repair, removal, and disposal of airbag genera-
tors executed only by a BMW center or a work-
shop that works according to BMW repair
procedures with correspondingly trained per-
sonnel and has the required explosives
licenses. Unprofessional attempts to service
the system could lead to failure in an emer-
gency or undesired airbag activation, either of
which could result in personal injury.<
Warnings and information about the airbags is
also provided on the sun visors.
Automatic deactivation of front
passenger airbags
The occupation of the seat is detected by eval-
uating the impression on the occupied seat sur-
face of the front passenger seat. The system
appropriately activates or deactivates the front,
knee, and side airbag on the front passenger
side.
The current status of the front passenger
airbag, i.e. deactivated or activated, is
indicated by the indicator lamp over the interior
rearview mirror, refer to Operating state of front
passenger airbags in the following.<
Before transporting a child on the front
passenger seat, pay attention to the
safety information and follow the handling
instructions under Transporting children safely,
Page 113 of 254
Controls
111Reference
At a glance
Driving tips
Communications
Navigation
Entertainment
Mobility
Practical interior accessories
Integrated universal remote
control*
The concept
The integrated universal remote control can
replace as many as three hand-held transmit-
ters for various radio-controlled accessories,
such as garage doors, entrance gates, or light-
ing systems. The integrated universal remote
control registers and stores signals from the
original hand-held transmitters.
The signal of an original hand-held transmitter
can be programmed into one of the three mem-
ory buttons1. After this, the programmed
memory button1 will operate the system in
question. The LED2 flashes to confirm trans-
mission of the signal.
Should you sell your vehicle one day, be sure to
delete the stored programs beforehand for your
security, refer to page112.
To prevent possible damage or injury,
during programming or before each use
of the programmed device by the integrated
universal remote control, always inspect the
immediate area to make certain that no people,
animals or objects are within the swiveling and
movement range of the device. Also, comply
with the safety precautions of the original hand-
held transmitter.<
Checking compatibility
If you see this symbol on the packaging
or in the manual supplied with the orig-
inal hand-held transmitter, then it is
safe to assume that it is compatible with the
integrated universal remote control.
If you have additional questions, please
contact your BMW center or call:
1-800-355-3515.
Information is also provided on the Internet at:
www.bmwusa.com or
www.homelink.com. HomeLink is a registered trademark of
Johnson Controls, Inc.<
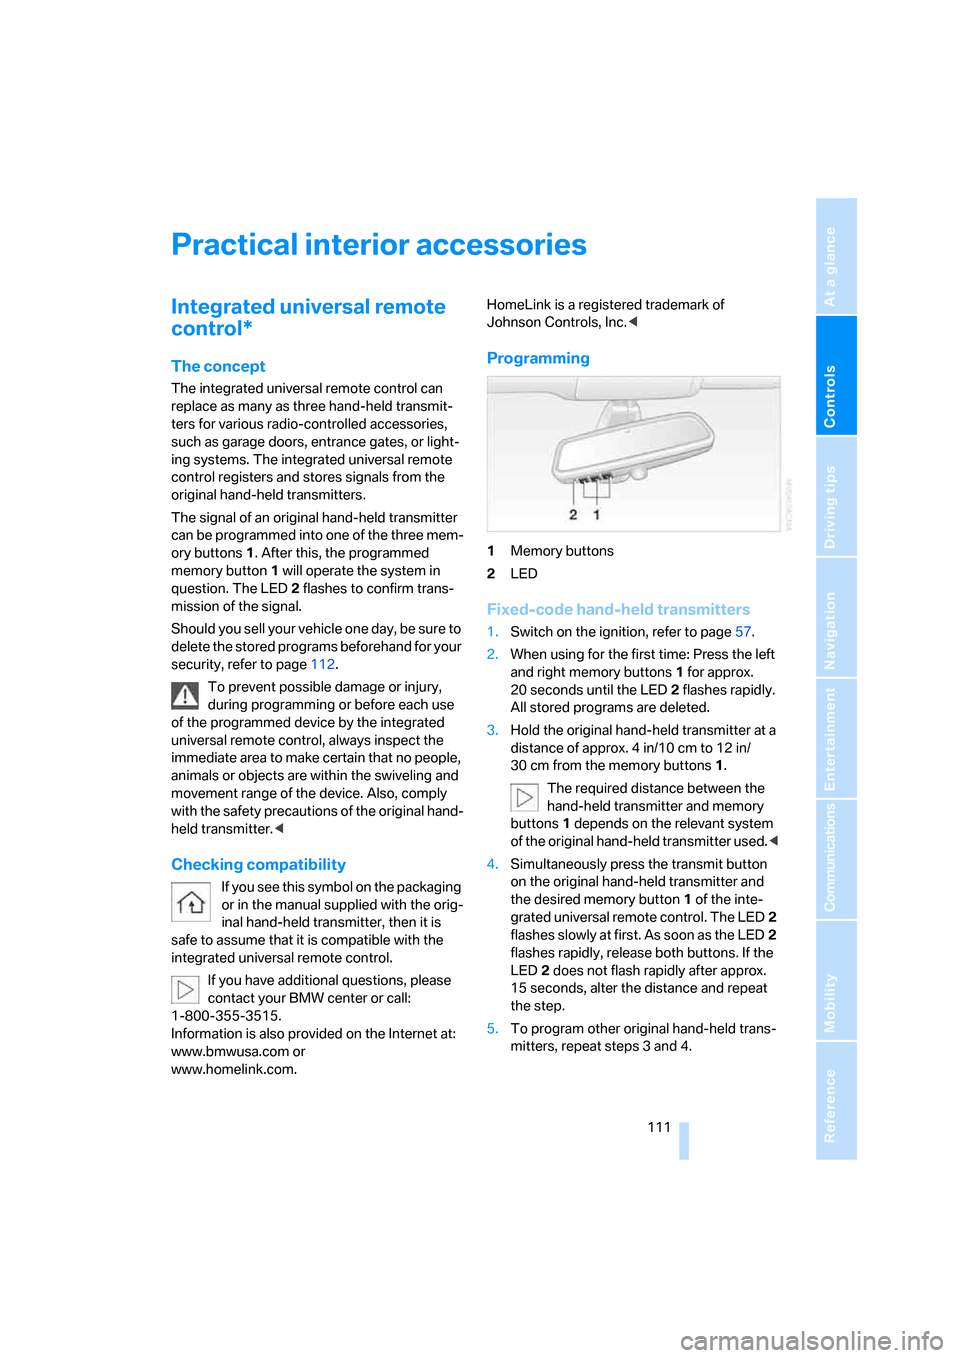
Programming
1Memory buttons
2LED
Fixed-code hand-held transmitters
1.Switch on the ignition, refer to page57.
2.When using for the first time: Press the left
and right memory buttons1 for approx.
20 seconds until the LED2 flashes rapidly.
All stored programs are deleted.
3.Hold the original hand-held transmitter at a
distance of approx. 4 in/10 cm to 12 in/
30 cm from the memory buttons1.
The required distance between the
hand-held transmitter and memory
buttons1 depends on the relevant system
of the original hand-held transmitter used.<
4.Simultaneously press the transmit button
on the original hand-held transmitter and
the desired memory button1 of the inte-
grated universal remote control. The LED2
flashes slowly at first. As soon as the LED2
flashes rapidly, release both buttons. If the
LED2 does not flash rapidly after approx.
15 seconds, alter the distance and repeat
the step.
5.To program other original hand-held trans-
mitters, repeat steps 3 and 4.
Page 120 of 254
Practical interior accessories
118
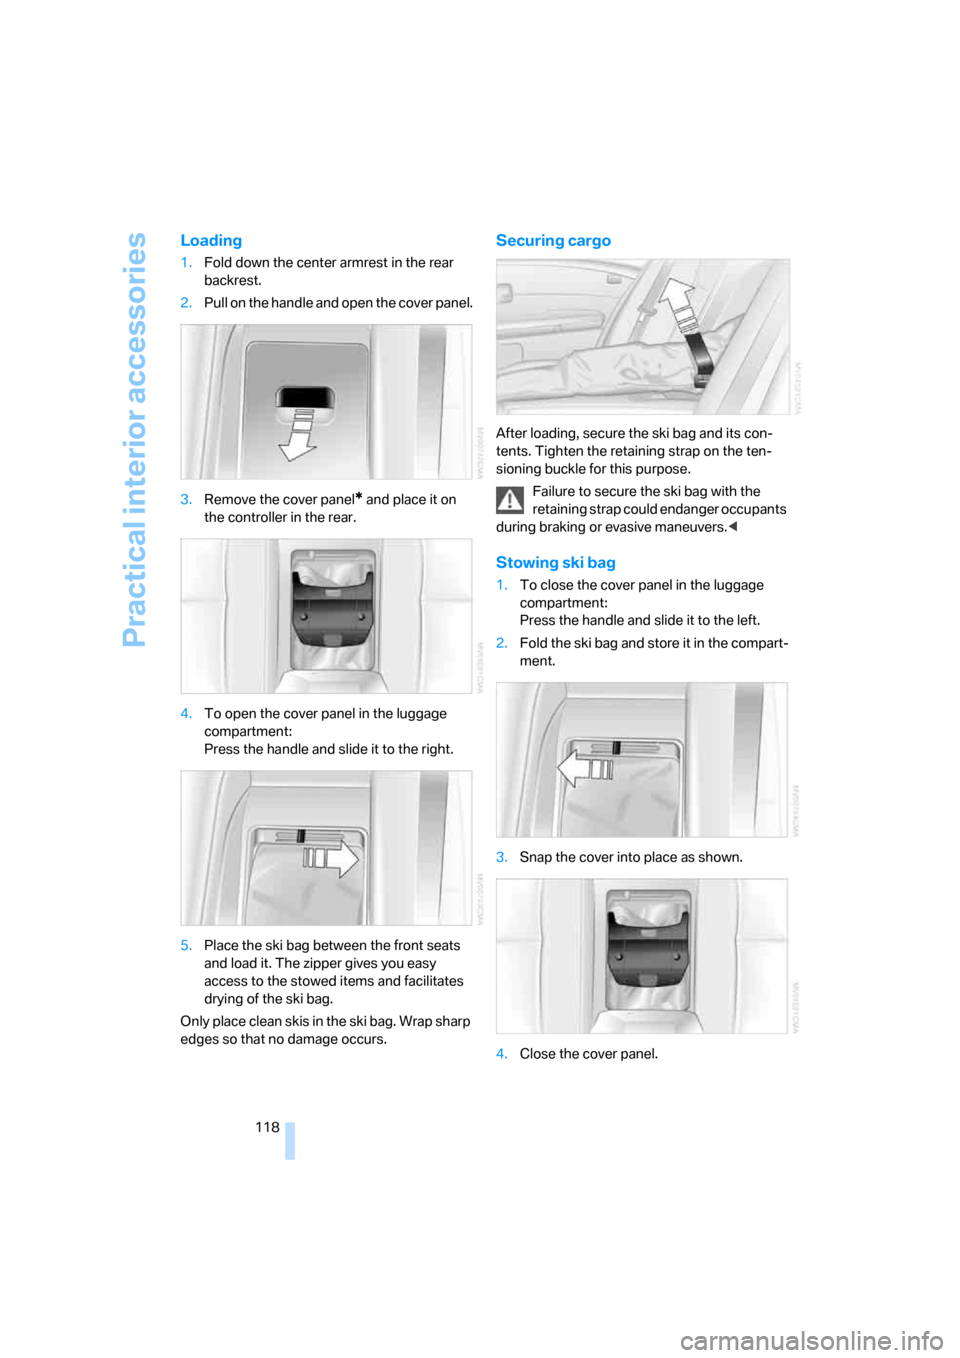
Loading
1.Fold down the center armrest in the rear
backrest.
2.Pull on the handle and open the cover panel.
3.Remove the cover panel
* and place it on
the controller in the rear.
4.To open the cover panel in the luggage
compartment:
Press the handle and slide it to the right.
5.Place the ski bag between the front seats
and load it. The zipper gives you easy
access to the stowed items and facilitates
drying of the ski bag.
Only place clean skis in the ski bag. Wrap sharp
edges so that no damage occurs.
Securing cargo
After loading, secure the ski bag and its con-
tents. Tighten the retaining strap on the ten-
sioning buckle for this purpose.
Failure to secure the ski bag with the
retaining strap could endanger occupants
during braking or evasive maneuvers.<
Stowing ski bag
1.To close the cover panel in the luggage
compartment:
Press the handle and slide it to the left.
2.Fold the ski bag and store it in the compart-
ment.
3.Snap the cover into place as shown.
4.Close the cover panel.
Page 126 of 254

Things to remember when driving
124
Cargo loading
To avoid loading the tires beyond their
approved carrying capacity, never over-
load the vehicle. Overloading can lead to over-
heating of the tires and increases the rate at
which damage develops inside them. The ulti-
mate result can come in the form of a sudden
blow-out.<
Determining loading limit
1.Locate the following statement on your
vehicle's placard
*:
The combined weight of occupants
and cargo should never exceed
XXX lbs. or YYY kg; otherwise, the vehicle
may be damaged and unstable driving con-
ditions may result.<
2.Determine the combined weight of the
driver and passengers that will be riding in
your vehicle.
3.Subtract the combined weight of the driver
and passenger from XXX lbs. or YYY kg.
4.The resulting figure equals the available
amount of cargo and luggage load capacity.
For example, if the XXX amount equals
1400 lbs. and there will be five 150-lb. pas-
sengers in your vehicle, the amount of avail-
able cargo and luggage load capacity is
650 lbs.:
1400 lbs. minus 750 lbs. = 650 lbs.
5.Determine the combined weight of luggage
and cargo being loaded into the vehicle.
This weight may not safely exceed the avail-
able cargo and luggage load capacity calcu-
lated in step 4.6.If your vehicle will be towing a trailer, part of
the load from your trailer will be transferred
to your vehicle. Consult the manual for
transporting a trailer to determine how this
may reduce the available cargo and luggage
load capacity of the vehicle.
Load
The permissible load is the total of the weight of
occupants and cargo/luggage. The greater the
weight of occupants, the less cargo/luggage
can be transported.
Stowing cargo
>Place heavy cargo as far forward and as low
as possible, placing it directly behind the
bulkhead behind the rear seats.
>Cover sharp edges and corners.
>For very heavy cargo when the rear seat is
not occupied, secure each outside rear
safety belt in the opposite buckle.
Page 127 of 254

Driving tips
125Reference
At a glance
Controls
Communications
Navigation
Entertainment
Mobility
Securing cargo
>Use the luggage net* or securing straps to
secure small and lightweight luggage and
cargo.
>Heavy-duty straps
* for securing larger and
heavier objects are available at your BMW
center. Four lashing eyes for attaching
these heavy-duty straps are provided in the
luggage compartment, refer to illustration.
>Please follow the special instructions sup-
plied with the heavy-duty straps.
Always position and secure the load as
described above. If you do not, it can
endanger the passengers, for example during
braking or evasive maneuvers.
Attach heavy-duty straps only to the lashing
eyes, refer to illustration, otherwise, the heavy-
duty straps could come loose or the vehicle
could be damaged.
Never exceed either the approved gross vehicle
weight or either of the approved axle loads, refer
to page228, as excessive loads can impair the
operational safety of the vehicle and may also
put you in violation of highway safety laws.
You should never transport unsecured heavy or
hard objects in the passenger compartment, as
they could fly around and pose a safety hazard
to the vehicle's occupants during abrupt brak-
ing or evasive maneuvers .<
Roof-mounted luggage rack*
A special rack system is available as an option
for your BMW. Please comply with the precau-
tions included with the installation instructions.
Anchorage points
The anchorage points are located inside the
door openings.
Loading roof rack
Because roof racks raise the vehicle's center of
gravity when loaded, they have a major effect on
its handling and steering response.
You should therefore always remember not to
exceed the approved roof load capacity, the
approved gross vehicle weight or the axle loads
when loading the rack.
You can find this information under Weights on
page228.
The roof load must be uniformly distributed and
should not be too large in area. Always load the
heaviest pieces on the bottom. Be sure that
adequate clearance is maintained for raising the
glass sunroof, and that objects do not project
into the opening path of the luggage compart-
ment lid.
Secure roof-mounted cargo correctly and
securely to prevent it from shifting or falling off
as you drive.
Drive smoothly. Avoid sudden acceleration and
braking maneuvers. Take corners gently.
Page 209 of 254
Mobility
207Reference
At a glance
Controls
Driving tips
Communications
Navigation
Entertainment
Under the hood
Never attempt to perform any service or
repair operations on your vehicle without
the required, professional technical training.
If you are unfamiliar with the regulations to be
observed, only have work on your vehicle car-
ried out by a BMW center or a repair shop that
works in accordance with BMW guidelines and
uses appropriately trained personnel. If this
work is not carried out properly, there is a dan-
ger of subsequent damage and related safety
hazards.<
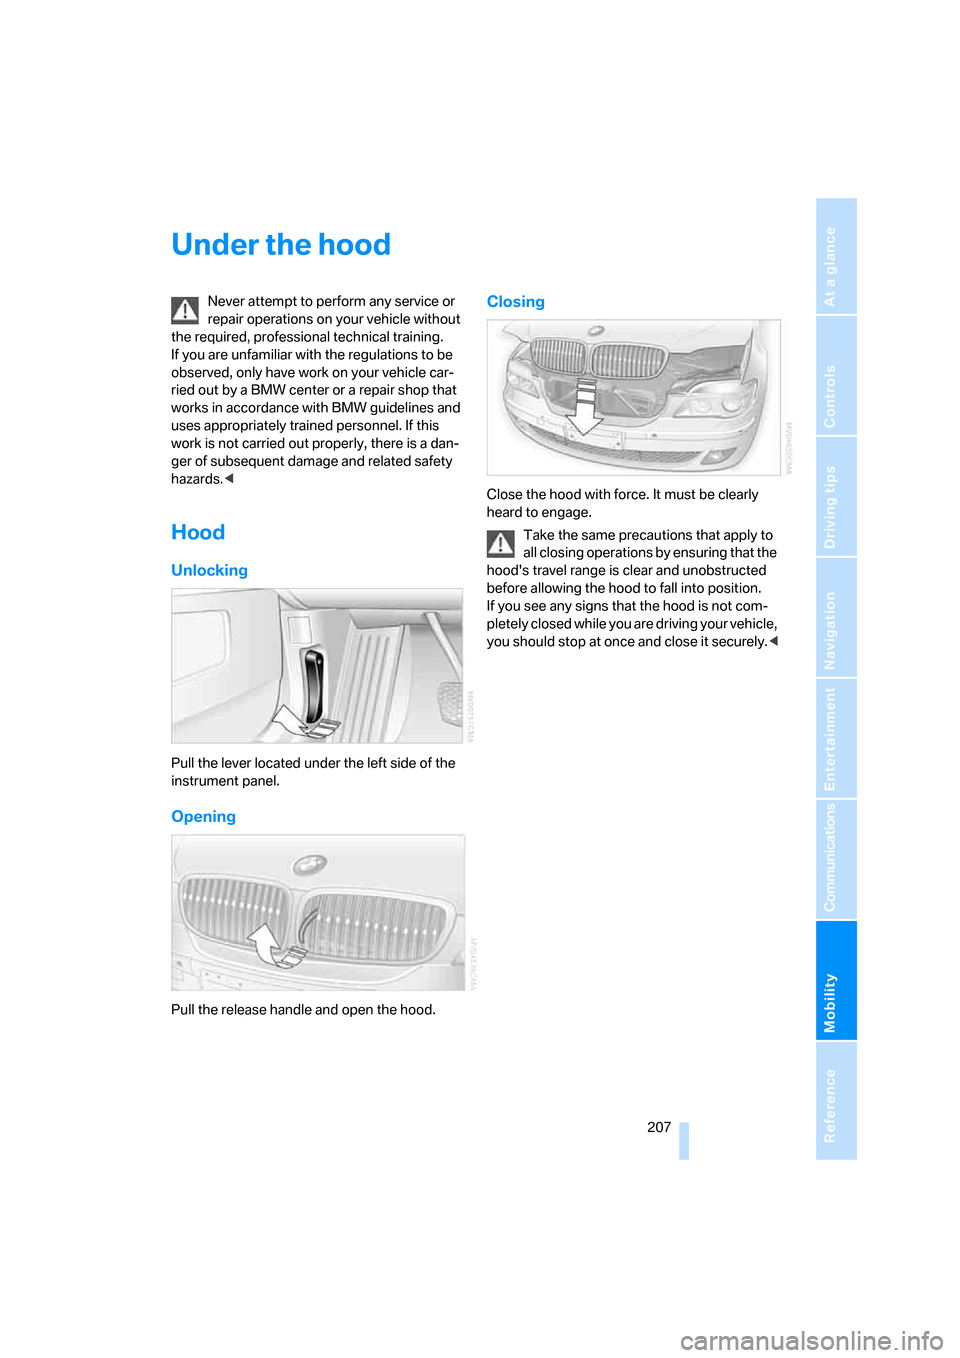
Hood
Unlocking
Pull the lever located under the left side of the
instrument panel.
Opening
Pull the release handle and open the hood.
Closing
Close the hood with force. It must be clearly
heard to engage.
Take the same precautions that apply to
all closing operations by ensuring that the
hood's travel range is clear and unobstructed
before allowing the hood to fall into position.
If you see any signs that the hood is not com-
pletely closed while you are driving your vehicle,
you should stop at once and close it securely.<
Page 218 of 254
Replacing components
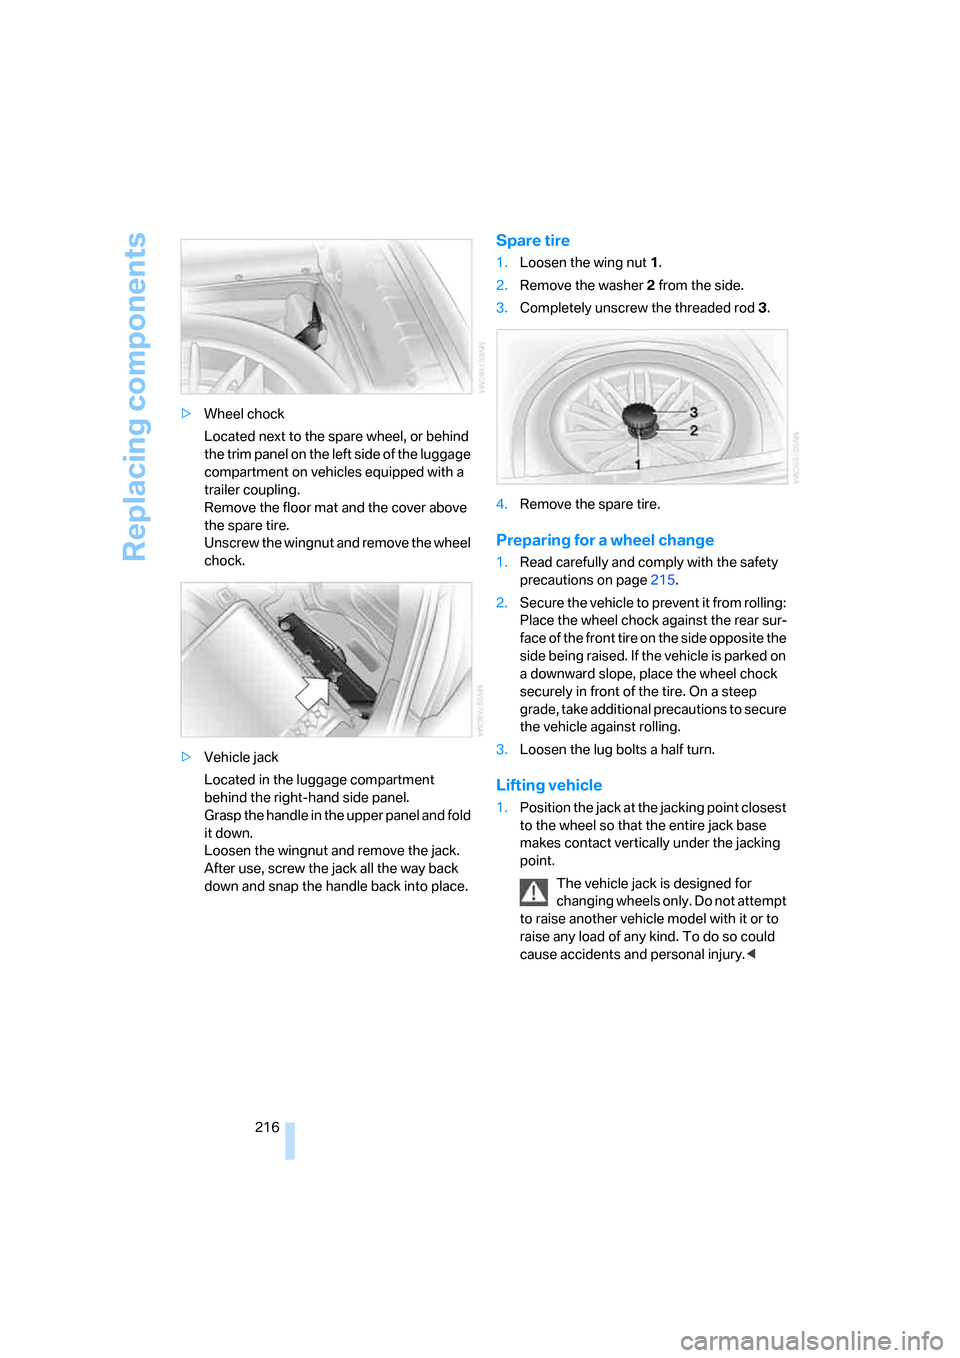
216 >Wheel chock
Located next to the spare wheel, or behind
the trim panel on the left side of the luggage
compartment on vehicles equipped with a
trailer coupling.
Remove the floor mat and the cover above
the spare tire.
Unscrew the wingnut and remove the wheel
chock.
>Vehicle jack
Located in the luggage compartment
behind the right-hand side panel.
Grasp the handle in the upper panel and fold
it down.
Loosen the wingnut and remove the jack.
After use, screw the jack all the way back
down and snap the handle back into place.
Spare tire
1.Loosen the wing nut 1.
2.Remove the washer 2 from the side.
3.Completely unscrew the threaded rod 3.
4.Remove the spare tire.
Preparing for a wheel change
1.Read carefully and comply with the safety
precautions on page215.
2.Secure the vehicle to prevent it from rolling:
Place the wheel chock against the rear sur-
face of the front tire on the side opposite the
side being raised. If the vehicle is parked on
a downward slope, place the wheel chock
securely in front of the tire. On a steep
grade, take additional precautions to secure
the vehicle against rolling.
3.Loosen the lug bolts a half turn.
Lifting vehicle
1.Position the jack at the jacking point closest
to the wheel so that the entire jack base
makes contact vertically under the jacking
point.
The vehicle jack is designed for
changing wheels only. Do not attempt
to raise another vehicle model with it or to
raise any load of any kind. To do so could
cause accidents and personal injury.<
Page 219 of 254
Mobility
217Reference
At a glance
Controls
Driving tips
Communications
Navigation
Entertainment
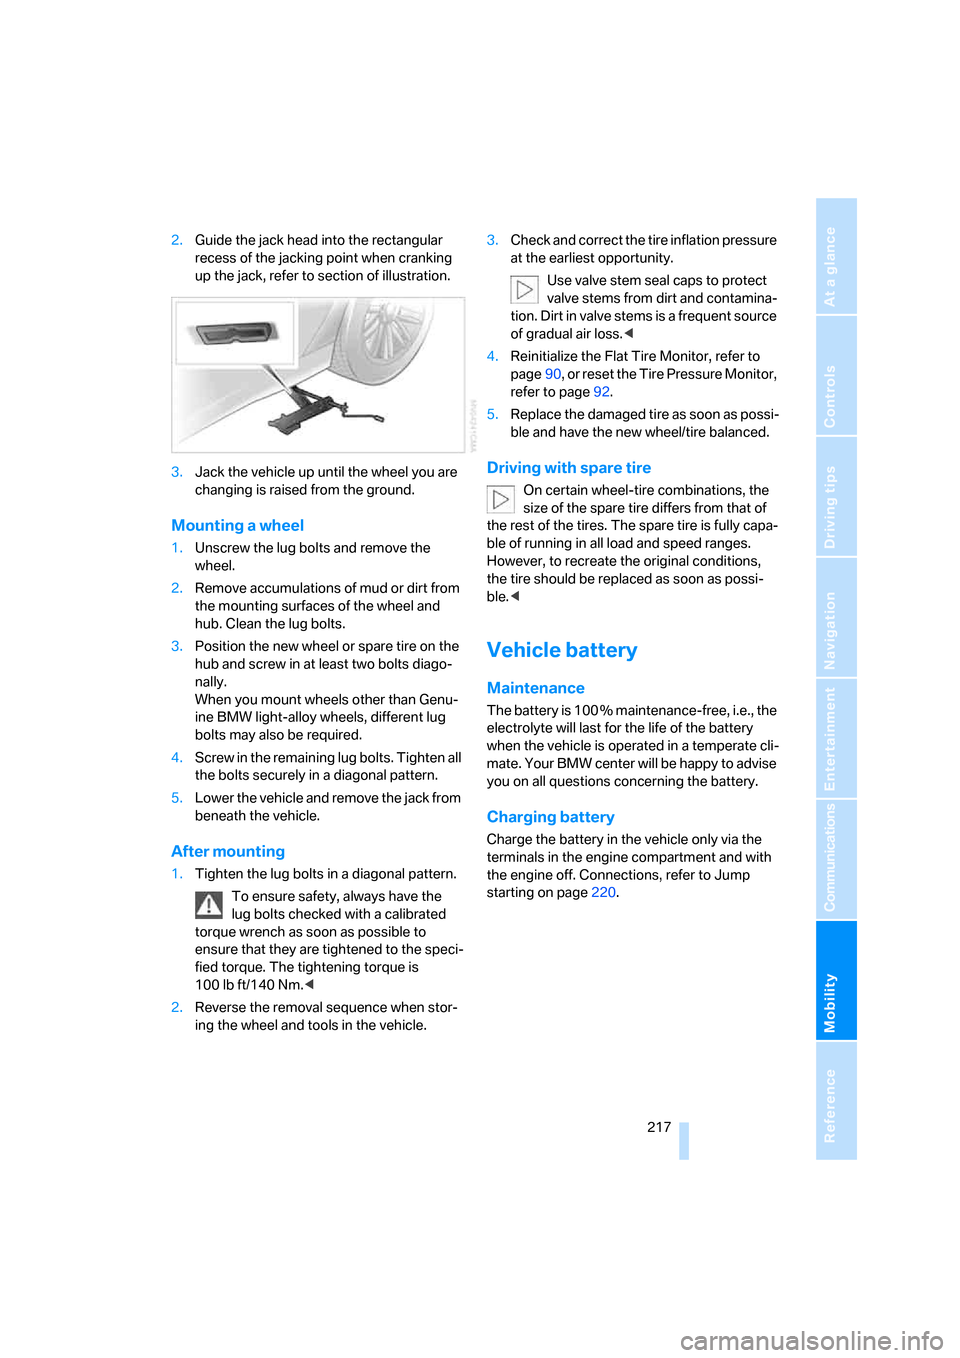
2.Guide the jack head into the rectangular
recess of the jacking point when cranking
up the jack, refer to section of illustration.
3.Jack the vehicle up until the wheel you are
changing is raised from the ground.
Mounting a wheel
1.Unscrew the lug bolts and remove the
wheel.
2.Remove accumulations of mud or dirt from
the mounting surfaces of the wheel and
hub. Clean the lug bolts.
3.Position the new wheel or spare tire on the
hub and screw in at least two bolts diago-
nally.
When you mount wheels other than Genu-
ine BMW light-alloy wheels, different lug
bolts may also be required.
4.Screw in the remaining lug bolts. Tighten all
the bolts securely in a diagonal pattern.
5.Lower the vehicle and remove the jack from
beneath the vehicle.
After mounting
1.Tighten the lug bolts in a diagonal pattern.
To ensure safety, always have the
lug bolts checked with a calibrated
torque wrench as soon as possible to
ensure that they are tightened to the speci-
fied torque. The tightening torque is
100lbft/140Nm.<
2.Reverse the removal sequence when stor-
ing the wheel and tools in the vehicle.3.Check and correct the tire inflation pressure
at the earliest opportunity.
Use valve stem seal caps to protect
valve stems from dirt and contamina-
tion. Dirt in valve stems is a frequent source
of gradual air loss.<
4.Reinitialize the Flat Tire Monitor, refer to
page90, or reset the Tire Pressure Monitor,
refer to page92.
5.Replace the damaged tire as soon as possi-
ble and have the new wheel/tire balanced.
Driving with spare tire
On certain wheel-tire combinations, the
size of the spare tire differs from that of
the rest of the tires. The spare tire is fully capa-
ble of running in all load and speed ranges.
However, to recreate the original conditions,
the tire should be replaced as soon as possi-
ble.<
Vehicle battery
Maintenance
The battery is 100 % maintenance-free, i.e., the
electrolyte will last for the life of the battery
when the vehicle is operated in a temperate cli-
mate. Your BMW center will be happy to advise
you on all questions concerning the battery.
Charging battery
Charge the battery in the vehicle only via the
terminals in the engine compartment and with
the engine off. Connections, refer to Jump
starting on page220.