2008 AUDI TT ROADSTER tires
[x] Cancel search: tiresPage 259 of 316
________________________________________________ T_ i _r_e _s_ a_n_ d_ w_ h_ e_e _ l_s __ !II
•
• After any impact, immediately inspect your tires or have them
inspected by the nearest authorized Audi dealer. Replace a
damaged tire as soon as possible .
• Inspect your tires every 2,000 miles (3,000 km) for damage and
wear . Damage is not always easy to see. Damage can lead to loss of
air and underinflation, which could eventua lly cause tire fai lure . If
you believe that a tire may have been damaged, replace the tire as
soon as possible .
• These tires may wear more quickly than others.
• Please a lso remember that, whi le these tires deliver responsive
handling, they may ride less comfortably and make more noise than
other choices.
R edu ced p erform an ce in w in te r/ c o ld sea son
co nditi ons
All tires are designed for certain purposes. The low aspect ratio,
ultra high performance tires originally installed on your vehicle are
intended for maximum dry and wet road performance and hand ling.
They are not suitable for cold, snowy or icy weather conditions . If
you drive under those circumstances, you should equip your vehicle
with al l- season or winter tires, which offer better traction under
those conditions . We suggest you use the recommended snow or
a ll- season tires specified for your vehicle, or their equivalent .
Refer to=>
page 254 for more detai led in formation regarding winter
tires. •
Run-flat tires
Applies to vehi cles : w ith R un-f lat tires
Introduction
Run-flat tires help keep you moving if a tire goes flat.
Reinforced s idewalls give the ti res run -flat capability if tire pressure
is lost . We recommend that run-flat tires only be mounted on vehicles that
we
re origina lly equipped with these special tires at the fac tory and
have a Tire Pressure Monitoring System .
Run-flat t ires can be ident ified by the letter s "RSC" on the tire side
wall.
If you do change the tires on your vehic le from normal to run -flat
tires, you must buy the special rims required for run-flat tires, and
the Tire Pressure Monitoring System must be reprogrammed by an
authorized Audi dea ler or other qualified workshop.
Wh at do run-fl at tir es do?
These special t ires have run-flat capabi lities that he lp keep you
moving if a tire loses pressure and goes flat. Under favorable condi
t ions tires can be driven
at least 30 miles (50 km ), but you must not
drive
f as ter t han 50 mph (80 km/h i=> page 258 , "Driving with run
flat t ires".
The Tire Pressure Moni toring System constantly checks the air pres
sure in the tires. If the run -flat system is active (shown in the center
display), you must inspect the affected tire or tires and then decide
whether to continue driving . Be sure to follow these tips
=>
page 258, "Driving with run-flat tires" .
When it is not po ssibl e to continue driving , even with
run -fl at tire s?
• If the Electronic Stabilization Program (ES P) is not working or
keeps coming on.
• If the Tire Pressure Monitoring System does not work.
• If the tire has been severely damaged, in a crash , for example .
The tread can separate from a damaged tire as the wheel turns, and
hit parts of the vehicle , such as the fue l tank filler neck, fuel lines or
brake lines.
• Do not continue driving if severe vibration occurs or if the tire
starts to smoke because the tire is running hot.
• Do not continue driving if damage to the tire, such as cracks in
the s idewall, appears .
~
Vehicle care I t •
Page 260 of 316
-Tires and wheels
---------------------------------------------
& WARNING
Improper use of run-flat tires can cause vehicle damage that can
lead to loss of vehicle control, a crash and serious personal injury.
• Run-flat tires can only be used with special rims.
• Run -flat tires must always be monitored with a properly
programmed Tire Pressure Monitoring System.
• Always inspect a tire that has lost air to make sure it is safe to
drive with the tire in the run-flat mode .
• Never drive with run-flat tires that have been damaged in a
collision.
• Never drive with run-flat tires if heat build-up causes the tire to
give off smoke.
• Never drive with run-flat tires if the vehicle shakes or vibrates
severely.
• Never drive with a run-flat tire that develops sidewall cracks or
other damage while in use.
0 Note
Run -flat tires have special characteristics and requirements, that are
very different from conventional tires . Run-flat tires require special
rims for run -flat use and cannot be used on conventional wheel
rims .
[ i] Tips
• If you are not able to continue driving with run-flat tires, please
seek professional assistance.
• Please contact your authorized Audi dealer or Audi of America,
Inc. if you have questions about tires and rims. •
Applie s t o vehic le s: wi th Run -flat tires
Driving with run-flat tires
Handling characteristics change when tire pressure is
low.
Driving on tires with low tire pressure changes the way a
vehicle handles, particularl y when cornering and braking.
The handling characteristics of run-flat tires do not seem to
change a lot even when driving on low pressure or in the
run -flat mode . Nevertheless you must still take special
precautions when operating a vehicle on run-flat tires when
tire pressure is low o r the tire(s) is flat:
- The Electronic Stabilization Program (ESP) must be
switched on.
- Never drive faster than 50 mph (80 km/h)~ &.
- Plan ahead when driving and anticipate what you will
have to do considering traffic and road conditions up
ahead.
- Accelerate carefully.
- Avo id unnecessary and sudden steering and braking
maneuvers .
- Reduce your speed in plenty of time before intersections,
curves and other places where you may have to react
quickly.
P lease see:=:, page 257, "When it is not possible to continue driving,
even with run-flat tires?" ..,_
Page 261 of 316
________________________________________________ T_ i _r_e _s_ a_n_ d_ w_ h_ e_e _ l_s __ lfll
•
Handling characteristi cs change wh en dri ving with
low air pressure or with flat tires even with special run
flat tires
A low pressure or flat front tire affects vehicle hand lin g charac te ri s
t ics by pulling the vehic le slightly to the side where the tire is
mounted and reduces brak ing performance .
A low pressure or flat
rear tire also affec ts driving c haracteristics by
pul ling to the side where th e tire is mounted and also reduces
b raki ng per for mance . T he ef fec t o n ve hic le han dlin g is most n otice
able when driving around curves .
& WARNING
Changed vehicle handling characteristics when driv ing in the run
flat mode can cause lo ss of vehicle control , a crash and serious
personal injury .
• Driving on special run-flat tires in the run -flat mode will change
vehicle handling characterist ics during braki ng , when cornering
and under heavy acceleration .
• Never drive faster than the max imum rated speed of 50 mph
(80 km /h) when driving in the run -flat mode .
• Always adjust vehicle speed to traffic , road and weather condi
tions and drive slower than the maximum rated speed if nece ssary
weather and road conditions are taken into ac count .
• Always obey speed limits and other traffic laws .
0 Note
We always recommend driv ing with even more care when using
these special tires in the run -flat mode. A lways avoid sudden
m aneuvers. •
Applies to vehic les: with Run-f lat tires
Replacing run -flat tires and rims
Y our vehicle was especi ally des igned to use special run
fl at t ires.
You may use and c ombi ne o nly approved run -flat t ires a nd specia l
matching rims that have been designed for run -flat tires. Mounting
special run -fla t tires o n stan dard wheels w ill not work and wi ll not
provide the advantages fo the run -falt feature. Never us e special
run-flat tir es o n standard whee l rims.
After driving with a tire in the run -f lat mode, always have the vehicle
and affected tire(s) and rim(s) inspected by an a uthorized Audi
dea ler. T ires tha t have been driven i n the run -fla t mode mus t be
replaced.
& WARNING
Use of damaged run-flat tires and rims c an cause vehicle damage
that can lead to loss of vehicle control , a crash and serious
personal injury.
• Always have the vehi cle and affected tire (sl and rim(s )
inspe cted by an authorized Audi dealer after driving a tire in the
run -flat mode .
• Tires that have been driven in the run -flat mode must be
repla ced .•
Vehicle care
I t •
Page 265 of 316
_____________________________________________ W_ h_ a_t _d.....;. o_ l _d _o :....:.. n:..o:.. w.:....... ?:....:..--Jffllll
& WARNING
• Using a bumper jac k to raise the vehicle will damage the
bumper system . The jack may slip , causing injury .
• Never support your veh icle on cinder blocks , bri cks or other
obje cts. The se may not be able to support the load and could
c ause injury when they fail.
• Never start or run the engine while the vehicle is supported by
the jack .
• If you mu st work under the vehicle, always use safety stands
specifically des igned for this purpose .
• Never use the he xagonal socket in the handle of the screw
driver to loo sen or tighten the wheel bolts . •
Tire repair
App lies to vehicles: with Tire Mob ility System
General and safety pointers
Tire repair is in tended only for te m porary, shor t- te rm use.
®
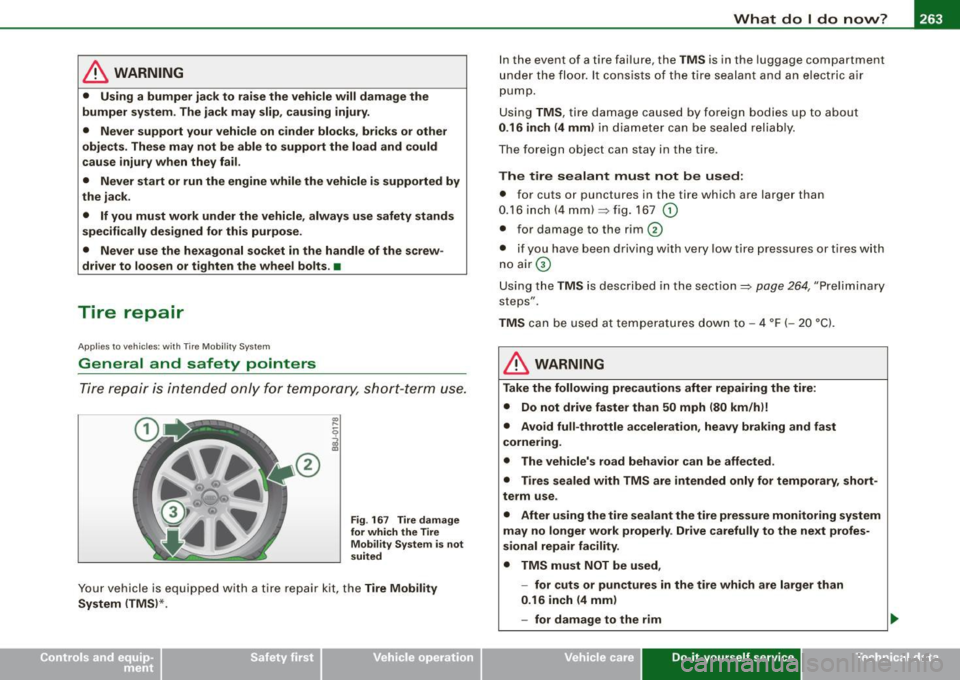
Fig . 16 7 Tire damage
for which the Tire Mobility Sy stem is not
suited
Your vehicle is equipped with a tire repai r kit, the Tire Mobil ity
System (TMS) *. I
n the event of a tire fai lure, the TMS is in the luggage compartment
u nde r th e floo r. It cons ists of the tir e sealan t and an el ectric a ir
pump .
U sing TMS, tire damage caused by foreign bodies up to about
0 .16 inch (4 mm ) in diam eter can be seale d relia bly.
T he foreign object can stay in the tire .
The tire sealant must not be used:
• for cuts or punctures in the tire which are large r than
0.16 inch (4 mm)~ fig . 167
G)
• for damage to the rim 0
• if you have been driving with very low tire pressures or tires w ith
n o air G)
Using the TMS is described in the section~ page
264, "Preliminary
steps" .
TMS can be used a t te m peratures down to -4 °F ( -20 °C).
& WARNING
Take the following precautions after repairing the tire :
• Do not drive faster than 50 mph (80 km /hi!
• Avoid full -throttle acceleration , heavy braking and fast
cornering .
• The vehicle's road behavior can be affe cted .
• Tires sealed with TMS are intended only for temporary , short
term use .
• After using the tire sealant the tire pressure monitoring system
m ay no longer work properly . Drive carefully to the next profes
s ional repair facility.
• TMS must NOT be used ,
- for cuts or punctures in the tire whi ch are larger than
0 .16 inch (4 mm )
- for damage to the rim
Vehicle care Do-it-yourself service irechnical data
Page 266 of 316
1111...__W_ h_ a _ t_d_ o_ l _d _o_ n_ o_ vv_ ? ______________________________________________ _
& WARNING (continued)
-if you have been driving with very low tire pressures or tires
with no air
• Seek professional assistance if it is not possible to repair the
tire with the tire sealant.
& WARNING
The tire sealant must not come into contact with skin, eyes or
clothing.
• If you get any tire sealant
in your eyes or come into contact
with it, rinse the affected area thoroughly with clean water. Find a physician immediately!
• Change any clothing contaminated with tire sealant immedi
ately.
• Do not inhale the vapor!
• If you have swallowed tire sealant, rinse your mouth thor
oughly right away and drink plenty of water .
- Do not induce vomiting! Find a physician immediately!
• If you have allergic reactions, find a physician immediately .
• Keep the tire sealant away from children .
0 Note
Do not use commercially available tire sealants. The electrical
components of the tire pressure monitoring system will no longer
work properly.
'i> For the sake of the environment
Used sealant bottles can be dropped off at a recycling facility.
[ i] Tips
• If sealant has run out, allow it to dry. Then you can peel it off.
• Have the tire sealant replaced every 4 years at a dealership. •
Applies to vehic les: with T ire Mob ility System
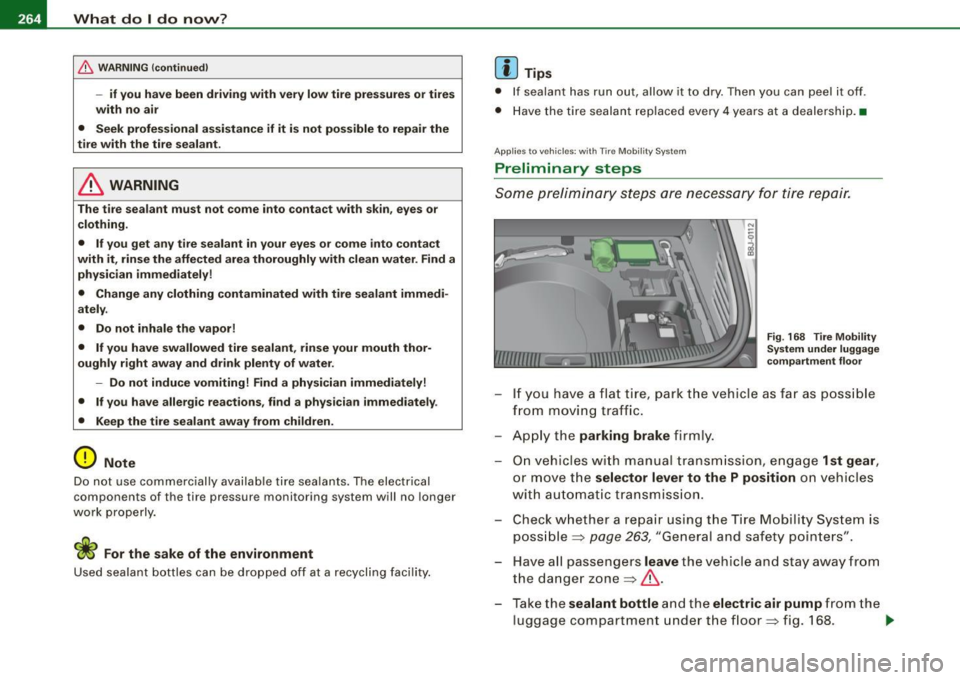
Preliminary steps
Some preliminary steps are necessary for tire repair .
Fig. 168 Tire Mobility
System under luggage
compartment floor
- If you have a flat tire, park the vehicle as far as possible
from moving traffic.
- Apply the
parking brake firmly.
- On vehicles with manual transmission, engage
1st gear,
or move the selector lever to the P position on vehicles
w ith automatic transmission.
- Check whether a repair using the Tire Mobility System is
possible~
page 263, "General and safety pointers".
Have all passengers
leave the vehicle and stay away from
the danger zone~&.
- Take the
sealant bottle and the electric air pump from the
luggage compartment under the floor ~ fig. 168. .,_
Page 273 of 316

What do I do now? -
----------------
•
-Screw the threaded end of the alignment pin from the
tool kit hand-tight into the now vacant bolt hole
=:> page 270, fig. 177.
- Then completely unscrew the other wheel bolts as
described above.
- Take off the wheel leaving the alignment pin in the bolt
hole.
Putting on the wheel
- Lift the spare wheel and carefully slide it over the align
ment pin to guide it in place.
- Use the hexagonal socket in the screwdriver handle to
screw in and tighten all wheel bolts slightly.
- Unscrew the alignment pin and insert and tighten the
remaining wheel bolt slightly like the rest.
- Turn the jack handle counter -clockwise to lower the
vehicle until the jack is fully released.
- Use the wheel bolt wrench to tighten all wheel bolts
firmly =:> page 268. Tighten them crosswise, from one
bolt to the (approximately) opposite one, to keep the
wheel centered.
[ i J Tips
Never use the hexagonal socket in the handle of the screwdriver to
loosen or tighten the wheel bolts.
• Pull the reversible blade from the screwdriver before you use the
hexagonal socket in the handle to turn the wheel bolts.
• When mounting tires with
unidirectional tread design make sure
the tread pattern is pointed the right way~
page 272.
• The wheel bolts should be clean and easy to turn. Check for dirt
and corrosion on the mating surfaces of both the wheel and the
hub . Remove all dirt from these surfaces before remounting the
wheel. •
Notes on wheel change
Please read the information~ page 249, "New tires and replacing
tires and wheels", if you are going to use a spare tire which is
different from the tires on your vehicle.
After you change a tire:
• Check the tire pressure on the spare immediately after
mounting.
• Have the wheel bolt tightening torque checked with a torque
wrench as soon as possible by your authorized Audi dealer or a qualified service station .
• With steel and alloy wheel rims, the wheel bolts are correctly
tightened at a torque of 90 ft lb (120 Nml.
• If you notice while changing a tire that the wheel bolts are
corroded and difficult to turn, then they should be replaced before
you check the tightening torque.
• Replace the flat tire with a new one and have it installed on your
vehicle as soon as possible. Remount the wheel cover.
Until then, drive with extra care and at reduced speeds.
& WARNING
• If you are going to equip your vehicle with tires or rims which
differ from those which were factory installed, then be sure to read
the information
~ page 249, "New tires and replacing tires and
wheels".
• Always store the tools securely in luggage compartment.
Otherwise, in an accident or sudden maneuver they could fly
forward, causing injury to passengers in the vehicle.
Do-it-yourself service
Page 274 of 316

-What d o I d o now ? PU:I...__ ______________ _
0 Note
Do not use commercially available ti re sealants . Otherwise, the elec
trical components of the tire pressure monitoring system * wi ll no
longer work properly and the sensor for the tire pressure moni
toring system will have to be replaced by a qua lified workshop. •
Tires with unidirectional tread design
Tires with unidirec tional tread design must be mounted
with their tread pattern pointed the right direction.
A unidirectional tire can be identified by arrows on th e sidewall ,
which point in the direction of the rotation . You must fol low the
specified direction of rotation. This is necessary in order for these
tires to deve lop their optimum characteristics regarding grip, road
noise, wear, and hydroplaning. •
Page 302 of 316

___ A---" lp_h_ a_b_ e_ t_ i_ c _ a_ l_ in_d_ e_x ______________________________________________ _
A
A/C operation
Climate control
ABS 102
See Anti -Lock Brake System . . . . . . . . 189
Accessories . . . . . . . . . . . . . . . . . . . . . . . . 296
Acoustic park assist rear .. .... .. ... ... ....... .... .. .
Acoustic parking system
Adaptive Light 109
109
defective . . . . . . . . . . . . . . . . . . . . . . . . 36
Adaptive light . . . . . . . . . . . . . . . . . . . . . . . 72
Adding Engine coolant ... .... ........... 228
Engine oil ....................... 225
Windshield washer fluid . . . . . . . . . . 236
Additiona l accessories .. ...... ...... . 296
Additives Engine oi l ....................... 225
Adjustable steering column .......... 105
Adjusting front seats ... .. .... .... .... 87
Adjusting steering column ...... .. ... 105
Adjusting the seats ...... .... ........ 89
Advanced Airbag System Children ........................ 169
Components .. .................. 153
Front airbags ......... .... ...... . 151
How the components work together 154
Monitoring . . . . . . . . . . . . . . . . . . . . . . 157
Weight -sensing mat .. .. .. .... .... 169 Air distribution
Climate control
Air recirculation mode Climate control ...... .... ... .. .. .
Air vents Climate control
Airbag 101
102
102
Warning/indicator lights ..... ...... 19
Airbag system . . . . . . . . . . . . . . . . . . 146, 165
Care ... ........... .... .... ...... 160
Child restraints ............ .... .. 170
Components (front airbags) .. ... ... 153
Danger of fitting a child safety seat on the front passenger seat . . . . . . . . . . . . 147
Disposal . . . . . . . . . . . . . . . . . . . . . . . . 160
Front airbags ................. ... 150
How do the front aiirbags work? . . . . 155
How many airbags does my vehicle have?
153
Important safety instructions on the knee airbag system .......... ....... . 163
Important things to know ......... 146
Indicator light .. ..... ....... ..... 157
Knee a irbags .. ...... ......... ... 161
Monitoring . . . . . . . . . . . . . . . . . . . . . . 157
PASSENGER AIR BAG OFF light ... .. 157 Alternator
See Generator . . . . . . . . . . . . . . . . . . . . 19
Anti -freeze
See Engine coolant system ...... .. 227
Anti-glare inside day-night mirror ...... 82
Anti-Lock Brake System .............. 189
Anti -lo ck brake system
Warning/indicator lights . ...... .... . 20
Anti-Slip Regulation System (ASR) How the system works . . . . . . . . . . . . 186
Anti-theft systems Anti-Theft Alarm System ........... 56
Electronic immobilizer ............. 49
Ashtray .............. ........... .... 94
ASR How the Anti-Slip Regu lation System
works ......................... 186
Asterisk What does it mean when something is
marked with an asterisk? ... .... .... 6
Audi magnetic ride .... .... ..... .. 17, 112
Description .... .... .... ...... .... 112
Indicator light .... .... ............ 17
Audi Service Repair Manuals and Literature .
294
Repairs .. .... ....... ...... .... .. 160 Auto Safety Hotline . .... .... .... ..... 136
Side airbags . ........ ....... ..... 164 Auto-Check Contro l ................... 29
When must the system be inspected? . . . Automatic transmission ............ 31
157 Auto-Check -Control
All Wheel Drive . . . . . . . . . . . . . . . . . . . . . 191
Alloy wheels . . . . . . . . . . . . . . . . . . . . . . . 207 Manual
transmission
Automatic belt retractor 31
141
air conditioning All-wheel drive Automatic car wash
Temperature .. ............ ... ... 100 Winter tires ..................... 254 See Washing .................. .. 201