2008 AUDI TT ROADSTER ECO mode
[x] Cancel search: ECO modePage 90 of 316

Seats and storage
-Position the head restraint according to the occupant's
height=>
page 92. For maximum protection, the top of
the head restraint should be at least at eye level, prefer
ably higher and ideally level with the top of the head
=>
page 132, fig. 120.
& WARNING
Never place any objects in the driver's footwell. An object could
get into the pedal area and interfere with pedal function. In case
of sudden braking or an accident, you would not be able to brake
or accelerate! •
Front passenger's seat
Always move the front passenger seat into the rearmost position.
To avoid contact with the airbag while it is deploying, do not
sit any closer to the instrument panel than necessary and
always wear the three-point safety belt provided adjusted
correctly. We recommend that you adjust the passenger's
seat in the following manner:
- Move the front passenger seat into the rearmost position
of the fore and aft adjustment range=>
& in "Why is
your seat adjustment so important?" on
page 87.
- Bring the backrest up to an (almost) upright position. Do
not ride with the seat reclined.
- The ideal position for the head restraint is with the upper
edge of the restraint level with the top of your head
=> page 92. You should not lower the top of the restraint
below the level of your eyes. -
Place your feet on the floor in front of the passenger's
seat. •
Adjusting front seats manually
Applie s to vehicles: with manua l seat ad justment
Adjustment controls
Various controls on the manual seats provide a wide
range for individual adjustments.
(D Moving the seat forward or backward
® Adjusting the lumbar support~ page 91
G) Adjusting the seat height
© Adjusting the seatback angle
[ i] Tips
Fig . 80 Adjustment
controls: locations on
driver's seat
Some of the controls are fitted on certain models only or they are
optional equipment. •
Page 100 of 316

Warm and cold
Warm and cold
Climate controls
Controls
The air conditioning automatically maintains the selected
temperature in the vehicleinterior throughout each
se aso n.
Fig . 93 C limate co ntro ls
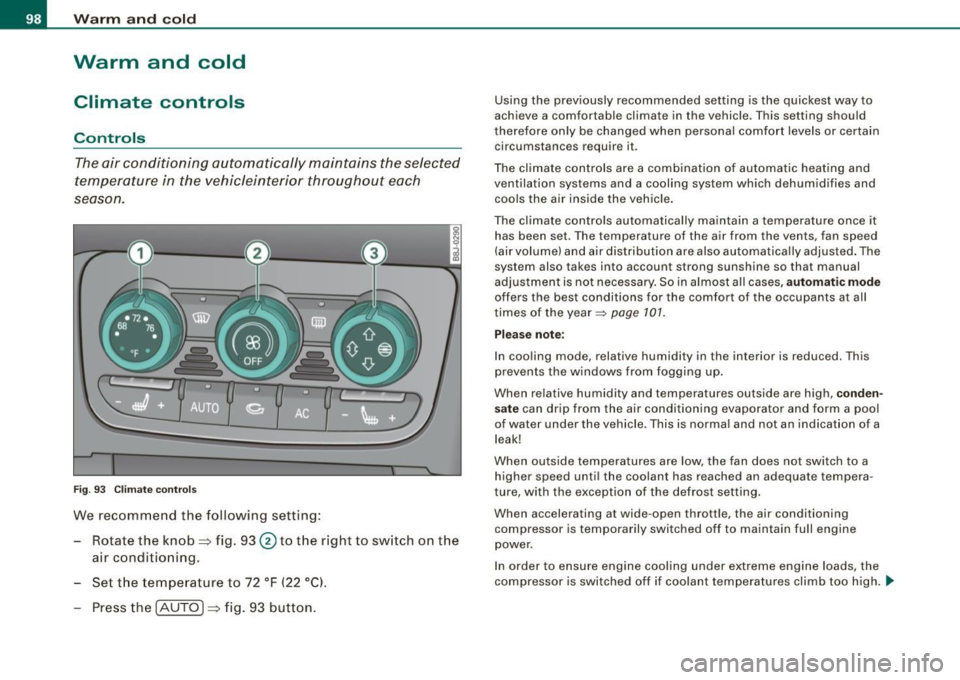
We recomme nd the following setting:
Rotate the knob=> fig. 93 @to th e right to switch on the
air conditioning.
Set t he temperature to 72 °F ( 22 °Cl.
Press th e !AUTO ]=> fig . 93 button.
Using the previously recommended setting is the quickest way to
achieve a comfortable climate in the vehicle . T his setting should
therefore on ly be changed when persona l comfort levels or certain
circumstances require it .
The climate contr ols are a combination of automatic heating and
ventilation systems and a cooling system which dehumidifies and coo ls the a ir inside the veh ic le .
The climate controls automa tically ma intain a temperature once it
has been set . T he temperature of the air from the vents, fan speed
(air volume) and air dis tribution are also automa tica lly adjusted . The
system also takes into account strong sunshine so that manual
adjustment is no t necessary. So in al most a ll cases,
automatic mode
offers the best conditions for the comfort of the occupants at all
times of the year~
page 101.
Please note :
In cooling mode, relative humidity in the interior is reduced. This
prevents the w indows from fogging up.
When relative humidity and temperatures outside are high,
conden
sate
can drip from the air conditioning evaporator and form a poo l
of water under the vehicle . This is normal and not an indication of a
leak!
When outside temperatures are low, the fan does not switch to a
higher speed until the coolant has reached an adequate tempera
ture, with the exception of the defrost setting .
When accelerating at wide -open throttle, the air conditioning
compressor is temporarily switched off to maintain full engine
power .
I n order to ensure eng ine cooling under extreme engine loads, the
compressor is switched off if coolant temperatures climb too high. _,,,
Page 104 of 316
![AUDI TT ROADSTER 2008 Owners Manual • ..__w_ a_ r_m _ a_ n_d_ c_ o_ ld __________________________________________________ _
Manual air recirculation mode[~]
The recirculation mode prevents polluted outside air from
enteri AUDI TT ROADSTER 2008 Owners Manual • ..__w_ a_ r_m _ a_ n_d_ c_ o_ ld __________________________________________________ _
Manual air recirculation mode[~]
The recirculation mode prevents polluted outside air from
enteri](/manual-img/6/57671/w960_57671-103.png)
• ..__w_ a_ r_m _ a_ n_d_ c_ o_ ld __________________________________________________ _
Manual air recirculation mode[~]
The recirculation mode prevents polluted outside air from
entering the vehicle interior.
Switching on air recir culation
- Press the button [19.] ~ page 98, fig . 93 ~ & .
Swit ching off air recir culation
Press the butt on [19.] ag ain, o r
Press the
[AUTO I button, or
- Press the[@] button.
In recircu lation mode, air is drawn from the vehic le interior, filtered,
and recircu lated. We recommend that you se lect recircu lat ion mode
briefly ~ & under the fo llowing conditions:
When driving through a tunnel or i n a traffic jam so that exhaust
fumes and odors cannot enter the vehic le interior .
& WARNING
You should not u se the re circulat ion mode for an e xtended period
s ince no fre sh air i s drawn in , and with the air conditioning
s wit ched off the windows can fog up -this in crea se s the ris k of an
accident !•
A /C operation [AC)
Switching on A /C
- Press th e [AC] button~ page 98, fig. 93 .
Switching A /C off
- Press the [AC] button again.
The cooling system is switched on during A/C operation - the
heating and ven tilation system is controlled automatica lly.
I i ] Tips
If the LED in the switch stays on after A/C operation has been
switched off( = switching the A/C offl, there is a fau lt in an air condi
t ioning component. Please consult an authorized Audi dealer when
there is an operating prob lem .•
Air vents
Air d istribution determines the air flow fro m the indi
vi dual vents.
Fig . 97 Instrumen t pan el: Loc ation o f air vent s
Vents @and 0
- To open and close the outlets, t urn the adjusting ring.
Page 105 of 316

___________________________________________________ W_ a_ r_m _ a_ n_d_ c_ o_ ld _ __.11111
- To adjust the direction o f the airflow from the o utlet,
move the tab in the cen ter of the o utlet in the desired
direction . The direction of the air delivered from the
vents can be adjusted hor izontally and vertically .
G) Air flows to the windshield and the driver and front passenger
side windows
@ Air flows to the driver/fron t passeng er or to the driver and front
passenger side windows
© Air flows to the driver/front passenger
© Air flows to the footwe ll
Using the rotary knob, you can adjust air distribution=>
page 101 so
that air flows from specific vents=>
page 102, fig. 97.
Heated or unheated fresh air, or cooled air flows from the vents.
[ i ] Tip s
If climate control is running in cooling mode, air should flow mainly
from vents @ and
G). To achieve adequate coo ling, you should
never c lose the outlets completely .•
Using the climate controls economically
Economical use of the climate controls helps to save fuel.
When climate co ntrol is w orking in c ooling mode, engine
performa nce is reduced and fuel consum ption is affected .
To keep the t ime the air cond itioning is on as s hort as
poss ible, you s hould do the following :
- If yo u would like to save fue l, sw itch the air con ditioning
off .
- If you open t he windows while driving, switch the air
conditio ning off .
Contro ls and eq uip
ment
- If the ve hicle is extremely hot due to the heat of the sun,
br ie fl y open doors and windows .
c£> For the sake of the environment
When you save fuel, you reduce emissions from the vehicle .•
Rear window defogger [ffiJ
The rear window defogger clears the rear window of
condensation.
F ig . 9 8 Switc h for rear
w ind ow defo gg er
- Press the [ml button to turn t he rear window defogger on
and off.
The rear window defogger works only when the engine is running .
The indicator light in the button illuminates when the rear window
defogger is turned on .
The rear window defogger is switched off automatica lly after 10 to
20 m inutes, depending on the outside temperature .
At very low outside temperatures, the rear window defogger can be switched on continuously by pushing the
Qii) button for more than 2
seconds. This remains stored until the ignition is switched off . A ..,
Vehicle care I I Technical data
Page 109 of 316

___________________________________________________ O _n_ t_h _ e_ r_ o _ a_ d __ ,n
Starting and stopping the engine
Starting the engine
The engine can only be started with on original Audi key
and the clutch pedal* depressed.
- Set the parking brake.
Move the selector lever to the neutral position (automatic
transmission: selector lever in P or N)
~ & .
- On vehicles with manual transmission, fully depress the
clutch pedal.
- Turn the ignition key to position
G) ~ page 106, fig. 101
- do not depress the gas pedal when starting the engine!
- Let go of the key as soon as the engine starts.
A cold engine may at first be loud after it has been started. This is
due to the hydraulic valves building up the oil pressure . This normal
and no need for concern.
If the engine does not star t immediately, stop trying after 10
seconds and then try to restart the engine about 30 seconds later.
& WARNING
Never start or let the engine run in a confined or enclosed area.
Exhaust fumes from the engine contain carbon monoxide, a color
less and odorless gas. Carbon monoxide can be fatal if inhaled .
• Never leave the engine idling unattended. An unattended
vehicle with a running engine poses a danger of personal injury or
theft.
Controls and equip
ment
0 Note
• Avoid high engine speeds, fast acceleration or heavy engine
loads while the engine is still cold. This could damage the engine.
• The engine cannot be started by pushing o r towing the vehicle.
~ For the sake of the environment
To avoid unnecessary engine wear and to reduce exhaust emis
sions, do not let your vehicle stand and warm up. Be ready to drive
off immediately after starting your vehicle. Maintain moderate
speed until the engine is completely warm. Remember, the engine
performs best at operating temperature. •
Stopping the engine
-Turn the ignition key to position G) ~ page 106 , fig. 101.
& WARNING
• Never turn off the engine until the vehicle has come to a
complete stop.
• The brake booster and servotronic only work when the engine
is running . With the ignition turned off, you have to apply more
force when steering or braking. Since you cannot steer and stop
normally, this can lead to accidents and serious injuries.
• The radiator fan can continue to run for up to 10 minutes even
after you have turned off the engine and removed the ignition key.
The radiator fan can also turn on again if the engine coolant heats
up because of intense sunlight or heat build-up in the engine
compartment. .,
I • •
Page 121 of 316

_______________________________________________________ T_ r _a_ n_s_ m __ is_ s_ io_ n _ __.1111111
Downshifting
- Tap the selector lever backward (in the tiptronic setting)
o.
Switching to manual can be carried out with the vehicle stationary
as well as moving .
When accelerating, the transmission shifts into the next gear in
gears 1, 2, 3, 4 and 5 shortly before the maximum permissible
engine speed is reached.
If you have selected a lower gear than the current one, the transmis
sion wil l only shift down when the engine cannot be overspeeded.
If kick -down is actuated, the transmission shifts into a lower gear
independently of speed and engine rpm.•
Applies to vehicles: with S tron ic® and with T iptronic controls on the s tee ring wheel
Steering wheel with Tiptronic ® controls
The selector paddles allow the driver to keep both hands
on the steering wheel when shifting gears.
Shifting up
F ig . 112 S port
stee ring w he el wi th
se lector paddl es
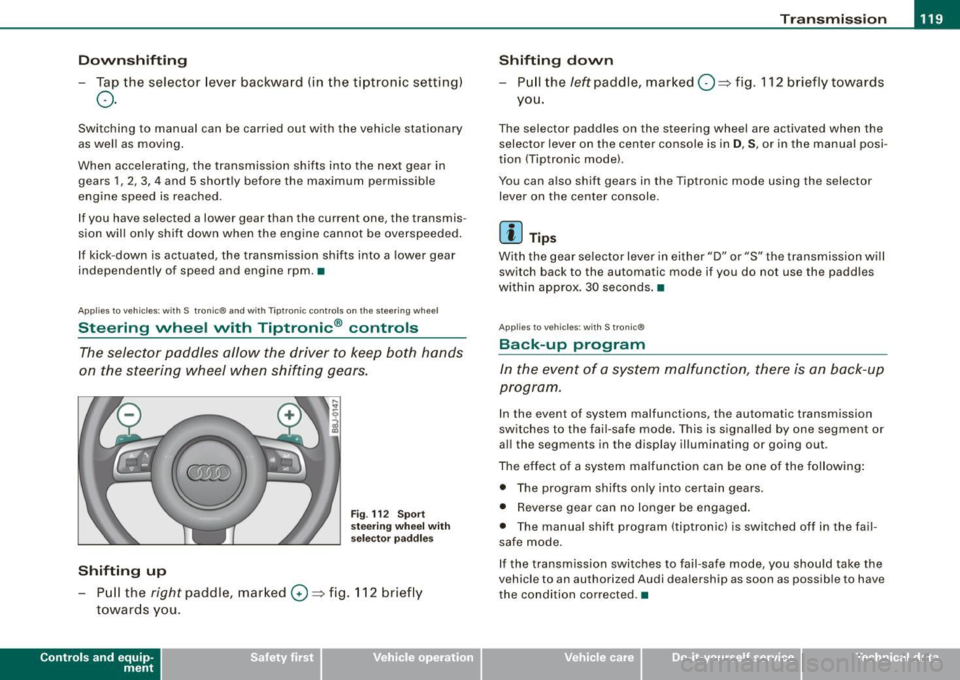
- Pu ll the right paddle, marked 0 => fig . 112 briefly
towards you .
Contro ls and eq uip
ment
Shifting d own
Pull the left paddle, marked O ::::> fig. 112 brief ly towards
you .
The selector paddles on the steering wheel are activated when the
selector lever on the center console is in
D, S, or in the manual posi
tion (Tiptronic model.
You can also shift gears in the Tiptronic mode using the selector
lever on the center console .
[ i ] Tips
With the gear se lector lever in either "D" or "S" the transmission wi ll
switch back to the automatic mode if you do not use the paddles
within approx . 30 seconds .•
App lies to vehic les: w ith S tronic®
Back -up program
In the event of a sys tem malfunction, there is an back-up
program .
In the event of system malfunctions, the automatic transmission
switches to the fai l-safe mode . This is signa lled by one segment or
al l the segments in the display illuminating or going out.
The effect of a system ma lfunction can be one of the fo llowing :
• The program shifts only into certain gears.
• Reverse gear can no longer be engaged .
• The manua l shift program (tiptronicl is switched off in the fail
safe mode.
If the transmission switches to fail-safe mode, you should take the
vehicle to an authorized Audi dea lership as soon as possible to have
the condition corrected .•
Vehicle care I I irechnical data
Page 123 of 316

HomeLink® -_______________ ___.
Homelink®
Universal remote control
Applies to veh icles: wit h Home link® unive rsa l rem ote cont rol
General information
The Homelink® feature can learn up to three radio
frequency codes for most current transmitters used for
operating garage doors, estate gates, home or outdoor
lighting systems, and other devices.
You must first program the Homelink® transmitter before you can
use the system~
page 121, "Programming the Homelink® trans
mitter" .
In order to program the Homelink® transmitte r for devices utili zing
rolling cod e, a second person on a ladder who can safely reach the
garage door opener motor is recommended. It is also necessary to
locate the "learn" button on your garage door opener motor . Refer
to the operating instructions for the opener, as the location and
color of this button may vary by manufacturer .
You can still use the original remote control for the device at any
time .
& WARNING
• Never use the Homelink"" transmitter with any garage door
opener that does have not the safety stop and reverse feature as
required by federal safety standards. This includes any garage
door opener model manufactured before April 1, 1982.
• A garage door opener which cannot detect an object, signaling
the door to stop and reverse does not meet current federal safety standards. Using a garage door opener without these features
increases risk of serious injury or death .
Con tro ls and eq uip
ment
& WARNING (continued)
• For safety reasons never release the parking brake or start the
engine while anyone is standing in front of the vehicle.
• A garage door or an estate gate may sometimes be set in
motion when the Homelink® remote control is being
programmed .
If the device is repeatedly activated, this can over
strain motor and damage its electrical components -an over
heated motor is a fire hazard!
• To avoid possible injuries or property damage, please always
make absolutely certain that no persons or objects are located in
the range of motion of any equipment being operated. •
Applies to vehi cles : wit h Home link ® un iv ers al re mote co ntrol
Programming the Homelink ® transmitter
The transmitter is programmed in two phases. For rolling
code transmitters, a third phase is also necessary.
0
Vehicle care I I
Fig. 115 Overhead
console: Homelink®
keypad ...
irechnical data
Page 124 of 316

-L_!H~o~m~ e~L:!!in~ k~®~------------------------------------------------
Fig . 116 Front bumper ,
driver side: location of
transmitter unit
Phase 1: programming the overhead keypad
1. Make sure your vehicle is within operating range of the
remote controlled garage door opener.
2. Set the parking brake::::,
& in "Genera l information".
3. Turn the ignition on. Do not start the engine!
4. Press and hold the two outside Homelink® buttons
(D
and @f or approxim~tely 20 sec_onds until indicator
light@::::,
page 121, fig. 115 begins to flash. Then
release both buttons. Do not hold the buttons for longer
than
30 seconds.
- This procedure only needs to be performed
once. It
erases the factory-set default codes and does not have to
be repeated to program additional remote controls.
5. Press and hold the Homelink® button
(D , ® or @ until
the indicator light@starts flashing
slowly. Release the
button.
- The system will remain in programming mode for 5
minutes.
Go to the front of the vehicle and proceed with
phase 2.
Phase 2:
programming the bumper mounted transmitter
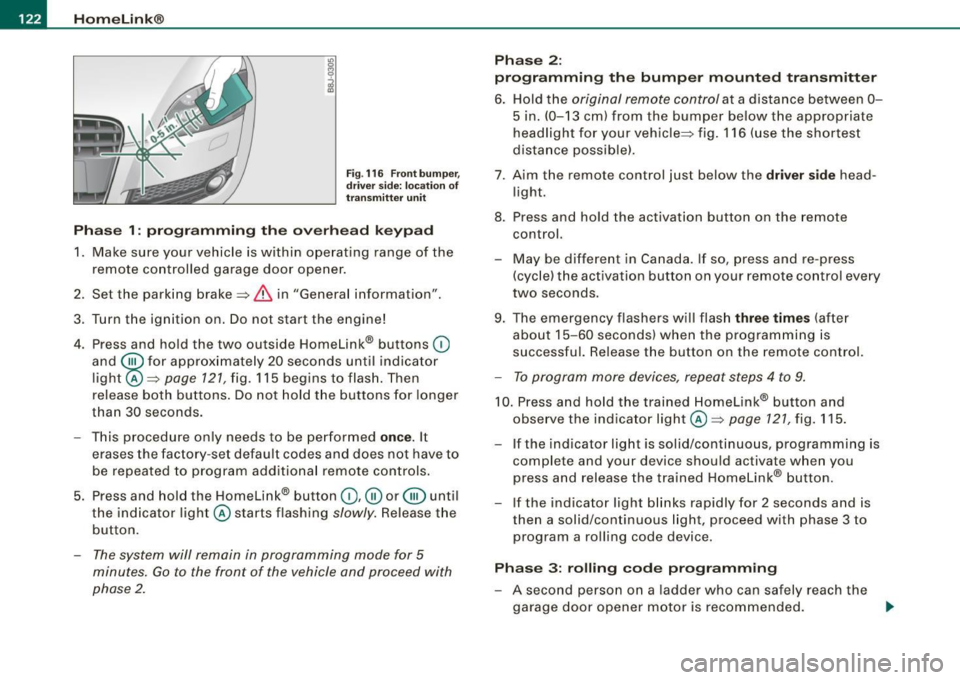
6. Hold the original remote control at a distance between 0-
5 in. (0-13 cm) from the bumper below the appropriate
headlight for your vehicle::::, fig.
116 (use the shortest
distance possible).
7 . Aim the remote control just below the driver side head
light.
8. Press and hold the activation button on the remote control.
- May be different in Canada. If so, press and re-press
(cycle) the activation button on your remote control every
two seconds.
9. The emergency flashers will flash three times (after
about
15-60 seconds) when the programming is
successful. Release the button on the remote control.
- To program more devices, repeat steps 4 to 9.
10. Press and hold the trained Homelink® button and
observe the indicator light @::::,
page 121, fig. 115.
If the indicator light is solid/continuous, programming is
complete and your device should activate when you
press and release the trained Homelink® button.
- If the indicator light blinks rapidly for 2 seconds and is
then a solid/continuous light, proceed with phase 3 to
program a rolling code device.
Phase 3: rolling code programming
- A second person on a ladder who can safely reach the
garage door opener motor is recommended.
~