2008 AUDI TT ROADSTER towing
[x] Cancel search: towingPage 283 of 316

________________________________________________ E_ m_ e_r ,,::g c..e_ n _ c..::y;._ s_ i_t _u _a_ t_ i_o _n_ s _ ___._
Emergency towing with commercial
tow truck
General hints
Your Audi requires special handling for towing.
The following information is to be used by commercial tow truck
operators who know how to operate their equipment safely.
• Never tow your Audi, towing will cause damage to the engine
and transmission.
• Never wrap the safety chains or winch cables around the brake
lines.
• To prevent unnecessary damage, your Audi must be transported
with a car carrier (flatbed truck).
• To load the vehicle on to the flat bed, use the towing loop found
in the vehicle tools and attach to the front or rear anchorage
=> page 281 and=> page 282.
& WARNING
A vehicle being towed is not safe for passengers. Never allow
anyone to ride in a vehicle being towed, for any reason. •
Front towing loop
Do not install the front towing loop until it is needed.
Fig. 184 Front
bumper: removing the
grill
Fig . 185 Front
bumper: screwing
in
the towing loop
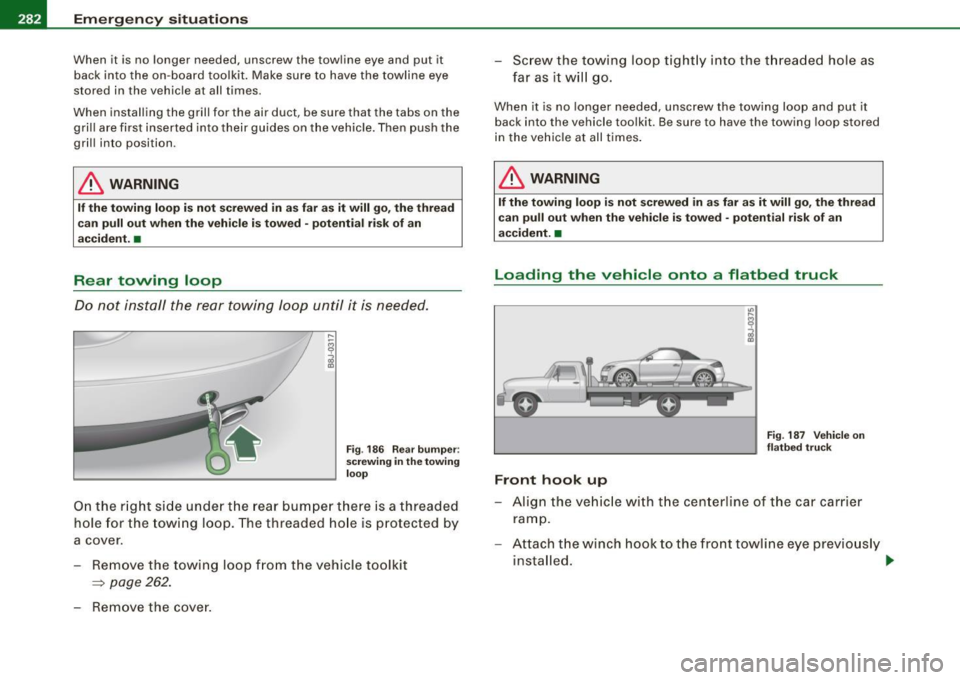
The towline eye fits into the threaded hole located on the
right side of the front bumper behind the grill.
- Remove the screwdriver and towing loop from the
vehicle toolkit=>
page 262.
-Insert the screwdriver into the slot as shown and press
toward the center of the vehicle => fig. 184. At the same
time, pull the grill forward and out.
- Screw the towing loop tightly into the threaded hole as
far as it will go => fig. 185.
~
Vehicle care Do-it-yourself service irechnical data
Page 284 of 316

IIJ!I Emergency situations L-----=----!.___;:_;_:_=..::..:..:.=~------------------------
When it is no longer needed, unscrew the towline eye and put it
back into the on -board toolkit. Make sure to have the towline eye
stored in the vehicle at all times.
When installing the grill for the air duct, be sure that the tabs on the grill are first inserted into their guides on the vehicle. Then push the
grill into position.
& WARNING
If the towing loop is not screwed in as far as it will go, the thread
can pull out when the vehicle is towed -potential risk of an
accident. •
Rear towing loop
Do not install the rear towing loop until it is needed.
Fig. 186 Rear bumper :
screwing in the towing
loop
On the right side under the rear bumper there is a threaded
hole for the towing loop. The threaded hole is protected by
a cover.
Remove the towing loop from the vehicle toolkit
=:> page 262.
-Remove the cover. -
Screw the towing loop tightly into the threaded hole as
far as it will go.
When it is no longer needed, unscrew the towing loop and put it
back into the vehicle toolkit . Be sure to have the towing loop stored
in the vehicle at all times.
& WARNING
If the towing loop is not screwed in as far as it will go, the thread
can pull out when the vehicle is towed -potential risk of an
accident. •
Loading the vehicle onto a flatbed truck
Front hook up
Fig. 187 Vehicle on
flatbed truck
- Align the vehicle with the centerline of the car carrier
ramp.
- Attach the winch hook to the front towline eye previously
installed. .,,_
Page 305 of 316

______________________________________________ A_ l_,_ p _h_ a_ b_e _t_i c_ a _ l _in _ d_e _ x __ lllll
Dimensions ... .. ...... . .... .. .. .... 290 Electronic differential lock (EDU
Dipstick Reading the dipstick properly
Direct Shift Gearbox 224
Emergency release . . . . . . . . . . . . . . . 120
Distance ........ .... ....... ...... ... 40
Driver information system . .... .... ... . 22
Digital speedometer ... .. .... ...... 24
Fuel filler cap ...... ..... .... .... .. 24
Menu button ..................... 28
Menu display ..................... 27
Open door or rear lid warning . ......
24
Outside temperature display .. .... .. 23
Parking brake warning ............. 30
red symbols .. ............. ....... 31
Setting ...... .... ... .... ..... .. .. 28
Sound system disp lay ............ .. 23
Text messages . .... .... .... .... ... 30
Driver seat See Seating position . ............. 130
Driving Run -flat tires . .... .... ....... .... . 258
Dr iving messages ... ..... .. ... .... ... 30
Driving safely . . . . . . . . . . . . . . . . . . . . . . . 128
Driving time ... .... ... ..... .... .... .. 39
Duplicate key .... .... ...... ....... ... 47
Dust filter . ....... .... .... ........ ... 99
E
Electro -mechanical power assist ... 21, 190 How the system works
............ 186
Warning/indicator lights ............ 20
Electronic immobilizer ...... ... .. .. 14, 49
Electronic power cont ro l
EPC warning/indicator light ..... .... 17
Electronic Stability Program .......... 184
Electronic stabilization program (ESP! Warning/indicator lights ........ .... 18
Emergency flasher Warning/ind icator lights .. .... ...... 19
Emergency flashers .................. 75
Emergency locking . ... .... .... ... .. .. 54
Emergency operation Folding top ....................... 64
Rear lid .. .... ....... .... .... .... . 56
Emergency release for selector lever ... 120
Emergency starting ........ ... .... ... 278
Emergency towing .. ............. .. . 281
Engine Cecking and filling locations ... ... . 222
Checking and filling locations ...... 221
Coolant ... .. .... .... ..... .. ... .. 227
Hood . ..... .. ... ... .. .... ..... .. 219
Starting ..................... 106, 107
Starting with jumper cables ........ 278
Stopping .... .... ...... ...... ... . 107
Engine compartment .... ...... ...... 221
Safety instructions ................ 220
Working in the engine compartment 220
Engine coolant sys tem ..... .... ...... 227
Adding coolant .... .... ..... ... ... 228
Checking the engine coolant leve l .. . 228 Radiator fan
... .. .. .. .... .... .... 229
Temperature gauge ................ 13
Engine cooling system Malfunction ... .. .... .... .... ..... 32
Engine data .. ............... .... ... 291
Engine hood Closing .. ... ........ .... ... ..... 220
How to release the hood ... ... ... .. 219
Engine oil . ...... .... .... ... .... .... 222
Adding .... ....... .... ... .... .... 225
Additives .. .... .... ... .... .... ... 225
Changing . .... .... .... ..... ..... . 226
Checking the engine oi l leve l ... .... 224
Indications and conditions requiring extra checking .... .... .... .... .... ... 224
Oil consumption . ...... ..... .. .... 224
Oil grades . ....... .... .... ....... 222
Pressure malfunction .............. 33
Recommended oil check intervals ... 224
Specification and viscosity ......... 222
Engine oi l leve l .. .... .... ... .... .... . 35
Engine oil sensor defective .... ...... .. 35
Environment Break-in period ..... .. ... .... .... . 192
Catalytic converter .......... ... .. . 193
Disposing of your vehic le battery .. . 231
Driving at high speeds . ...... .... . 194
Dr iving to minim ize pollution and noise .
194
Fuel .. .... .... .... ... .... .... ... 216
Fuel economy ......... ........ ... 194
Leakage from your vehicle . .... .... 220
Letting the vehicle stand and warm up ..
195
Controls and equip ment Safety first Vehicle operation
Vehicle care Do-it-yourself service Technical data
Page 311 of 316

______________________________________________ A_ l_,_ p _h_ a_ b_e _t_ic _ a _ l _in _ d_e _ x __ lll
Sound system display
Driver info rma tion system .... .... .. 23
Speed rating letter code ........... ... 251
Speed warning 1 . .... ...... ... .. .... . 35
Sp eed warning 2 . .... .... ... ... ... .. . 35
Speed warning system ... .... .. .. .... . 37
Speedometer . . . . . . . . . . . . . . . . . . . . . . . . 14
Starting assistance ...... .... ...... .. 279
Starting the engine .. .... .... ... . 106, 107
What should I do if the engine does not
star t? ........ .... .... ... .. ... . 10 7
Stee l wheels .... ....... .... .. . ..... 206
Steering
See Electro-mechanical power assist 21,
190
Steering co lumn
Adjusting .... ... .... .... ...... .. 105
Locking the steering ... .. .... .... . 106
Steps fo r determining co rrect load limit 247
Stopping the engine ...... ....... .... 107
Storage . .... .... .... .... ... .... .... . 95
Compartment in the front seats . .... 96
Cup holder ... .... .... ......... ... 94
Glove compartment ...... .... .... .. 96
Sun visors .. .. .. ..... ... ..... .. ..... 77
Switches Emergency flasher ..... .. .... .... .. 75
T
Tachometer ... .. .... .... ... .... .... . 12
Tank flap
Un locking the fuel filler flap by hand 218
Controls and equip
ment Safety first
Technical
modifications ..... .... ..... 297 Tires and wheels
Tempera ture ............ ... .... .... 100 Checking tire pressure .
.... ...... . 244
The firs t 1,000 miles ( 1,500 kml and Co
ld tire inflation pressure . ... ... .. 242
afterwards ... .. .. .. .... .... .... 192 Dimensions
.. ... .... ... .. .... .... 249
Tightening whee l bolts ... .... .... .... 267 General
notes ...... ... .... ...... . 238
Tire mobility system .... ....... .... .. 263
Tire pressure .... .. ...... .... ....... 244 G
lossary of tire and loading terminology
239
New tires and wh eels . ....... .... . 249
Tire pressure monitor ing system ...... . 42
Changing wheels ........... .... ... 44
Declaration of conform ity . .... .... .. 45
Learning process . ..... ... .... .... . 44
Loss of air pressure ........... .. 17, 43
Malfunctions ... .. .... .... .... ... . 45
Sensors ........... ... .... ....... 251
Storing tire pressures ............. . 44
Tires and wheels ...... .... .... ... 251
Valves ....... .... .... .... .... ... 25 1
Warning light ..... .. .... .... .... .. 37
Tire repair kit ... ... ...... .... .... ... 263
Tire service life ........ .... ... .... .. 248
Tires .... .. . ... ... ................. 238
Replacing .... .... .... .... ... 249, 251
run -flat .. .... ... .... .... .... .... 257
S ervice lif e ..... .... ... .. .... .... 248
speed ra ting let ter code ..... .. ... . 251
Tire manufacturing date . .... ...... 251 Replacing
..... .. .... .... ..... .. . 250
Snow chains ...... .... .. . .. .. .... 255
Ti re pressure monitoring system .... 251
Tires and vehicle load limits ... .... . 246
Wheel bo lts ... .... .... ... .... .... 256
Winter tires ... .... .... ....... .. .. 254
Ti res/Wheels
Low aspect ratio tires . .... ...... .. 256
Tire mob ility system ..... .. .... ... 263
Tire pressure mon itoring system .. 17, 42
Tire repair kit ................ .... 263
Tool kit ..... .... ... .. .... .. .... .... 262
Touch -up paint ... .. .... .... .... .... 205
Towing Front eyelet ... ... ..... ... .... .... 281
Rear eyelet ... .... .... .... ....... 282
Tow truck procedures .. ...... .... . 281
Trailer towing .......... .. ...... .... . 196
Tire specifica tions . ...... ... .... .. 250 Transmission
Tread depth ..... .... ...... .. .... 248 6
-speed manua l transmission ...... 113
Uniform tire quality grading ... ..... 253 S tronic transm
ission ............. 113
Winter tires .... .... ... .... ....... 254 Transport Canada
........ .. .. ....... 293
Tires and vehicle load limits ... ....... 246 Tread
Wear Indicator (TWI) ... .... .... . 248
Vehicle operation Vehicle care Do-it-yourself service Technical data