2008 AUDI TT ROADSTER inflation pressure
[x] Cancel search: inflation pressurePage 252 of 316
.,,.___T_ ir_e_ s _ a_ n_d_ w_ h_ e_e _ l_s _________________________________________________ _
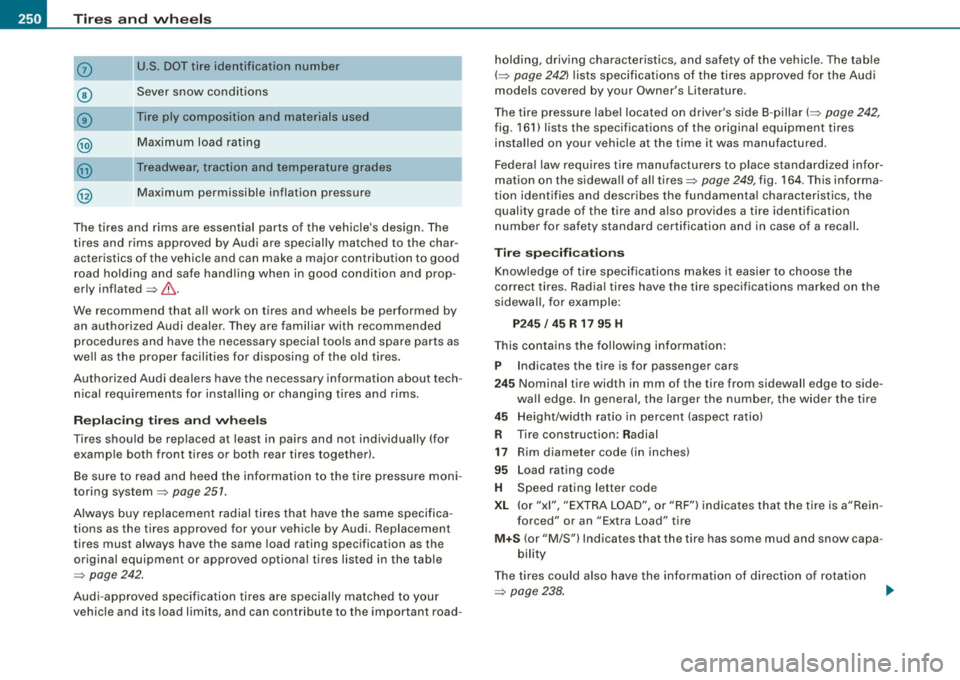
0
©
G)
U.S. DOT tire identification number
Sever snow conditions
Tire ply composition and materials used
Maximum load rating
Treadwear, traction and temperature grades
@ Maximum permissible inflation pressure
The tires and rims are essential parts of the vehicle's design. The
tires and rims approved by Audi are specially matched to the char acteristics of the vehicle and can make a major contribution to good
road holding and safe handling when in good condition and prop
erly inflated =>& .
We recommend that al l work on tires and wheels be performed by
an authorized Audi dealer . They are familiar with recommended
procedures and have the necessary special tools and spare parts as
we ll as the proper facilities for disposing of the old tires .
Authorized Audi dealers have the necessary information about tech
nical requirements for insta lling or changing tires and rims .
Rep lac ing t ires a nd w heels
Tires should be replaced at least in pairs and not individually (for
example both front tires or both rear tires together) .
Be sure to read and heed the information to the tire pressure moni
toring system =>
page 251.
Always buy replacement radial tires t hat have the same specifica
tions as the tires approved for your vehicle by Audi . Replacement
tires must always have the same load rating specification as the
original equipment or approved optional tires listed in the table
=>
page 242.
Audi -approved specification tires are specially matched to your
vehic le and its load limits, and can contribute to the important road- holding, driving characteristics, and safety of the vehicle
. The tab le
( =>
page 242) lists specifications of the tires approved for the Audi
models covered by your Owner's Literature.
The tire pressure labe l located on driver's side 8 -pillar (=>
page 242,
fig. 161) lists the spec ifications of the original equipment tires
installed on your vehicle at the time it was manufactured.
Federal law requires tire manufacturers to place standardized in for
mation on the sidewall of all tires=>
page 249, fig. 164 . T his informa
tion identifies and describes the fundamenta l characteristics, the
quality grade of the tire and also provides a tire identification
number for safety standard certification and in case of a recall.
T ire s pec ifica tio ns
Know ledge of tire specifications makes it easier to choose the
correct tires . Radial tires have the tire specifications marked on the
sidewal l, for example:
P 2 45 / 45 R 17 95 H
This contains the following information :
P Indicates the tire is for passenger cars
24 5 Nominal tire width in mm of the tire from sidewall edge to side-
wa ll edge . In general, the larger the number, the wider the tire
45 Height/width ratio in percent (aspect ratio)
R Tire construction: Radial
17 Rim diameter code (in inches)
95 Load rating code
H Speed rating letter code
X L (or "xi", "EXTRA LOAD", or "RF") indicates that the tire is a"Rein
forced" or an "Extra Load" ti re
M+ S (or "M/S") Indicates that the tire has some mud and snow capa
bility
The tires could also have the information of direction of rotation =>
page 238.
Page 258 of 316

_L_T~ir ~e :..:s~ a~n~ d~ w~ h ~e~e~ l~ s '.,_ ______________________________________________ _
Wheel bolts
W heel b olts mus t al wa ys be tigh te n ed to t he cor rect
to rqu e.
The design of wheel bolts is matched to the factory instal led rims . If
d ifferen t rims are fitted, the co rrect w heel bo lts wit h th e rig ht length
and correctly shaped bolt heads m ust be used. This ensures that
w hee ls are fitt ed s ecure ly a nd th at t he brake sys te m funct ions
correctly .
I n certain circums tances, yo u may no t use w heel b olts fr om a
differ ent vehicle -even if it is the same model::::;,
page 296.
&_ WARNING
Improperly tightened or maintained wheel bolts can become loose
causing loss of control , a collision and serious personal injury.
• Always keep the wheel bolts and the threads in the wheel hubs
clean so the wheel bolts can turn easily and be properly tightened.
• Never grease or oil the wheel bolts and the threads in the wheel
hubs. They can become loose while driving if greased or oiled,
even if tightened to the specified torque .
• Only use wheel bolts that belong to the rim being installed.
• Never use different wheels bolts on your vehicle.
• Always maintain the correct tightening torque for the wheel
bolts to reduce the risk of a wheel loss. If the tightening torque of
the wheel bolts is too low , they can loosen and come out when the
vehicle is moving . If the tightening torque is too high, the wheel
bolts and th reads can be damaged and the wheel can become
loose .
0 Note
The specified torque for the wheel bolts is 90 ft lb (120 Nm) with a
t ole ranc e of ± 7,4 ft lb(± 1 0 Nm). To rque whee l bolts diag onally.
After changing a wheel, the torque must be checked as soon as possible with a to
rque wrench -preferab ly by an authorized Audi
dea ler o r qu alif ied wo rksh op.•
Low aspect ratio tires
Yo ur Audi is fac tory-equip ped wi th l ow asp ect rati o tires. Th ese tires
have been thorough ly tested and been selected specifically for your
mod el for thei r su per b p erfo rma nce, road feel an d handl in g u nder
a variety of driving conditions . Ask your author ized Aud i dea ler for
mo re deta ils.
T he low aspec t ra tio o f th ese t ires is ind icate d by a numera l o f 55 or
less in the t ire's size designation. The numera l represents the ratio
of the ti re's s idewa ll height in re la ti on to its tread w idth e xpress ed
in percentage. Conventiona l tires have a height/width ratio of 60 or
mo re .
The performan ce of low -aspect -ratio t ires is part icularly sensitive to
improper inflation pressure . It is therefore important that low
aspect ratio tires are inflated to the specified pressure and that the
inflation pressure is regularly checked and maintained. Tire pres
sures should be checked at least once a month and alway s before a
long trip::::;,
page 244, "Checking tire p ressure".
What you can do to a void tire and rim damage
L ow a spect ratio tires can be damaged more easi ly by impact with
potho les, curbs, gull ies or ridges on the road, particularly if the t ire
is underinflated.
In orde r to minimi ze the occurrence o f im pact da mage to th e tire s
of your vehicle, we recommend that you observe the fo llowing
p reca utions:
• Always ma intain reco mm ende d inflat io n pressu res . C heck your
tire p ressure every 2, 000 miles (3 ,000 km) and add ai r if neces sary .
• D rive car eful ly on roads with potholes, deep gullies or ridges.
Th e impact from d riving th ro ugh o r ove r such o bstac les can
dama ge you r tires . Impact w ith a curb may also cause da mage to
your tires . .,_
Page 259 of 316
________________________________________________ T_ i _r_e _s_ a_n_ d_ w_ h_ e_e _ l_s __ !II
•
• After any impact, immediately inspect your tires or have them
inspected by the nearest authorized Audi dealer. Replace a
damaged tire as soon as possible .
• Inspect your tires every 2,000 miles (3,000 km) for damage and
wear . Damage is not always easy to see. Damage can lead to loss of
air and underinflation, which could eventua lly cause tire fai lure . If
you believe that a tire may have been damaged, replace the tire as
soon as possible .
• These tires may wear more quickly than others.
• Please a lso remember that, whi le these tires deliver responsive
handling, they may ride less comfortably and make more noise than
other choices.
R edu ced p erform an ce in w in te r/ c o ld sea son
co nditi ons
All tires are designed for certain purposes. The low aspect ratio,
ultra high performance tires originally installed on your vehicle are
intended for maximum dry and wet road performance and hand ling.
They are not suitable for cold, snowy or icy weather conditions . If
you drive under those circumstances, you should equip your vehicle
with al l- season or winter tires, which offer better traction under
those conditions . We suggest you use the recommended snow or
a ll- season tires specified for your vehicle, or their equivalent .
Refer to=>
page 254 for more detai led in formation regarding winter
tires. •
Run-flat tires
Applies to vehi cles : w ith R un-f lat tires
Introduction
Run-flat tires help keep you moving if a tire goes flat.
Reinforced s idewalls give the ti res run -flat capability if tire pressure
is lost . We recommend that run-flat tires only be mounted on vehicles that
we
re origina lly equipped with these special tires at the fac tory and
have a Tire Pressure Monitoring System .
Run-flat t ires can be ident ified by the letter s "RSC" on the tire side
wall.
If you do change the tires on your vehic le from normal to run -flat
tires, you must buy the special rims required for run-flat tires, and
the Tire Pressure Monitoring System must be reprogrammed by an
authorized Audi dea ler or other qualified workshop.
Wh at do run-fl at tir es do?
These special t ires have run-flat capabi lities that he lp keep you
moving if a tire loses pressure and goes flat. Under favorable condi
t ions tires can be driven
at least 30 miles (50 km ), but you must not
drive
f as ter t han 50 mph (80 km/h i=> page 258 , "Driving with run
flat t ires".
The Tire Pressure Moni toring System constantly checks the air pres
sure in the tires. If the run -flat system is active (shown in the center
display), you must inspect the affected tire or tires and then decide
whether to continue driving . Be sure to follow these tips
=>
page 258, "Driving with run-flat tires" .
When it is not po ssibl e to continue driving , even with
run -fl at tire s?
• If the Electronic Stabilization Program (ES P) is not working or
keeps coming on.
• If the Tire Pressure Monitoring System does not work.
• If the tire has been severely damaged, in a crash , for example .
The tread can separate from a damaged tire as the wheel turns, and
hit parts of the vehicle , such as the fue l tank filler neck, fuel lines or
brake lines.
• Do not continue driving if severe vibration occurs or if the tire
starts to smoke because the tire is running hot.
• Do not continue driving if damage to the tire, such as cracks in
the s idewall, appears .
~
Vehicle care I t •
Page 268 of 316
11111.___W_ h_ a _ t_d_ o_ l _d _o_ n_ o_ w_ ? ______________________________________________ _
- Switch the electric air pump off - switch in position
0. If
the required tire pressure of at least 1.8 bar has not been
reached, follow the instructions in the section Re
inflating tire.
Re-inflating tire
-Remove the hose from the valve and pull the plug out of
the socket.
- Drive the vehicle slowly 10 meters backward or forward.
This helps to distribute the sealant better.
- Remove the empty inflation bottle and screw the hose
G)
=> page 265, fig. 169 from the electric pump directly onto
the valve.
- Insert the plug ©=>
page 265, fig. 169 into the socket for
the cigarette lighter.
- Move the switch
@ => page 265, fig. 170 on the electric
air pump
31 to position I. After 5 minutes, tire pressure
must have reached at least
1 .8 bar.
- Switch the electric air pump off - switch in position
0. If
the required tire pressure of at least 1.8 bar has not been reached, it is not possible to make a repair with the tire
sealant. Seek professional assistance.
Disassembling Tire Mobility System
- Remove the hose from the valve and pull the plug out of
the socket.
- Screw the dust cap onto the valve.
- Place the empty sealant bottle back in the original pack-
aging and cl ip it in place under the floor so that no tire
sealant can run out into t he vehicle. -
Place the electric air pump in the luggage compartment
for the time being.
- Start driving right away so that the sealant is distributed
in the tire.
& WARNING
• Follow the manufacturer's safety instructions on the decal for
the air pump and the sealant bottle.
• If a tire pressure of 1.8 bar cannot be achieved after pumping
for 5 minutes, the tire is too severely damaged. Do not continue to
drive.
• Seek professional assistance if it is not possible to repair the
tire with the tire sealant.
[ i] Tips
• Do not operate the electric air pump for more than 8 minutes
without stopping, otherwise it can overheat. When the air pump has
cooled down, you can continue to use it.
• If sealant has escaped, allow it to dry, then you can peel it off. •
Applies to vehic les : with Tire Mobil ity Sys tem
Final check
After driving for a short distance , tire pressure
must be checked
- After driving for about 10 minutes, stop and check the
tire pressure .
- If tir e pressure is still at least 1.3 bar, inflate the tire to
specified pressure (see driveas side B -pillarl, drive to the
next repair shop and have the tire and the sealant bottle
replaced.
~
Page 304 of 316
___ A_l.:,. p _h_ a_ b_e _t _i c_ a_l _i n_ d_e _x ____________________________________________ _
Convertible locking retractor . . . . . . . 177
Important safety instructions for using child safety seats .. ..... .. .. .... 171
Important things to know when driving with chi ldren . .... .... ... .... ... 168
Infant seats .. ........ ....... .... 173
Older children and safety belts ..... 177
Safety belts and older children . . . . . 177
Which restraint system should my older child wear? .. .... .... ... ... .... 177
Child safety seat .... .... ... .. ...... . 173
Convertible locking retractor . . . . . . . 177
Installing ..... ............ ...... 177
Ch ild safety seats
How do I properly install a chi ld safety
seat in my vehicle? .. ... .... . .. .. 171
Safety instructions . . . . . . . . . . . . . . . 171
Cigarette lighter ... ..... ... ....... ... 95
Cleaning Alcantara (synthetic suede) . . . . . . . . 211
E ngine compartment ... .. .... .... 212
Fabrics and fabric coverings . ...... 208
Instrument panel ... .. .... ... .... 209
Interior ...... .... .... .... .... ... 208
Leather . . . . . . . . . . . . . . . . . . . . . . . . . 210
P lastic and viny l .. .... ....... .... 204
Plastic parts ..................... 209
Safety belts . . . . . . . . . . . . . . . . . . . . . 212
Trim strips .................. 204, 205
Cleaning and protection ... .. .... .... 200
Climate control A/C operation . . . . . . . . . . . . . . . . . . . . 102
Air distribution . . . . . . . . . . . . . . . . . . 101
Air ven ts . . . . . . . . . . . . . . . . . . . . . . . . 1 02 Automatic mode .
. . . . . . . . . . . . . . . . 101
Defrost . . . . . . . . . . . . . . . . . . . . . . . . . 101
Economical use .................. 103
Fan ... .... ....... .... .... .... .. 100
Heated seats . . . . . . . . . . . . . . . . . . . . 104
Rear window defogger . . . . . . . . . . . . 103
Switching on and off ..... ... .. ... 100
Climate controls ... .. .... ..... .. ... .. 98
Air recirculation mode .. .... ...... 102
Controls ......................... 98
Dust filter ..... ............... .... 98
Heating ........ ... .... .... .... ... 98
Pollen fi lter .. ...... .... .... .... ... 98
Venti lation .... .... .... .... .... ... 98
Clock ... ... .. .... ..... .. ... ... .... .. 13
Co ld tire inflation pressure . ...... .... 242
Coming -home -function ............... 73
Compass mirror ..... .... ... ... .. .... 85
Consumer In formation .... .... ... 136, 293
Contacting NHTSA . . . . . . . . . . . . . . . . . . 136
Con trols and displays . . . . . . . . . . . . . . . . 11
Conve nience close/open feature
P o wer top . . . . . . . . . . . . . . . . . . . . . . . . 63
Windows ... .. .... .... .... .... ... 58
Convertible chi ld seats
How do I proper ly install a convertib le
chi ld seat in my vehic le? ... .... .. 174
Safety instructions ............... 174
Convertible locking retractor Activating ... .. ..... .. .... .... ... 1 79
Deactivati ng . . . . . . . . . . . . . . . . . . . . . 180
Using to secure a chi ld safety seat . . 177,
179 Coolant System
Expansion tank 228
Coolant system ...... .... .... .... ... 227
Cornering light .... ....... ....... .... 72
Cruise contro l ...................... 110
Changing speed ................. 111
Presetting your speed ............. 111
Switching off . .... ..... ... .... ... 111
Switching on .. .... .... ..... .. ... 110
Warning/indicator l ights ........... . 19
Cruising range ..... ... .... .... ...... . 39
Cup holder . ...... .... .... ... .... .... 94
D
Damp ing
See Audi magnet ic ride ..... .... ... 112
Data .......... ... ....... .... ...... 291
Data recorder . ........ ... .. .... .... 184
Date display .. .... .... ............... 13
Daytime running lights ......... ...... 71
Daytime running lights (Canada) ...... . 71
Declaration of conformity ............. 45
def What does this mean when it appears in the trip odometer disp lay? .. ...... 14
Defrosting the windows ............. . 101
De termining correct load li mit ... .. ... 247
Digital clock . .... .... ..... .. ..... .... 13
Setting the time ................... 13
Digital compass ... ....... .... ...... . 85
Digital speedometer ...... .... .... .... 2 4
Page 311 of 316
______________________________________________ A_ l_,_ p _h_ a_ b_e _t_ic _ a _ l _in _ d_e _ x __ lll
Sound system display
Driver info rma tion system .... .... .. 23
Speed rating letter code ........... ... 251
Speed warning 1 . .... ...... ... .. .... . 35
Sp eed warning 2 . .... .... ... ... ... .. . 35
Speed warning system ... .... .. .. .... . 37
Speedometer . . . . . . . . . . . . . . . . . . . . . . . . 14
Starting assistance ...... .... ...... .. 279
Starting the engine .. .... .... ... . 106, 107
What should I do if the engine does not
star t? ........ .... .... ... .. ... . 10 7
Stee l wheels .... ....... .... .. . ..... 206
Steering
See Electro-mechanical power assist 21,
190
Steering co lumn
Adjusting .... ... .... .... ...... .. 105
Locking the steering ... .. .... .... . 106
Steps fo r determining co rrect load limit 247
Stopping the engine ...... ....... .... 107
Storage . .... .... .... .... ... .... .... . 95
Compartment in the front seats . .... 96
Cup holder ... .... .... ......... ... 94
Glove compartment ...... .... .... .. 96
Sun visors .. .. .. ..... ... ..... .. ..... 77
Switches Emergency flasher ..... .. .... .... .. 75
T
Tachometer ... .. .... .... ... .... .... . 12
Tank flap
Un locking the fuel filler flap by hand 218
Controls and equip
ment Safety first
Technical
modifications ..... .... ..... 297 Tires and wheels
Tempera ture ............ ... .... .... 100 Checking tire pressure .
.... ...... . 244
The firs t 1,000 miles ( 1,500 kml and Co
ld tire inflation pressure . ... ... .. 242
afterwards ... .. .. .. .... .... .... 192 Dimensions
.. ... .... ... .. .... .... 249
Tightening whee l bolts ... .... .... .... 267 General
notes ...... ... .... ...... . 238
Tire mobility system .... ....... .... .. 263
Tire pressure .... .. ...... .... ....... 244 G
lossary of tire and loading terminology
239
New tires and wh eels . ....... .... . 249
Tire pressure monitor ing system ...... . 42
Changing wheels ........... .... ... 44
Declaration of conform ity . .... .... .. 45
Learning process . ..... ... .... .... . 44
Loss of air pressure ........... .. 17, 43
Malfunctions ... .. .... .... .... ... . 45
Sensors ........... ... .... ....... 251
Storing tire pressures ............. . 44
Tires and wheels ...... .... .... ... 251
Valves ....... .... .... .... .... ... 25 1
Warning light ..... .. .... .... .... .. 37
Tire repair kit ... ... ...... .... .... ... 263
Tire service life ........ .... ... .... .. 248
Tires .... .. . ... ... ................. 238
Replacing .... .... .... .... ... 249, 251
run -flat .. .... ... .... .... .... .... 257
S ervice lif e ..... .... ... .. .... .... 248
speed ra ting let ter code ..... .. ... . 251
Tire manufacturing date . .... ...... 251 Replacing
..... .. .... .... ..... .. . 250
Snow chains ...... .... .. . .. .. .... 255
Ti re pressure monitoring system .... 251
Tires and vehicle load limits ... .... . 246
Wheel bo lts ... .... .... ... .... .... 256
Winter tires ... .... .... ....... .. .. 254
Ti res/Wheels
Low aspect ratio tires . .... ...... .. 256
Tire mob ility system ..... .. .... ... 263
Tire pressure mon itoring system .. 17, 42
Tire repair kit ................ .... 263
Tool kit ..... .... ... .. .... .. .... .... 262
Touch -up paint ... .. .... .... .... .... 205
Towing Front eyelet ... ... ..... ... .... .... 281
Rear eyelet ... .... .... .... ....... 282
Tow truck procedures .. ...... .... . 281
Trailer towing .......... .. ...... .... . 196
Tire specifica tions . ...... ... .... .. 250 Transmission
Tread depth ..... .... ...... .. .... 248 6
-speed manua l transmission ...... 113
Uniform tire quality grading ... ..... 253 S tronic transm
ission ............. 113
Winter tires .... .... ... .... ....... 254 Transport Canada
........ .. .. ....... 293
Tires and vehicle load limits ... ....... 246 Tread
Wear Indicator (TWI) ... .... .... . 248
Vehicle operation Vehicle care Do-it-yourself service Technical data
Page 312 of 316

__ _!:_A~l'.!:p~ h~ a~ b~e~ t~ic ~a..'.... l ~in~d~e ~x~ --------------------------------------------
Trip computer
Fuel consumption ................. 39
Mi leage .. ........ ........ .... ... 39
Trip odometer .. ...... .... ........ ... 14
What does it mean when dEF appears in the trip odometer display? ... ... .. 14
Trunk lid .... ........ ............. .. 55
Trunk escape handle ... .. .... .... 262
Turn signals ................. ....... 76
Warning/indicator lights ........... 19
u
Undercoating 207
Unfastening safety belts ...... ...... . 143
Unidirectional tires .................. 238
Uniform tire quality grading . ......... 253
Universal Radio- Frequency Remote Control (Homelink®) . . . . . . . . . . . . . . . . . . . 121
Un locking
Power locking switch . . . . . . . . . . . . . . 53
Rear lid/trunk lid ...... .... ...... .. 55
Remote control key ..... .. .... .... . 51
Using the key ... .. .... .... ...... .. 53
V
Vanity mirror ...... .. .... ........ .... 77
Vehic le electrical system .. ........ .... 19
Vehicle Identification Number (VIN) .... 288
Vehic le jack . . . . . . . . . . . . . . . . . . . . . . . . 269
Vehicle literature ............. ........ 5
Vehic le tool kit . . . . . . . . . . . . . . . . . . . . . 262 Vehicle-care products
...... ........ . 200 Power top cleaning ..... .. .... ... . 203
Venti lation ... ............ .... .... ... 98 with a power washer
....... .... ... 202
Waxing .......... .... .... ....... ... 203
w Wear indicator ..... ... ... .... ....... 248
Warning light
Tire pressure monitoring system 37
Warning lights ...................... 16 Weatherstrips
.... ....... .... .... ... 206
Weights ....... .. .... .... ...... .... 289
What happens if you wearyoursafety belt too loose? ..... .. .... .............. 142
Warning/Indicator light
Rear spoi ler ... ... .... ........ .... 18 What happens to unbelted occupants? .
139
What impairs driving safety? ... .... ... 129
Warning/indicator ligh1ts ... .. · · · · · · · · · 12 What should I do after changing a wheel? ..
Airbag system . . . . . . . . . . . . . . . . . . . . 19 245
Anti -lock brake system (ABS) · · · · · · · · 20 What shou ld I do after replacing whe els?
Brake system . . . . . . . . . . . . . . . . . . . . . 20 245
Cruise control . . . . . . . . . . . . . . . . . . . . 19
Electronic power control ........... 17
El ec tronic stabilization program (ESP) 18
Folding top ...... ... .. ... ... .. .... 18
Generator . . . . . . . . . . . . . . . . . . . . . . . . 19
High beam . . . . . . . . . . . . . . . . . . . . . . . 18
Malfunction Indicator Lamp (MIU .... 18
Parking brake . . . . . . . . . . . . . . . . . . . . . 20
Safety be lt . . . . . . . . . . . . . . . . . . . . . . . 19
Tire pressure monitoring system .... 17
Turn signals .. ....... ...... ....... 19
Warranty coverages .. ........ .... ... 293
Washer reservoir ..... .... ... ..... ... 236
Washing ........ ....... ...... .... .. 200
Automatic car wash ........... ... 201
by hand ......... ......... ... ... 201
Folding top cleaning ...... ... .. ... 203
General information ......... ..... 200 Wheel bolts
Torque ......................... 256
Wheels .............. ....... .... ... 238
Cast alloy .................... ... 207
Checking tire pressure ............ 244
Co ld tire inflation pressure ....... . 242
General notes .......... .......... 238
Glossary of tire and loading terminology .
239
New tires and whee ls .. ... .. ...... 249
Tires and vehicle load limits ... .... 246
Wheels/Tires Steel wheels ... .... .... ...... .... 206
When must the airbag system be inspected?
157
When should I adjust the tire pressures? 245
When should I check the tire pressures? 245