2008 AUDI TT ROADSTER ESP
[x] Cancel search: ESPPage 42 of 316
Driver inf ormation sy ste m
To ta l-tr ip mem ory ( Trip compu te r 2)
Unlike the single -trip memory, the total -tr ip memory is not reset
automatically . This permits you to evaluate your driving data for the
entire period between manua l resets.
Fu el r an ge
The estimated cruising range in miles (km) appears in the display.
This tells you how far your vehicle will be able to travel on the
current tank of fuel and with the same driving sty le . The display
changes in increments of 6 miles (10 km).
The cruising range is calculated based on the fuel consumption for
t he last 18 miles (30 km). If you drive conservatively, the cruising
range will increase .
Average fuel m ile ag e
The average fuel economy in MPG (1/100 km) since you last cleared
the memory appears in this display. You can use this display to
adjust your driving technique to achieve a desired mileage.
C ur rent fuel mil eage
The instantaneous fuel consumption in mi les per gallon (1/100 km)
is shown in th is d isplay. You can use this display to adjust your
driving technique to achieve a desired mileage.
Fue l consumption is recalcu la ted at intervals of 33 yards (30
meters). When the vehicle is stationary, the most recent fuel
consumption is d isplayed .
Average speed
The average speed in mph (km/h) s ince the last time the display was
reset appears in the display .
Elap se d time
The length of time that you have been driving since you last reset
the memory appears in this display.
Di stance
The elapsed distance since the last time the memory was cleared
appears in the display. The maximum distance that can be recorded
is 9,999 .9 miles (9,999 .9 kilometers).
[ i ] Tips
• Fuel consumptions (average and current), range and speed are
displayed in metric units on Canadian models.
• All stored values will be lost if the vehicle battery is
disconnected .•
Operation
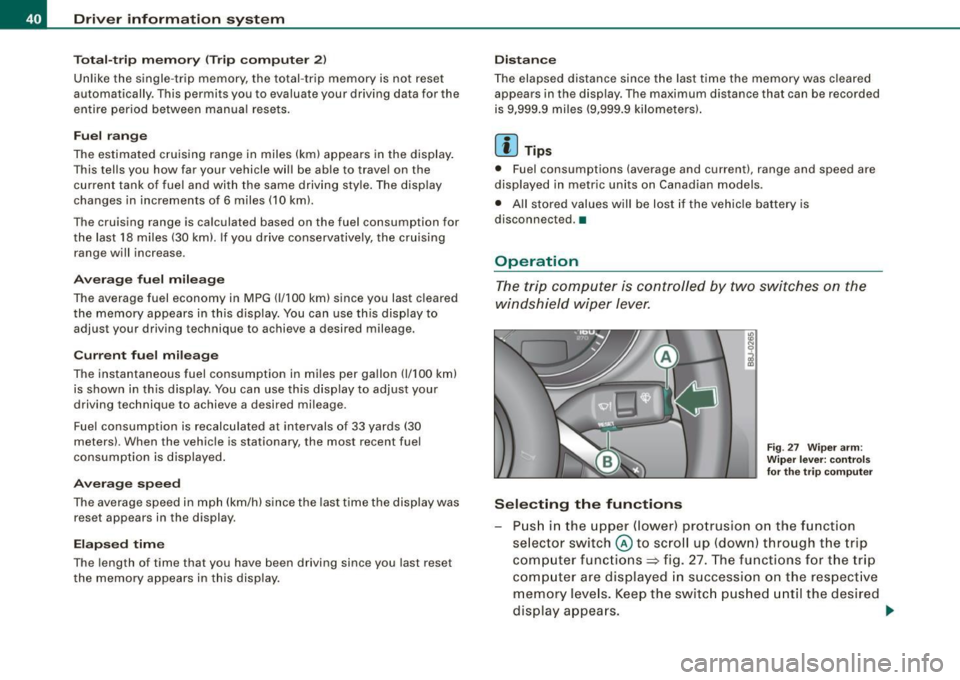
The trip computer is controlled by two switches on the
windshield wiper lever.
S ele cting th e fun ctions
Fig. 27 Wiper ar m:
W iper l ever: co ntrols
fo r th e tr ip com pute r
P u sh in the upper (lower) pro trusion o n the function
se lector switch @to scroll up (dow n) through the trip
computer functions~ fig. 27. The functions for the trip
comp uter are displayed in succession on the respect ive
memory leve ls. Keep the switc h pus hed until the desired
display appears . .-,,
Page 43 of 316
Switchin g bet w ee n m enu l ev els
- Tap the Rest button ® briefly to reach the various menu
levels one after the other ("Computer 1 ", "Computer 2",
"Navigation system"* and "Start menu") .
Rese ttin g th e fun ction to z ero
- Select the desired function.
- Push the reset button ® for at least two seco nds .
The trip computer only operates when the ignition is on. When you
turn on the ignition, the function that was in use when you last
turned the ignition off will be displayed .
In addition to the trip computer information (memory level 1 or 2)
and navigation information can be displayed. To switch the display
between the different systems, tap the Reset button
@ briefly .
You can reset the following va lues to zero using the reset button:
• driving time
• average mileage
• average speed
In addition,
a ll the values in the single -trip or the total-trip memory
can be de leted simu ltaneously .
[ i ] Tips
• If you hold down the reset button for longer than 2 seconds, the
current value (for example, average fuel consumption) will be reset
to zero .
• Malfunction displays in Auto -Check Control are shown even with
the display switched off.
• All stored values will be lost if the vehicle battery is
disconnected. •
Controls and equip
ment
Dri ver infor mat io n sy ste m
Tire pressure monitoring system
General notes
As an added safety feature, your vehicle has been equipped with a
tire pressure monitoring system (TPMS) that illuminates a low tire
pressure telltale when one or more of your tires is significant ly
under -inflated. The TPMS only provides a low tire pressure warning
and does not reinflate your tires.
Accordingly, when the low tire pressure tellta le illuminates, you
should stop and check your tires as soon as possib le, and inflate
them to the proper pressure. Driving on a significantly under
inflated t ire causes the tire to overheat and can lead to tire failure .
Under -inflation a lso reduces fuel efficiency and tire tread l ife, and
may affect the vehicle's handling and stopping ability.
(D Note
• Please note that the TPMS is not a substitute for proper tire
maintenance, and it is the driver's respons ib ility to maintain correct
tire pressure, even if under -inflation has not reached the level to
trigger illumination of the TPMS low tire pressure telltale .
• Each tire, including the spare, should be checked monthly when
cold and inflated to the inflat ion pressure recommended by the
vehic le manufacturer on the vehicle p lacard or tire inflation pres
s u re label. (If your vehicle has tires of a different size than the size
indicated on the vehicle placard or tire inflation pressure labe l, you
should determine the proper tire inflation pressure for those
tires.) •
TPMS malfunction indicator
Your vehic le has a lso been equipped with a TPMS malfunction indi
cator to indicate when the system is not operating proper ly . The
TPMS malfunction indicator is combined with the low tire pressure _.,
I • •
Page 44 of 316
Driver inf orm atio n syst em
telltale. When the system detects a malfunction, the telltale will
flash for approximately one minute and then remain continuously
illuminated. This sequence will continue upon subsequent vehicle
starts up as long as the malfunction exists .
When the ma lfunction indicator is illuminated, the system may not
be able to detect or signal low tire pressure as intended.
TPMS malfunctions may occur for a variety of reasons, including the installation of replacement or alternate tires or wheels on the
vehicle that prevent the TPMS from functioning properly. A lways
check the TPMS malfunction tellta le after replacing one or more
tires or whee ls on your vehicle to ensure that the replacement or
a lternate tires and wheels al low the TPMS to continue to function
proper ly .•
Introduction
The tire pressure monitoring system monitors air pressure
in all four road wheels while the vehicle is moving.
As soon as the t ire pressure monitoring system senses a s ignificant
loss of air pressure in one or several tires, text messages and yel low
symbo ls appear in the instrument cluster display to a lert the driver.
The warning light in the instrument c luster comes on when the
tire is significantly underinflated
=> page 17.
The warning light
malfunction . also
illuminates in the case of a system
Be aware that tire pressure is also dependent on the temperature of
the tire . For every 18 °F (10 °C) increase in tire temperature, tire pres
sure increases by about 1 .5 psi (0. 1 bar) . The tire warms up while the
vehic le is moving and tire pressure rises. So you should adjust tire
pressure on ly when they are
cold , when the temperature of the tires
is roughly the same as the ambient air temperature.
In order to keep the tire pressure monitoring system properly ca li
brated, tire pressure on all four tires should be checked at regular intervals, adjusted if necessary and saved in the proper setting
(recommended
pressure)=>
page 44.
The tire pressure is shown on the label located on the driver 's side
B -pillar (visible when the door is open) .
& WARNING
• When the tire pre ssure monitor ing system warn ing light i s lit ,
one or more of your t ir es is s ignificantl y unde r-inflated . You should
s top and check your tire s as s oon as po ssible , and inflate them to
the p rope r pre ss ure as indi cated on th e vehicl e's tire pr essure
label
=> pag e 242. Driv ing on a s ignific antl y un der-inflated t ire
c a use s the tire to overhe at and can le ad to tire fa ilure. Unde r-inf la
ti on also i s lik el y to impair the vehicle' s handling and stopping
ability .
• Do not adju st t ir e pressur e wh en t ire t emp erature is exce ssiv e.
Thi s could le ad to seriou s tire dam age and even cau se the tire t o
bur st, w ith the addition al dan ger of an accident.
W For the sake of the environment
Driving with under -inflated tires reduces fuel efficiency and tire
tread life.
[ i ] Tips
• Each tire should be checked month ly when the temperature of
the tires is abou t the same as ambient air temperature and s et to the
recommended inflation pressure as specified on the tire pressure
label =>
page 242.
• The factory supplied spare whee l is equipped with a se nsor for
the tire pressure monitoring sys tem. As long as the spare wheel is
n ot mounted, the tire pressure of this tire wil l not be monitored.
• T he tire pressure monitoring system he lps the driver to keep an
eye on tire pressures . But the driver still has the responsibility f or
maintaining the correct tire pressure . .,_
Page 46 of 316

Driver inf ormation sy ste m
Storing tire pressures
Correct storage of specified pressure is the basic require
ment for reliable tire pressure monitoring.
F ig . 29 S ET -butt on:
T ire pressure mon i
t or ing syste m
In order for the tire pressure monitori ng system to operate
appropr iately, you have to re-save the specified p ressures
whenever you adjust tire pressures, for example when the load co nd ition of your vehicle changes. Proceed as fo llows:
Corr ecting tir e pr es sure
Check the pressure in the t ires.
- Adjust air pressure as needed to comply w ith the infor
mat ion on the label located on the driver's side B -pillar
(visible when the door is open) .
Saving tire pressures
-Turn on the igniti on.
- Press the button :::> fig. 29 for app rox imately 5 seconds.
You will hear a beep and the symbol in the instrument
cluster flashes three t imes .
All pressure warning indicators in the d isplay will be canceled. Following each intentional change in specified pressures, ti
re pres
sures must be resaved.
After the pressures are saved, the tire pressure monito ring system
measures the current tire pressures and saves them as the new
spec ified pressures .
[ i ] Tip s
• The tire pressure is shown on the tire pressure labe l. The tire
pressur e lab el is located on the driv er's sid e B-pillar (visible when
the door is open). The tire pressure label l ists the recommended
cold tir e inflation pr essur es for the vehic le at its maximum capacity
weigh t and the tires that were on your vehicle at the time it was
manufactured . For recommended tire pressures for norma l load
conditions, please see chapter~
page 242.
• The tire pressure monitoring syst em he lps the driver to keep an
eye on tire pressures. But the driver still has the responsibility for
maintaining the cor rect tire pressure .•
Wheel change
If a wh eel is ch anged , the wheels tha t were exchan ged
have to be re -programmed.
- Tu rn on the ignition.
- Press the button :::> fig. 29 for approximately 5 seconds .
You will hear a beep and the symbol in the button flashes
three times.
Programming is necessary :
• after the t ires have been rotated on the vehicle, or the spare tire
is used,
• if tires with new wheel sensors are used .
All pressure warning indicators in the disp lay wil l be canceled . The
system malfunction error message will not disapp ear until the .,_
Page 49 of 316
Opening and closing
Keys
Key set
Fig. 31 Key set
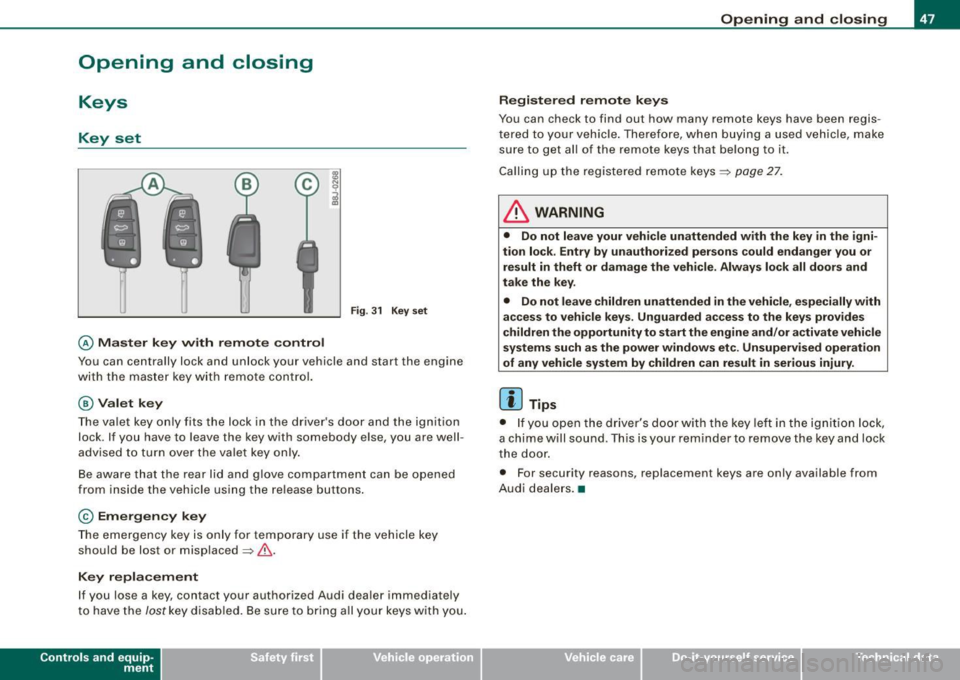
© Master key with remote control
Y ou can centrally lock and unlock your vehicle and start the engin e
wi th the mas te r key wit h remote c ontr ol.
@ Valet key
The va let key only fits the lock in the driv er's d oor an d the ignition
lock . If you have to leave the key with somebody e lse, you are well
advised to turn over the vale t key o nly .
B e aware that t he rea r lid and glove co mpartme nt can be opened
from inside the vehicle usi ng the re lea se b uttons .
© Emergency key
The emerge ncy ke y is only fo r tempo rar y use if the vehicle key
should be lost or misplaced=> &.
Key replacement
If you lose a ke y, contact your authorized Audi dea ler immedia tely
t o have the
Jost k ey disa bled. Be s ure to br ing a ll yo ur k eys wit h you.
Con tro ls and eq uip
ment
Opening and closing
Registered remote keys
You can chec k to find out how many remote keys have been regi s
te re d to you r vehi cle. Th ere for e, wh en bu ying a used v ehicle , ma ke
su re to get a ll of t he remote keys that belong to it.
Ca lling up the registered remote ke ys =>
page 27.
& WARNING
• Do not leave your vehicle unattended with the key in the igni
tion lock . Entry by unauthorized persons could endanger you or
result in theft or damage the vehicle . Always lock all doors and
take the key .
• Do not leave children unattended
in the vehicle, especially with
access to vehicle keys . Unguarded access to the keys provides
children the opportunity to start the engine and/ or a ctivate vehicle
systems such as the power windows etc . Unsupervised operation
of any vehicle system by children can result in serious injury .
[ i ] Tips
• If y ou open the dri ver's doo r with the key left i n the ig nit ion loc k,
a chi me will sound . Thi s is your rem inde r to remove the ke y an d lock
t he door.
• F or security reasons, replacement keys are only available from
A udi deale rs.•
Vehicle care I I irechnical data
Page 52 of 316
Openin g a nd clo sin g
• Cana da mo dels: RSS-210 of Industry Canada .
Operation is subject to the following conditions:
• this device may not cause harmful interference, and
• this device must accept any interference received, including
interference that may cause undesired operation.
0 Note
The manufacturer is not responsible for ANY RADIO OR TV interfer ence caused by unauthorized modifications to this equipment.
Changes or modifications to this unit not express ly approved by the
party responsib le for comp liance could void the user's authority to
operate the equipment .•
Power locking system
General description
The power locking system Jocks or unlocks all doors
simultaneously.
The power locking system in your vehicle incorpora tes the following
functions:
• Central locking function
• Remote contro l feature
=> page 48 .
• Anti -Theft Alarm System
=> page 56.
You can lock and un lock the veh icle from outside either with the
k ey s or the remot e control transmitter inside the master key.
Act ivatin g the po wer loc king sy ste m lo ck s or unlo cks all doo rs
s im ult ane ously.
You can also open or close the windows when you lock or unlock the
driver's door using the key . For safety reasons, you cannot use the
remote contro l to open/close the windows . T
he selective unlock feature makes it possible to open just the
driver's door.
If the power locking system should malfunction, you can lock and
unlock each lock individually using the vehicle key.
A ut om atic lock ing*
The automatic locking feature locks all the vehicle doors and the rear lid when you drive faster than 9 mph (15 km/h) .
You can unlock the vehicle from the inside by:
• removing the key from the ignition switch (the vehicle wi ll auto
matically un lock itself) or
• pressing the unlock part of the power lock switch
oc:'i:l or
pulling the door handle (to open the door).
If you wish, you can have an authorized Audi dealer convert your
power door lock system to automatic loc king .
Unlo cking /locking t he vehi cle
When you unlo ck your vehicle:
• T he anti -theft alarm system is deactivated briefly .
• The vehicle interior lights illuminate for approximate ly 30
seconds.
When you
lo ck the vehicle:
• All doors are locked .
• The anti-theft alarm system is activated.
• The vehicle interior lights turn off.
• The anti-theft alarm system is activated . The horn of the anti
theft a larm system wi ll sound and the anti -theft alarm system readi
ness light, located in the center of the instrument panel below the
windshie ld on the right side of the air vent, will start to blink. .,_
Page 53 of 316
& WARNING
• When you lock your vehicle from outside, nobody -especially
children · should remain inside the vehicle. Remember, when you
lock the vehicle from the outside the windows cannot be opened
from the inside.
• When you leave the vehicle, always remove the ignition key and
take it with you. This will prevent passengers (children, for example) from accidentally being locked in the vehicle should they
accidentally press the power locking switch.
• Do not leave children inside the vehicle unsupervised. In an
emergency it would be impossible to open the doors from the
outside without the key.
[ i J Tips
• In the event of a crash with airbag deployment all locked doors
will be automatically unlocked to give access to the vehicle occu
pants from the outside .
• If the power locking system should malfunction, you can lock
each door individually using the vehicle key.
• If the power locking system should fail, you can still open the
fuel tank flap in an emergency=>
page 218.
• You are well advised not to keep valuables inside an unattended
vehicle, visible or not . Even a properly locked vehicle cannot provide
the security of a safe! •
Contro ls and eq uip
ment
Opening and closing
Unlocking and locking the vehicle with the
remote control
How the remote control works.
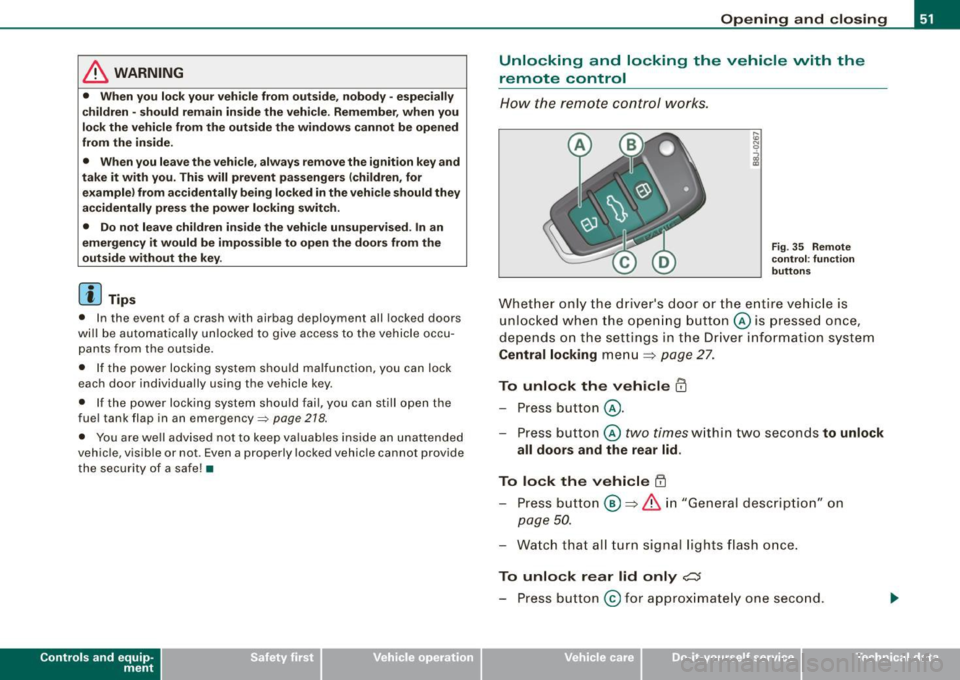
Fig. 35 Remote
control : function
buttons
Whether only the driver's door or the entire vehicle is
unlocked when the opening button@ is pressed once,
depends on the settings in the Driver information system
Central locking menu => page 27.
To unlock the vehicle m
-Press button @.
- Press button ©
two times within two seconds to unlock
all doors and the rear lid .
To lock the vehicle 63
-Press button @ => & in "General description" on
page 50.
-Watch that all turn signal lights flash once.
To unlock rear lid only e::5
-Press button @for approximately one second.
Vehicle care I I irechnical data
Page 57 of 316

Rear lid/trunk lid
Opening and closing rear lid
You can open the rear lid from inside the vehicle using a
switch in the driver's door.
Opening the rear lid
Fig . 40 Driver's door:
remote rear lid release
-Press the center button e::5 on the master key or pull the
release button
C::5 in the dr iver's door=> fig. 40. The rear
lid is unlocked.
Opening rear lid
- Lift the rear lid.
Closing the rear lid
- Pull the rear lid down and allow it to drop gently=>& .
& WARNING
• After closing the rear lid, always pull up on it to make sure that
it is properly closed. Otherwise it could open suddenly when the
vehicle is moving.
Con tro ls and eq uip
ment
Opening and closing
& WARNING !continued)
• To help prevent poisonous exhaust gas from being drawn into
the vehicle, always keep the rear lid closed while driving. Never
transport objects larger than those which fit completely into the
luggage area, because then the rear lid cannot be fully closed.
• Never leave your vehicle unattended especially with the rear lid
left open. A child could crawl into the car through the luggage
compartment and pull the lid shut, becoming trapped and unable
to get out. To reduce the risk of personal injury, never let children
play in or around your vehicle . Always keep the rear lid as well as
the vehicle doors closed when not in use.
[ i] Tips
• If the rear lid is open or not properly locked when the ignition is
turned on, the door and rear lid warning~
page 24 appears in the
instrument cluster display.
• If the rear lid on a locked vehicle is unlocked with the m iddle
button
~ on the remote key, the rear lid is automatically locked
again immediately after closing . This is indicated by the turn signals
blinking. •
Vehicle care
I I irechnical data