2008 AUDI TT ROADSTER alarm
[x] Cancel search: alarmPage 29 of 316

& WARNING
Always observe the posted speed limits and adjust your speed to suit prevailing road, traffic and weather conditions. Never drive
your vehicle faster than the maximum speed rating of the tires
installed. •
Menu display
Introduction
0 ,...
"' 9 .., 00 m
Fig. 15 Wiper lever:
Controls for the menu
display
"'
"'
~ m
Fig . 16 Display: Start
menu
Some functions in your vehicle can be set, activated , and controlled
by
Menus (e.g. Acoustic Park Assist*). With these menus you can
Con tro ls and eq uip
ment
Driver information system
also select the information shown in the DIS display, which operates
only with the ignition switched on. Operation is controlled by the
I Reset) button and the rocker switch on the wiper lever::::, fig. 15.
The Start menu shows you the different display types:
Set
Check
Menu off
Each display type in the Start menu contains a submenu with addi
tional options.
Set
Check
Menu off Clock ::::, page 28
Lighting* => page 71, "Daytime
running lights (DRU
(USA
models)" =>
page 73
Computer ::::, page 28
Acoustic park assist* => page 109
Speed alarm (speed ::::, page 38
warning)
Language (6 languages) => page 28
Units (distance, fuel con-::::, page 28
sumption, temperature)
Wiper (service position) => page80
Window => page 58
Doors (Auto-lock) => page 50
Service ::::, page 25
Vehicle ID number* => page288
Engine oil temperature*
l! AII of the messages shown in vehicles without
menu display appear on the display screen.
•
Vehicle care I I Technical data
Page 52 of 316
Openin g a nd clo sin g
• Cana da mo dels: RSS-210 of Industry Canada .
Operation is subject to the following conditions:
• this device may not cause harmful interference, and
• this device must accept any interference received, including
interference that may cause undesired operation.
0 Note
The manufacturer is not responsible for ANY RADIO OR TV interfer ence caused by unauthorized modifications to this equipment.
Changes or modifications to this unit not express ly approved by the
party responsib le for comp liance could void the user's authority to
operate the equipment .•
Power locking system
General description
The power locking system Jocks or unlocks all doors
simultaneously.
The power locking system in your vehicle incorpora tes the following
functions:
• Central locking function
• Remote contro l feature
=> page 48 .
• Anti -Theft Alarm System
=> page 56.
You can lock and un lock the veh icle from outside either with the
k ey s or the remot e control transmitter inside the master key.
Act ivatin g the po wer loc king sy ste m lo ck s or unlo cks all doo rs
s im ult ane ously.
You can also open or close the windows when you lock or unlock the
driver's door using the key . For safety reasons, you cannot use the
remote contro l to open/close the windows . T
he selective unlock feature makes it possible to open just the
driver's door.
If the power locking system should malfunction, you can lock and
unlock each lock individually using the vehicle key.
A ut om atic lock ing*
The automatic locking feature locks all the vehicle doors and the rear lid when you drive faster than 9 mph (15 km/h) .
You can unlock the vehicle from the inside by:
• removing the key from the ignition switch (the vehicle wi ll auto
matically un lock itself) or
• pressing the unlock part of the power lock switch
oc:'i:l or
pulling the door handle (to open the door).
If you wish, you can have an authorized Audi dealer convert your
power door lock system to automatic loc king .
Unlo cking /locking t he vehi cle
When you unlo ck your vehicle:
• T he anti -theft alarm system is deactivated briefly .
• The vehicle interior lights illuminate for approximate ly 30
seconds.
When you
lo ck the vehicle:
• All doors are locked .
• The anti-theft alarm system is activated.
• The vehicle interior lights turn off.
• The anti-theft alarm system is activated . The horn of the anti
theft a larm system wi ll sound and the anti -theft alarm system readi
ness light, located in the center of the instrument panel below the
windshie ld on the right side of the air vent, will start to blink. .,_
Page 54 of 316
Openin g a nd clo sin g
PANIC B utton
- Push the red button@to activate the panic function. The
horn sounds and the turn signals flash.
- Push the button ® again to deactivate the panic func-
tion.
The remote controls allows you to:
• lock or unlock the vehicle
• selectively unlock the rear lid.
The turn signals wi ll flash briefly whenever you lock or unlock the
vehic le. Also, the interior light will come on or go off whenever you
open or close the driver's door.
The transmitter and battery are located in the head of the remote control. The receiver is located inside the vehicle. The maximum
effective range depends on several things. Remember, if the battery
is weak, the effective range decreases.
The remote -contro l key contains a fo ld -out key that you can use to
manually lock or unlock the vehicle and to start the engine.
If you need to replace the remote contro l, or if you need to have it
repaired, you must see your authorized Audi dealer . On ly then can
you use the key again.
& WARNING
Re ad and follo w all WARNINGS ~ & in "General de scr iption " on
page 50 .
[ i J Tips
• The remote control key is automatically deactivated when the
ignition is switched on.
• The operation of the remote control key can be temporarily
disrupted by interference from transmitters in the vicinity of the vehic
le working in the same frequency range (e.g . a cell phone,
radio equipment).
• In order to make sure the locking function is working, you should
a lways keep your eye on the vehic le to make sure it is properly
locked .
• Do not use the remote control if you are inside the ca r, otherwise
you may unintentionally lock the vehicle, and then you would set off
the an ti-theft alarm when you try to start the engine or open a door.
I n case this happens anyhow, push the unlock button@.
• Use the panic func tion only if you are in an emergency
situation. •
Resetting the remote control
The remote con tr o l must be reset if the vehicle does not
unlock.
- Press the unlock
III button on the remote control.
- Unlock or lock the vehicle once at t he door lock using the
stem of the remote control key.
T he synchronization process must not take longer than 30
seco nds. •
Page 58 of 316
Opening and closing
Rear Lid Emergency Release
If the rear li d cannot be opened, an emergency relea se is
provided.
F ig . 41 Stor ag e
c omp artm en t b etw een
th e se at ba cks
Fig . 4 2 Handl e for
e m erg ency re lease
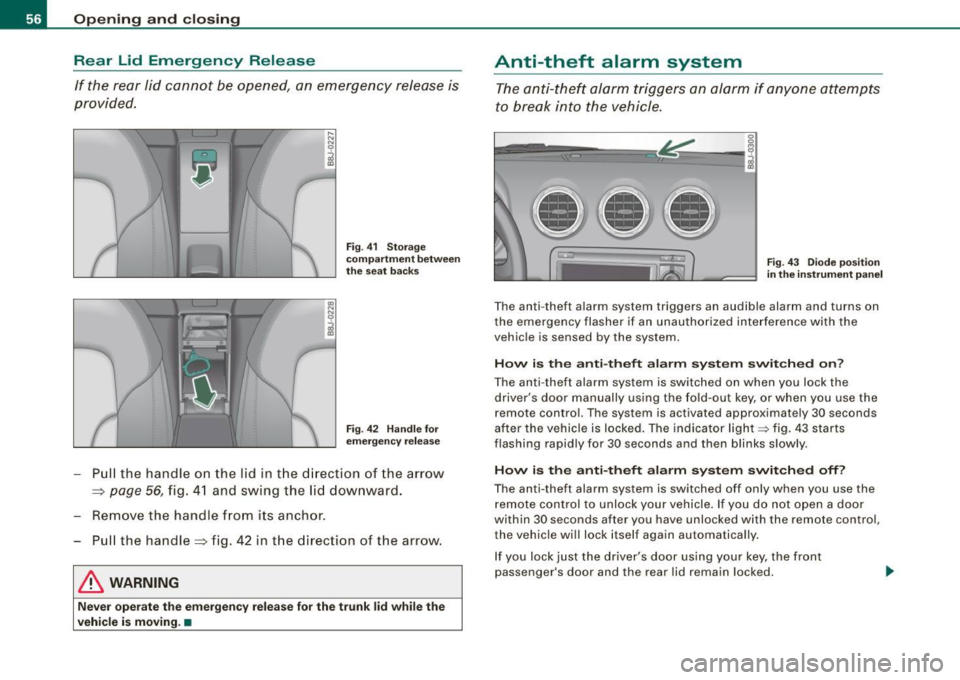
- Pull the handle on the lid in t he d irecti on of th e arrow
=> page 56, fig . 41 and swing the lid downwa rd.
- Remove the handle f rom its anchor .
Pull the handle=> fig. 42 in the direction of the arrow.
& WARNING
Ne ver oper ate the emergen cy r ele ase fo r the tr unk lid while the
vehicle is moving .•
Anti-theft alarm system
The a nti-thef t alarm triggers an alarm if anyone attempts
to break into the vehicle .
---
Fig . 4 3 Diode p osition
in th e ins tru ment pan el
T he an ti- theft alarm system triggers an audible alarm and turns on
the emergency flasher if an unauthorized inte rference with the
vehic le is sensed by the system.
How i s the anti -theft alarm sy stem switched on ?
The anti-theft alarm system is switched on when you lock the
driver's door manually using the fold-out key, or when you use the
remote control. The system is activated approximate ly 30 seconds
after the vehicle is locked. The indicator light~ fig. 43 starts
flashing rapidly for 30 seconds and then blinks slowly .
How is the anti-theft alarm sy stem switched off ?
The anti- theft alarm system is switched off only when you use the
r emote control to unl ock your vehicle. I f you do not open a doo r
wi thin 30 seconds after you have unlocked with the remote control ,
the vehic le will lock itse lf again automatically .
If you lock just the driver's door using your key, the front
passenger's door and the rear lid remain locked.
Page 59 of 316

When w ill the anti th eft ala rm sys te m be trigge re d ?
When the vehicle is locked, the alarm system mon itors and protects
the following parts of the vehicle :
• engine compartment
• luggage compartment
• doors
• ignition
When the system is activated, the alarm will be triggered if one of the doors , the engine hood or the rear lid are opened, or if the igni
tion is turned on .
The anti -theft alarm sys tem will also go off when the battery is
disconnected .
You can also trigger the alarm by pressing the PANIC button on your remo te -control key . This will alert other people in case of emer
gency. Press the
PANIC button again to turn off the a larm.
H ow is the ant i-th eft al arm s witche d o ff wh en
t riggered ?
The alarm system is switched off when you unlock the vehic le using
t he remote -con tro l key or when the ignition is swi tched on . The
alarm will also switch itse lf off when it comes to the end of its cycle .
Emerg en cy fla sher
The emergency flasher wil l b link brief ly when the doors, engine
hood and rear lid are properly closed .
If the emergency flashers do not blink, check the doors, engine hood
and rear lid to make sure they are properly closed. If you close a
door, the hood or the rear lid with the anti-theft alarm switched on,
the emergency flashers will blink only after you have closed the
door or lid.
[ i ] Tips
• For the ant i-theft a larm system to function properly, make sure
all vehicle doors and windows are closed before leaving the vehicle.
Con tro ls and eq uip
ment
Op ening and clo sing
• When you open the vehicle from the driver's door using the key,
the central locking swi tch wi ll work only after you have swi tched on
the ignition .•
Power windows
Controls
The driver can operate all windows.
M ;g 0
i
F ig . 44 Dri ver's door:
p ow er w in dow
swi tc hes
Fi g. 4 5 Passe nger's
d oor : p ow er window
swi tch
If the respective switch is pushed or pulled the window wil l
open or close. The power window sw itches have a
two-posi -
tion fun ction :
1)1,
Vehicle care I I Technical data
Page 65 of 316
-Press and hold the switch down throughout the closing
procedure.
The folding top is completely open or closed when the indicator
light <:-in the instrument cluster goes out. The door windows are
automatically lowered about 20 mm while the top is opening .
& WARNING
Never drive the vehicle with the top not properly latched! Other
wise there is a risk that the top will be opened by the wind. This
can result in injuries and damage to the vehicle.
[ i] Tips
• Opening and closing the automatic convertible top is possible
below posted speed limits in city driving . At speeds above 4 mph (6
km/h), you can use the "convenience opening" function. The folding
top is completely opened by briefly pulling on the switch.
• The indicator light for the folding top goes out as soon as it is
correctly latched .
• In order not to discharge the battery unnecessarily, the top
should not be lowered or raised several times in succession with the
engine not running.
• I f the indicator light for the folding top flashes when the switch
is actuated, there is a malfunction. •
Controls and equip
ment
Folding top
Ap plies to vehic les: with power fo lding top
Convenience opening and closing of power
top
The power top can alternatively be opened and closed by
turning the key in the driver's door Jock.
Fig. 52 Keyturns for
opening and closing
the power top
Please note that convenience opening requires one addi
tional action for vehicles equipped with anti-theft alarm.
This applies to convenience closing as well.
Convenience opening
-Press the unlock button CD on the remote control key to
unlock the vehicle.
- Turn the key in the driver door
once to position @
=> fig. 52.
- Within two seconds turn the key a second time and hold
it in this position until the power top has completely
retracted.
Convenience closing
- Turn the key in the driver door once to position @
=> fig. 52.
I • •
Page 232 of 316

___ C_h_ e_ c_k _in --== g'-- a_n _d_ f_il _li _n ..:::g:::..- ___________________________________________ _
& WARNING (continued)
• The auxiliary electric fan is temperature controlled and can
switch on suddenly even when the engine is not running.
• The auxiliary radiator fan switches on automatically when the
engine coolant reaches a certain temperature and will continue to
run until the coolant temperature drops. •
Brake fluid
Checking brake fluid level
The brake fluid level can be checked with a quick glance.
Fig. 155 Engine
compartment: brake
fluid reservoir
Before you check anything in the engine compartment,
always read and heed all WARNINGS =>
& in "Working in
the engine compartment" on
page 220.
- Read the brake fluid level from the brake fluid reservoir
~ fig. 155. The brake fluid level must be between the
"MIN" and "MAX" markings.
The brake fluid reservoir is located behind the rear partition of the
engine compartment on the left side~
page 221 .
The fluid level may drop slightly after some time due to the auto
matic adjustment of the brake pads. This is not cause for alarm.
If the brake fluid level falls
considerably below the "MIN" mark, the
brake warning/indicator light (U .S. models:
BRAKE , Canadian models:
ill) will come on~ page 20 and~ page 32. Do not continue to
operate the vehicle . The complete brake system should be thor
oughly checked by an authorized Audi dealer or other qualified
facility and the cause corrected. If the brake fluid level is too low, the
brake warning/indicator light will illuminate. Contact an authorized
Audi dealer
immediately .•
Changing brake fluid
Have the brake fluid changed by an experienced techni
cian.
Brake fluid absorbs moisture from the air. If the water content in the
brake fluid is too high, corrosion in the brake system may result
after a period of time. The boiling point of the brake fluid will als o
decrease considerably and decrease braking performance.
Therefore, the brake fluid must be changed
every two years. Always
use new brake fluid which conforms to Federal Motor Vehicle Stan
dard "FMVSS 116 DOT 4".
The brake fluid reservoir can be difficult to reach, therefore, we
recommend that you have the brake fluid changed by your autho
rized
Audi dealer . Your dealer has the correct tools, the right brake
fluid and the know -how to do this for you.
& WARNING
• Brake fluid is poisonous. It must be stored only in the closed
original container out of the reach of children!
• Brake failure can result from old or inappropriate brake fluid.
Observe these precautions : .,,_
Page 235 of 316
__________________________________________ C_ h _ e_c _k _in _ g =- a_ n __ df _i_ lli _n ___ g __ __
•
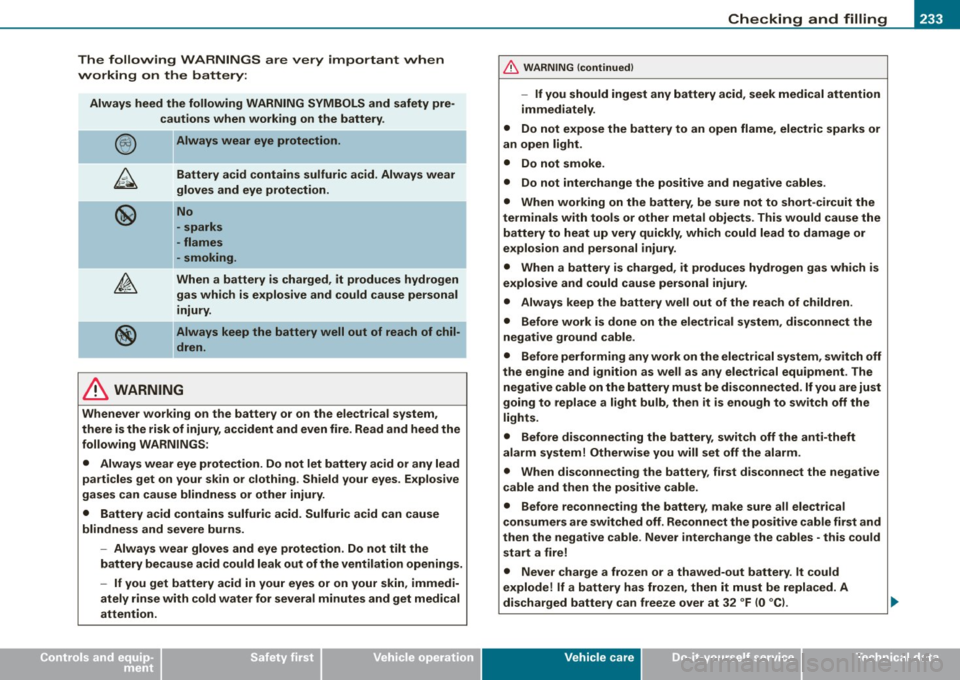
The following WARNINGS are very important when
working on the battery:
Always heed the following WARNING SYMBOLS and safety pre
cautions when working on the battery .
Always wear eye protection.
Battery acid contains sulfuric acid. Always wear
gloves and eye protection.
No
- sparks
- flames
- smoking.
When a battery is charged, it produces hydrogen
gas which is explosive and could cause personal
injury.
Always keep the battery well out of reach of chil
dren.
& WARNING
Whenever working on the battery or on the electrical system,
there is the risk of injury, accident and even fire. Read and heed the
following WARNINGS:
• Always wear eye protection. Do not let battery acid or any lead
particles get on your skin or clothing. Shield your eyes. Explosive
gases can cause blindness or other injury.
• Battery acid contains sulfuric acid. Sulfuric acid can cause
blindness and severe burns.
- Always wear gloves and eye protection. Do not tilt the
battery because acid could leak out of the ventilation openings.
- If you get battery acid in your eyes or on your skin, immedi
ately rinse with cold water for several minutes and get medical
attention.
& WARNING (continued)
-If you should ingest any battery acid, seek medical attention
immediately.
• Do not expose the battery to an open flame, electric sparks or
an open light.
• Do not smoke.
• Do not interchange the positive and negative cables .
• When working on the battery, be sure not to short -circuit the
terminals with tools or other metal objects. This would cause the battery to heat up very quickly, which could lead to damage or
explosion and personal injury.
• When a battery is charged, it produces hydrogen gas which is
explosive and could cause personal injury.
• Always keep the battery well out of the reach of children.
• Before work is done on the electrical system, disconnect the
negative ground cable.
• Before performing any work on the electrical system, switch off
the engine and ignition as well as any electrical equipment. The
negative cable on the battery must be disconnected.
If you are just
going to replace a light bulb, then it is enough to switch off the
lights.
• Before disconnecting the battery, switch off the anti-theft
alarm system! Otherwise you will set off the alarm.
• When disconnecting the battery, first disconnect the negative
cable and then the positive cable.
• Before reconnecting the battery, make sure all electrical
consumers are switched off. Reconnect the positive cable first and
then the negative cable . Never interchange the cables - this could
start a fire!
• Never charge a frozen or a thawed-out battery. It could
explode! If a battery has frozen, then it must be replaced. A
discharged battery can freeze over at 32 °F (0 °CI. .,,_
Vehicle care
I t •