2008 AUDI S6 lock
[x] Cancel search: lockPage 93 of 390

Seat memory
Applies to vehicles: w ith seat memory
Driver's seat memory
The seat adjustment settings for two drivers con be stored
using the memory buttons in the driver's door.
Fig . 81 Driver's door :
Seat memory
In addition to the setting for the driver's seat, the settings for the
steering column* and both exterior mirrors can be stored.
Storing and reca lling settings
Using the memory buttons 1 and 2, you can store and recall the
settings for two different drivers=> fig. 81.
The current settings are also automatically stored on the remote control key being used when the vehicle is locked. When the vehicle
is unlocked, the settings stored on the remote contro l key being
used are automatically recalled. This function has to be activated in
the MMI =>
page 92, "Activating remote control key memory".
Turning seat memory on and off
If the [ ON/OFF ! switch is depressed, the seat memory is inoperative.
Th e word OFF next to the [ON/OFF) switch illuminates.
All the stored settings are retained. We recommend using the
I ON/OFF] switch and deactivating the seat memory if the vehic le is
Con tro ls and eq uip
ment
Seats and storage
only going to be used temporarily by a driver whose settings are not
going to be stored. •
Applies to veh icles: w ith seat memory
Storing and recalling a seat position
Before you can store or recall your seat position, the
I ON/OFF] button must be engaged (down) .
Storing settings
- Adjust the driver's seat~
page 88.
-Adjust the steering column*~ page 123.
-Adjust both outside mirrors~ page 83.
-Press the !SE T] button and hold it down. At the same
time, press one of the memory buttons for at least one
second.
- Release the buttons. The settings are now stored under
the corresponding memory button.
Recalling settings
- Driver's door open -press the desired memory button.
- Driver's door closed -press the corresponding memory
button until the stored position is reached.
Successful storage is confirmed audibly and by the light in the [ SET)
button illuminating.
When the vehicle is
locked, the current settings are stored and
assigned to the remote control key. But the settings stored on
memory buttons 1 and 2 are not deleted. They can be recalled at any
time. When the vehicle is
unloc ked, the settings stored on the
remote control key are restored . ..,
Vehicle care I I irechnical data
Page 94 of 390

Seats and storage
If your vehicle is driven by other persons using your remote control key, you should save your individual seat position on one of the
memory buttons. You can recall your settings again simply and
conveniently by pressing the corresponding memory button. When
the vehicle is locked, these settings are automatically re-assigned to
the remote control key and stored.
& WARNING
• For safety reasons, the seat setting can only be recalled when
the vehicle is stationary -otherwise you risk having an accident .
• In an emergency, the recall operation can be stopped by
pressing the [
ON/OFF I button or by briefly pressing any given
memory button. •
Applies to vehicles: with seat memory
Activating remote control key memory
To be able to recall the stored settings with the remote
control key, the function hos to be activated in the MM/.
Fig . 82 MMI display :
Drivers' seat
- Select Seat adjustment in the CAR menu.
- Select
Driver's seat.
-Select Remote control key on to activate the remote
control key memory::::> fig. 82. •
Rear seats
General information
Safe transportation of passengers on the rear seats
requires proper safety precautions.
All passengers on the rear seats must be seated in compliance with
the safety guidelines explained in=>
page 202 and=> page 212. The
correct seating position is critical for the safety of front
and rear
seat passengers alike=>
page 196.
& WARNING
• Occupants in the front and rear seats must always be properly
restrained.
• Do not let anyone ride in the vehicle without the head restraints
provided. Head restraints help to reduce injuries.
• Loose items inside the passenger compartment, can fly
forward in a crash or sudden maneuver and injure occupants.
Always store articles in the luggage compartment and use the
fastening eyes, especially when the rear seat backs have been
folded down.
• Read and heed all WARNINGS=>
page 196, "Proper seating
positions for passengers in rear seats" .•
Page 95 of 390

Rear window shelf
You can place light articles of clothing on the rear
window shelf behind the seatback.
& WARNING
Whenever you are driving, do not leave any hard objects on the
rear window shelf or allow your pet to sit on the shelf. These could
become a hazard for vehicle occupants in the event of sudden
braking or a crash!
[ i] Tips
• A vent slot is located between the shelf and the rear window. Do
not block the vent with any items you may place on the rear window
shelf.
• Do not place bulky items on the rear window shelf as they would
restrict or block the driver's vision through the rear view mirror.•
Controls and equip
ment
Seats and storage
Head restraints
Adjusting head restraints, front seats
The head restraints must be adjusted properly to provide
protection.
Fig. 83 Front seats
head restraints
The head restraints on the front seats can be adjusted to
provide safe support to head and neck at the optimum
height. When optimally adjusted, the top of the restraint
should be level with the top of the head=>
page 197,
"Proper adjustment of head restraints".
Raising head restraint
-Grasp the side of the head restraint with both hands.
- Adjust the head restraints so that the top of the head
restraint is
at least level with your eyes or higher.
Lowering head restraint
-With one hand push down on the middle of the head
restraint.
- With the other hand press the release knob@=> fig. 83
and push the head restraint down. ..,
I • •
Page 98 of 390

Seats and storage
Applies to vehic les: with front arm rest
Arm rest
The arm rest can be adjusted to several positions and
contains a storage compartment.
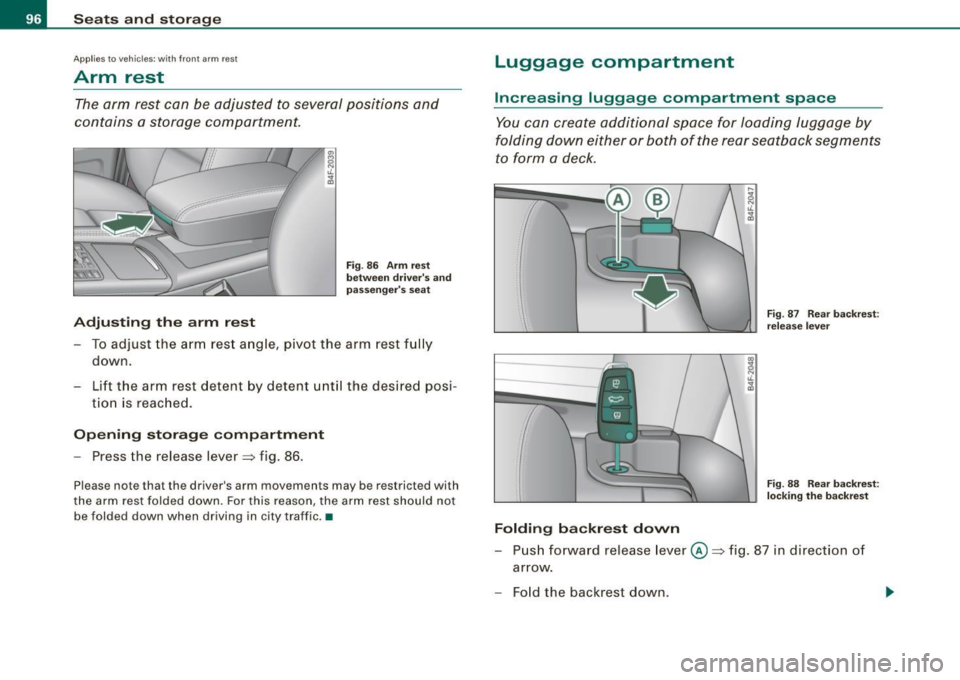
Adjusting the arm rest
Fig. 86 Arm rest
between driver's and
passenger's seat
-To adjust the arm rest angle, pivot the arm rest fully
down.
- Lift the arm rest detent by detent until the desired posi-
tion is reached.
Opening storage compartment
-Press the release lever=> fig. 86.
Please note that the driver's arm movements may be restricted with
the arm rest folded down. For this reason, the arm rest should not
be folded down when driving in city traffic . •
Luggage compartment
Increasing luggage compartment space
You can create additional space for loading luggage by
folding down either or both of the rear seatback segments
to form a deck.
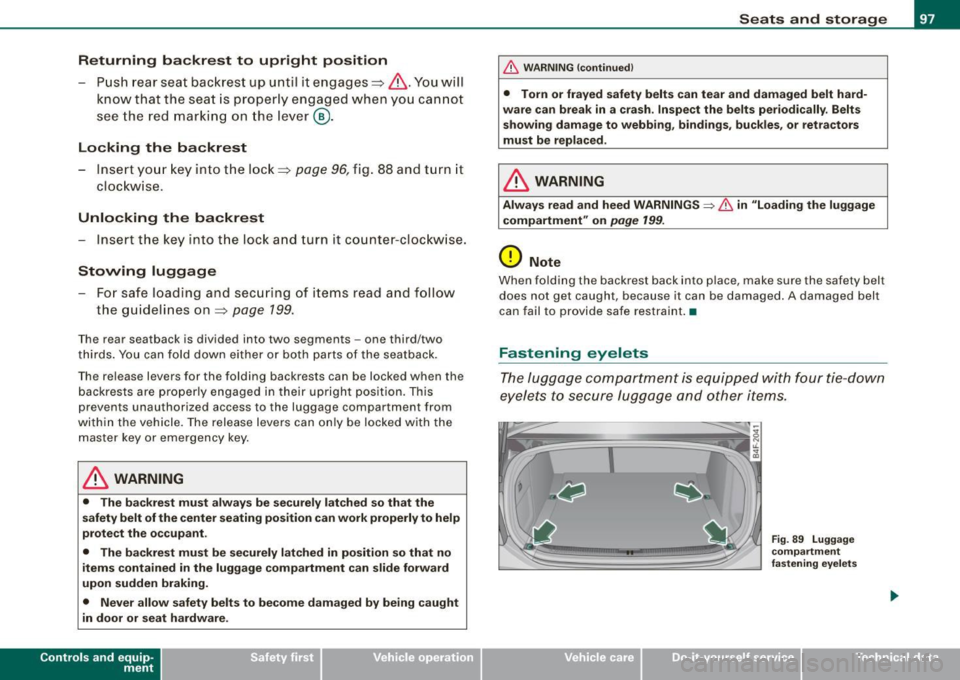
Folding backrest down
F ig. 87 Rear backrest :
release lever
Fig. 88 Rear backrest:
locking the backrest
- Push forward release lever@=> fig. 87 in direction of
arrow .
- Fold the backrest down .
Page 99 of 390

Returning backrest to upright position
-Pu sh rear seat back rest up until it engages~ &. You will
know that the sea t is proper ly engaged when you can not
see the red marki ng on the lever ®·
Locking the backrest
- Insert yo ur key into t he lock~ page 96, fig. 88 and t urn it
cloc kwise.
Unlocking the backrest
- Inse rt th e key i nto the lock a nd tu rn it co unter-cloc kw ise.
Stowing luggage
- For safe loading and securing of i tems read and follow
the guidelines on~ page 199.
The rear seatback is divided into two segments -one thi rd/two
thirds . You can fold down either or both parts o f the seatback.
T he release levers for the fold ing backrests can be locked when the
backrests are pro pe rly engaged in their up right pos itio n. This
prevents unauthorized access to the luggage compartment from
with in the veh icle. The release levers can on ly be locked with the
master key or emer gency key.
& WARNING
• The ba ck rest must al ways be securely lat ched so that the
safety b elt of the center seating position can work properly to help
protect the o ccupant .
• The backre st must be securely latched in po sition so that no
items contained in the luggage compartment can slide forward
upon sudden brak ing .
• Never allow safety belt s to be come damaged by being caught
in door or seat hardware .
Con tro ls and eq uip
ment
Seats and storag e
& WARNING !continued )
• Torn or frayed safety belts can tear and damaged belt hard
ware can b reak in a cra sh . Inspect the belts periodically . B elt s
showing damage to webbing , bindings, buckles , or retractor s
must be replaced .
& WARNING
Always read and heed WARNINGS ::::;, & in "Loading the luggage
c ompartment " on
page 199.
(D Note
When fo lding the backrest back into p lace, make sure the safety belt
does not get caught, because it can be damaged. A damaged belt
can fail to provide safe restraint . •
Fastening eyelets
T he luggage compartment is equipped with four tie -down
eyelets to secure lugga ge and other items.
Vehicle care I I
Fig . 8 9 Luggage
co mp artment
fastening eye lets
irechnical data
Page 109 of 390
![AUDI S6 2008 Owners Manual ________________________________________________ S_e_ a_ ts_ a_ n_d _ s_t _o _r_ a ....; g::;. e _ __._
0 Note
To avoid damaging the socket, only use plugs that fit properly.
[ i] Tips AUDI S6 2008 Owners Manual ________________________________________________ S_e_ a_ ts_ a_ n_d _ s_t _o _r_ a ....; g::;. e _ __._
0 Note
To avoid damaging the socket, only use plugs that fit properly.
[ i] Tips](/manual-img/6/57596/w960_57596-108.png)
________________________________________________ S_e_ a_ ts_ a_ n_d _ s_t _o _r_ a ....; g::;. e _ __._
0 Note
To avoid damaging the socket, only use plugs that fit properly.
[ i] Tips
When the engine is off and accessories are still plugged in and are
on, the vehicle battery can still be drained. •
Storage
General overview
There are numerous places to store items in your vehicle.
Glove compartment
Storage compartment in roof
Coat hooks
Storage compartment in the trunk
& WARNING
~ page 107
~ page 108
~ page 109
~ page99
• Always remove objects from the instrument panel. Any items
not stored could slide around inside the vehicle while driving or
when accelerating or when applying the brakes or when driving
around a corner.
• When you are driving make sure that anything you may have
placed in the center console or other storage locations cannot fall
out into the footwells. In case of sudden braking you would not be
able to brake or accelerate.
• Any articles of clothing that you have hung up must not inter
fere with the driver's view. The coat hooks are designed only for
lightweight clothing. Never hang any clothing with hard, pointed
or heavy objects in the pockets on the coat hooks. During sudden
Con tro ls and eq uip
ment
& WARNING !continued)
braking or in an accident -especially if the airbag is deployed -
these objects could injure any passengers inside the vehicle. •
Glove compartment
The media player is in the glove compartment.
To open glove compartment
Fig. 104 Unlocking
button for glove
compartment
Press the button ::!}...--==> fig. 104 (arrow) - the lid opens
automatically.
To close glove compartment
Push the glove compartment lid up until the lock
engages.
In the glove compartment lid you will find a place to store a pen and
a pad of paper.
CD changer*
The CD changer for the radio system and the Navigation drive* is located in the glove compartment . How to change CDs is described
in the pertinent Owner's Manual.
tJ,,,
Vehicle care I I irechnical data
Page 110 of 390

• ..__S_ e_a _ t_ s_ a_ n_ d_ s_t _o _r_ a-' g==- e ________________________________________________ _
& WARNING
To reduce the risk of personal injury in an accident or sudden stop,
always keep the glove compartment closed while driving.
[ i J Tips
Should you not be able to open the glove compartment as
described, make sure the valet key function is not activated
=> page 51. •
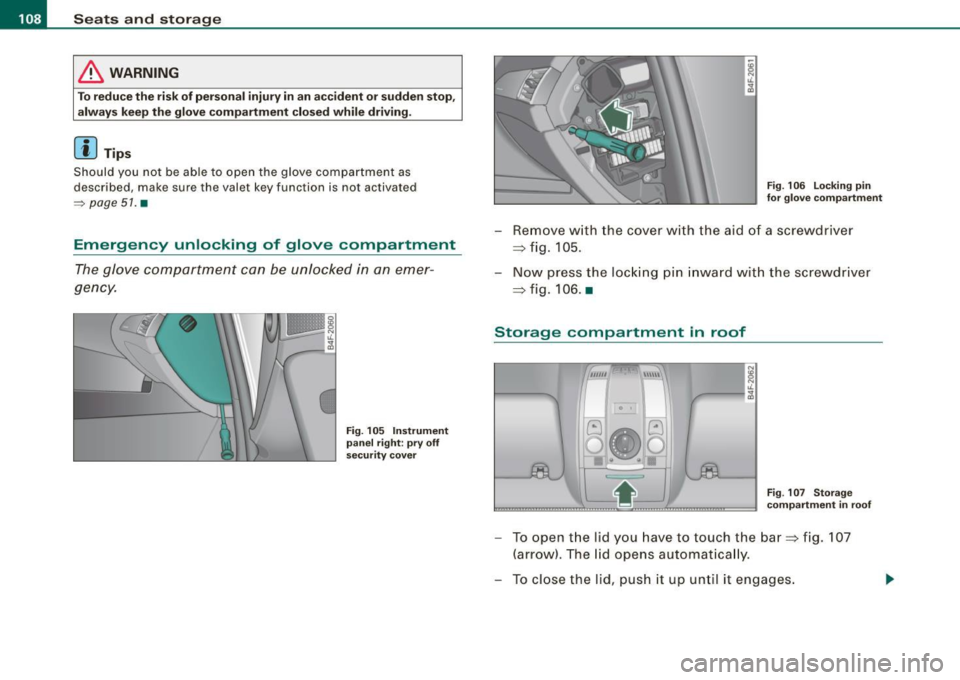
Emergency unlocking of glove compartment
The glove compartment can be unlocked in an emer
gency.
Fig. 105 Instrument
panel right : pry off
security cover
Fig. 106 Locking pin
for glove compartment
- Remove with the cover with the aid of a screwdriver
=> fig. 105.
- Now press the locking pin inward with the screwdriver
=> fig. 106. •
Storage compartment in roof
~1 0 I
G
0
••
8
"' iL
"' a,
Fig. 107 Storage
compartment in roof
- To open the lid you have to touch the bar=> fig. 107
(arrow). The lid opens automatically.
- To close the lid, push it up until it engages.
Page 115 of 390
![AUDI S6 2008 Owners Manual Warm and cold -
----------------
Turning on and off [ECON ON /OFF]
Turning th e air conditioning on
- Press [ECON ON/OF F] briefly, or
- Press [AUTO].
Turning the air conditioning AUDI S6 2008 Owners Manual Warm and cold -
----------------
Turning on and off [ECON ON /OFF]
Turning th e air conditioning on
- Press [ECON ON/OF F] briefly, or
- Press [AUTO].
Turning the air conditioning](/manual-img/6/57596/w960_57596-114.png)
Warm and cold -
----------------
Turning on and off [ECON ON /OFF]
Turning th e air conditioning on
- Press [ECON ON/OF F] briefly, or
- Press [AUTO].
Turning the air conditioning off
-Press the !ECON ON/OFF] button for at least 2 seconds to
switch the a ir cond itioning off and to block the air supply
f rom the outs ide .
"O FF" appears in the display.
Sw itchin g air c ondit ioning on /off
- Switching the air conditioning system on/off is done with
climate contro l switched on.
- Press the !ECON ON/OFF] button just
briefly.
The air conditioner turns back on if you press one of the control
buttons or the contro l knob.
ECON operation is indicated by the glowing LED on the right next to
the word ECON.
The air conditioning (compressor) is turned off in ECON mode .
"ECON" means "Economy" . You save fuel by switching off the air
conditioning=>
page 119.
Please note that vehicle interior temperature cannot be lower than
the outside temperature in the ECON mode. The air is no t cooled or
dehumidified. This can cause the windows to fog up.
[ i ) Tip s
Residu al he at: With the ignition turned off, you can activate the
residual heat function by pressing the !ECON ON/OFF] button. The
residual heat from the coo lant can be used to heat the vehic le inte-
Controls and equip
ment
rior. The residual heat function is turned off automatical ly after 30
minutes .•
Aut omati c mod e [AUTO ]
The automatic mode is the standard setting for all
seasons.
Turning on AUTO
- Selec t temperature be tween 60 °F (+ 1 6 °C) and 84 °F
(+28 °C) .
-Press [AUTO]~ page 112, fig. 109.
Automatic operation ensures constant temperatures in the interior and dehumidifies the air inside the vehicle . Air temperature, volume
and distribution are controlled automatically to reach or maintain
the desired interior temperature as quickly as possib le. Fluctuations
in exter ior temperature and the effects of temperature from the
position of the sun are compensated for automatica lly.
This operating mode works only in the adjustable temperature range, from 60 °F ( + 16 °C) to 84 °F ( +28 °C). If a temperature below
60 °F (+16 °C) is se lected,
LO appears in the display. At temperatures
above 84 °F (+28 °Cl,
HI is displayed. At both extreme settings,
climate control runs continuously at maximum cooling or heating
power. There is no temperature regulation. •
I • •