2008 AUDI A5 fuel
[x] Cancel search: fuelPage 102 of 313
Heating and cooling 100adequate cooling effect, you should not close these outlets
completely.Applies to vehicles: with deluxe automatic air conditionerEconomical operation of the air conditioner
Economical operation of the air conditioner will help to
save fuel.When the air conditioner is operating in the cooling mode it
reduces engine power and increases fuel consumption. To
ensure that the cooling mode is activated only when really
necessary, please note the following points:
– Switch off the cooling mode by pressing the AC button
(LED off) if you wish to save fuel.
– You should also switch off the cooling mode by pressing
the AC button (LED off) if you open the windows or the
tilting panorama roof* while driving.
– If the vehicle has heated up after standing in the sun,
open the windows and doors for a short time to cool the
vehicle.
For the sake of the environmentBy saving fuel you also reduce the amount of pollutants emitted
from your vehicle.
Deluxe automatic air conditioner -
basic settingsApplies to vehicles: with deluxe automatic air conditionerGeneral notes
You can change the basic settings for the air conditioner
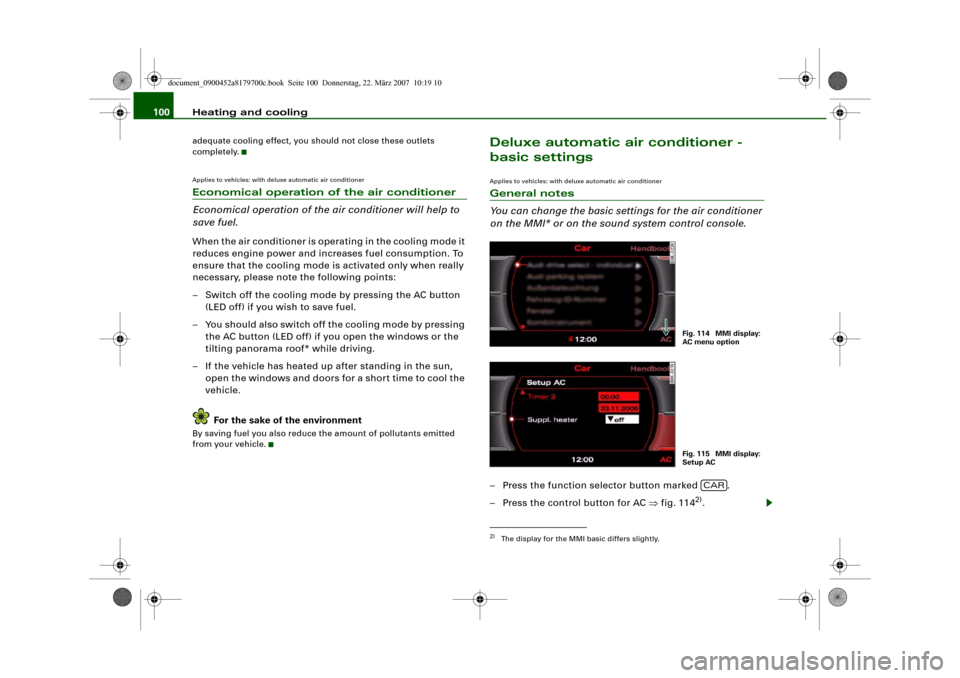
on the MMI* or on the sound system control console.– Press the function selector button marked .
– Press the control button for AC ⇒fig. 114
2).
2)The display for the MMI basic differs slightly.
Fig. 114 MMI display:
AC menu optionFig. 115 MMI display:
Setup AC
CAR
document_0900452a8179700c.book Seite 100 Donnerstag, 22. März 2007 10:19 10
Page 109 of 313
Heating and cooling107
Controls
Safety
Driving tips
General maintenance
Self-help
Technical data Switch to for automatic control of the air distribution.
The air distribution setting will be shown on the MMI display
⇒page 106, fig. 122 for a few seconds if the MMI is switched on.
Applies to vehicles: with deluxe automatic air conditioner plusDefrosting
The windscreen and side windows are defrosted or
demisted as quickly as possible.– To switch on, press the button.
– To switch off, press the button again, or press the
button.The temperature is regulated automatically. The air output is
increased to maximum and most of the air comes out of the outlets
below the windscreen.
The air recirculation mode is switched off when the button is
pressed.Applies to vehicles: with deluxe automatic air conditioner plusHeated rear window
The rear window heating helps to demist the rear window.– Press the
button to switch the rear window heating on
and off.
The rear window heating only works when the engine is running. An
indicator lamp in the button lights up when the rear window heater
is switched on.
Depending on the outside temperature, the rear window heating
switches off automatically after about 10 to 20 minutes.
The rear window heating can be switched on permanently by
pressing the
button for longer than two seconds. It will then remain on until the ignition is switched off. When the rear window
heating is switched on, this setting will remain activated for 15
minutes after switching off the ignition.
If the engine is started again during this period of 15 minutes, the
rear window heating will be switched on for about 10 to 20 minutes,
depending on the exterior temperature. This means you do not have
to manually switch on the rear window heating again if the vehicle
has only been parked for a short time.
For the sake of the environment
Switch off the heated rear window manually as soon as the rear
window is clear. By saving electrical power you can also save fuel.Applies to vehicles: with deluxe automatic air conditioner plusAC mode Deactivating the AC mode
– Press the button.
Activating the AC mode
– Press the button again.In the AC mode, the air cooling system is switched on and the
heating and ventilation are regulated automatically.
Note
If the LED in the AC button should continue to light up when the AC
mode has been switched off (i.e. the air conditioner has been
switched off) this is due to a defect in one of the air conditioner
components. If a malfunction should occur, please contact a quali-
fied workshop.
AUTO
AUTO
ACACAC
document_0900452a8179700c.book Seite 107 Donnerstag, 22. März 2007 10:19 10
Page 111 of 313
Heating and cooling109
Controls
Safety
Driving tips
General maintenance
Self-help
Technical data
Applies to vehicles: with deluxe automatic air conditioner plusEconomical operation of the air conditioner
Economical operation of the air conditioner will help to
save fuel.When the air conditioner is operating in the cooling mode it
reduces engine power and increases fuel consumption. To
ensure that the cooling mode is activated only when really
necessary, please note the following points:
– Switch off the cooling mode by pressing the AC button
(LED off) if you wish to save fuel.
– You should also switch off the cooling mode by pressing
the AC button (LED off) if you open the windows or the
tilting panorama roof* while driving.
– If the vehicle has heated up after standing in the sun,
open the windows and doors for a short time to cool the
vehicle.
For the sake of the environmentBy saving fuel you also reduce the amount of pollutants emitted
from your vehicle.
Deluxe automatic air conditioner plus
- basic settingsApplies to vehicles: with deluxe automatic air conditioner plusGeneral notes
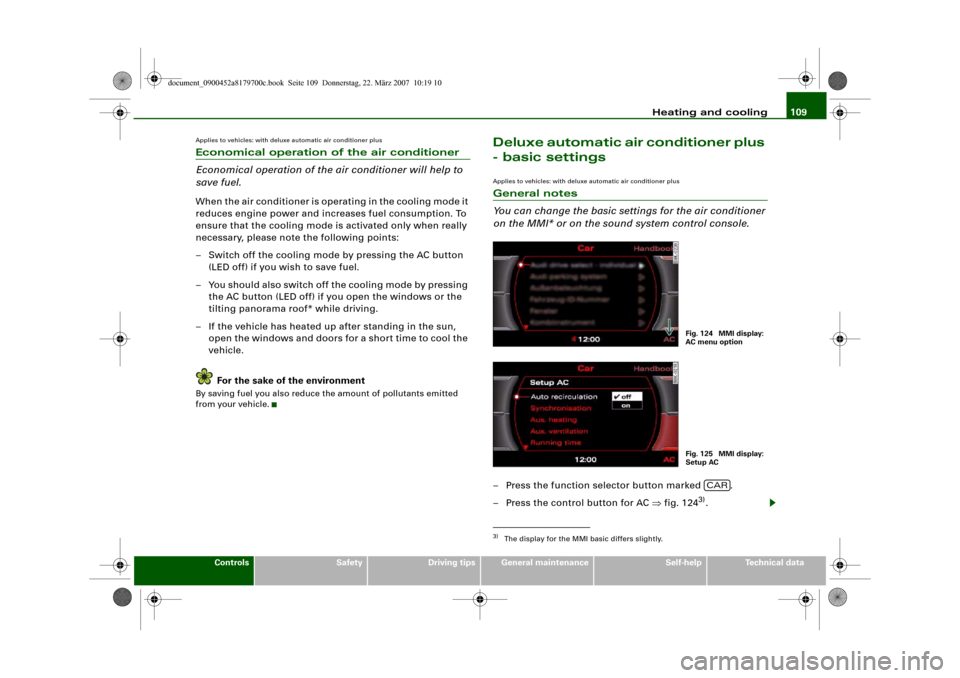
You can change the basic settings for the air conditioner
on the MMI* or on the sound system control console.– Press the function selector button marked .
– Press the control button for AC ⇒fig. 124
3).
3)The display for the MMI basic differs slightly.
Fig. 124 MMI display:
AC menu optionFig. 125 MMI display:
Setup AC
CAR
document_0900452a8179700c.book Seite 109 Donnerstag, 22. März 2007 10:19 10
Page 113 of 313
Heating and cooling111
Controls
Safety
Driving tips
General maintenance
Self-help
Technical data
Auxiliary heating and auxiliary
ventilationApplies to vehicles: with auxiliary heating - under development at the time of printingDescription
The auxiliary heating and ventilation systems heat and
cool the interior independently of the engine.The auxiliary heating
works in conjunction with the air condi-
tioner system, but does not rely on heat from the engine. Instead of
this, the system burns fuel. The system's main function is to warm
up the interior of the vehicle and to defrost the windows in cold
weather.
The auxiliary heating system can be used both when the vehicle is
stationary and when driving (to provide extra heat while the engine
is warming up).
The auxiliary ventilation also operates independently of the
engine. This feature can be used to cool the interior with the blower
when the vehicle is left parked in the sun.
The system will automatically activate either the auxiliary heating or
the auxiliary ventilation mode, depending on the actual tempera-
ture measured inside the car and the temperature you have set with
the air conditioner controls. It is possible to alter the temperature
setting while the auxiliary heating/ventilation is running.
Switching on and off
There are two different ways of switching on the auxiliary
heating/ventilation system.
•
Immediate start: You can switch the auxiliary heating/ventilation
on and off at any time in the MMI Car menu ⇒page 112. You can
also switch the system on and off using the remote control
⇒page 114.
•
Switching on via timer: You can programme various start times
using the timers ⇒page 112. However you must first activate the timer before the auxiliary heating/ventilation system will switch on
automatically.
The auxiliary heating/ventilation will switch itself off at the end of
the programmed running time. The running time can be set to 15,
30, 45 or 60 minutes ⇒page 113.
WARNING
•
The auxiliary heating must not be allowed to run when the
vehicle is in a confined space because it can give off toxic fumes.
•
To avoid any possible fire risk, never have the auxiliary heating
switched on when refuelling the vehicle.
•
Because of the high temperatures which occur when the auxil-
iary heating is running, make sure when parking the car that the
exhaust outlet under the car is not obstructed in any way and that
the exhaust gases do not come into contact with flammable mate-
rials (fire risk).Note
•
It is advisable to open the air outlets when using the auxiliary
heating/ventilation.
•
The auxiliary heating/ventilation will not switch on if the fuel in
the tank has reached the reserve zone.
•
The auxiliary heating/ventilation will not switch on if the battery
charge level is low.
•
The symbols
(auxiliary ventilation) or
(auxiliary heating)
flash in the instrument cluster next to the clock display when the
auxiliary heating/ventilation is switched on. Both symbols light
continuously when the timer is activated.
•
At low outside temperatures some visible water vapour may
form in the engine compartment. This is a normal phenomenon,
and no reason for concern.
document_0900452a8179700c.book Seite 111 Donnerstag, 22. März 2007 10:19 10
Page 116 of 313
Heating and cooling 114Applies to vehicles: with auxiliary heating - under development at the time of printingRemote control
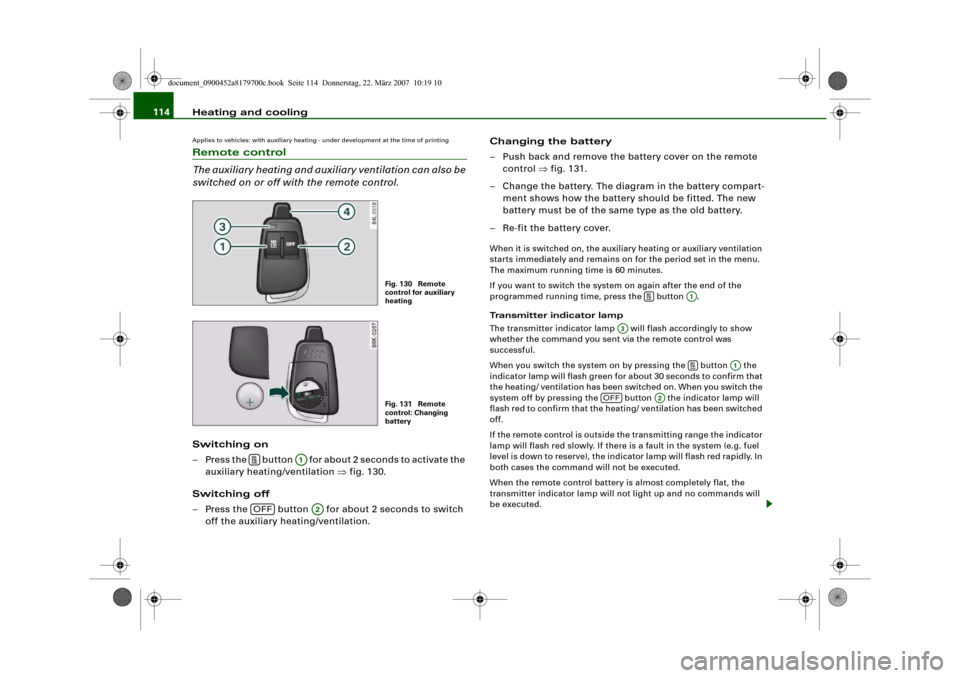
The auxiliary heating and auxiliary ventilation can also be
switched on or off with the remote control.Switching on
– Press the button for about 2 seconds to activate the
auxiliary heating/ventilation ⇒fig. 130.
Switching off
– Press the button for about 2 seconds to switch
off the auxiliary heating/ventilation.Changing the battery
– Push back and remove the battery cover on the remote
control ⇒fig. 131.
– Change the battery. The diagram in the battery compart-
ment shows how the battery should be fitted. The new
battery must be of the same type as the old battery.
– Re-fit the battery cover.
When it is switched on, the auxiliary heating or auxiliary ventilation
starts immediately and remains on for the period set in the menu.
The maximum running time is 60 minutes.
If you want to switch the system on again after the end of the
programmed running time, press the button .
Transmitter indicator lamp
The transmitter indicator lamp will flash accordingly to show
whether the command you sent via the remote control was
successful.
When you switch the system on by pressing the button the
indicator lamp will flash green for about 30 seconds to confirm that
the heating/ ventilation has been switched on. When you switch the
system off by pressing the button the indicator lamp will
flash red to confirm that the heating/ ventilation has been switched
off.
If the remote control is outside the transmitting range the indicator
lamp will flash red slowly. If there is a fault in the system (e.g. fuel
level is down to reserve), the indicator lamp will flash red rapidly. In
both cases the command will not be executed.
When the remote control battery is almost completely flat, the
transmitter indicator lamp will not light up and no commands will
be executed.
Fig. 130 Remote
control for auxiliary
heatingFig. 131 Remote
control: Changing
battery
A1
OFF
A2
A1
A3
A1
OFF
A2
document_0900452a8179700c.book Seite 114 Donnerstag, 22. März 2007 10:19 10
Page 132 of 313
Automatic gearbox 130Automatic gearboxmultitronic
®
Applies to vehicles: with multitronic®IntroductionThe vehicle is equipped with an electronically controlled continu-
ously variable transmission (multitronic
®). Unlike conventional
automatics, the gear ratios are not shifted in fixed steps but contin-
uously variable. This gives smoother transmission and makes for
better fuel economy.
The gearbox selects the gear ratio and shifts up or down automati-
cally according to the gear change programmes stored in the
control unit ⇒page 133, “Dynamic gear control program (DCP)”.
The gearbox also has the tiptronic manual shift feature. This system
allows the driver to select gears manually if required ⇒page 134.
Please note that on vehicles with a multitronic gearbox, torque is
transmitted via a multi-plate clutch, and not via a torque converter
as on conventional automatics. This means that the car will not
“creep” as much as conventional automatics when the engine is
idling if you stop temporarily with the selector lever in position D, S
or R.
Applies to vehicles: with multitronic®General notes on using multitronic
®
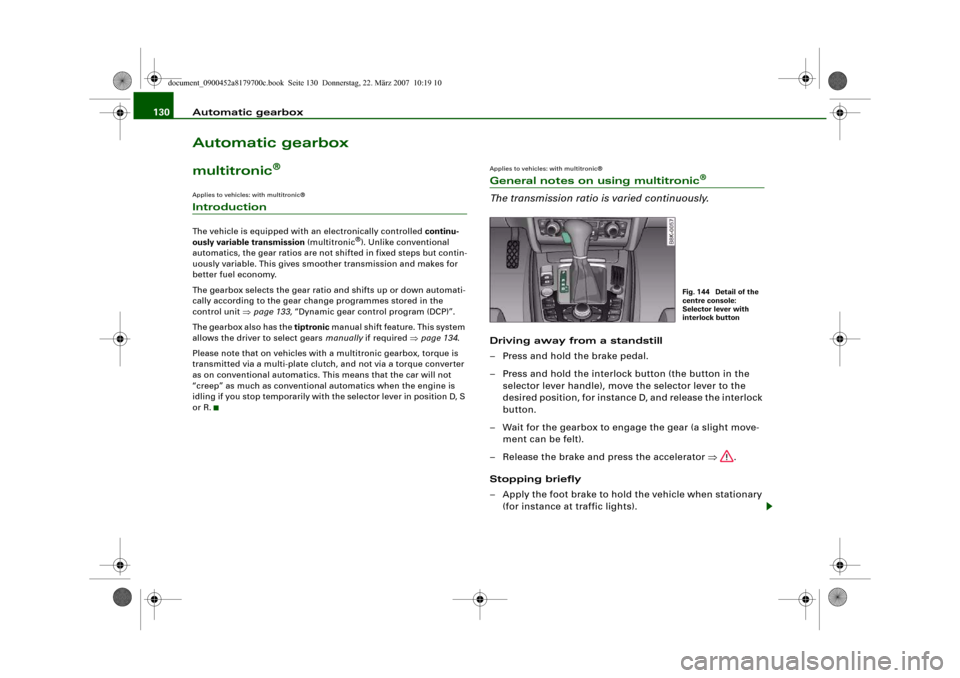
The transmission ratio is varied continuously.Driving away from a standstill
– Press and hold the brake pedal.
– Press and hold the interlock button (the button in the
selector lever handle), move the selector lever to the
desired position, for instance D, and release the interlock
button.
– Wait for the gearbox to engage the gear (a slight move-
ment can be felt).
– Release the brake and press the accelerator ⇒.
Stopping briefly
– Apply the foot brake to hold the vehicle when stationary
(for instance at traffic lights).
Fig. 144 Detail of the
centre console:
Selector lever with
interlock button
document_0900452a8179700c.book Seite 130 Donnerstag, 22. März 2007 10:19 10
Page 135 of 313
Automatic gearbox133
Controls
Safety
Driving tips
General maintenance
Self-help
Technical data
– Press the brake pedal and at the same time press in the
interlock button.Automatic selector lever lock
The selector lever is locked in the P and N positions when the igni-
tion is on. The brake pedal must be depressed before the lever can
be moved out of either of these positions. The following message
appears in the instrument display as a reminder for the driver when
the selector lever is in position P or N:
WHEN STATIONARY APPLY FOOTBRAKE WHILE SELECTING GEAR.
The selector lever lock only works if the vehicle is stationary or
driving at speeds up to 5 km/h. At higher speeds the selector lever
lock in the N position is disengaged automatically.
The selector lever lock is not engaged if the selector lever is moved
quickly through position N (e.g. when shifting from R to D). This
makes it possible, for instance, to “rock” the vehicle backwards and
forwards if it is stuck in snow or mud. The selector lever lock
engages automatically if the brake pedal is not depressed and the
lever is in position N for more than about a second.
Interlock button
The interlock button on the selector lever handle prevents the driver
from inadvertently engaging particular gears. Press the button in to
disengage the selector lever lock. The illustration shows the selector
lever positions in which the button has to be pressed, highlighted in
colour ⇒page 132, fig. 146.
Safety interlock for ignition key
The key can only be withdrawn with the ignition switched off and
the selector lever in position P. When the ignition key is removed,
the selector lever is locked in position P.
Applies to vehicles: with multitronic®Kick-down feature
The kick-down feature is designed to give maximum
acceleration.When the accelerator pedal is pressed right down past the point of
resistance at full throttle, the gearbox will select a lower gear,
depending on road speed and engine speed. While you keep the
accelerator depressed the engine speed is automatically controlled
to give your vehicle maximum acceleration.
WARNING
Please note that if the road surface is slippery or wet, the kick-
down feature could cause the driving wheels to spin, which could
result in skidding.Applies to vehicles: with multitronic®Dynamic gear control program (DCP)
The multitronic
® gearbox is controlled electronically.
The vehicle is equipped with an electronically controlled gearbox.
The gear ratios are selected automatically according to preset gear-
shift programmes.
When you drive at moderate speeds the gearbox will select the most
economical shift programme. It will then change up early and delay
the downshifts to give better fuel economy.
If you drive at higher speeds with heavy acceleration, if you open the
throttle quickly, or if you use the kick-down or the car's maximum
speed, the gearbox will automatically select the more “sporty” shift
programmes.
The gearbox is self-adapting, and continuously selects the most
suitable shift programme. At the same time, the driver can also
make the gearbox switch to a more "sporty" programme by pressing
document_0900452a8179700c.book Seite 133 Donnerstag, 22. März 2007 10:19 10
Page 207 of 313
Your vehicle and the environment205
Controls
Safety
Driving tips
General maintenance
Self-help
Technical data
Your vehicle and the environmentRunning inA new vehicle should be run in over a distance of 1,500 km. For the
first 1,000 km the engine speed should not exceed 2/3 of the
maximum permissible engine speed – do not use full throttle and do
not tow a trailer or caravan. From 1,000 to 1,500 km you can gradu-
ally increase the engine rpm and road speed.
During its first few hours of running, the internal friction in the
engine is greater than later on when all the moving parts have
bedded down.
How the vehicle is driven for the first 1,500 km also influences the
engine quality. After the first 1,500 km you should continue driving
at moderate engine speeds, in particular when the engine is cold.
This helps to reduce wear and tear on the engine and increases the
potential mileage which can be covered by the engine.
You should also avoid driving with the engine speed too low.
Change down to a lower gear when the engine no longer runs
“smoothly”. Excessively high engine speeds are prevented by an
automatic rev limiter.Emission control systemsCatalytic converter
Applies to vehicles with petrol engine: The vehicle must only be
used with unleaded petrol, otherwise the catalytic converter will be
destroyed.
Never run the tank completely dry. The irregular fuel supply can
cause misfiring, which would allow unburnt fuel to enter the
exhaust system, which could cause overheating and damage the
catalytic converter.Diesel particulate filter
Applies to vehicles with diesel engine: The diesel particulate filter
can filter out almost all soot particles contained in the exhaust gas.
In normal driving conditions the filter is self-cleaning. Should the
self-cleaning function of the filter not be able to operate, e.g. when
the vehicle is continuously used only for short trips, the filter
becomes obstructed with soot and the symbol
for the diesel
particulate filter lights up ⇒page 37.
WARNING
•
Because of the high temperatures which can occur in the emis-
sion control system (catalytic converter or diesel particulate
filter), do not park the vehicle where the exhaust can come into
contact with flammable materials under the car (e.g. on grass or
at the forest edge). - Fire hazard!
•
Do not apply any underseal agents in the area around the
exhaust system - fire hazard!
Driving abroadChanging over headlight dip settings
The asymmetric low beams of the headlights are designed to light
up the near side of the road more intensely. If you drive in a country
where traffic drives on the opposite side of the road to the home
country, this will dazzle oncoming traffic.
Headlights with halogen bulbs: To avoid dazzling oncoming traffic
you can apply opaque stickers to certain parts of the headlight
lenses.
Headlights with xenon gas-discharge bulbs*: The headlight dip
settings must be changed to avoid dazzling oncoming traffic. For
document_0900452a8179700c.book Seite 205 Donnerstag, 22. März 2007 10:19 10