2008 AUDI A5 light
[x] Cancel search: lightPage 144 of 313
Audi parking system 142displayed on the MMI screen. The warnings will then return to the
normal volume if the vehicle approaches the detected obstacle
again.
Graphic display
The segments in the MMI display indicate the distance between the
vehicle and an obstacle. The number of segments shown depends
on the obstacle in front of or behind the vehicle. The closer the
vehicle gets to the obstacle the closer the segments move towards
the vehicle in the graphic ⇒page 141, fig. 155. At the latest when
the penultimate segment is highlighted the vehicle has reached the
danger (collision) zone. The driver should then not move back-
wards/forwards any further ⇒.
The graphic display in the MMI screen ⇒page 149 can be switched
off. The acoustic proximity warning will, however, remain activated.
The graphic display will be deactivated as soon as you press a func-
tion selector button on the MMI control console. The graphic
display in the MMI screen can also be switched on again manually
using the switch
. For more information on the MMI control
console please refer to the MMI Operating Manual.
Reversing camera (Rear View)
The mirrored image of the picture supplied by the reversing camera
⇒page 145, fig. 160 is shown in the MMI display. The picture
supplied by the reversing camera also includes orientation lines
and area markings which are projected onto the image to assist you
when parking ⇒page 143. The red line in the picture ⇒page 143,
fig. 156/⇒page 143, fig. 157 shows the collision zone. From here at
the latest, the driver should not reverse any further ⇒.
If your vehicle is near an obstacle, the proximity graphic will also
appear in the reversing camera image. This superimposed graphic
helps the driver to localise the critical area of the vehicle.
If the MMI screen is showing the graphic display you can switch to
the image of the reversing camera by pressing the control button
for the function Rear View ⇒page 141, fig. 155.If the MMI screen is showing the image of the reversing camera you
can switch to the graphic display by pressing the control button for
the function Graphic ⇒page 145, fig. 160.
The image of the reversing camera in the MMI screen ⇒page 149
can be switched off. The acoustic proximity warning will, however,
remain activated.
The image of the reversing camera will be deactivated as soon as
you press a function selector button on the MMI control console.
The image of the reversing camera will be shown again the next
time you park the vehicle. The image of the reversing camera can
also be switched on again manually using the switch
. For more
information on the MMI control console please refer to the MMI
Operating Manual.
WARNING
•
The sensors have blind spots in which obstacles are not regis-
tered. It is particularly important to ensure that there are no small
children or animals near the vehicle, as the sensors may not
always be able to detect them.
•
The parking aid cannot replace the full concentration of the
driver. The driver is always responsible for safety during parking
and other manoeuvres. Always keep a close watch on the area
around the vehicle.
•
Please note that low obstacles detected by the system may no
longer be registered by the sensors as the car moves closer, so the
system will not give any further warning. Certain kinds of obsta-
cles (such as wire fences, chains, thin painted posts or trailer draw
bars, etc.) may not always be detected by the system (accident
risk).Note
•
There is a slight delay in the picture display.
•
You can change the settings for the graphic display and the
reversing camera in the MMI ⇒page 149.
document_0900452a8179700c.book Seite 142 Donnerstag, 22. März 2007 10:19 10
Page 146 of 313
Audi parking system 144•
Off (no display).
The reversing camera can be switched on and off in the MMI
⇒page 149. The acoustic proximity warning will, however, remain
activated.
WARNING
•
The reversing camera has blind spots in which obstacles are
not registered. It is particularly important to ensure that there are
no small children or animals near the vehicle, as the reversing
camera may not always be able to detect them (accident risk).
•
The parking aid cannot replace the full concentration of the
driver. The driver is always responsible for safety during parking
and other manoeuvres. Always keep a close watch on the area
around the vehicle.
•
Please note that low obstacles detected by the system may no
longer be registered by the sensors as the car moves closer, so the
system will not give any further warning. Certain kinds of obsta-
cles (such as wire fences, chains, thin painted posts or trailer draw
bars, etc.) may not always be detected by the system (accident
risk).Note
•
There is a slight delay in the picture display.
•
To ensure that the reversing camera works properly, the lens of
the camera ⇒page 140, fig. 154 must be kept clean and free of
snow and ice. Please observe the additional notes on ⇒page 152.
•
If the boot lid is open the angle covered by the camera will
change. For this reason, the image of the reversing camera will then
be shown without orientation lines and blue area markings.
•
Please refer to the notes on towing ⇒page 147.
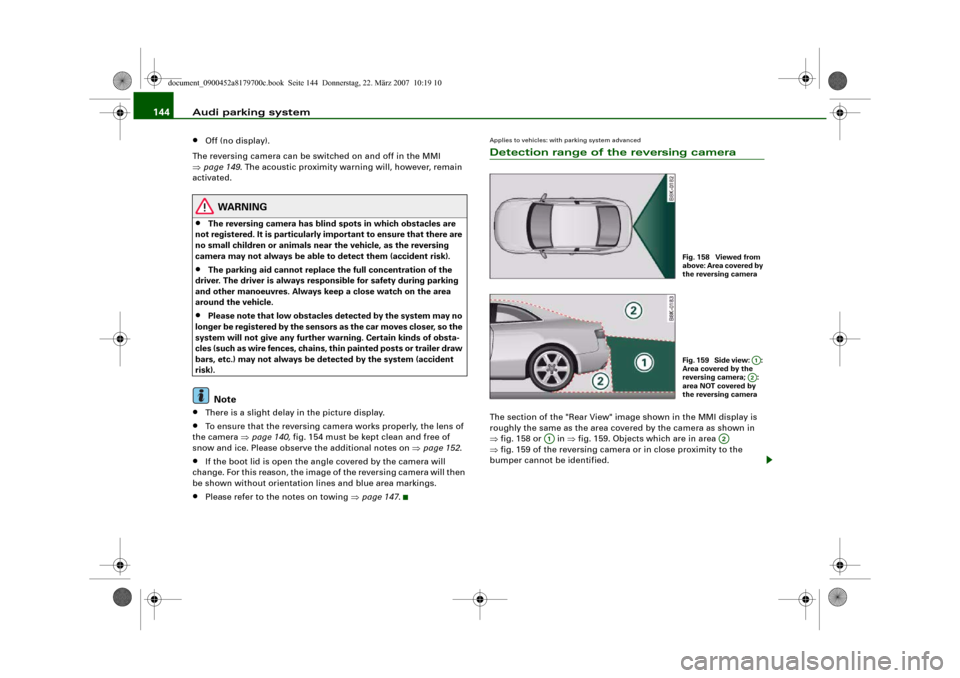
Applies to vehicles: with parking system advancedDetection range of the reversing cameraThe section of the "Rear View" image shown in the MMI display is
roughly the same as the area covered by the camera as shown in
⇒fig. 158 or in ⇒fig. 159. Objects which are in area
⇒fig. 159 of the reversing camera or in close proximity to the
bumper cannot be identified.
Fig. 158 Viewed from
above: Area covered by
the reversing cameraFig. 159 Side view: :
Area covered by the
reversing camera; :
area NOT covered by
the reversing camera
A1A2
A1
A2
document_0900452a8179700c.book Seite 144 Donnerstag, 22. März 2007 10:19 10
Page 149 of 313
Audi parking system147
Controls
Safety
Driving tips
General maintenance
Self-help
Technical data
– Press the control button for Mode ⇒page 145,
fig. 161. “Parking mode 2” ⇒fig. 162 will appear in the
MMI display.
– Reverse and align the position of your vehicle in such a
way that the dark blue area marking ⇒fig. 162
borders onto the vehicle behind or onto the parking
space line marking. If you are not parking next to obsta-
cles ⇒page 150 the long side of the dark blue marking
should border onto the kerb. The complete dark blue
area marking must fit into the parking space ⇒page 143,
fig. 157.
– When the vehicle is stationary turn the steering wheel to
the right as far as it will go.
– Reverse into the parking space. If you are not parking
next to obstacles ⇒page 150 the dark blue marking
should touch the kerb ⇒page 146, fig. 163. Stop your
vehicle.
– Turn the steering wheel to the left as far as it will go
(vehicle is stationary).
– Continue to reverse into the parking space until the
vehicle is standing parallel to the kerb. When reversing
you must also keep a close watch on the front end of the
vehicle ⇒.You can use “Parking mode 2” to park on the left or the right side of
the road. For this reason, the blue markings are shown in various
shades of blue. The dark blue area marking and the dark blue
curve are used when parking on the right side of the road. The
light blue area marking and the light blue curve are used
when parking on the left side of the road.When the turn signals are on, the display will only show the mark-
ings for the relevant side. To change the display to the other side,
just switch on the opposite turn signals.
The light blue and dark blue cur v e s s h o w y o u w h e n t o t u r n t h e
steering wheel in the other direction, i.e. when the curve touches
the kerb. ⇒page 146, fig. 163.
The distance from your rear bumper to the red line is approx.
40 cm. From here at the latest, the driver should not reverse any
further ⇒page 151.
WARNING
Please note that objects which are not touching the ground may
appear to be further away than they actually are (e.g. the bumper
of a parked vehicle, a towing bracket or the rear end of a truck). In
this case you should not use the orientation lines for judging the
distance (accident risk).
Caution
The MMI display shows the path of the rear end of the vehicle if you
were to reverse using the current steering angle. NB: The front end
of the vehicle swings out further than the rear.
Note
To ensure that the reversing camera works properly, the lens of the
camera ⇒page 140, fig. 154 must be kept clean and free of snow
and ice. Please observe the additional notes on ⇒page 152.Applies to vehicles: with parking system and towing bracketTo w i n g b r a c k e tOnce the electrical connector for the trailer socket is plugged in on
vehicles with a factory-fitted towing bracket the rear sensors for the
AAA2
A4
A2
A4
A1
A3
A3
A4
A5
A6
document_0900452a8179700c.book Seite 147 Donnerstag, 22. März 2007 10:19 10
Page 154 of 313
Audi parking system 152Safety notesApplies to vehicles: with parking systemFault warning for the acoustic parking aidparking system:
If you hear a long beep when you engage reverse gear, the rear
parking aid is not functioning correctly.
parking system plus*/parking system advanced*:
If you hear a long beep for a few seconds when you engage reverse
gear and the diode in the switch
* starts flashing, there is a fault
in the rear and front parking system with graphic display.
You will be notified of a system fault
•
when you manually activate the parking system via the switch
* ⇒page 138•
the first time you engage reverse gear after switching on the
ignition, or
•
immediately, if the fault is identified while you are using the
parking system.Note
If the system alerts you to a fault please have the fault rectified by
an Audi workshop or other qualified workshop.Applies to vehicles: with parking system advancedNotes on reversing cameraWe recommend that you practise parking with the reversing camera
in a quiet location (car park or similar) in order to become familiar
with the system, including the orientation lines and all the other
features. Ideally, the weather and light conditions should be good.Vehicles or other objects shown in the MMI display appear to be
further away or closer, if:
•
you are reversing from a horizontal surface up a gradient or
down a hill,
•
you are reversing towards protruding objects,
•
the vehicle has been loaded with a greater load on the rear.
The accuracy of the orientation lines and the blue area markings
decreases if:
•
the reversing camera does not provide a reliable image, e.g. if
visibility is poor or the lens is dirty,
•
the sun is so dazzling that you cannot see the image on the
display screen.
How to clean the lens of the reversing camera:
•
Moisten the lens using a commercially available, alcohol-based
glass cleaning agent and clean the lens with a dry cloth.
•
Remove snow using a small brush.
•
If possible, use de-icing spray to remove any ice ⇒.
WARNING
•
Even when using the reversing camera, the driver must still
keep a close watch on the area behind the vehicle and use the
mirrors.
•
For technical reasons, the reversing camera cannot show the
complete area behind the vehicle ⇒page 144, fig. 159. It is partic-
ularly important to ensure that there are no small children or
animals near the vehicle, as the reversing camera may not always
be able to detect them (accident risk).
•
The parking aid cannot replace the full concentration of the
driver. The driver is always responsible for safety during parking
and other manoeuvres. Always keep a close watch on the area
around the vehicle.
document_0900452a8179700c.book Seite 152 Donnerstag, 22. März 2007 10:19 10
Page 155 of 313
Audi parking system153
Controls
Safety
Driving tips
General maintenance
Self-help
Technical data
•
Do not allow the camera images in the MMI display to distract
you from watching the traffic.
•
When parking or manoeuvring do not rely solely on the MMI
display. Some objects (e.g. narrow posts or bars) may - due to the
resolution of the display screen - not be displayed in a satisfactory
manner or may not be displayed at all.
•
Only use the reversing camera to assist you if it is supplying
you with a good and clear picture. The quality of the picture could
be impaired by adverse light, dirt on the lens or a defect (accident
risk).
•
If the MMI display is switched on and the picture is obscured or
the area behind the vehicle is not visible (e.g. due to a dirty or
defective lens) you must not use the reversing camera to assist
you when manoeuvring (accident risk).
•
The reversing camera produces two-dimensional images.
Please remember that ridges in the ground, parts protruding on
other vehicles or fixed objects jutting out are all more difficult to
detect on the MMI display screen due to a lack of spatial depth. In
some cases it may not be possible to detect them at all.
•
For safety reasons, you should not use the system if the posi-
tion and installation angle of the camera have been changed, e.g.
in a rear-end collision. Have it checked by a qualified workshop.
•
Only use the reversing camera when the boot lid is completely
closed. Please make sure that there are no objects mounted to the
rear end of the vehicle which could block the view of the reversing
camera.Caution
•
Never remove snow and ice from the lens of the reversing
camera using warm or hot water - danger of cracks appearing on the
lens.
•
Never use abrasive cleaning agents on the lens.WARNING (continued)
document_0900452a8179700c.book Seite 153 Donnerstag, 22. März 2007 10:19 10
Page 156 of 313
HomeLink 154HomeLinkUniversal transmitterApplies to vehicles: with HomeLinkDescription
The HomeLink universal transmitter can be programmed
to replace the hand-held controls of devices already in
use.HomeLink allows you to conveniently activate garage doors, estate
gates, security systems, home or office lighting and other electric
devices by means of control buttons inside your car.
HomeLink can replace up to three hand-held transmitters operating
existing devices on your property with a single universal trans-
mitter. This will be possible for most transmitters which control the
drive units for a garage door or external gates, etc. You can
programme the individual hand-held transmitters for your remote
control at or near the centre of the radiator grille. This is where the
control unit is located.
To be able to control systems with HomeLink, you need to perform
initial programming on the HomeLink transmitter first. If systems
fail to respond after the initial programming, check whether these
systems work with a "rolling code" (variable security code)
⇒page 155.
WARNING
When you are programming the HomeLink universal transmitter,
make sure that no persons or objects are close to the devices
receiving the transmitter signals. If a gate or door is inadvertently
set into motion during programming, persons might be injured or
other damage caused by moving parts.
Note
•
For additional information on HomeLink
® and/or products
compatible with HomeLink
®, please call the toll-free HomeLink
®
hotline (0) 08000466 35465 or alternatively +49 (0) 6838 907 277, or
visit the HomeLink
® website at: www.homelink.com
•
HomeLink
® is a registered trademark of Johnson Controls.
Applies to vehicles: with HomeLinkProgramming the universal transmitter
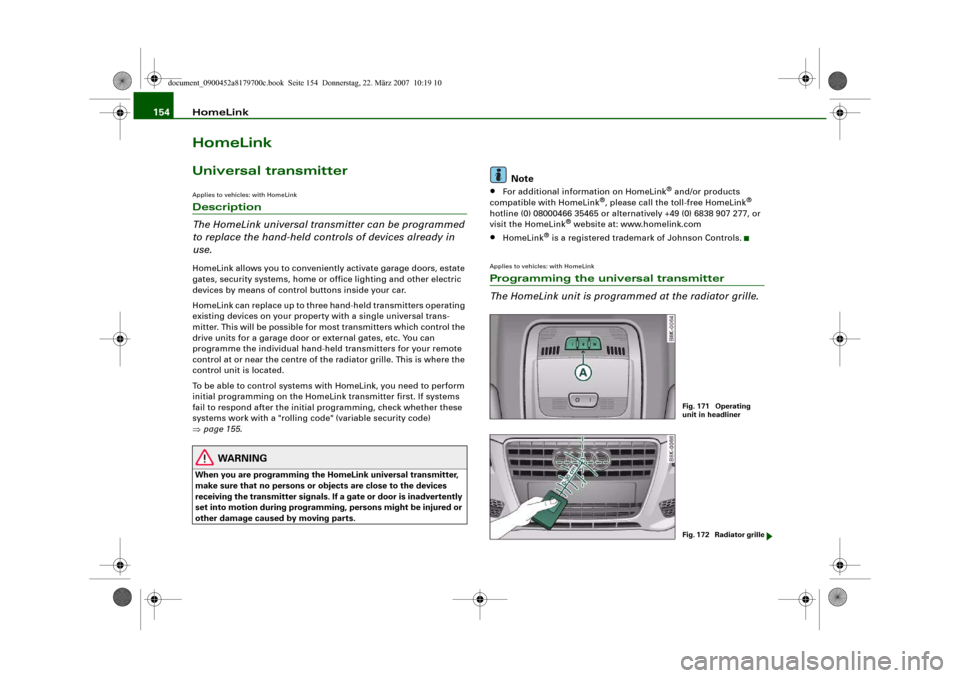
The HomeLink unit is programmed at the radiator grille.
Fig. 171 Operating
unit in headlinerFig. 172 Radiator grille
document_0900452a8179700c.book Seite 154 Donnerstag, 22. März 2007 10:19 10
Page 157 of 313
HomeLink155
Controls
Safety
Driving tips
General maintenance
Self-help
Technical data
At the operating unit
1. Switch on the ignition (do not start the engine).
2. Press and hold down the two outer HomeLink buttons
⇒page 154, fig. 171 until the indicator diode
⇒page 154, fig. 171 begins to flash after about
20 seconds. This procedure will delete the standard
factory settings and does not need to be repeated when
programming the other buttons.
3. Press the particular HomeLink button which you would
like to program.
4. Wait until the diode begins to flash. The HomeLink
module now remains in training mode for 5 minutes.
5. Now step in front of your vehicle with the original hand-
held transmitter for the garage door opener or any other
device you wish to assign to the HomeLink control
button.
At the radiator grille
6. Hold the original hand-held transmitter at or near the
centre of your car's radiator grille ⇒page 154, fig. 172.
7. Press the activator button on the original hand-held
transmitter.
8. As you do so, watch the turn signals on your vehicle.
HomeLink confirms successful programming by flashing
all four turn signals three times.
9. If the turn signals fail to flash three times, repeat the
procedure with the transmitter held at a different
distance from the radiator grille.
The proper distance between the hand-held transmitter and the
HomeLink module at the radiator grille depends on the system you
want to train. It may require several attempts.
The turn signals will flash once if the time limit for the programming
mode has been exceeded. In this case the programming procedure
needs to be performed again. Repeat the sequence at the operating
unit starting with step 3.
The programming instructions above also apply to the other control
buttons. Start with step 3 if you wish to proceed and program the
other two buttons.
If the garage door or other devices still fail to be activated with the
HomeLink control buttons after programming is completed, it is
possible that these systems might be working with a rolling code
instead of the normal fixed security code. If this is the case, a rolling
code programming is required in addition to the steps described
above. ⇒page 155Applies to vehicles: with HomeLinkRolling code programming
Some devices require rolling code programming of the
HomeLink universal transmitter.Identifying a rolling code
– Press the already programmed HomeLink button again
and hold it down.
–Watch HomeLink diode ⇒page 154, fig. 171. If the
diode starts flashing rapidly and turns into a constant
light after about 2 seconds, this indicates that the device
you wish to operate (e.g. a garage door opener) is
equipped with a rolling code.
– Program the rolling code as follows:
AA
AA
AA
document_0900452a8179700c.book Seite 155 Donnerstag, 22. März 2007 10:19 10
Page 158 of 313
HomeLink 156
Activating the garage door opener drive unit
– Locate the programming button on the garage door
drive. The exact location and colour of the button may
vary depending on the type of garage door opener.
– Press the programming button on the door drive unit
(this will normally cause a “programming mode indicator
lamp” on the unit to light up). You now have about 30
seconds to start and complete the programming of the
HomeLink control button on the operating unit.
Programming at the operating unit in the
headliner
– Press and release the already programmed HomeLink
button.
– Press the HomeLink button again to complete rolling
code programming.After programming at the operating unit in the headliner, the
garage door opener should recognize the HomeLink signal and
respond when the HomeLink button is pressed. Now the other
control buttons can be programmed as required.
Note
•
Having a second person assist you makes programming of the
rolling code easier and faster. For some makes of garage door
openers the HomeLink button may have to be pressed a third time
to complete the training sequence.
•
If you encounter problems programming the rolling code you
may find helpful information in the operating instructions of the
garage door opener or other device you wish to operate.
Applies to vehicles: with HomeLinkOperating HomeLink
The programmed devices are activated by means of the
HomeLink control buttons in the headliner.– Make sure that the ignition is on.
– Press the programmed HomeLink button ⇒page 154,
fig. 171. The device assigned to that button (e.g. garage
door) will be activated.The HomeLink indicator diode ⇒page 154, fig. 171 will light up
when you press the button.Applies to vehicles: with HomeLinkErasing the button programming
You can erase the complete HomeLink programming by
pressing the two outer buttons.– Switch on the ignition (do not start the engine).
– Press and hold down the two outer buttons until the indi-
cator diode starts to flash ⇒page 154, fig. 171.
– Then release the buttons.After the programming of the HomeLink buttons has been erased,
the system will return to the training mode and is ready to be re-
programmed at any time.
Note
•
Programmed buttons cannot be erased individually.
•
For security reasons it is advisable to erase the programming of
the HomeLink buttons prior to selling your vehicle.
document_0900452a8179700c.book Seite 156 Donnerstag, 22. März 2007 10:19 10