Page 189 of 433

�µ�µThe scan f unction gives
you a sampling of all channels while
in the channel mode. In the category
mode, only the channels within that
category are scanned. To activate
scan, press the SCAN button. The
system plays each channel in
numerical order f or a f ew seconds,
then selects the next channel. When
you hear a channel you want to
continue listening to, press the
button again. To store a channel: Pick a preset number f or the
channel you want to store. Press
and hold the appropriate side of
the preset bar until you hear a
beep.
Repeat steps 2 and 3 to store the
f irst six channels.
Press the button again.
The other XM band will be shown.
Store the next six channels by
repeating steps 2 and 3.
Once a channel is stored, press and
release the proper side of the preset
bar to tune to it.
For inf ormation, see page .
For inf ormation, see page .
Youcanstoreupto12
preset channels using each side of
the preset bar. Each side of the bar
stores one channel f rom the XM1
band and one channel f rom the XM2
band.
In category mode, only channels
within that category can be selected.
In channel mode, all channels can be
selected. Usethetune,seek,orscan
function to tune to a desired
channel.
Press the button. Either
XM1 or XM2 will be shown on the
center display.
4.
3.
5.
2.
1.
186
228
SCAN
XM Satellite Radio Reception
Adjusting the Sound
Preset
Audio System
Features
185
�\f���—�\f���—�\f�
�y�
���������\f���y���
�(�)� ���
�\f�y�\f�
���\f�y
2008 RDX
Page 191 of 433
�µ�µ
�´ �µ �µ
Use the
SUBWOOFER mode to adjust the
strength of the sound f rom the
subwoof er speaker. Turn the PWR/
VOL knob to the desired level ( 6
to 6). Even if the adjustment level
reaches 6, the subwoof er is not
turned off. You can use the instrument panel
brightness control knob to adjust the
illumination of the audio system (see
page ). The audio system
illuminates when the parking lights
are on, even if the system is turned
of f .
The SVC
mode controls the volume based on
vehicle speed. The f aster you go, the
louder the audio volume becomes.
As you slow down, the audio volume
decreases.
The SVC has f our modes; SVC OFF,
SVC LOW, SVC MID, and SVC
HIGH. The def ault setting is MID.
Turn the PWR/VOL knob to adjust
the setting to your liking. 117
SUBWOOFER A udio System L ighting
Speed-sensitive volume
compensation (SVC)
Audio System
Features
187
�\f���—�\f���—�\f�
�y�
�����������
�y���
�(�)� ���
�\f�y�\f�
�����y
2008 RDX
Page 196 of 433

�µTo tune with the interf ace dial, press
the AUDIO button to view the audio
control display, then push the
selector down, and turn the dial to
TUNE. Then press ENTER on the
selector, and turn the dial to the
desired f requency. To exit the
TUNE mode, press ENTER again.
XM satellite radio inf ormation is
available on page .
You can use any of f ive methods to
f ind radio stations on the selected
band: TUNE, SEEK, SCAN, the
preset buttons or icons, and AUTO
SELECT.
Use the TUNE/FOLDER
bar to tune the radio to a desired
f requency. Press the side of the
bar to tune to a higher f requency,
and the side of the bar to tune
to a lower f requency.
If youpressandholdthe or
side of the bar, the f requency
will begin to change rapidly. It will
stop when you release it.
The ignition switch must be in the
ACCESSORY (I) or the ON (II)
position. Press the AUDIO button to
view the audio control display. Turn
the system on by pressing the PWR/
VOL knob or the AM/FM button.
Adjust the volume by turning the
PWR/VOL knob.
The band and f requency the radio
waslasttunedtoareshownonthe
upper display. To change bands,
press the AM/FM button. You can
also change bands with the interf ace
dial. Press the AUDIO button to view
the audio control display and the
band changes to FM1, FM2, or AM
each time you push the selector up.
On the FM bands, ‘‘STEREO’’ will be
shown on the audio control display.
‘‘ST’’ will also appear on the upper
display if the station is broadcasting
in stereo. Stereo reproduction on AM
is not available. 211
Audio System
To Select a Station
TUNE
192
TUNE ICON
�\f���—�\f���—�\f�
�y�
�������������y���
�(�)� ���
�\f�y�\f�
�����y
2008 RDX
Page 199 of 433

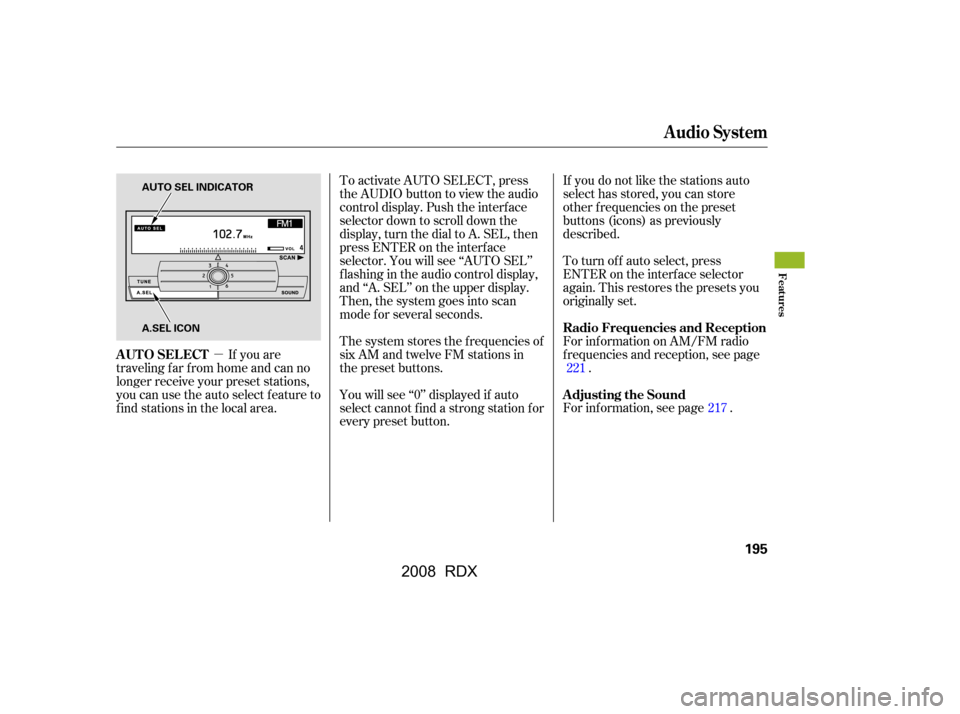
�µTo activate AUTO SELECT, press
the AUDIO button to view the audio
control display. Push the interf ace
selector down to scroll down the
display, turn the dial to A. SEL, then
press ENTER on the interf ace
selector. You will see ‘‘AUTO SEL’’
f lashing in the audio control display,
and ‘‘A. SEL’’ on the upper display.
Then, the system goes into scan
mode f or several seconds.
If you are
traveling far from home and can no
longer receive your preset stations,
you can use the auto select feature to
find stations in the local area. If you do not like the stations auto
select has stored, you can store
other f requencies on the preset
buttons (icons) as previously
described.
The system stores the f requencies of
six AM and twelve FM stations in
the preset buttons. To turn of f auto select, press
ENTER on the interf ace selector
again. This restores the presets you
originally set.
You will see ‘‘0’’ displayed if auto
select cannot f ind a strong station f or
every preset button. For inf ormation on AM/FM radio
f requencies and reception, see page
.
For inf ormation, see page . 221
217
Audio System
AUTO SELECT Radio Frequencies and Reception
Adjusting the Sound
Features
195
AUTO SEL INDICATOR
A.SEL ICON
�\f���—�\f���—�\f�
�y�
�����������\f�y���
�(�)� ���
�\f�y�\f���\f�\f�y
2008 RDX
Page 202 of 433
Your vehicle’s audio system has an
in-dash disc changer with the same
controls used f or the radio. To
operate the disc changer, the ignition
switch must be in the ACCESSORY
(I) or the ON (II) position.
The disc changer can play these disc
formats:CD (CD-DA)
CD-R/RW
DVD-A
DTS
The disc packages or jackets should
have one of these marks. DVD-A discs not meeting DVD
verification standards may not be
playable.
The changer cannot play DVD-V or
DVD-R/RW f ormats.
Some CD-DA and CD-ROM mixed
discs are not playable.
‘‘DTS’’ and ‘‘DTS Digital Surround’’
are registered trademarks of Digital
Theater Systems, Inc.
You cannot load and play 3-inch
(8-cm)discsinthissystem.
The changer can also play MP3 or
WMA format (see page ).
202
Audio System
198
TM
Do not use discs with adhesive labels.
The label can curl up and cause the
disc to jam in the unit.
�\f���—�\f���—�\f�
�y�
�������������y���
�(�)� ���
�\f�y�\f���\f���y
2008 RDX
Page 205 of 433

�µ
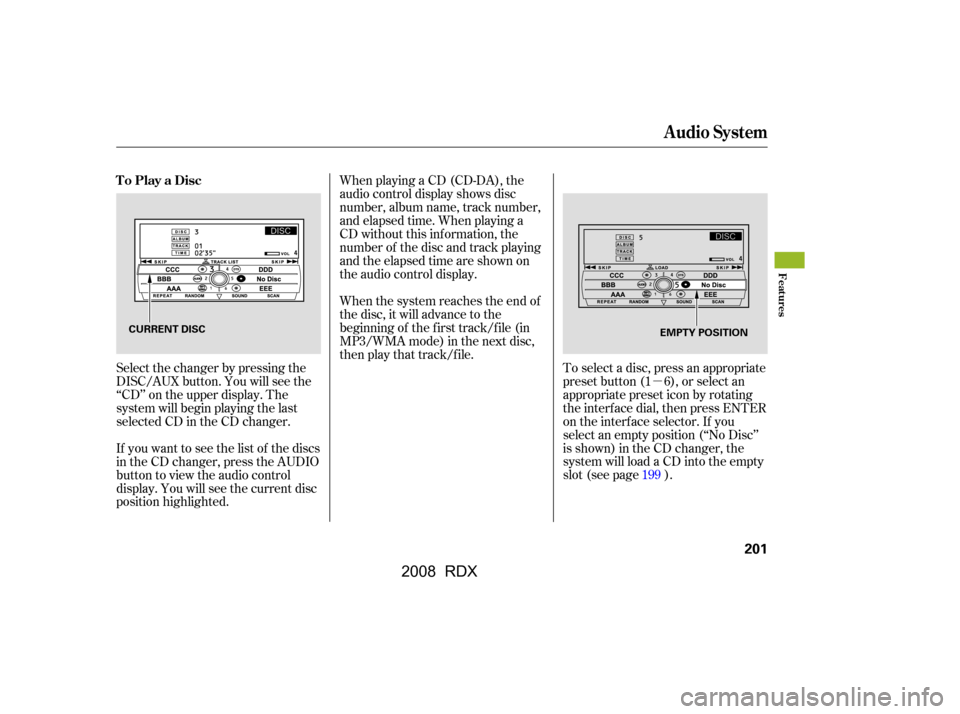
When playing a CD (CD-DA), the
audio control display shows disc
number, album name, track number,
and elapsed time. When playing a
CD without this inf ormation, the
number of the disc and track playing
andtheelapsedtimeareshownon
the audio control display.
If you want to see the list of the discs
in the CD changer, press the AUDIO
button to view the audio control
display. You will see the current disc
position highlighted.
Select the changer by pressing the
DISC/AUX button. You will see the
‘‘CD’’ on the upper display. The
system will begin playing the last
selected CD in the CD changer. To select a disc, press an appropriate
preset button (1 6), or select an
appropriate preset icon by rotating
the interf ace dial, then press ENTER
on the interf ace selector. If you
select an empty position (‘‘No Disc’’
is shown) in the CD changer, the
system will load a CD into the empty
slot (see page ).
When the system reaches the end of
the disc, it will advance to the
beginning of the f irst track/f ile (in
MP3/WMA mode) in the next disc,
then play that track/file.
199
To Play a Disc
Audio System
Features
201
CURRENT DISC
EMPTY POSITION
�\f���—�\f���—�\f�
�y�
���������
�
�y���
�(�)� ���
�\f�y�\f���\f���y
2008 RDX
Page 214 of 433

If you turn the system of f while a CD
is playing, either with the PWR/VOL
knob or by turning off the ignition
switch, the disc will stay in the drive.
When you turn the system back on,
the CD will begin playing where it
left off.If you do not remove the disc f rom
the slot, the system will reload the
disc af ter 10 seconds and put the CD
changer in pause mode. To begin
playing the disc, press the DISC/
AUX button.
To remove a dif f erent CD f rom the
changer, select it with the
appropriate preset button, or icon on
the audio control display. When that
disc begins playing, press the eject
button.Press and hold the eject button until
you hear a beep to remove all the
discs from the changer.
You can also eject discs when the
ignition switch is of f by pressing the
eject button. The disc that was last
selected is ejected f irst. You can
eject the rest of the discs one at a
time.
For inf ormation on how to handle
and protect compact discs, see page
.
For inf ormation, see page .
For inf ormation, see page .
To take the system out of CD mode,
press the AM/FM, or DISC/AUX, or
button to switch to the radio,
or satellite radio, or auxiliary input
while a CD is playing. When you
return to CD mode by pressing the
DISC/AUX button, play will continue
at the same point that it left off. To remove the disc that is currently
playing, press and release the eject
( ) button. You will see
‘‘EJECT’’ on the upper display. When
you remove the disc f rom the slot,
the system begins the load sequence
so you can load another disc in that
position. If you do not load another
disc within 10 seconds, the system
selects the previous mode (AM, FM1,
FM2, or XM Radio).
223226217
To Stop Playing a Disc Removing CDs f rom the Changer
Protecting Discs
Adjusting the Sound
CD Changer Error Messages
Audio System
210
�\f���—�\f���—�\f�
�y�
�������������y���
�(�)� ���
�\f�y�\f���
���y
2008 RDX
Page 220 of 433
Pick a preset number f or the
channel you want to store. Press
and hold the appropriate button
until you hear a beep.
To store the channel on a preset
icon, rotate the interf ace dial to
select a desired preset icon. The
selected preset icon will be
highlighted. Press and hold
ENTER on the selector f or more
than 2 seconds to store the
channel.Repeat steps 2 and 3 to store the
f irst six channels.
Press the button again.
The other XM band will be shown.
Store the next six channels by
repeating steps 2 and 3.
Once a channel is stored, press and
release the proper preset button to
tune to it. For inf ormation, see page .
For inf ormation, see page .
3. 4.
5.
217
228
Audio System
XM Satellite Radio Reception
Adjusting the Sound
216
PRESET ICONS
�\f���—�\f���—�\f�
�y�
���������
���y���
�(�)� ���
�\f�y�\f�����
�y
2008 RDX