Page 73 of 114

8-5
1
2
3
4
5
6
78
9
10
11
18
*
Crankcase breather
system
�
Check breather hose for cracks or other damage,
and replace if necessary.
√√√
19 Engine oil
�
Change.
�
Check ATV for oil leakage, and correct if neces-
sary.
√ √√√
20 Final gear oil
�
Change.
�
Check ATV for oil leakage, and correct if neces-
sary.
√√
21
*
Moving parts and
cables
�
Lubricate.
√√√√
22
*
Throttle lever hous-
ing and cable
�
Check operation and correct if necessary.
�
Check throttle cable free play and have a Yamaha
dealer adjust if necessary.
�
Lubricate throttle lever housing and cable.
√√√√√
23
*
Exhaust system
�
Check for leakage and replace gasket(s) if neces-
sary.
�
Check for looseness and tighten all screw clamps
and joints if necessary.
√√√
24 Spark arrester
�
Clean.
√√√
25
*
Front and rear brake
switches
�
Check operation and correct if necessary.
√√√√√
26
*
Battery
�
Check electrolyte level and specific gravity, and
correct if necessary.
�
Make sure that the breather hose is properly
routed.
√√√√√
NO. ITEMCHECK OR MAINTENANCE
JOBINITIAL EVERY
Whichev-
er comes
firstmonth136612
km
(mi)320
(200)1200
(750)2400
(1500)2400
(1500)4800
(3000)
hours 20 75 150 150 300
Page 74 of 114
8-6
1
2
3
4
5
6
78
9
10
11
EBU23060
NOTE:
The air filter needs more frequent service if you are riding in unusually wet or dusty areas.
Page 75 of 114
8-7
1
2
3
4
5
6
78
9
10
11
EBU23211
Checking the spark plug
The spark plug is an important engine component,
which is easy to check. Since heat and deposits
will cause any spark plug to slowly erode, the spark
plug should be removed and checked in accor-
dance with the periodic maintenance and lubrica-
tion chart. In addition, the condition of the spark
plug can reveal the condition of the engine.
To remove the spark plug
1. Remove the spark plug cap.
2. Remove the spark plug as shown, with thespark plug wrench included in the owner’s tool
kit.
To check the spark plug
1. Check that the porcelain insulator around the
center electrode of the spark plug is a medi-
um-to-light tan (the ideal color when the ATV
is ridden normally).NOTE:
If the spark plug shows a distinctly different color,
the engine could be operating improperly. Do not
attempt to diagnose such problems yourself. In-
stead, have a Yamaha dealer check the ATV.
1. Spark plug cap
1
1. Spark plug wrench
1
Page 76 of 114

8-8
1
2
3
4
5
6
78
9
10
11
2. Check the spark plug for electrode erosion
and excessive carbon or other deposits, and
replace it if necessary.
To install the spark plug
1. Measure the spark plug gap with a wire thick-
ness gauge and, if necessary, adjust the gap
to specification.2. Clean the surface of the spark plug gasket
and its mating surface, and then wipe off any
grime from the spark plug threads.
3. Install the spark plug with the spark plug
wrench, and then tighten it to the specified
torque.NOTE:
If a torque wrench is not available when installing
a spark plug, a good estimate of the correct torque
is 1/4–1/2 turn past finger tight. However, the spark
plug should be tightened to the specified torque as
soon as possible.
4. Install the spark plug cap.
EBU23251
Engine oil
The engine oil level should be checked before
each ride. In addition, the oil must be changed at
the intervals specified in the periodic maintenance
and lubrication chart. Specified spark plug:
NGK/CR7HSA
Spark plug gap:
0.6–0.7 mm (0.024–0.028 in)
1. Spark plug gap
Tightening torque:
Spark plug:
12.5 Nm (1.3 m·kgf, 9.0 ft·lbf)
Page 77 of 114
8-9
1
2
3
4
5
6
78
9
10
11
To check the engine oil level
1. Place the ATV on a level surface.
2. Start the engine, warm it up for several min-
utes, and then turn it off.
3. Wait a few minutes until the oil settles before
checking.
4. Remove the engine oil filler cap, and then
wipe the dipstick off with a clean rag.
5. Insert the dipstick into the filler hole (without
screwing it in), and then remove it again to
check the oil level.NOTE:
The engine oil should be between the minimum
and maximum level marks.
6. If the engine oil is at or below the minimum
level mark, add sufficient oil of the recom-
mended type to raise it to the correct level.
7. Insert the dipstick into the oil filler hole, and
then tighten the engine oil filler cap.
To change the engine oil
1. Place the ATV on a level surface.
2. Start the engine, warm it up for several min-
1. Dipstick
1
1. Maximum level mark
2. Minimum level mark
1
2
Page 78 of 114

8-10
1
2
3
4
5
6
78
9
10
11
utes, and then turn it off.
3. Place an oil pan under the engine to collect
the used oil.
4. Remove the engine oil filler cap, and then re-
move the engine oil drain bolt to drain the oil
from the crankcase.
5. Check the O-ring for damage and replace it if
necessary.
6. Install the engine oil drain bolt, and then tight-
en it to the specified torque.7. Add the specified amount of the recommend-
ed engine oil, and then install and tighten the
engine oil filler cap.CAUTION:
ECB00300
�
In order to prevent clutch slippage (since the
engine oil also lubricates the clutch), do not
mix any chemical additives. Do not use oils
with a diesel specification of “CD” or oils of
a higher quality than specified. In addition,
do not use oils labeled “ENERGY CONSERV-
ING II” or higher.
�
Make sure that no foreign material enters the
crankcase.
8. Start the engine, and then let it idle for several
1. Engine oil drain bolt
1
Tightening torque:
Engine oil drain bolt:
20 Nm (2.0 m·kgf, 14.5 ft·lbf)
Recommended oil:
See page 10-1.
Oil quantity:
0.80 L (0.85 US qt) (0.70 Imp.qt)
Page 79 of 114

8-11
1
2
3
4
5
6
78
9
10
11
minutes while checking it for oil leakage. If oil
is leaking, immediately turn the engine off and
check for the cause.
9. Turn the engine off, and then check the oil lev-
el and correct it if necessary.
EBU23403
Final gear oil
The final gear case must be checked for oil leak-
age before each ride. If any leakage is found, have
a Yamaha dealer check and repair the ATV. In ad-
dition, the final gear oil level must be checked and
the oil changed as follows at the intervals specified
in the periodic maintenance and lubrication chart.
To check the final gear oil level
1. Place the ATV on a level surface.
NOTE:
The final gear oil level must be checked on a cold
engine.
2. Remove the final gear oil filler cap, wipe the
dipstick off with a clean rag, insert it back into
the oil filler hole (without screwing it in), and
then remove it again to check the oil level.
NOTE:
The final gear oil should be between the minimum
and maximum level marks.
3. If the oil is at or below the minimum level mark,
add sufficient oil of the recommended type to
raise it to the correct level.
4. Insert the dipstick into the oil filler hole, and
then tighten the oil filler cap.
To change the final gear oil
1. Place the ATV on a level surface.
1. Dipstick
2. Maximum level mark
3. Minimum level mark
1 2
3
Page 80 of 114

8-12
1
2
3
4
5
6
78
9
10
11
2. Place an oil pan under the final gear case to
collect the used oil.
3. Remove the final gear oil filler cap and the fi-
nal gear oil drain bolt to drain the oil from the
final gear case.
4. Install the drain bolt, and then tighten it to the
specified torque.
5. Add the specified amount of the recommend-ed final gear oil, and then check the oil level.CAUTION:
ECB00420
Be sure no foreign material enters the final
gear case.
6. Install and tighten the oil filler cap.
7. Check the final gear case for oil leakage. If oil
is leaking, check for the cause.
EBU23801
Cleaning the air filter element
The air filter element should be cleaned at the in-
tervals specified in the periodic maintenance and
lubrication chart. Clean the air filter element more
frequently if you are riding in unusually wet or dusty
areas.
NOTE:
There is a check hose at the bottom of the air filter
case. If dust or water collects in this hose, empty
the hose and clean the air filter element and air fil-
1. Final gear oil drain bolt
Tightening torque:
Final gear oil drain bolt:
23 Nm (2.3 m·kgf, 16.6 ft·lbf)
1
Recommended final gear oil:
See page 10-1.
Oil quantity:
0.12 L (0.13 US qt) (0.11 Imp.qt)
 1
1 2
2 3
3 4
4 5
5 6
6 7
7 8
8 9
9 10
10 11
11 12
12 13
13 14
14 15
15 16
16 17
17 18
18 19
19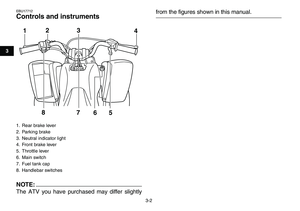 20
20 21
21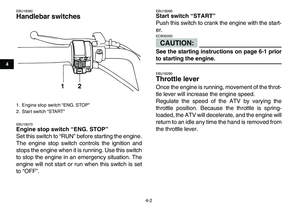 22
22 23
23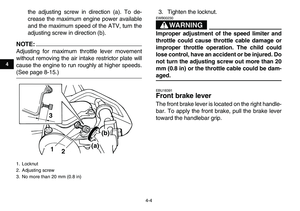 24
24 25
25 26
26 27
27 28
28 29
29 30
30 31
31 32
32 33
33 34
34 35
35 36
36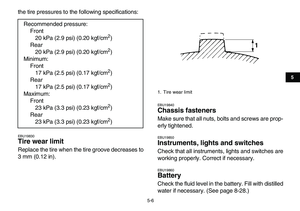 37
37 38
38 39
39 40
40 41
41 42
42 43
43 44
44 45
45 46
46 47
47 48
48 49
49 50
50 51
51 52
52 53
53 54
54 55
55 56
56 57
57 58
58 59
59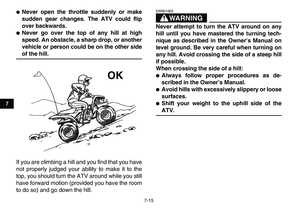 60
60 61
61 62
62 63
63 64
64 65
65 66
66 67
67 68
68 69
69 70
70 71
71 72
72 73
73 74
74 75
75 76
76 77
77 78
78 79
79 80
80 81
81 82
82 83
83 84
84 85
85 86
86 87
87 88
88 89
89 90
90 91
91 92
92 93
93 94
94 95
95 96
96 97
97 98
98 99
99 100
100 101
101 102
102 103
103 104
104 105
105 106
106 107
107 108
108 109
109 110
110 111
111 112
112 113
113

