Page 90 of 116
8-19
1
2
3
4
5
6
78
9
10
11
EBU24090
Checking the front and rear brake
shoes
The front and rear brake shoes must be checked
for wear at the intervals specified in the periodic
maintenance and lubrication chart. Each brake is
provided with a wear indicator, which allows you to
check the brake shoe wear without having to dis-
assemble the brake. To check the brake shoe
wear, check the position of the wear indicator while
applying the brake. If a brake shoe has worn to the
point that the wear indicator reaches the wear limit
line or mark, have a Yamaha dealer replace the
brake shoes as a set.
Front brake
1. Wear limit line
2. Wear indicator
1
2
Page 91 of 116
8-20
1
2
3
4
5
6
78
9
10
11
Rear brake
EBU24330
Adjusting the front brake lever free
play
The brake lever free play must be checked and, if
necessary, adjusted at the intervals specified in
the periodic maintenance and lubrication chart.
NOTE:
Before adjusting the brake lever free play, check
the front brake shoes for wear.
The brake lever free play should measure 10.0–12.0 mm (0.39–0.47 in) as shown. If the free play
is incorrect, adjust it as follows.
1. Loosen the upper locknut and fully turn in the
upper adjusting bolt.
2. Loosen the lower locknut.
3. Turn the lower adjusting bolt in direction (a) to
increase the free play, and in direction (b) to
decrease it.
1. Wear limit mark
2. Wear indicator
1
2
1. Brake lever free play
1
Page 92 of 116
8-21
1
2
3
4
5
6
78
9
10
11
4. Tighten the lower locknut.
5. While applying the front brake, turn out the up-
per adjusting bolt until the upper and lower ca-
ble lengths are equal. The cable joint will
become vertical.6. Tighten the upper locknut.
WARNING
EWB02080
Operating with improperly serviced or adjust-
ed brakes could cause loss of braking ability,
which could lead to an accident.
After servicing:
�
Make sure the brakes operate smoothly and
that the free play is correct.
�
Make sure the brakes do not drag.
Replacement of brake components requires
professional knowledge. These procedures
1. Upper locknut
2. Upper adjusting bolt
3. Lower locknut
4. Lower adjusting bolt
1
2
4
3(a)(b)(a)
(b)
1. Cable joint
1
Page 93 of 116

8-22
1
2
3
4
5
6
78
9
10
11
should be performed by a Yamaha dealer.
EBU24451
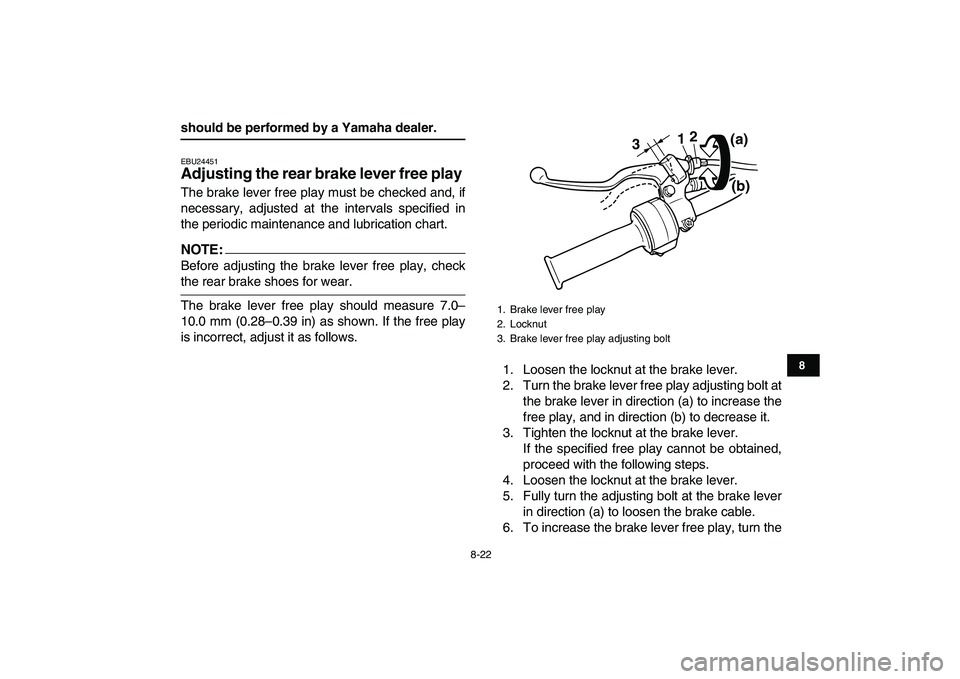
Adjusting the rear brake lever free play
The brake lever free play must be checked and, if
necessary, adjusted at the intervals specified in
the periodic maintenance and lubrication chart.
NOTE:
Before adjusting the brake lever free play, check
the rear brake shoes for wear.
The brake lever free play should measure 7.0–
10.0 mm (0.28–0.39 in) as shown. If the free play
is incorrect, adjust it as follows.
1. Loosen the locknut at the brake lever.
2. Turn the brake lever free play adjusting bolt at
the brake lever in direction (a) to increase the
free play, and in direction (b) to decrease it.
3. Tighten the locknut at the brake lever.
If the specified free play cannot be obtained,
proceed with the following steps.
4. Loosen the locknut at the brake lever.
5. Fully turn the adjusting bolt at the brake lever
in direction (a) to loosen the brake cable.
6. To increase the brake lever free play, turn the
1. Brake lever free play
2. Locknut
3. Brake lever free play adjusting bolt
312
(a)
(b)
Page 94 of 116

8-23
1
2
3
4
5
6
78
9
10
11
adjusting nut on the brake cable at the rear
wheel hub in direction (a), and to decrease it,
turn the nut in direction (b).
7. Tighten the locknut at the brake lever.
NOTE:
If the specified free play cannot be obtained as de-
scribed above or if the rear brake does not operate
correctly, have a Yamaha dealer check the internal
rear brake mechanism.WARNING
EWB02080
Operating with improperly serviced or adjust-
ed brakes could cause loss of braking ability,
which could lead to an accident.
After servicing:
�
Make sure the brakes operate smoothly and
that the free play is correct.
�
Make sure the brakes do not drag.
Replacement of brake components requires
professional knowledge. These procedures
should be performed by a Yamaha dealer.
EBU24900
Checking and lubricating the cables
The operation and the condition of all control ca-
bles should be checked before each ride, and the
cables and cable ends should be lubricated if nec-
essary. If a cable is damaged or does not move
smoothly, have a Yamaha dealer check or replace
it.
1. Brake lever free play adjusting nut
1
(a)(b)
Recommended lubricant:
Engine oil
Page 95 of 116

8-24
1
2
3
4
5
6
78
9
10
11
WARNING
EWB02130
Inspect cables frequently and replace if dam-
aged. Corrosion can result when the cable
sheaths become damaged, and cables can
also become frayed or kinked, which could re-
strict the operation of controls and lead to an
accident or injury.
EBU24911
Checking and lubricating the front and
rear brake levers
The operation of the front and rear brake levers
should be checked before each ride, and the lever
pivots should be lubricated if necessary.
EBU24961
Checking the wheel bearings
The front and rear wheel bearings must be
checked at the intervals specified in the periodic
maintenance and lubrication chart. If there is play
in a wheel hub or if a wheel does not turn smoothly,have a Yamaha dealer check the wheel bearings.
EBU25070
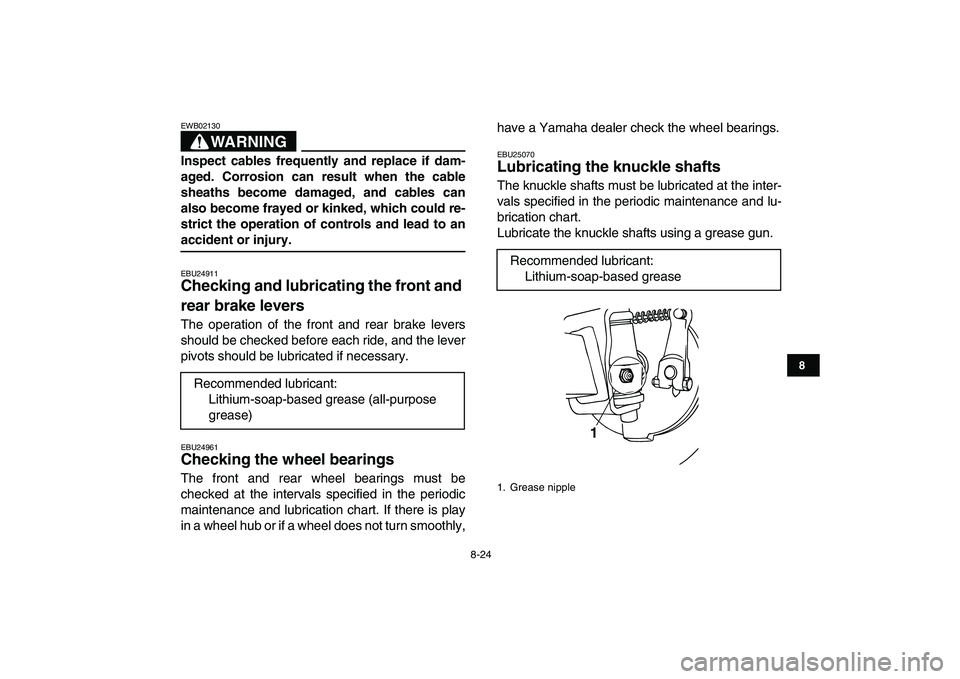
Lubricating the knuckle shafts
The knuckle shafts must be lubricated at the inter-
vals specified in the periodic maintenance and lu-
brication chart.
Lubricate the knuckle shafts using a grease gun.
Recommended lubricant:
Lithium-soap-based grease (all-purpose
grease)
Recommended lubricant:
Lithium-soap-based grease
1. Grease nipple
1
Page 104 of 116

9-1
1
2
3
4
5
6
7
89
10
11
EBU25860
CLEANING AND STORAGE
EBU25880
Cleaning
Frequent, thorough cleaning of your ATV will not
only enhance its appearance but will improve its
general performance and extend the useful life of
many components.
1. Before cleaning the ATV:
a. Block off the end of the exhaust pipe to
prevent water entry. A plastic bag and
strong rubber band may be used.
b. Make sure the spark plug and all filler caps
are properly installed.
2. If the engine case is excessively greasy, apply
degreaser with a paint brush. Do not apply de-
greaser to the wheel axles.
3. Rinse the dirt and degreaser off with a garden
hose. Use only enough pressure to do the job.
CAUTION:
ECB00710
Excessive water pressure may cause water
seepage and deterioration of wheel bearings,
brakes, transmission seals and electrical de-
vices. Many expensive repair bills have result-
ed from improper high-pressure detergentapplications such as those available in coin-
operated car washers.
4. Once most of the dirt has been hosed off,
wash all surfaces with warm water and mild,
detergent-type soap. An old toothbrush or bot-
tle brush is handy for hard-to-reach places.
5. Rinse the ATV off immediately with clean wa-
ter and dry all surfaces with a chamois, clean
towel or soft absorbing cloth.
6. Clean the seat with a vinyl upholstery cleaner
to keep the cover pliable and glossy.
7. Automotive type wax may be applied to all
painted and chrome plated surfaces. Avoid
combination cleaner-waxes. Many contain
abrasives which may mar the paint or protec-
tive finish. When finished cleaning, start the
engine and let it idle for several minutes.WARNING
EWB02310
Wet brakes may have reduced stopping ability,
increasing the chance of an accident. Test the
brakes after washing. Apply the brakes several
times at slow speeds to let friction dry out the
Page 109 of 116
10-3
1
2
3
4
5
6
7
8
910
11
Manufacturer/model:
DUNLOP/KT145
Rear tire:
Type:
Tubeless
Size:
AT16 x 8-7
Manufacturer/model:
DUNLOP/KT145
Loading:
Maximum loading limit:
40.0 kg (88 lb)
(Total weight of rider, cargo, accessories, and tongue)
Tire air pressure (measured on cold tires):
Recommended:
Front:
20.0 kPa (2.9 psi) (0.200 kgf/cm
2
)
Rear:
20.0 kPa (2.9 psi) (0.200 kgf/cm
2
)
Minimum:
Front:
17.0 kPa (2.5 psi) (0.170 kgf/cm
2
)
Rear:
17.0 kPa (2.5 psi) (0.170 kgf/cm
2
)
Maximum:
Front:
23.0 kPa (3.3 psi) (0.230 kgf/cm
2
)
Rear:
23.0 kPa (3.3 psi) (0.230 kgf/cm
2
)
Front wheel:
Wheel type:
Panel wheel
Rim size:
7x5.5AT
Rear wheel:
Wheel type:
Panel wheel
Rim size:
7x6.5AT
Front brake:
Type:
Drum brake
Operation:
Right hand operation
Rear brake:
Type:
Drum brake
Operation:
Left hand operation
Front suspension:
Type:
Leading arm
Spring/shock absorber type:
Coil spring/oil damper
Wheel travel:
57 mm (2.3 in)
Rear suspension:
Type:
Swingarm