INSTRUMENT AND CONTROL FUNCTIONS
3-6
3
EAU43242
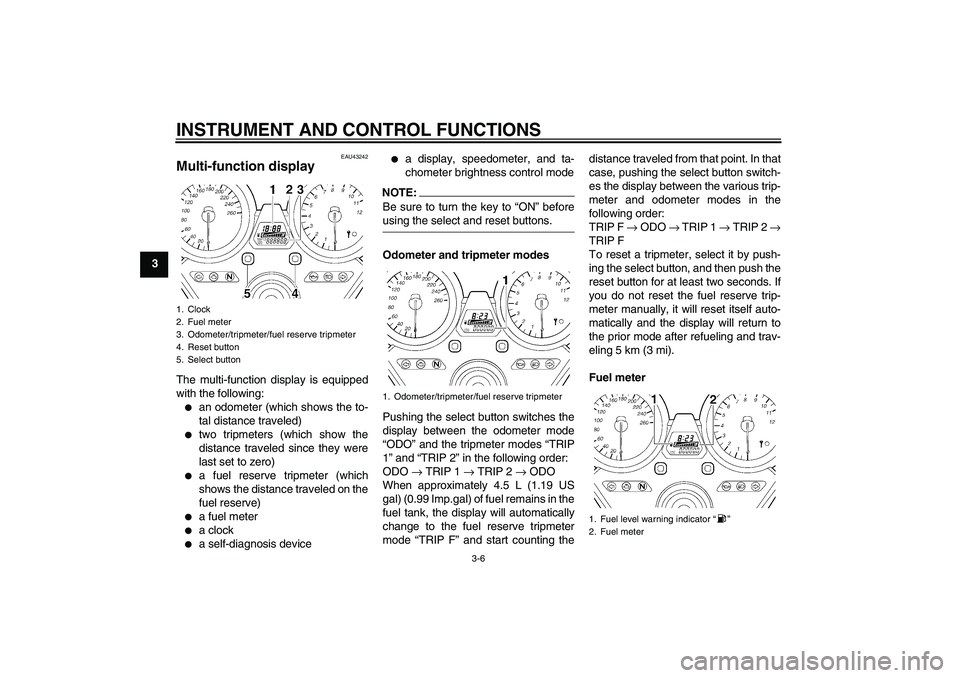
Multi-function display The multi-function display is equipped
with the following:�
an odometer (which shows the to-
tal distance traveled)
�
two tripmeters (which show the
distance traveled since they were
last set to zero)
�
a fuel reserve tripmeter (which
shows the distance traveled on the
fuel reserve)
�
a fuel meter
�
a clock
�
a self-diagnosis device
�
a display, speedometer, and ta-
chometer brightness control mode
NOTE:Be sure to turn the key to “ON” beforeusing the select and reset buttons.
Odometer and tripmeter modes
Pushing the select button switches the
display between the odometer mode
“ODO” and the tripmeter modes “TRIP
1” and “TRIP 2” in the following order:
ODO → TRIP 1 → TRIP 2 → ODO
When approximately 4.5 L (1.19 US
gal) (0.99 Imp.gal) of fuel remains in the
fuel tank, the display will automatically
change to the fuel reserve tripmeter
mode “TRIP F” and start counting thedistance traveled from that point. In that
case, pushing the select button switch-
es the display between the various trip-
meter and odometer modes in the
following order:
TRIP F → ODO → TRIP 1 → TRIP 2 →
TRIP F
To reset a tripmeter, select it by push-
ing the select button, and then push the
reset button for at least two seconds. If
you do not reset the fuel reserve trip-
meter manually, it will reset itself auto-
matically and the display will return to
the prior mode after refueling and trav-
eling 5 km (3 mi).
Fuel meter
1. Clock
2. Fuel meter
3. Odometer/tripmeter/fuel reserve tripmeter
4. Reset button
5. Select button
1. Odometer/tripmeter/fuel reserve tripmeter
1. Fuel level warning indicator“”
2. Fuel meter
U5WME4E0.book Page 6 Friday, July 6, 2007 2:43 PM
INSTRUMENT AND CONTROL FUNCTIONS
3-7
3 The fuel meter indicates the amount of
fuel in the fuel tank. The display seg-
ments of the fuel meter disappear to-
wards “E” (Empty) as the fuel level
decreases. When the fuel level warning
indicator“” starts flashing, refuel as
soon as possible.
NOTE:This fuel meter is equipped with a self-
diagnosis system. If the electrical circuit
is defective, the following cycle will be
repeated until the malfunction is cor-
rected: All the display segments and
symbol“” will flash eight times, then
go off for approximately 3 seconds. If
this occurs, have a Yamaha dealercheck the electrical circuit.Clock mode
To set the clock:
1. Turn the key to “ON”.
2. Push the select button and reset
button together for at least two
seconds.
3. When the hour digits start flashing,
push the reset button to set the
hours.
4. Push the select button, and the
minute digits will start flashing.
5. Push the reset button to set the
minutes.
6. Push the select button and then re-
lease it to start the clock.Self-diagnosis device
This model is equipped with a self-diag-
nosis device for various electrical cir-
cuits.
If any of those circuits are defective, the
engine trouble warning light will come
on, and then the odometer/tripmeter
display will indicate a two-digit error
code.
This model is also equipped with a self-
diagnosis device for the immobilizer
system.
If any of the immobilizer system circuits
are defective, the immobilizer system
indicator light will flash, and then the
display will indicate a two-digit error
code.1. Clock
1. Error code display
U5WME4E0.book Page 7 Friday, July 6, 2007 2:43 PM
 as the fuel level
decr")