Page 226 of 794

3 - 14
INSP
ADJ
ENGINE OIL LEVEL INSPECTION
ENGINE OIL LEVEL INSPECTION
1. Stand the machine on a level surface.
NOTE:
When checking the oil level make sure that
the machine is upright.
Place the machine on a suitable stand.
WARNING
Never remove the oil tank cap just after
high speed operation. The heated oil could
spurt out. causing danger. Wait until the oil
cools down to approximately 70 °C (158 °F).
2. Idle the engine more than 3 minutes while
keeping the machine upright. Then stop the
engine and inspect the oil level.
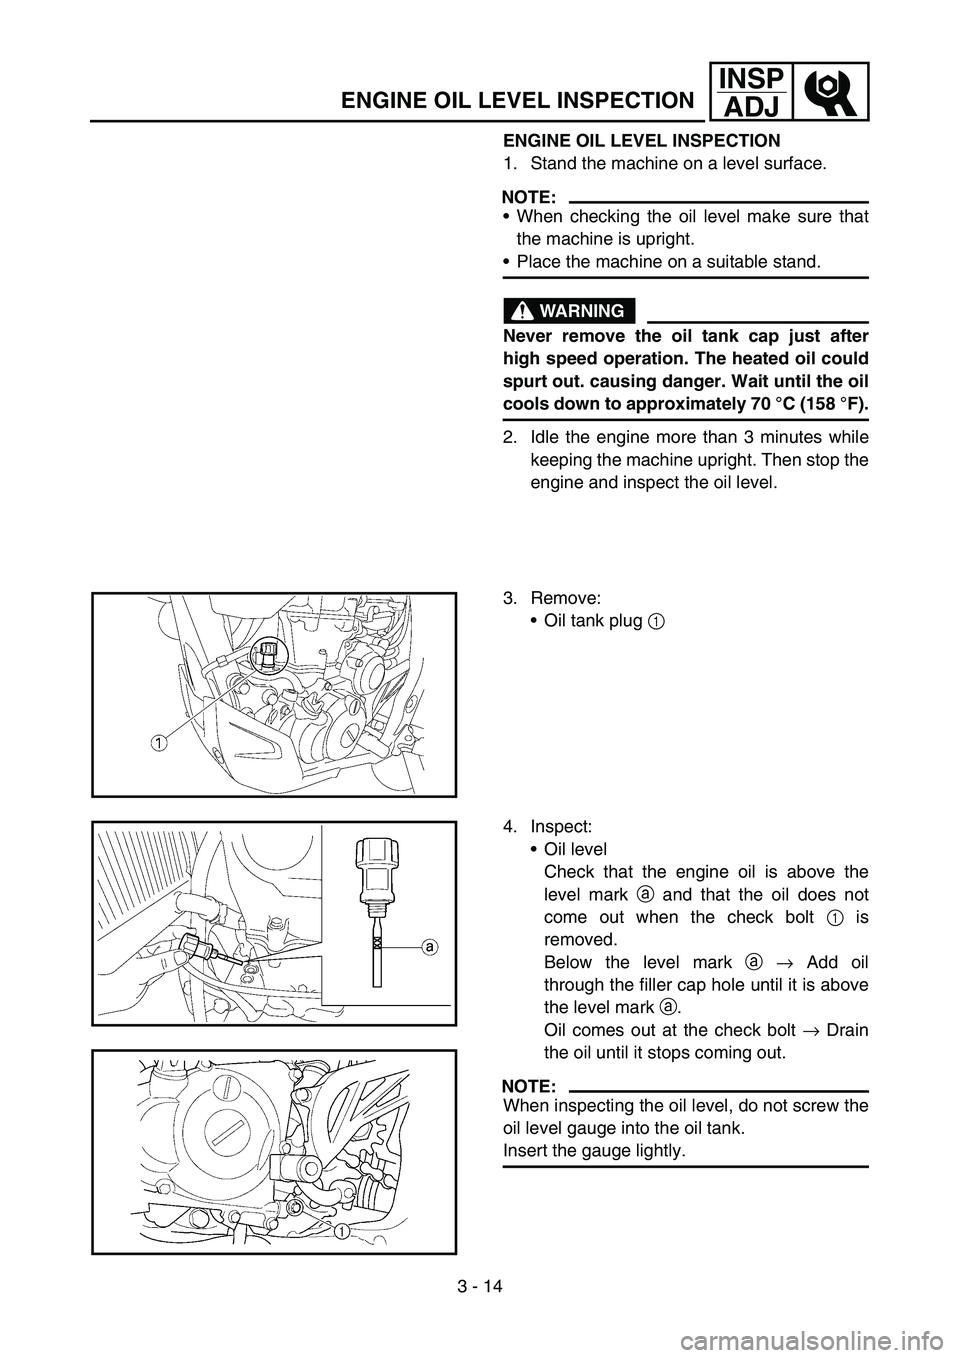
3. Remove:
Oil tank plug 1
4. Inspect:
Oil level
Check that the engine oil is above the
level mark a and that the oil does not
come out when the check bolt 1 is
removed.
Below the level mark a → Add oil
through the filler cap hole until it is above
the level mark a.
Oil comes out at the check bolt → Drain
the oil until it stops coming out.
NOTE:
When inspecting the oil level, do not screw the
oil level gauge into the oil tank.
Insert the gauge lightly.
Page 234 of 794

3 - 18
INSP
ADJ
IDLE SPEED ADJUSTMENT
9. Check:
Oil pressure
Checking steps:
Slightly loosen the oil gallery bolt 1.
Start the engine and keep it idling until oil
starts to seep from the oil gallery bolt. If no
oil comes out after one minute, turn the
engine off so it will not seize.
Check oil passages, oil filter and oil pump
for damage or leakage.
Start the engine after solving the prob-
lem(s) and recheck the oil pressure.
Tighten the oil gallery bolt to specification.
T R..
Oil gallery bolt:
10 Nm (1.0 m kg, 7.2 ft lb)
EC35M021
IDLE SPEED ADJUSTMENT
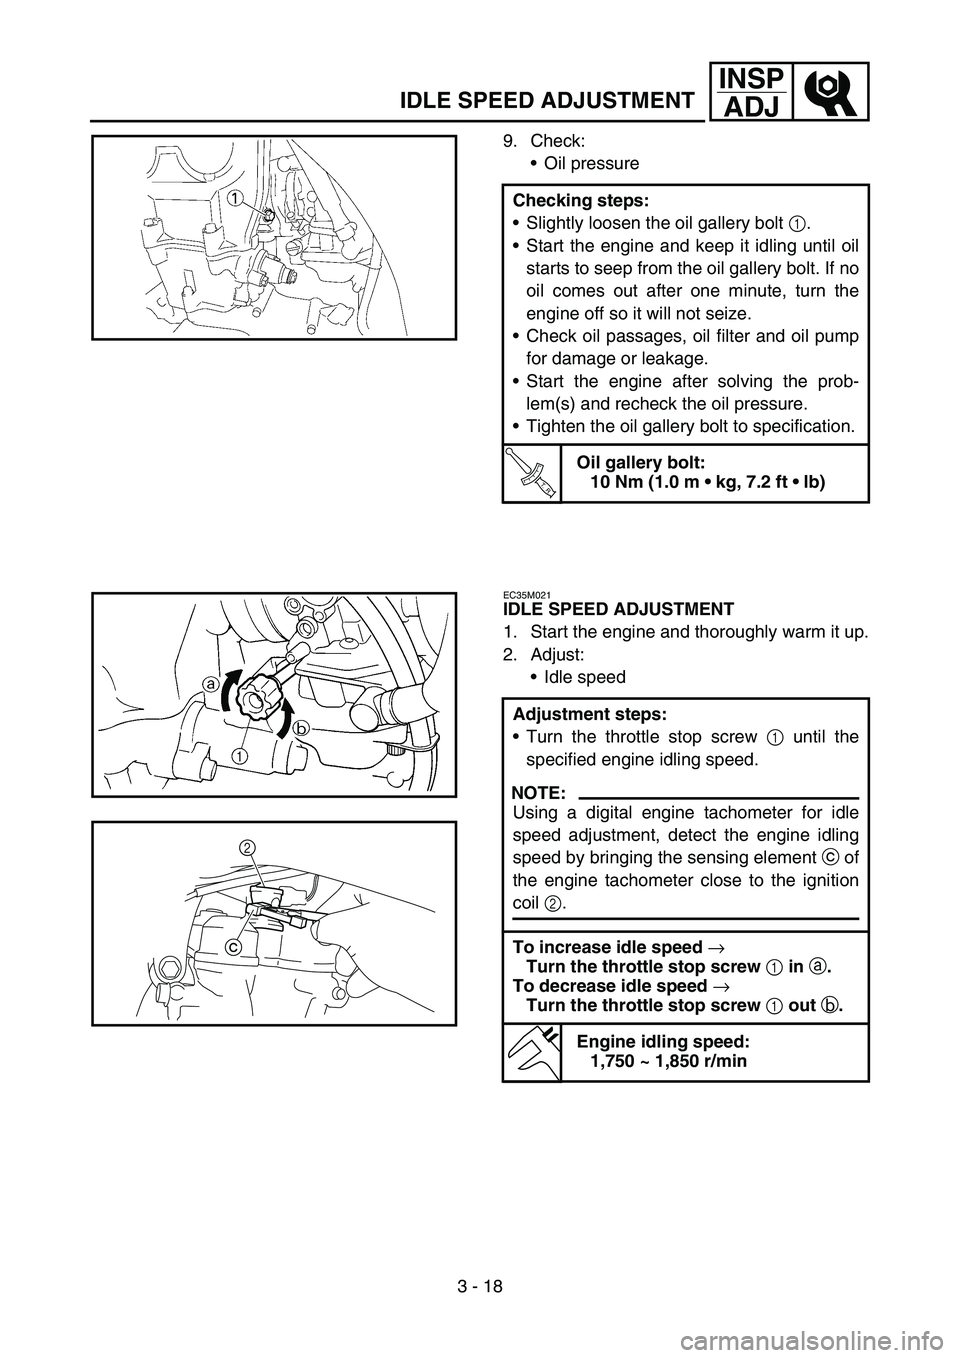
1. Start the engine and thoroughly warm it up.
2. Adjust:
Idle speed
Adjustment steps:
Turn the throttle stop screw 1 until the
specified engine idling speed.
NOTE:
Using a digital engine tachometer for idle
speed adjustment, detect the engine idling
speed by bringing the sensing element c of
the engine tachometer close to the ignition
coil 2.
To increase idle speed
→
Turn the throttle stop screw
1 in
a.
To decrease idle speed
→
Turn the throttle stop screw
1 out
b.
Engine idling speed:
1,750 ~ 1,850 r/min
c2
Page 288 of 794
3 - 44
INSP
ADJ
STEERING HEAD INSPECTION AND ADJUSTMENT
2. Inspect:
Bearing free play
Exist play → Replace.
STEERING HEAD INSPECTION AND
ADJUSTMENT
1. Elevate the front wheel by placing a suit-
able stand under the engine.
2. Check:
Steering shaft
Grasp the bottom of the forks and gently
rock the fork assembly back and forth.
Free play → Adjust steering head.
3. Check:
Steering smooth action
Turn the handlebar lock to lock.
Unsmooth action → Adjust steering ring
nut.
4. Adjust:
Steering ring nut
Steering ring nut adjustment steps:
Remove the headlight.
Remove the handlebar and handle crown.
Loosen the ring nut 1 using the ring nut
wrench 2.
Ring nut wrench:
YU-33975/90890-01403
Page 296 of 794
3 - 48
INSP
ADJ
ELECTRICAL/SPARK PLUG INSPECTION
EC370000
ELECTRICAL
EC371001
SPARK PLUG INSPECTION
1. Remove:
Spark plug
2. Inspect:
Electrode 1
Wear/damage → Replace.
Insulator color 2
Normal condition is a medium to light tan
color.
Distinctly different color → Check the
engine condition.
NOTE:
When the engine runs for many hours at low
speeds, the spark plug insulator will become
sooty, even if the engine and carburetor are in
good operating condition.
3. Measure:
Plug gap a
Use a wire gauge or thickness gauge.
Out of specification → Regap.
Spark plug gap:
0.7 ~ 0.8 mm (0.028 ~ 0.031 in)
4. Clean the plug with a spark plug cleaner if
necessary.
5. Tighten:
Spark plug
NOTE:
Before installing a spark plug, clean the gas-
ket surface and plug surface.
Finger-tighten a the spark plug before torqu-
ing to specification b.
T R..13 Nm (1.3 m · kg, 9.4 ft · lb)
Page 298 of 794
3 - 49
INSP
ADJ
IGNITION TIMING CHECK
IGNITION TIMING CHECK
1. Remove:
Timing plug 1
1
2. Attach:
Timing light
Inductive tachometer
To the ignition coil lead (orange lead 1).
Timing light:
YM-33277-A/90890-03141
1
3. Adjust:
Engine idling speed
Refer to “IDLE SPEED ADJUSTMENT”.
4. Check:
Ignition timing
Visually check the stationary pointer a is
within the firing range b on the rotor.
Incorrect firing range → Check rotor and
pickup assembly.
5. Install:
Timing plug
Page 378 of 794
4 - 29
ENGCAMSHAFTS
Decompression system
1. Check:
Decompression system
Checking steps:
Check that the decompressor cam 1
moves smoothly.
Check that the decompressor lever pin 2
projects from the camshaft.
Timing chain tensioner
1. Check:
While pressing the tensioner rod lightly
with fingers, use a thin screwdriver 1
and wind the tensioner rod up fully clock-
wise.
When releasing the screwdriver by press-
ing lightly with fingers, make sure that the
tensioner rod will come out smoothly.
If not, replace the tensioner assembly.
ASSEMBLY AND INSTALLATION
1. Install:
Exhaust camshaft 1
Intake camshaft 2
Installation steps:
Turn the crankshaft counterclockwise until
the “I” mark a on the rotor is aligned with
the stationary pointer b on the crankcase
cover.
NOTE:
Apply the molybdenum disulfide oil on the
camshafts.
Apply the engine oil on the decompression
system.
Page 516 of 794

4 - 98
ENGCRANKCASE AND CRANKSHAFT
REMOVAL POINTS
Crankcase
1. Separate:
Crankcase (right)
Crankcase (left)
Separation steps:
Remove the crankcase bolts, hose guide
and clutch cable holder.
NOTE:
Loosen each bolt 1/4 of a turn at a time and
after all the bolts are loosened, remove
them.
Remove the crankcase (right).
NOTE:
Place the crankcase with its left side
downward and split it by inserting a screw-
driver tip into the splitting slit a in the
crankcase.
Lift the crankcase (right) horizontally while
lightly patting the case splitting slit and
engine mounting boss using a soft ham-
mer, and leave the crankshaft and trans-
mission with the crankcase (left).
CAUTION:
Use soft hammer to tap on the case half.
Tap only on reinforced portions of case.
Do not tap on gasket mating surface.
Work slowly and carefully. Make sure the
case halves separate evenly. If the cases
do not separate, check for a remaining
case screw or fitting. Do not force.
Remove the dowel pins and O-ring.
a
Balancer shaft
1. Remove:
Balancer shaft 1
NOTE:
Remove the balancer shaft with its flat side a
facing the crankshaft.
Page 526 of 794
4 - 103
ENGCRANKCASE AND CRANKSHAFT
5. Install:
Dowel pin 1
O-ring 2
Crankcase (right)
To crankcase (left).
NOTE:
Fit the crankcase (right) onto the crankcase
(left). Tap lightly on the case with soft ham-
mer.
When installing the crankcase, the connect-
ing rod should be positioned at TDC (top
dead center).
New
6. Tighten:
Hose guide 1
Clutch cable holder 2
Bolt (clutch cable holder)
Bolt (crankcase)
NOTE:
Tighten the crankcase tightening bolts in
stage, using a crisscross pattern.
7. Install:
Timing chain
Timing chain guide (rear)
Bolt (timing chain guide)
8. Remove:
Sealant
Forced out on the cylinder mating surface.
9. Apply:
Engine oil
To the crank pin, bearing and oil delivery
hole.
10. Check:
Crankshaft and transmission operation.
Unsmooth operation → Repair.
T R..10 Nm (1.0 m · kg, 7.2 ft · lb)
T R..12 Nm (1.2 m · kg, 8.7 ft · lb)
T R..10 Nm (1.0 m · kg, 7.2 ft · lb)