Page 676 of 794

6 - 1
–+ELECELECTRICAL COMPONENTS AND WIRING DIAGRAM
EC600000
ELECTRICAL
EC610000
ELECTRICAL COMPONENTS AND WIRING DIAGRAM
EC611000
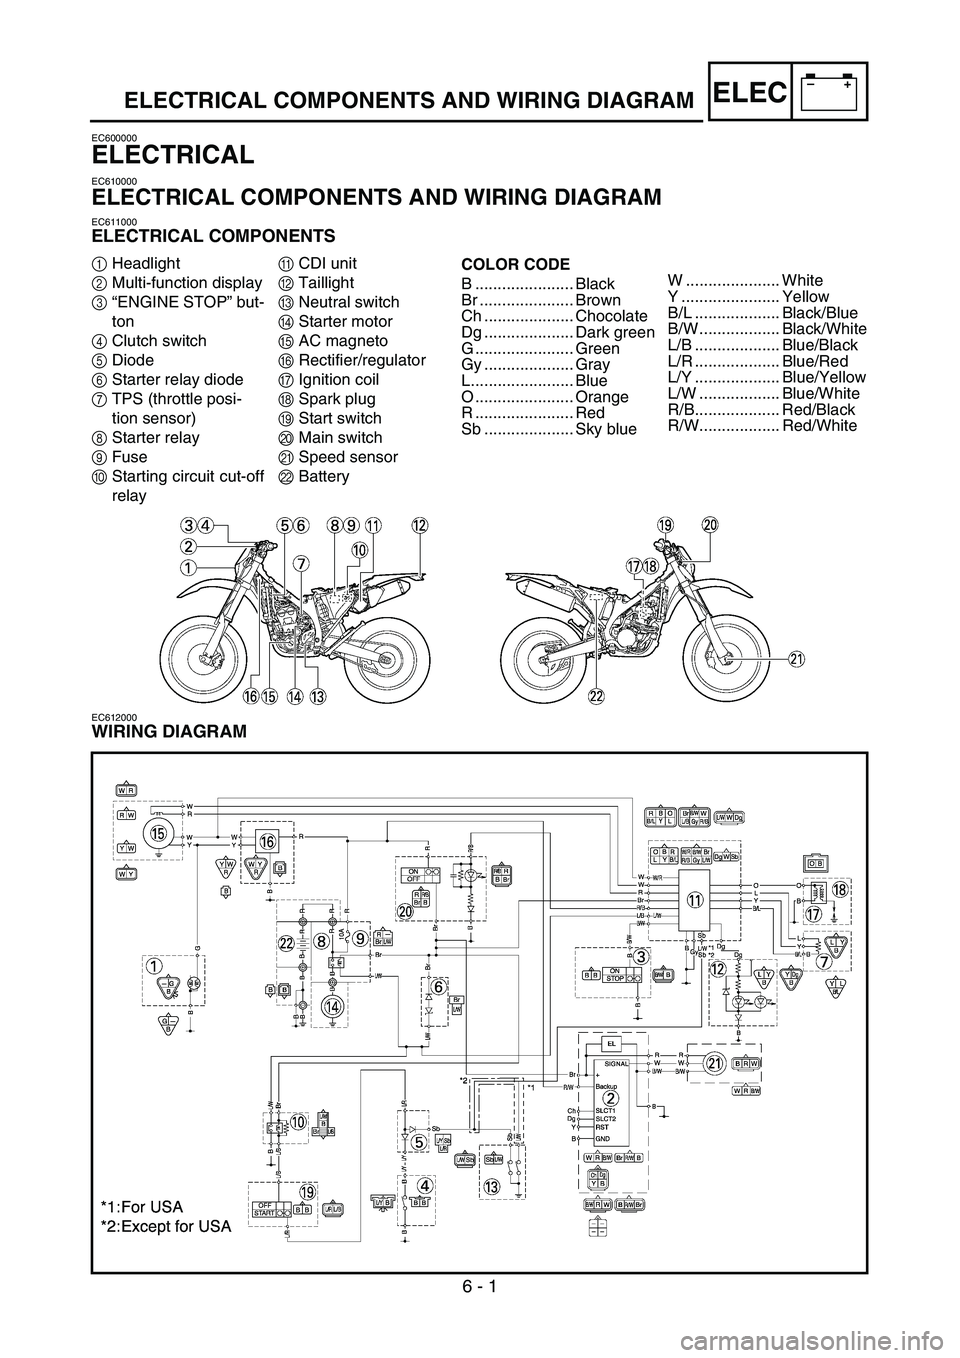
ELECTRICAL COMPONENTS
1Headlight
2Multi-function display
3“ENGINE STOP” but-
ton
4Clutch switch
5Diode
6Starter relay diode
7TPS (throttle posi-
tion sensor)
8Starter relay
9Fuse
0Starting circuit cut-off
relayACDI unit
BTaillight
CNeutral switch
DStarter motor
EAC magneto
FRectifier/regulator
GIgnition coil
HSpark plug
IStart switch
JMain switch
KSpeed sensor
LBatteryCOLOR CODE
B ...................... Black
Br ..................... Brown
Ch .................... Chocolate
Dg .................... Dark green
G ...................... Green
Gy .................... Gray
L....................... Blue
O ...................... Orange
R ...................... Red
Sb .................... Sky blue
EC612000
WIRING DIAGRAM
W ..................... White
Y ...................... Yellow
B/L ................... Black/Blue
B/W .................. Black/White
L/B ................... Blue/Black
L/R ................... Blue/Red
L/Y ................... Blue/Yellow
L/W .................. Blue/White
R/B................... Red/Black
R/W.................. Red/White
Page 736 of 794
–+ELEC
6 - 26
SIGNALING SYSTEM
SIGNALING SYSTEM
INSPECTION STEPS
If the speedometer will not operate, use the following inspection steps.
*1 marked: Refer to “BATTERY INSPECTION AND CHARGING” section in the CHAPTER 3.
NOTE:
•Remove the following parts before inspection.
1) Headlight
•Use the following special tools in this inspection.
Pocket tester:
YU-3112-C/90890-03112
*1 Check battery. Recharge or replace.
Check each coupler and
wire connection.Repair or replace.
Check multi-function dis-
play.Input voltage Replace wire harness.
Output voltageReplace multi-func-
tion display.
Check speed sensor. Replace.
OK
OK
OK
No good
No good
No good No good
No good
Page 740 of 794
6 - 27
–+ELECSIGNALING SYSTEM
COUPLERS AND LEADS CONNECTION
INSPECTION
1. Check:
•Couplers and leads connection
Rust/dust/looseness/short-circuit →
Repair or replace.
MULTI-FUNCTION DISPLAY INPUT
VOLTAGE INSPECTION
1. Disconnect the multi-function display cou-
pler.
2. Set the main switch to “ON”.
3. Measure:
•Multi-function display input voltage
Out of specification → Replace wire har-
ness.
CAUTION:
Make sure that a short-circuit does not
develop between the terminals because it
may cause damage to electrical compo-
nents.Tester (+) lead
→ Brown lead
1
Tester (–) lead
→ Black lead
2
Multi-function dis-
play input voltageTester selec-
tor position
10 V or more DCV-20
MULTI-FUNCTION DISPLAY OUTPUT
VOLTAGE INSPECTION
1. Disconnect the multi-function display cou-
pler.
2. Set the main switch to “ON”.
Page 742 of 794
6 - 28
–+ELECSIGNALING SYSTEM
3. Measure:
•Multi-function display output voltage
Out of specification → Replace multi-
function display.
CAUTION:
Make sure that a short-circuit does not
develop between the terminals because it
may cause damage to electrical compo-
nents.Tester (+) lead
→ Red lead
1
Tester (–) lead
→ Black/White lead
2
Multi-function dis-
play output voltageTester selec-
tor position
4.5 V or more DCV-20
SPEED SENSOR OUTPUT VOLTAGE
INSPECTION
1. Insert the thin electric conductors 1 (lead)
into the speed sensor coupler 2, as
shown, and connect the tester to them.
CAUTION:
Do not insert the electric conductors
more than required because it may
reduce the waterproof function of the
coupler.
Make sure that a short-circuit does not
develop between the terminals because it
may cause damage to electrical compo-
nents.
2. Set the main switch to “ON”. Tester (+) lead
→ White lead
3
Tester (–) lead
→ Black lead
4
Page:
< prev 1-8 9-16 17-24