Page 33 of 72

OPERATION AND IMPORTANT RIDING POINTS
5-3
2
3
4
56
7
8
9 shifting gears, otherwise damage to
the engine and drive train may re-
sult.
3. Open the throttle gradually.
4. Once the motorcycle has reached
a speed high enough to change
gears, close the throttle.
5. Shift into second gear and release
the shift pedal.
6. Open the throttle gradually.
7. Follow the same procedure when
shifting to the next higher gear.
EAU16710
To decelerate
1. Close the throttle and apply both
the front and the rear brakes to
slow the motorcycle.
2. Downshift through the gears and
shift the transmission into the neu-
tral position when the motorcycle
is almost completely stopped.
EAU39920
Engine break-in
There is never a more important period
in the life of your engine than the first 5
hours of riding. It is also important to ac-
custom the rider to the motorcycle dur-
ing this time. Please read the following
information carefully.
Since the engine is brand new, do not
put an excessive load on it for the first 5
hours of operation. The various parts in
the engine wear and polish themselves
to the correct operating clearances.
During this period, prolonged full-throt-
tle operation or any condition that might
result in engine overheating must be
avoided. However, momentary
full-throttle operation under load (i.e.,
two to three seconds maximum) does
not harm the engine. Each full-throttle
acceleration should be followed with a
substantial rest period for the engine.
To allow the engine to cool down from
the temporary buildup of heat, cruise at
a lower engine speed.
After the first 5 hours of operation, thor-
oughly check the motorcycle for loose
parts, oil leakage and any other prob-
lems. Be sure to inspect and make ad-justments thoroughly, especially cable
and drive chain slack and loose
spokes. In addition, check all fittings
and fasteners for looseness, and tight-
en if necessary.
CAUTION:
ECA10270
If any engine trouble should occur
during the engine break-in period,
immediately have a Yamaha dealer
check the vehicle.
Page 34 of 72
OPERATION AND IMPORTANT RIDING POINTS
5-4
1
2
3
4
5
6
7
8
9
EAU17190
Parking
When parking, stop the engine, and
then turn the fuel cock lever to “OFF”.
WARNING
EWA10310
�
Since the engine and exhaust
system can become very hot,
park in a place where pedestri-
ans or children are not likely to
touch them.
�
Do not park on a slope or on soft
ground, otherwise the vehicle
may overturn.
Page 35 of 72

6-1
2
3
4
5
67
8
9
PERIODIC MAINTENANCE AND MINOR REPAIR
EAU41950
Safety is an obligation of the owner. Pe-
riodic inspection, adjustment and lubri-
cation will keep your vehicle in the
safest and most efficient condition pos-
sible. The most important points of mo-
torcycle inspection, adjustment, and
lubrication are explained on the follow-
ing pages.
Maintenance, replacement, or repair
of the emission control devices and
systems may be performed by any
repair establishment or individual
that is certified (if applicable).
WARNING
EWA10320
If you are not familiar with mainte-
nance work, have a Yamaha dealer
do it for you.
EAU17320
Owner’s tool kit
The service information included in this
manual and the tools provided in the
owner’s tool kit are intended to assist
you in the performance of preventive
maintenance and minor repairs. How-
ever, additional tools such as a torque
wrench may be necessary to perform
certain maintenance work correctly.
NOTE:
If you do not have the tools or experi-
ence required for a particular job, have
a Yamaha dealer perform it for you.
WARNING
EWA10350
Modifications not approved by
Yamaha may cause loss of perfor-
mance and render the vehicle un-
safe for use. Consult a Yamaha
dealer before attempting any chang-
es.
Page 36 of 72
PERIODIC MAINTENANCE AND MINOR REPAIR
6-2
1
2
3
4
5
6
7
8
9
EAU41763
Periodic maintenance and lubrication chart
NOTE:
�
From 160 hours, repeat the maintenance intervals starting from 40 hours.
�
Items marked with an asterisk should be performed by a Yamaha dealer as they require special tools, data and technical
skills.
NO. ITEM CHECK OR MAINTENANCE JOBINITIAL THEREAFTER EVERY
10
hours20
hours40
hours80
hours40
hours80
hours160
hours
1*Fuel line
Check fuel hoses for cracks or damage.Replace if necessary.
2Spark plugCheck condition.Adjust gap and clean.Replace if necessary.
3Air filter elementClean with solvent.Replace if necessary.
4*ClutchCheck operation.Adjust if necessary.
5*Front brakeCheck operation.Adjust brake lever free play.Replace brake shoes. Whenever worn to the limit
6*Rear brakeCheck operation.Adjust brake pedal free play.Replace brake shoes. Whenever worn to the limit
7*WheelsCheck runout, spoke tightness and for
damage.Tighten spokes if necessary.
Page 37 of 72

PERIODIC MAINTENANCE AND MINOR REPAIR
6-3
2
3
4
5
67
8
9
8*Tires
Check tread depth and for damage.Replace if necessary.Check air pressure.Correct if necessary.
9*Wheel bearingsCheck bearings for smooth operation.Replace if necessary.
10 *Steering bearingsCheck bearing assemblies for looseness.Moderately repack with lithium-soap-based
grease.
11Drive chainCheck chain slack/alignment and condi-
tion.Adjust and lubricate chain with Yamaha
chain and cable lube thoroughly.Every rideRemove and clean.
12 *Chassis fastenersCheck all chassis fitting and fasteners.Correct if necessary.
13Sidestand pivotCheck operation.Apply lithium-soap-based grease (all-pur-
pose grease) lightly.
14 *Front forkCheck operation and for oil leakage.Replace if necessary.
15 *Shock absorber
assemblyCheck operation and for oil leakage.Replace if necessary.
16 *CarburetorCheck engine idling speed and starter
operation.Clean.Replace if necessary. NO. ITEM CHECK OR MAINTENANCE JOBINITIAL THEREAFTER EVERY
10
hours20
hours40
hours80
hours40
hours80
hours160
hours
Page 38 of 72
PERIODIC MAINTENANCE AND MINOR REPAIR
6-4
1
2
3
4
5
6
7
8
9
NOTE:
The air filter needs more frequent service if you are riding in unusually wet or dusty areas.
17 *Autolube pump
Check operation.Correct if necessary.Bleed.
18Transmission oilCheck for oil leakage .Correct if necessary.Change.
19 *Control cablesApply Yamaha chain and cable lube or
engine oil 10W-30 lightly.
20 *Throttle grip housing
and cableCheck operation and free play.Apply Yamaha chain and cable lube or
engine oil 10W-30 lightly.
21Brake lever pivot shaftApply lithium-soap-based grease (all-pur-
pose grease) lightly.
22Brake pedal pivot
shaftApply lithium-soap-based grease (all-pur-
pose grease) lightly.
23 *Cylinder head and
exhaust systemCheck for leakage.Tighten if necessary.Decarbonize if necessary.
24 *Spark arresterClean. NO. ITEM CHECK OR MAINTENANCE JOBINITIAL THEREAFTER EVERY
10
hours20
hours40
hours80
hours40
hours80
hours160
hours
Page 39 of 72

PERIODIC MAINTENANCE AND MINOR REPAIR
6-5
2
3
4
5
67
8
9
EAU19603
Checking the spark plug
The spark plug is an important engine
component, which is easy to check.
Since heat and deposits will cause any
spark plug to slowly erode, the spark
plug should be removed and checked
in accordance with the periodic mainte-
nance and lubrication chart. In addition,
the condition of the spark plug can re-
veal the condition of the engine.
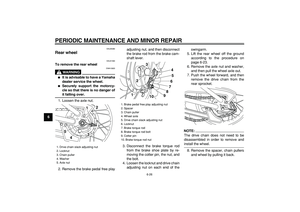
To remove the spark plug
1. Remove the spark plug cap.
2. Remove the spark plug as shown,
with the spark plug wrench includ-
ed in the owner’s tool kit.
To check the spark plug
1. Check that the porcelain insulator
around the center electrode of the
spark plug is a medium-to-light tan
(the ideal color when the vehicle is
ridden normally).
NOTE:
If the spark plug shows a distinctly dif-
ferent color, the engine could be oper-
ating improperly. Do not attempt to
diagnose such problems yourself. In-
stead, have a Yamaha dealer check
the vehicle.
2. Check the spark plug for electrode
erosion and excessive carbon orother deposits, and replace it if
necessary.
To install the spark plug
1. Measure the spark plug gap with a
wire thickness gauge and, if nec-
essary, adjust the gap to specifica-
tion.
1. Spark plug cap
1
1. Spark plug wrench
1
Specified spark plug:
NGK/BP6HS (AUS)(NZL)
NGK/BPR6HS
(AUT)(BEL)(CHE)(DEU)(DNK)
(ESP)(FIN)(FRA)(GBR)(GRC)(IRL)
(NLD)(NOR)(PRT)(SWE)(ZAF)
DENSO/W20FP (AUS)(NZL)
1. Spark plug gap
1
Page 40 of 72

PERIODIC MAINTENANCE AND MINOR REPAIR
6-6
1
2
3
4
5
6
7
8
9
2. Clean the surface of the spark plug
gasket and its mating surface, and
then wipe off any grime from the
spark plug threads.
3. Install the spark plug with the
spark plug wrench, and then tight-
en it to the specified torque.
NOTE:
If a torque wrench is not available when
installing a spark plug, a good estimate
of the correct torque is 1/4–1/2 turn
past finger tight. However, the spark
plug should be tightened to the speci-
fied torque as soon as possible.
4. Install the spark plug cap.
EAU41100
Removing the power
reduction plate
To obtain full engine performance ca-
pability, removing the power reduction
plate is required.
WARNING
EWA14580
Always let the exhaust system cool
prior to touching exhaust compo-
nents.
1. Remove the exhaust manifold by
removing the bolts.
2. Remove the gasket.
3. Remove the power reduction
plate.
NOTE:
Store the power reduction plate with the
owner’s manual so that it is readily
available whenever you want to reduce
the engine power.
4. Install the exhaust manifold by in-
stalling the bolts.
Spark plug gap:
0.6–0.7 mm (0.024–0.028 in)
Tightening torque:
Spark plug:
25 Nm (2.5 m·kgf, 18.1 ft·lbf)
1. Exhaust manifold bolt
1
1. Exhaust manifold
2. Gasket
3. Power reduction plate
Tightening torque:
Exhaust manifold bolt:
18 Nm (1.8 m·kgf, 13.0 ft·lbf)
2 13