Page 17 of 56

the reset button for at least two
second.
The tripmeter can be used together
with the fuel gauge to estimate the
distance that can be traveled with a
full tank of fuel. This information will
enable you to plan future fuel stops.
EAU12140
Fuel gauge
The fuel gauge indicates the amount
of fuel in the fuel tank. The needle
moves towards “E” (Empty) as the
fuel level decreases. When the needle
reaches “E”, refuel as soon as possi-
ble.
NOTE:
Do not allow the fuel tank to empty
itself completely.
EAUS1010
Clock
To set the clock
1. Turn the key to “f”.
2. Set the odometer/tripmeter dis-
play to “TOTAL” by pushing the
“SET” button.3. Push the “SET” button for at least
two seconds.
4. When the hours digits start flas-
hing, push the “SET” button to
set the hours.
5. Push the “SET” button for at least
two seconds and the minutes
digits will start flashing.
6. Push the “SET” button to set the
minutes.
7. Push the “SET” button for at least
two seconds to start the clock
and return to the odometer/trip-
meter mode.
NOTE:
The clock is displayed only when the
key is in the “f” position.
EAU12343
Handlebar switches
1. Horn switch
2. Turn signal switch
3. Dimmer swith
EAU12400
Dimmer switch “j/k”
Set this switch to “j” for the high
beam and to “k” for the low beam.
EAU12440
Turn signal switch “TURN”
To signal a right-hand turn, push this
switch to the right. To signal a left-
hand turn, push this switch to the left.
When released, the switch returns to
the center position. To cancel the turn
signal lights, push the switch in after it
has returned to the center position.
kb
a
3
INSTRUMENT AND CONTROL FUNCTIONS
3-3
13
2
5RW-F8199-E3.qxd 08/09/2005 18:07 Página 17
Page 18 of 56

EAU12500
Horn switch “a”
Press this switch to sound the horn.
EAUM1131
Start switch “g”
1. Start switch
Push this switch while applying the
front or rear brake to crank the engine
with the starter.
ECA10050
CAUTION
See page 5-1 for starting instruc-
tions prior to starting the engine.
EAU12900
Front brake lever
The front brake lever is located on the
right handlebar grip. To apply the
front brake, pull this lever toward the
handlebar grip.
EAU12950
Rear brake lever
The rear brake lever is located on the
left handlebar grip. To apply the rear
brake, pull this lever toward the hand-
lebar grip.
EAU13200
Fuel and 2-stroke engine oil
tank caps
1. Fuel tank cap
2. Engine oil tank cap
The fuel tank cap and the 2-stroke
engine oil tank cap are located under
the seat. (See page 3-6.)
Fuel tank cap
To remove the fuel tank cap, turn it
counterclockwise, and then pull it off.
To install the fuel tank cap, turn it
clockwise.
j
k
g
3
INSTRUMENT AND CONTROL FUNCTIONS
3-4
1
�
�
2
1
5RW-F8199-E3.qxd 08/09/2005 18:07 Página 18
Page 19 of 56

2-stroke engine oil tank cap
To remove the 2-stroke engine oil tank
cap, pull it off.
To install the 2-stroke engine oil tank
cap, push it into the oil tank opening.
EWA10140
s s
WARNING
Make sure that the fuel and 2-stro-
ke engine oil tank caps are properly
installed before riding the scooter.
EAU13220
Fuel
1. Refill pipe
2. Fuel level
Make sure that there is sufficient fuel
in the tank. When refueling, be sure to
insert the pump nozzle into the fuel
tank filler hole and to fill the tank to
the bottom of the filler tube as shown.
EWA10880
s s
WARNING
�Do not overfill the fuel tank,
otherwise it may overflow
when the fuel warms up and
expands.
�Avoid spilling fuel on the hot
engine.
ECA10070
CAUTION
Immediately wipe off spilled fuel
with a clean, dry, soft cloth, since
fuel may deteriorate painted surfa-
ces or plastic parts.
EAU13270
Your Yamaha engine has been desig-
ned to use regular unleaded gasoline
with a research octane number of 91
or higher. If knocking (or pinging)occurs, use a gasoline of a different
brand or premium unleaded fuel. Use
of unleaded fuel will extend spark
plug life and reduce maintenance
costs.
EAU13460
2-stroke engine oil
Make sure that there is sufficient oil in
the 2-stroke engine oil tank. Add the
recommended 2-stroke engine oil if
necessary.
NOTE:
Make sure that the 2-stroke engine oil
tank cap is properly installed.
Recommended oil:
Yamalube 2 or equivalent 2-stroke
engine oil (JASO grade “FC”, or
ISO grades “EG-C” or “EG-D”)
Oil quantity:
1,4L (0,31 US qt)(1,23 Imp.qt)Recommended fuel:
REGULAR UNLEADED GASOLINE
ONLY
Fuel tank capacity:
5,5L (1,21 US gal) (4,8Imp.gal)
Fuel reserve amount:
1,9L(0,42US gal) (1,67Imp.gal)
3
INSTRUMENT AND CONTROL FUNCTIONS
3-5
5RW-F8199-E3.qxd 08/09/2005 18:07 Página 19
Page 20 of 56

EAUS1050
Kickstarter
1. Kickstarter
To start the engine, push the kickstar-
ter down lightly with your foot until the
gears engage, and then push it down
smoothly but forcefully.
EAU13931
Seat
To open the seat
1. Place the scooter on the centers-
tand.
2. Insert the key into the main
switch, and then turn it counter-
clockwise.
NOTE:
Do not push inward when turning the
key.
3. Fold the seat up.
To close the seat
1. Fold the seat down, and then
push it down to lock it in place.
2. Remove the key from the main
switch if the scooter will be left
unattended.
NOTE:
Make sure that the seat is properly
secured before riding.
EAU14440
Storage compartment
1. Storage compartment
This storage compartment is desig-
ned to hold a genuine Yamaha U-
LOCK. (Other locks may not fit.) When
placing a U-LOCK in the storage
compartment, insert the ends of the
lock into the holes at the rear of the
compartment, push the curved part of
the lock into the holders at the bottom
of the compartment, and then secu-
rely fasten the lock with the straps.
When the U-LOCK is not in the stora-
ge compartment, be sure to secure
the straps to prevent losing them.
3
INSTRUMENT AND CONTROL FUNCTIONS
3-6
1
1
5RW-F8199-E3.qxd 08/09/2005 18:07 Página 20
Page 21 of 56

EWA10960
s s
WARNING
�Do not exceed the load limit of
3,5 kg (7,4 lb) for the storage
compartment.
�Do not e")
EAU14510
Storage compartment
There is a storage compartment
under the seat. (See page 3-6.)
EWA10960
s s
WARNING
�Do not exceed the load limit of
3,5 kg (7,4 lb) for the storage
compartment.
�Do not exceed the maximum
load of 158kg (348,4lb) CS50Z
or 161kg (355lb) CS50 for the
vehicle.
ECA10080
CAUTION
Keep the following points in mind
when using the storage compart-
ment.
�Since the storage compart-
ment accumulates heat when
exposed to the sun, do not sto-
re anything susceptible to heat
inside it.
�To avoid humidity from sprea-
ding through the storage com-
partment, wrap wet articles in
a plastic bag before storing
them in the compartment.
�Since the storage compart-
ment may get wet while the
scooter is being washed, wrap
any articles stored in the com-
partment in a plastic bag.
�Do not keep anything valuable
or breakable in the storage
compartment.
To store a helmet in the storage com-
partment, place the helmet upside-
down with the front facing forward.
NOTE:
�Some helmets cannot be stored
in the storage compartment
because of their size or shape.
�Do not leave your scooter unat-
tended with the seat open.
3
INSTRUMENT AND CONTROL FUNCTIONS
3-7
5RW-F8199-E3.qxd 08/09/2005 18:07 Página 21
Page 22 of 56
EAU15591
The condition of a vehicle is the
owner’s responsibility. Vital compo-
nents can start to deteriorate quickly
and unexpectedly, even if the vehicle
remains unused (for example, as a
result of exposure to the elements).
Any damage, fluid leakage or loss of
tire air pressure could have serious
consequences. Therefore, it is very
important, in addition to a thorough
visual inspection, to check the follo-
wing points before each ride.
NOTE:
Pre-operation checks should be
made each time the vehicle is used.
Such an inspection can be accom-
plished in a very short time; and the
added safety it assures is more than
worth the time involved.
EWA11150
s s
WARNING
If any item in the Pre-operation
check list is not working properly,
have it inspected and repaired
before operating the vehicle.
4
PRE-OPERATION CHECKS
4-1
5RW-F8199-E3.qxd 08/09/2005 18:07 Página 22
Page 23 of 56

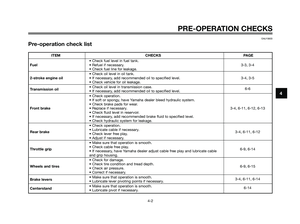
EAU15603
Pre-operation check list
PRE-OPERATION CHECKS
4-2
4
ITEM CHECKS PAGE
• Check fuel level in fuel tank.
Fuel• Refuel if necessary. 3-3, 3-4
• Check fuel line for leakage.
• Check oil level in oil tank.
2-stroke engine oil• If necessary, add recommended oil to specified level. 3-4, 3-5
• Check vehicle for oil leakage.
Transmission oil• Check oil level in transmission case.
• If necessary, add recommended oil to specified level.6-6
• Check operation.
• If soft or spongy, have Yamaha dealer bleed hydraulic system.
• Check brake pads for wear.
Front brake• Replace if necessary. 3-4, 6-11, 6-12, 6-13
• Check fluid level in reservoir.
• If necessary, add recommended brake fluid to specified level.
• Check hydraulic system for leakage.
• Check operation.
Rear brake• Lubricate cable if necessary.
3-4, 6-11, 6-12
• Check lever free play.
• Adjust if necessary.
• Make sure that operation is smooth.
Throttle grip• Check cable free play.
6-9, 6-14
• If necessary, have Yamaha dealer adjust cable free play and lubricate cable
and grip housing.
• Check for damage.
Wheels and tires• Check tire condition and tread depth.
6-9, 6-15
• Check air pressure.
• Correct if necessary.
Brake levers• Make sure that operation is smooth.
• Lubricate lever pivoting points if necessary.3-4, 6-11, 6-14
Centerstand• Make sure that operation is smooth.
• Lubricate pivot if necessary.6-14
5RW-F8199-E3.qxd 08/09/2005 18:07 Página 23
Page 24 of 56
ITEM CHECKS PAGE
Chassis fasteners• Make sure that all nuts, bolts and screws are properly tightened.
• Tighten if necessary.—
Instruments, lights, • Check operation.
signals and switches• Correct if necessary.—
• Check coolant level in reservoir.
Coolant• If necessary, add recommended coolant to specified level. 6-6, 6-7
• Check cooling system for leakage.
PRE-OPERATION CHECKS
4-3
4
5RW-F8199-E3.qxd 08/09/2005 18:07 Página 24