Page 76 of 140

7-22
1
2
3
4
5
67
8
9
10
11
to climb:
Turn the ATV around if you still have forward
speed. If not, stop, dismount on the uphill side of
the ATV and physically turn the ATV around. If
the ATV starts to slip backwards, DO NOT USE
THE REAR BRAKE – the ATV may tip over on
top of you. Dismount the ATV on the uphill side.
(See page 7-14.)
�
If your ATV is traversing a sloping surface:
Be sure to ride with your weight positioned to-
wards the uphill side of the ATV to maintain
proper balance. If the ATV starts to tip, steer
down the hill (if there are no obstacles in your
way) to regain balance. If you discover that the
ATV is going to tip over, dismount on the uphill
side. (See page 7-14.)
�
If your ATV encounters shallow water:
Ride slowly and carefully through slow moving
water, watching for obstacles. Be sure to let wa-
ter drain from the ATV and CHECK YOUR
BRAKES FOR PROPER OPERATION when
you come out of the water. Do not continue to
ride your ATV until you have regained adequate
braking ability. (See page 7-18.)
Page 79 of 140

8-3
1
2
3
4
5
6
78
9
10
11
EBU22403
Periodic maintenance and lubrication chart
NOTE:
�
For ATVs not equipped with an odometer or an hour meter, follow the month maintenance intervals.
�
For ATVs equipped with an odometer or an hour meter, follow the km (mi) or hours maintenance inter-
vals. However, keep in mind that if the ATV isn’t used for a long period of time, the month maintenance
intervals should be followed.
�
Items marked with an asterisk should be performed by a Yamaha dealer as they require special tools,
data and technical skills.
NO. ITEMCHECK OR MAINTENANCE
JOBINITIAL EVERY
Whichev-
er comes
firstmonth136612
km
(mi)320
(200)1200
(750)2400
(1500)2400
(1500)4800
(3000)
hours 20 75 150 150 3001
*
Fuel line
�
Check fuel hoses for cracks or other damage, and
replace if necessary.
√√√
2 Spark plugs
�
Replace.
√√√√√
3 Air filter element
�
Clean and replace if necessary.Every 20–40 hours (more often in wet or
dusty areas)
4
*
Clutch
�
Check operation and adjust if necessary.
√ √√√
5
*
Front brake
�
Check operation and correct if necessary.
�
Check fluid level and ATV for fluid leakage, and
correct if necessary.
√√√√√
�
Replace brake pads. Whenever worn to the limit
Page 80 of 140

8-4
1
2
3
4
5
6
78
9
10
11
6
*
Rear brake
�
Check operation and correct if necessary.
�
Check brake pedal free play and adjust if neces-
sary.
�
Check fluid level and ATV for fluid leakage, and
correct if necessary.
√√√√√
�
Replace brake pads. Whenever worn to the limit
7
*
Brake hoses
�
Check for cracks or other damage, and replace if
necessary.
√√√√
�
Replace. Every 4 years
8
*
Parking brake
�
Check operation and adjust if necessary.
√√√√√
9
*
Wheels
�
Check runout and for damage, and replace if nec-
essary.
√√√√√
10
*
Tires
�
Check tread depth and for damage, and replace if
necessary.
�
Check air pressure and balance, and correct if
necessary.
√√√√√
11
*
Wheel bearings
�
Check for looseness or damage, and replace if
necessary.
√ √√√
12
*
Upper and lower
arm pivots
�
Lubricate with lithium-soap-based grease.
√√√
13 Drive chain
�
Check chain slack and adjust if necessary.
�
Check rear wheel alignment and correct if necess-
sary.
�
Clean and lubricate.
√ √√√
14
*
Drive chain rollers
�
Check for wear and replace if necessary.
√√√
NO. ITEMCHECK OR MAINTENANCE
JOBINITIAL EVERY
Whichev-
er comes
firstmonth 1 3 6 6 12
km
(mi)320
(200)1200
(750)2400
(1500)2400
(1500)4800
(3000)
hours 20 75 150 150 300
Page 82 of 140
8-6
1
2
3
4
5
6
78
9
10
11
EBU23070
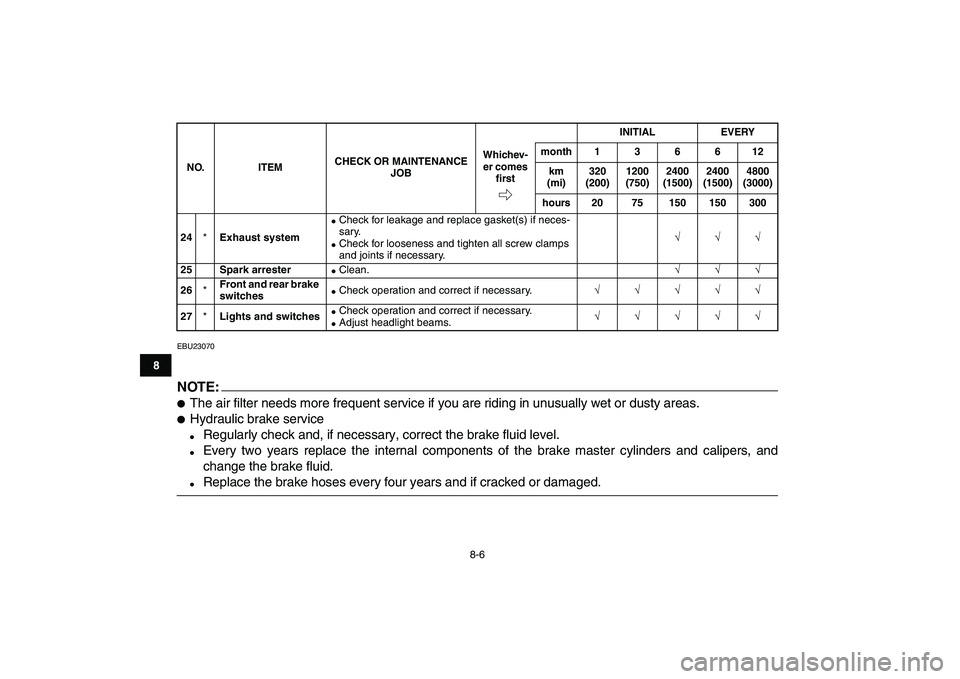
NOTE:
�
The air filter needs more frequent service if you are riding in unusually wet or dusty areas.
�
Hydraulic brake service
�
Regularly check and, if necessary, correct the brake fluid level.
�
Every two years replace the internal components of the brake master cylinders and calipers, and
change the brake fluid.
�
Replace the brake hoses every four years and if cracked or damaged.
24
*
Exhaust system
�
Check for leakage and replace gasket(s) if neces-
sary.
�
Check for looseness and tighten all screw clamps
and joints if necessary.
√√√
25 Spark arrester
�
Clean.
√√√
26
*
Front and rear brake
switches
�
Check operation and correct if necessary.
√√√√√
27
*
Lights and switches
�
Check operation and correct if necessary.
�
Adjust headlight beams.
√√√√√
NO. ITEMCHECK OR MAINTENANCE
JOBINITIAL EVERY
Whichev-
er comes
firstmonth 1 3 6 6 12
km
(mi)320
(200)1200
(750)2400
(1500)2400
(1500)4800
(3000)
hours 20 75 150 150 300
Page 107 of 140
8-31
1
2
3
4
5
6
78
9
10
11
the throttle cable free play, turn the adjusting
bolt in direction (b).
3. Tighten the locknut.
EBU24130
Checking the front and rear brake pads
The front and rear brake pads must be checked for
wear at the intervals specified in the periodic main-
tenance and lubrication chart.
EBU24140
Front brake pads
Each brake pad is provided with a wear indicator,
which allows you to check the brake pad wear
without having to disassemble the brake. To check
the brake pad wear, check the position of the wear
indicator while applying the brake. If a brake pad
has worn to the point that the wear indicator almost
touches the brake disc, have a Yamaha dealer re-
place the brake pads as a set.
EBU24190
Rear brake pads
Each brake pad is provided with a wear indicator,
which allows you to check the brake pad wear
1. Throttle lever free play adjusting bolt
2. Locknut
3. Throttle cable free play
1
2
3
1. Wear indicator
1
Page 108 of 140
8-32
1
2
3
4
5
6
78
9
10
11
without having to disassemble the brake. To check
the brake pad wear, check the position of the wear
indicator while applying the brake. If a brake pad
has worn to the point that the wear indicator almost
touches the brake disc, have a Yamaha dealer re-
place the brake pads as a set.
EBU24251
Checking the brake fluid level
Insufficient brake fluid may allow air to enter the
brake system, possibly causing it to become inef-
fective.
Before riding, check that the brake fluid is above
the minimum level mark and replenish if neces-sary. A low brake fluid level may indicate worn
brake pads and/or brake system leakage. If the
brake fluid level is low, be sure to check the brake
pads for wear and the brake system for leakage.
Front brake
1. Wear indicator
11
1. Minimum level mark
LOWER
1
Page 109 of 140

8-33
1
2
3
4
5
6
78
9
10
11
Rear brake
Observe these precautions:
�
When checking the fluid level, make sure that
the top of the brake fluid reservoir is level.
�
Use only the recommended quality brake fluid,
otherwise the rubber seals may deteriorate,
causing leakage and poor braking performance.
�
Refill with the same type of brake fluid. Mixing
fluids may result in a harmful chemical reaction
and lead to poor braking performance.
�
Be careful that water does not enter the brake
fluid reservoir when refilling. Water will signifi-
cantly lower the boiling point of the fluid and may
result in vapor lock.
�
Brake fluid may deteriorate painted surfaces or
plastic parts. Always clean up spilled fluid imme-
diately.
�
As the brake pads wear, it is normal for the brake
fluid level to gradually go down. However, if the
brake fluid level goes down suddenly, have a
Yamaha dealer check the cause.
EBU24290
Changing the brake fluid
Have a Yamaha dealer change the brake fluid at
the intervals specified in the NOTE after the peri-
odic maintenance and lubrication chart. In addi-
tion, have the oil seals of the master cylinders and
calipers as well as the brake hoses replaced at the
intervals listed below or whenever they are dam-
aged or leaking.
�
Oil seals: Replace every two years.
�
Brake hoses: Replace every four years.
EBU24390
Checking the front brake lever free play
The brake lever free play must be checked at the
1. Minimum level mark
Recommended brake fluid:
DOT 4
LOWER
1
Page 110 of 140
 as shown. If the free
play is incor")
8-34
1
2
3
4
5
6
78
9
10
11
intervals specified in the periodic maintenance and
lubrication chart. The brake lever should have a
free play of zero mm (zero in) as shown. If the free
play is incorrect, have a Yamaha dealer check the
brake system.
WARNING
EWB02070
Operating with improperly serviced or adjust-
ed brakes could cause loss of braking ability,
which could lead to an accident.
After servicing:
�
Make sure the brakes operate smoothly and
that the free play is correct.
�
Make sure the brakes do not drag.
�
Make sure the brakes are not spongy. All air
must be bled from the brake system.
Replacement of brake components requires
professional knowledge. These procedures
should be performed by a Yamaha dealer.
EBU24611
Checking the brake pedal position
The brake pedal position must be checked and, if
necessary, adjusted at the intervals specified in
the periodic maintenance and lubrication chart.
The top of the brake pedal should be positioned
10.0 mm (0.39 in) below the top of the footrest as
shown. If the brake pedal is not positioned as spec-
ified, have a Yamaha dealer adjust it.
1. Brake lever free play
1
.
3. Tighten the locknut.
EBU24130
Checking the front and rear brake pads
The front and rear")
