Page 111 of 140
8-35
1
2
3
4
5
6
78
9
10
11
WARNING
EWB02110
Operating with improperly serviced or adjust-
ed brakes could cause loss of braking ability,
which could lead to an accident.
After servicing:
�
Make sure the brakes operate smoothly and
that the brake pedal position is correct.
�
Make sure the brakes do not drag.
�
Make sure the brakes are not spongy. All air
must be bled from the brake system.
Replacement of brake components requires
professional knowledge. These procedures
should be performed by a Yamaha dealer.
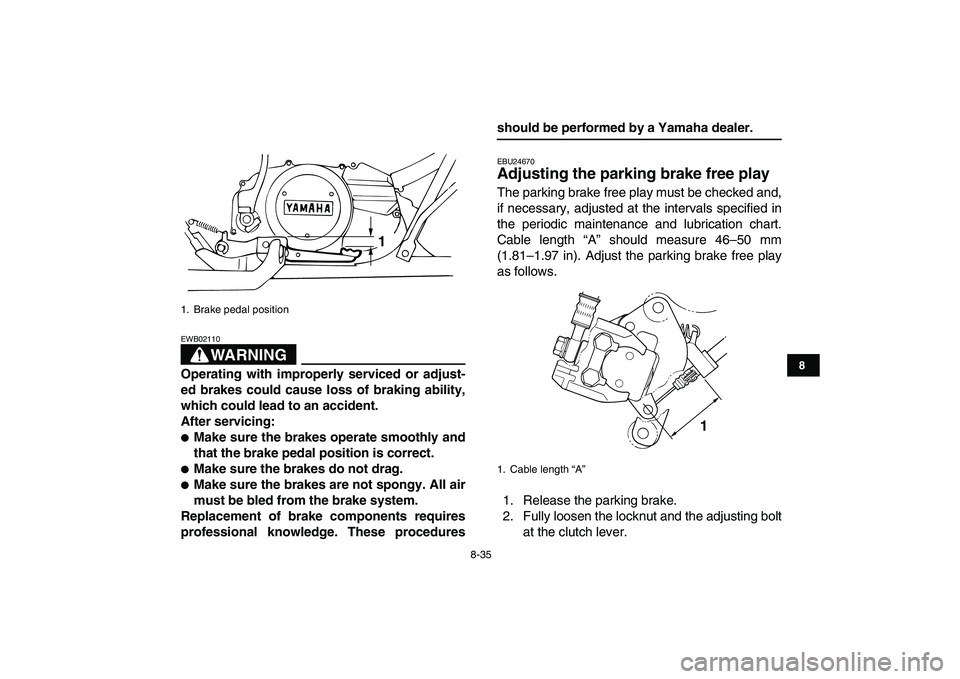
EBU24670
Adjusting the parking brake free play
The parking brake free play must be checked and,
if necessary, adjusted at the intervals specified in
the periodic maintenance and lubrication chart.
Cable length “A” should measure 46–50 mm
(1.81–1.97 in). Adjust the parking brake free play
as follows.
1. Release the parking brake.
2. Fully loosen the locknut and the adjusting bolt
at the clutch lever.
1. Brake pedal position
1
1. Cable length “A”
1
Page 112 of 140
8-36
1
2
3
4
5
6
78
9
10
11
3. Loosen the locknut and the adjusting bolt at
the rear brake caliper.
4. Turn the adjusting bolt at the clutch lever in di-
rection (a) to increase the cable length, and in
direction (b) to decrease it.
NOTE:
If the cable length cannot be adjusted to specifica-
tion, consult a Yamaha dealer.
5. Tighten the locknut at the clutch lever.
6. Turn in the adjusting bolt at the rear brake cal-
iper by hand until it feels tight, then turn it out1/8 turn and tighten its locknut to the specified
torque.CAUTION:
ECB00520
When tightening the locknut, hold the adjust-
ing bolt with a wrench so that it does not turn
together with the locknut.
1. Locknut
2. Adjusting bolt
12
(a)
(b)
1. Locknut
2. Adjusting bolt
Tightening torque:
Locknut (rear brake caliper):
16 Nm (1.6 m·kgf, 11 ft·lbf)
1
2
Page 113 of 140

8-37
1
2
3
4
5
6
78
9
10
11
WARNING
EWB02090
Operating with improperly serviced or adjust-
ed brakes could cause the brakes to malfunc-
tion, resulting in reduced braking
performance. This could increase the chance
of a collision or accident. After adjusting the
parking brake free play, block the rear of the
ATV off the ground and spin the rear wheels.
Check to make sure there is no brake drag. If
brake drag is noticed, perform the adjustment
again.
EBU24740
Brake light switches
The operation of the brake light switches must be
checked and, if necessary, adjusted at the inter-
vals specified in the periodic maintenance and lu-
brication chart.
The brake light switch for the brake pedal can be
adjusted as follows, but the other brake light
switches should be adjusted by a Yamaha dealer.
NOTE:
The brake light switch is properly adjusted when
the brake light comes on just before braking takes
effect.
Turn the adjusting nut while holding the brake light
switch in place. To make the brake light come on
earlier, turn the adjusting nut in direction (a). To
make the brake light come on later, turn the adjust-
ing nut in direction (b).
EBU24810
Adjusting the clutch lever free play
The clutch lever free play must be checked and, if
necessary, adjusted at the intervals specified in
the periodic maintenance and lubrication chart.
The clutch lever free play should measure as
1. Brake light switch
2. Brake light switch adjusting nut
1
2
(a)
(b)
Page 118 of 140

8-42
1
2
3
4
5
6
78
9
10
11
EBU24920
Checking and lubricating the brake and
clutch levers
The operation of the brake and clutch levers
should be checked before each ride, and the lever
pivots should be lubricated if necessary.
EBU24930
Checking and lubricating the brake and
shift pedals
The operation of the brake and shift pedals should
be checked before each ride, and the pedal pivots
should be lubricated if necessary.
EBU24961
Checking the wheel bearings
The front and rear wheel bearings must be
checked at the intervals specified in the periodic
maintenance and lubrication chart. If there is playin a wheel hub or if a wheel does not turn smoothly,
have a Yamaha dealer check the wheel bearings.
EBU25001
Lubricating the rear suspension relay
arm and connecting arm pivoting
points
The rear suspension relay arm and connecting
arm pivoting points must be lubricated at the inter-
vals specified in the periodic maintenance and lu-
brication chart.
Lubricate the pivoting points using a grease gun. Recommended lubricant:
Lithium-soap-based grease (all-purpose
grease)
Recommended lubricant:
Lithium-soap-based grease (all-purpose
grease)
Recommended lubricant:
Lithium-soap-based grease
Page 123 of 140
8-47
1
2
3
4
5
6
78
9
10
11
EBU25550
Adjusting a headlight beam
CAUTION:
ECB00690
It is advisable to have a Yamaha dealer make
this adjustment.
To raise a headlight beam, turn the adjusting
screw in direction (a).
To lower a headlight beam, turn the adjusting
screw in direction (b).
EBU25610
Replacing the tail/brake light bulb
If the tail/brake light bulb burns out, replace it asfollows.
1. Remove the bulb holder (together with the
bulb) by turning it counterclockwise.
2. Remove the defective bulb by pushing it in
and turning it counterclockwise.
1. Headlight beam adjusting screw
1
(a) (b)
1. Tail/brake light bulb holder
1
Page 124 of 140
8-48
1
2
3
4
5
6
78
9
10
11
3. Insert a new bulb into the bulb holder, push it
in, and then turn it clockwise until it stops.
4. Install the bulb holder (together with the bulb)
by turning it clockwise.
EBU25650
Removing a wheel
1. Loosen the wheel nuts.
Front
1. Tail/brake light bulb holder
2. Tail/brake light bulb
1
2
1. Wheel nut
1
1
Page 129 of 140

9-1
1
2
3
4
5
6
7
89
10
11
EBU25860
CLEANING AND STORAGE
EBU25920
Cleaning
Frequent, thorough cleaning of your ATV will not
only enhance its appearance but will improve its
general performance and extend the useful life of
many components.
1. Before cleaning the ATV:
a. Block off the end of the exhaust pipe to
prevent water entry. A plastic bag and
strong rubber band may be used.
b. Make sure the spark plugs and all filler
caps are properly installed.
2. If the engine case is excessively greasy, apply
degreaser with a paint brush. Do not apply de-
greaser to the chain, sprockets or wheel ax-
les.
3. Rinse the dirt and degreaser off with a garden
hose. Use only enough pressure to do the job.
CAUTION:
ECB00710
Excessive water pressure may cause water
seepage and deterioration of wheel bearings,
brakes, transmission seals and electrical de-
vices. Many expensive repair bills have result-ed from improper high-pressure detergent
applications such as those available in coin-
operated car washers.
4. Once most of the dirt has been hosed off,
wash all surfaces with warm water and mild,
detergent-type soap. An old toothbrush or bot-
tle brush is handy for hard-to-reach places.
5. Rinse the ATV off immediately with clean wa-
ter and dry all surfaces with a chamois, clean
towel or soft absorbing cloth.
6. Dry the chain and lubricate it to prevent it from
rusting.
7. Clean the seat with a vinyl upholstery cleaner
to keep the cover pliable and glossy.
8. Automotive type wax may be applied to all
painted and chrome plated surfaces. Avoid
combination cleaner-waxes. Many contain
abrasives which may mar the paint or protec-
tive finish. When finished cleaning, start the
engine and let it idle for several minutes.WARNING
EWB02310
Wet brakes may have reduced stopping ability,
Page 130 of 140

9-2
1
2
3
4
5
6
7
89
10
11
increasing the chance of an accident. Test the
brakes after washing. Apply the brakes several
times at slow speeds to let friction dry out the
linings.
EBU25951
Storage
Short-term
Always store your ATV in a cool, dry place and, if
necessary, protect it against dust with a porous
cover.
CAUTION:
ECB00720
�
Storing the ATV in a poorly ventilated room
or covering it with a tarp while it is still wet,
will allow water and humidity to seep in and
cause rust.
�
To prevent corrosion, avoid damp cellars,
stables (because of the presence of ammo-
nia) and areas where strong chemicals are
stored.
Long-term
Before storing your ATV for several months:
1. Follow all the instructions in the “Cleaning”section of this chapter.
2. Turn the fuel cock lever to “OFF”.
3. Drain the carburetor float chamber by loosen-
ing the drain bolt; this will prevent fuel deposits
from building up. Pour the drained fuel into the
fuel tank.
4. Fill up the fuel tank and add fuel stabilizer (if
available) to prevent the fuel from deteriorat-
ing.
5. Perform the following steps to protect the cyl-
inders, piston rings, etc. from corrosion.
a. Remove the spark plug caps and spark
plugs.
b. Pour a teaspoonful of engine oil into each
spark plug bore.
c. Install the spark plug caps onto the spark
plugs, and then place the spark plugs on
the cylinder head so that the electrodes
are grounded. (This will limit sparking dur-
ing the next step.)
d. Turn the engine over several times with
the starter. (This will coat the cylinder walls Specified amount:
7.5 ml of stabilizer to each liter of fuel (or 1 oz
of stabilizer to each gallon of fuel)
 to increase the cable length,")


by turning it clo")