Page 28 of 140
4-6
1
2
34
5
6
7
8
9
10
11
wise, the engine will misfire, preventing normal op-
eration.
WARNING
EWB00220
�
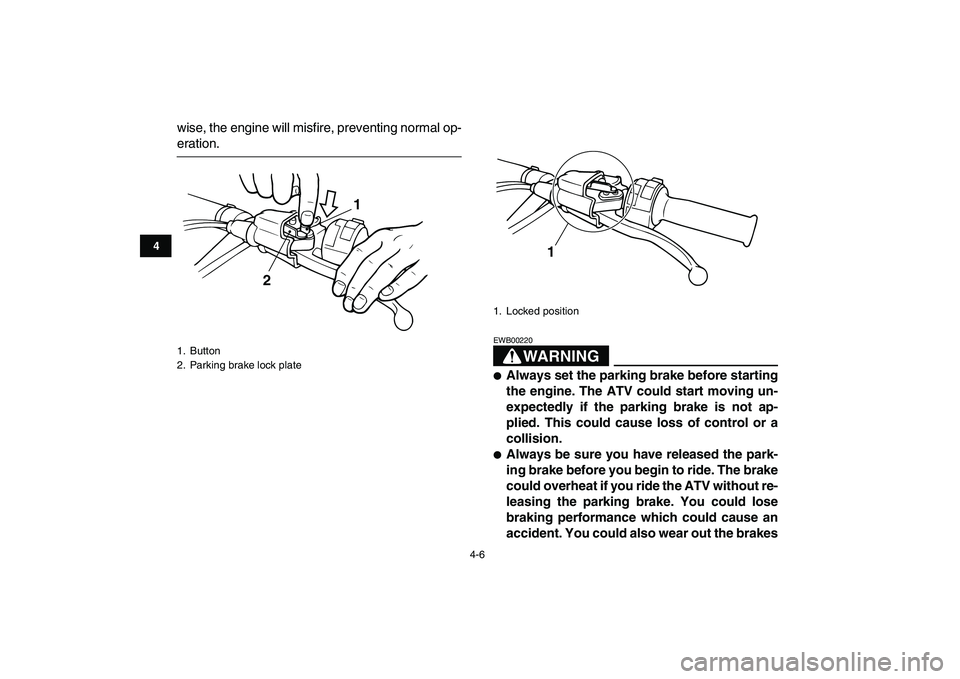
Always set the parking brake before starting
the engine. The ATV could start moving un-
expectedly if the parking brake is not ap-
plied. This could cause loss of control or a
collision.
�
Always be sure you have released the park-
ing brake before you begin to ride. The brake
could overheat if you ride the ATV without re-
leasing the parking brake. You could lose
braking performance which could cause an
accident. You could also wear out the brakes
1. Button
2. Parking brake lock plate
1
2
1. Locked position
1
Page 31 of 140

4-9
1
2
34
5
6
7
8
9
10
11
of gasoline or higher octane grade.
CAUTION:
ECB00060
Use only unleaded gasoline. The use of leaded
gasoline will cause severe damage to internal
engine parts, such as the piston rings, as well
as to the exhaust system.
WARNING
EWB00310
�
Do not overfill the fuel tank. Fuel expands
when it heats up. If the fuel tank is overfilled,
fuel could spill out due to heat from the en-
gine or the sun.
�
Be careful not to spill fuel, especially on the
engine or exhaust pipe which can cause a
fire and severe injury. Wipe up any spilled
fuel immediately.
�
Do not refuel right after the engine has been
running and is still very hot.
�
Be sure the fuel tank cap is closed securely.
EBU18830
Fuel cock
The fuel cock supplies fuel from the tank to the car-
buretors while also filtering it.The fuel cock lever positions are explained as fol-
lows and shown in the illustrations.
OFF
With the fuel cock lever in this position, fuel will not
flow. Always turn the fuel cock lever to this position
when the engine is not running.
1. Arrow mark positioned over “OFF”
RES
ONFUEL
OFF
1
Page 35 of 140

4-13
1
2
34
5
6
7
8
9
10
11
WARNING
EWB00400
Always adjust the shock absorber assemblies
on the left and right side to the same setting.
Uneven adjustment can cause poor handling
and loss of stability, which could lead to an ac-
cident.
EBU19100
Adjusting the rear shock absorber
assembly
The spring preload, rebound damping and com-
pression damping forces of the rear shock absorb-
er assembly can be adjusted to suit the rider’s
weight and the riding conditions.
WARNING
EWB00430
This shock absorber assembly contains highly
pressurized nitrogen gas. Read and under-
stand the following information before han-
dling the shock absorber assembly.
�
Do not tamper with or attempt to open the
cylinder assembly.
�
Do not subject the shock absorber assembly
to an open flame or other high heat source.
This may cause the unit to explode due to ex-cessive gas pressure.
�
Do not deform or damage the cylinder in any
way. Cylinder damage will result in poor
damping performance.
�
Do not dispose of a damaged or worn out
shock absorber assembly yourself. Take the
shock absorber assembly to a Yamaha deal-
er for any service.
Spring preload
1. Loosen the locknut.
2. Turn the adjusting nut in direction (a) to in-
crease the spring preload and thereby harden
the suspension, and in direction (b) to de-
crease the spring preload and thereby soften
the suspension.
Page 38 of 140

4-16
1
2
34
5
6
7
8
9
10
11
CAUTION:
ECB00090
Never turn an adjusting mechanism beyond
the minimum and maximum settings.NOTE:
Although the total number of clicks of a damping
force adjusting mechanism may not exactly match
the above specifications due to small differences in
production, the actual number of clicks always rep-
resents the entire adjusting range. To obtain a pre-
cise adjustment, it would be advisable to check the
number of clicks of each damping force adjusting
mechanism and to modify the specifications as
necessary.WARNING
EWB00460
Suspension components become hot during
operation. Never touch the compression
damping force adjusting knob, the rebound
damping force adjusting dial or the oil reser-
voir with your bare hand or skin until suspen-
sion components have cooled.
1. Compression damping force adjusting knob
Compression damping setting:
Minimum (soft):
1 click(s) in direction (a)*
Standard:
11 click(s) in direction (a)*
Maximum (hard):
15 click(s) in direction (a)*
* With the adjusting knob fully turned in direc-
tion (b)
1(a) (b)
Page 41 of 140
5-3
1
2
3
45
6
7
8
9
10
11
WARNING
EWB00480
Always inspect your ATV each time you use it to make sure it is in safe operating condition.
Always follow the inspection and maintenance procedures and schedules described in the Owner’s
Manual. Failure to inspect increases the possibility of an accident or equipment damage.
Page 42 of 140

5-4
1
2
3
45
6
7
8
9
10
11
EBU19550
Fuel and 2-stroke engine oil mixing
ratio
If Yamalube “R” oil is not available, select an oil
from the following list.
CAUTION:
ECB00140
Never mix two types of 2-stroke engine oil in
the same batch. Always use the same type of
oil to ensure maximum engine performance.
EBU19580
Transmission oil
Make sure that the transmission oil is at the speci-
fied level. Add oil as necessary. (See page 8-9.)
EBU19630
Coolant
Make sure that the coolant is at the specified level.
Add coolant as necessary. (See page 8-11.)
NOTE:
The coolant level must be checked on a cold en-
gine since the level varies with engine tempera-
ture.WARNING
EWB00510
Wait for the engine and radiator to cool before
removing the radiator cap. You could be
burned by hot fluid and steam blown out under
pressure. Always put a thick rag over the cap
when opening. Allow any remaining pressure
to escape before completely removing the cap.
EBU19710
Front and rear brakes
Brake lever and brake pedal
�
Check that there is no free play in the brake le-
ver. If there is free play, have a Yamaha dealer
check the brake system.
�
Check for correct brake pedal height. (See Recommended 2-stroke engine oil:
Yamalube “R” (Yamalube Racing 2-cycle oil)
Mixing ratio:
24:1
Recommended 2-stroke engine oil Mixing ratio
Castrol R30
20:1 Castrol A545
Castrol A747
Page 43 of 140
 If the pedal height is incorrect, have
a Yamaha dealer adjust it.
�
Check the operation of the lever and pedal. They
should move smoothly and there should")
5-5
1
2
3
45
6
7
8
9
10
11
page 8-34.) If the pedal height is incorrect, have
a Yamaha dealer adjust it.
�
Check the operation of the lever and pedal. They
should move smoothly and there should be a
firm feeling when the brakes are applied. If not,
have a Yamaha dealer check the brake system.
Brake fluid level
Check the brake fluid level. Add fluid if necessary.
(See page 8-32.)
Brake fluid leakage
Check to see if any brake fluid is leaking out of the
pipe joints or brake fluid reservoirs. Apply the
brakes firmly for one minute. If there is any leak-
age, have a Yamaha dealer check the brake sys-
tem.
Brake operation
Test the brakes at slow speed after starting out to
make sure they are working properly. If the brakes
do not provide proper braking performance, check
the brake pads for wear. (See page 8-31.)
WARNING
EWB00580
Always check the brakes at the start of every
ride. Do not ride the ATV if you find any prob-
lem with the brakes or you could lose braking
ability, which could lead to an accident. If a
problem cannot be corrected by the adjust-
ment procedures provided in this manual, have
a Yamaha dealer check for the cause.
EBU19761
Throttle lever
Check the operation of the throttle lever. It must
open smoothly and spring back to the idle position
when released. Have a Yamaha dealer correct if
necessary.
EBU19770
Drive chain
Check the condition of the drive chain and check
the drive chain slack. Lubricate and adjust the
drive chain as necessary. (See page 8-38.) Recommended brake fluid:
DOT 4
Page 44 of 140

5-6
1
2
3
45
6
7
8
9
10
11
EBU19791
Tires
WARNING
EWB00601
Use of improper tires on this ATV, or operation
of this ATV with improper or uneven tire pres-
sure, may cause loss of control, increasing
your risk of accident.
Pay attention to the following.
�
The tires listed below have been approved
by Yamaha Motor Co., Ltd. for this model.
Other tire combinations are not recommend-
ed.
Front:
Manufacturer/model:
DUNLOP/KT851B
Size:
AT21 x 7-10
Type:
Tubeless
Rear:
Manufacturer/model:
DUNLOP/KT877A
Size:
AT20 x 10-9
Type:
Tubeless
�
The tires should be set to the recommended
pressure:
Recommended tire pressure:
Front:
30.0 kPa (4.4 psi) (0.300 kgf/cm
2
)
Rear:
30.0 kPa (4.4 psi) (0.300 kgf/cm
2
)
�
Check and adjust tire pressures when the
tires are cold.
�
Tire pressures must be equal on both
sides.
�
Tire pressure below the minimum speci-
fied could cause the tire to dislodge from
the rim under severe riding conditions.
Minimum tire pressure:
Front:
27.0 kPa (3.9 psi) (0.270 kgf/cm
2
)
Rear:
27.0 kPa (3.9 psi) (0.270 kgf/cm
2
)
�
Use no more than the following pressures
when seating the tire beads.
Maximum tire seating pressure:
Front:
250 kPa (36 psi) (2.5 kgf/cm
2
)
Rear:
250 kPa (36 psi) (2.5 kgf/cm
2
)