2007 VOLVO S80 door lock
[x] Cancel search: door lockPage 82 of 251
Home safe lighting
When you leave your vehicle at night, you can make use of the home safe lighting function to illuminate the area in
front of the vehicle.
1. Remove the key from the ignition slot.
2. Pull the direction indicator lever as far as possible towards the steering wheel (to position 4) and release it.
3. Exit the vehicle and lock the doors.
The headlights and parking lights will illuminate and remain on for 30
1, 60 or 90 seconds. The time interval can be set
under Car settings
Light settings Home safe lighting . For a description of the menu system, see page 115.
Approach lighting
Approach lighting is activated by pressing the approach light button on the remote key (see the illustration on page 50
).
When the function has been activated, the parking lights, indicator lights, door mirror lights, license plate lighting,
dome lighting and door step lighting come on.
The time interval for this lighting can be set under Car settings
Light settings Approach lighting . For a
description of the menu system, see page 115
.
1 Factory setting
Contents | Top of Page
ProCarManuals.com
Page 87 of 251
passenger compartment. The windshield and side windows have laminated glass.
Water and dirt repellent glass
The front side windows are treated with a coating that improves the view in difficult weather conditions.
94 03 Your driving environment
Mirrors
Power door mirrors
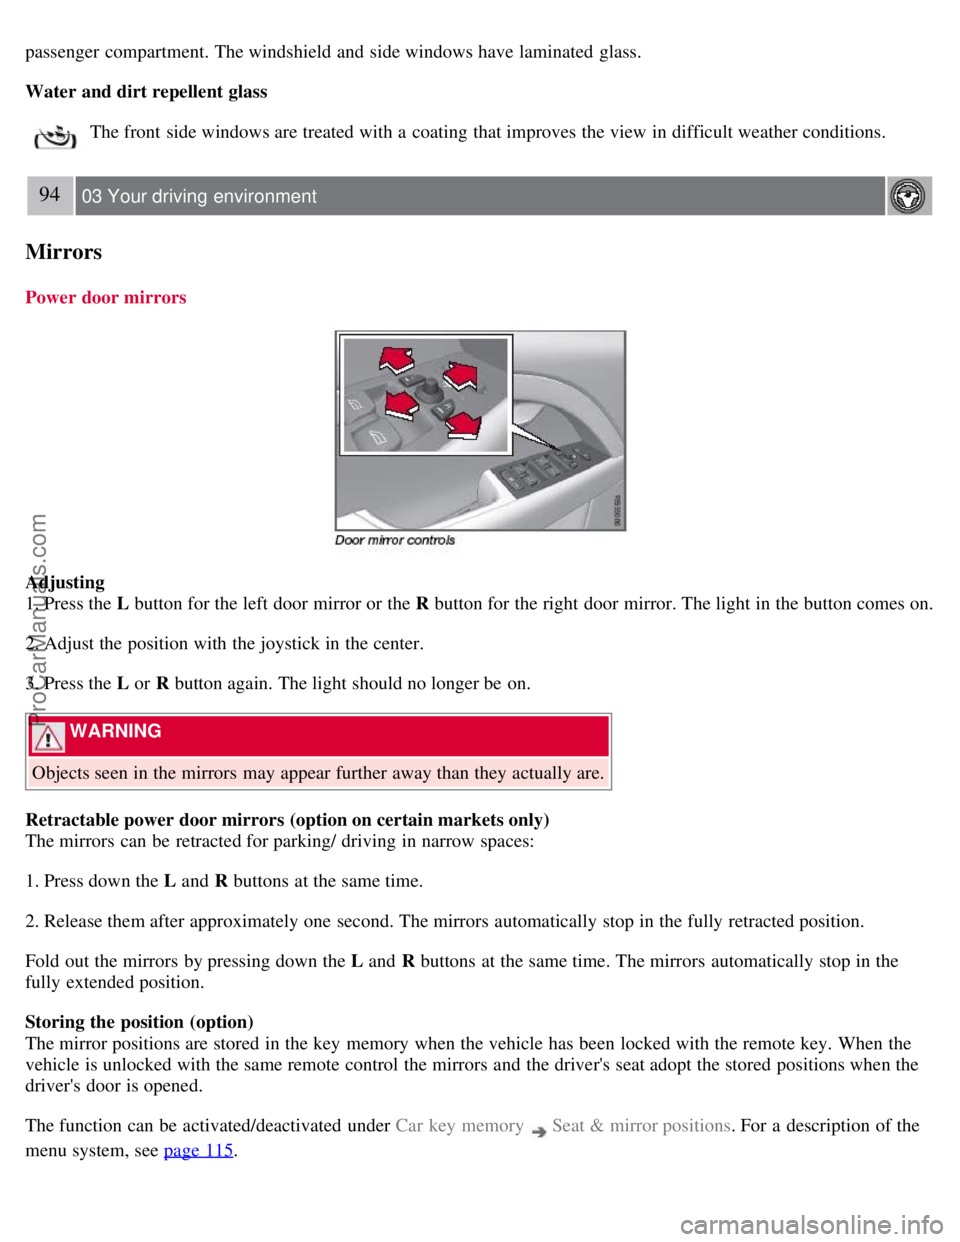
Adjusting
1. Press the L button for the left door mirror or the R button for the right door mirror. The light in the button comes on.
2. Adjust the position with the joystick in the center.
3. Press the L or R button again. The light should no longer be on.
WARNING
Objects seen in the mirrors may appear further away than they actually are.
Retractable power door mirrors (option on certain markets only)
The mirrors can be retracted for parking/ driving in narrow spaces:
1. Press down the L and R buttons at the same time.
2. Release them after approximately one second. The mirrors automatically stop in the fully retracted position.
Fold out the mirrors by pressing down the L and R buttons at the same time. The mirrors automatically stop in the
fully extended position.
Storing the position (option)
The mirror positions are stored in the key memory when the vehicle has been locked with the remote key. When the
vehicle is unlocked with the same remote control the mirrors and the driver's seat adopt the stored positions when the
driver's door is opened.
The function can be activated/deactivated under Car key memory
Seat & mirror positions . For a description of the
menu system, see page 115
.
ProCarManuals.com
Page 88 of 251

Tilting the door mirror when parking (option)
The door mirror can be tilted down for the driver to view the side of the road when parking for example. Engage
reverse gear and press the L or R button. The door mirror resets when reverse gear is disengaged.
Automatic retraction when locking
When the vehicle is locked/unlocked with the remote key the door mirrors are automatically retracted/extended.
The function can be activated/deactivated under Car settings
Retract mirrors when locking. For a description of the
menu system, see page 115
.
Resetting to neutral
Mirrors that have been moved out of position by an external force must be electrically reset to the neutral position for
electric retracting/extending to work.
Retract the mirrors with the L and R buttons.
Fold them out again with the L and R buttons.
The mirrors are now reset in neutral position.
Home safe and approach lighting
The light on the door mirrors comes on when approach lighting or home safe lighting is selected, see page 89
.
95 03 Your driving environment
Mirrors
Rear window and door mirror defrosters
Use the defroster to quickly remove misting and ice from the rear window and the door mirrors.
Press the button once to start simultaneous rear window and door mirror defrosting. The light in the button indicates
that the function is active. Defrosting is deactivated automatically and its duration is controlled by the outside
temperature.
The rear window is demisted/de-iced automatically if the vehicle is started in an outside temperature lower than + 7
°C.
Defrosting can be selected under Climate settings
Auto. rear defroster . Select between On or Off.
Interior rearview mirror
Auto-dim function
An integrated sensor reacts to headlights from following traffic and automatically reduces glare in the mirror.
ProCarManuals.com
Page 91 of 251
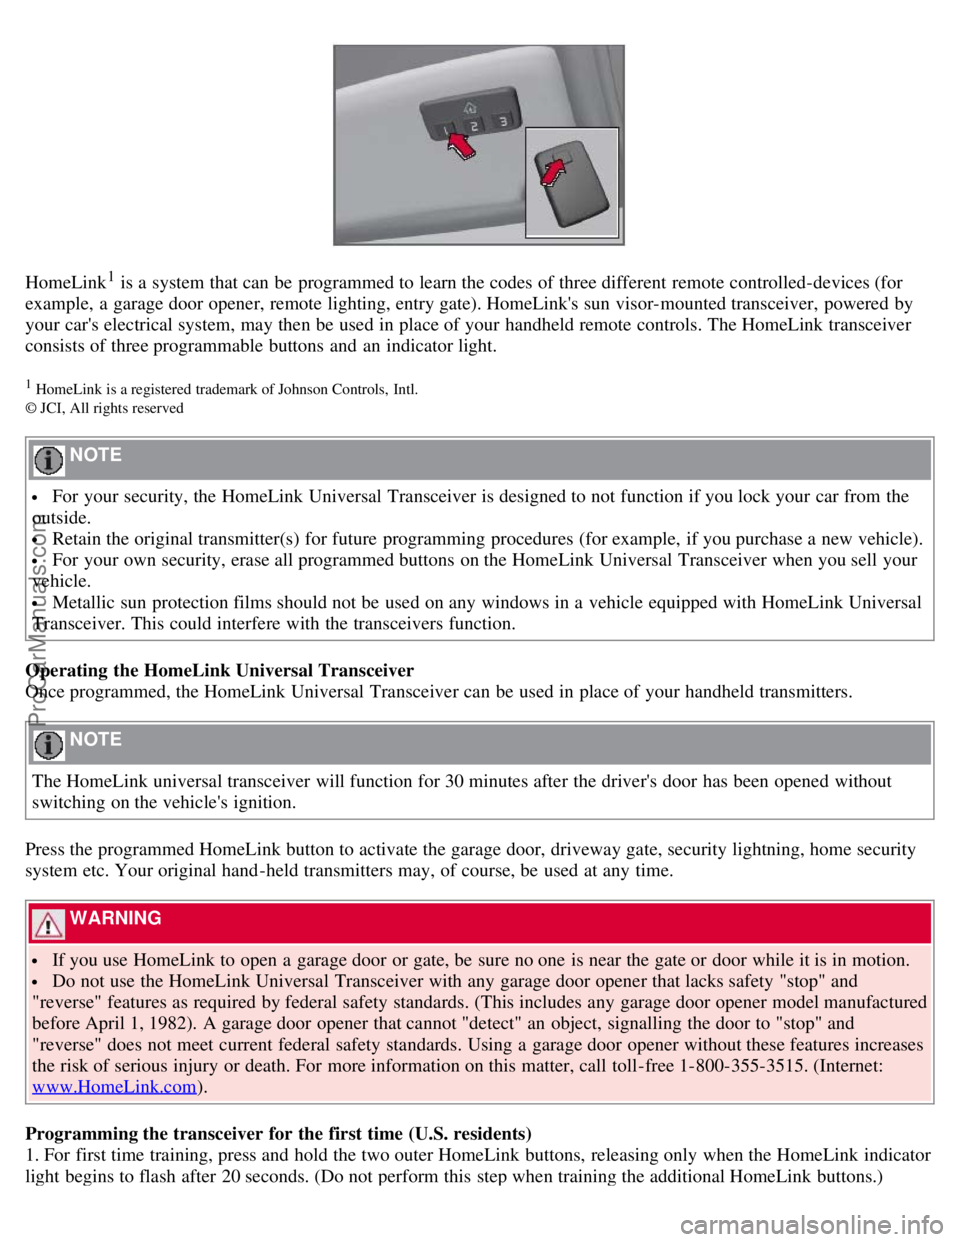
HomeLink1 is a system that can be programmed to learn the codes of three different remote controlled-devices (for
example, a garage door opener, remote lighting, entry gate). HomeLink's sun visor-mounted transceiver, powered by
your car's electrical system, may then be used in place of your handheld remote controls. The HomeLink transceiver
consists of three programmable buttons and an indicator light.
1 HomeLink is a registered trademark of Johnson Controls, Intl.
© JCI, All rights reserved
NOTE
For your security, the HomeLink Universal Transceiver is designed to not function if you lock your car from the
outside.
Retain the original transmitter(s) for future programming procedures (for example, if you purchase a new vehicle).
For your own security, erase all programmed buttons on the HomeLink Universal Transceiver when you sell your
vehicle.
Metallic sun protection films should not be used on any windows in a vehicle equipped with HomeLink Universal
Transceiver. This could interfere with the transceivers function.
Operating the HomeLink Universal Transceiver
Once programmed, the HomeLink Universal Transceiver can be used in place of your handheld transmitters.
NOTE
The HomeLink universal transceiver will function for 30 minutes after the driver's door has been opened without
switching on the vehicle's ignition.
Press the programmed HomeLink button to activate the garage door, driveway gate, security lightning, home security
system etc. Your original hand -held transmitters may, of course, be used at any time.
WARNING
If you use HomeLink to open a garage door or gate, be sure no one is near the gate or door while it is in motion.
Do not use the HomeLink Universal Transceiver with any garage door opener that lacks safety "stop" and
"reverse" features as required by federal safety standards. (This includes any garage door opener model manufactured
before April 1, 1982). A garage door opener that cannot "detect" an object, signalling the door to "stop" and
"reverse" does not meet current federal safety standards. Using a garage door opener without these features increases
the risk of serious injury or death. For more information on this matter, call toll-free 1-800-355-3515. (Internet:
www.HomeLink.com
).
Programming the transceiver for the first time (U.S. residents)
1. For first time training, press and hold the two outer HomeLink buttons, releasing only when the HomeLink indicator
light begins to flash after 20 seconds. (Do not perform this step when training the additional HomeLink buttons.)
ProCarManuals.com
Page 95 of 251
Starting the engine
Starting the engine
1. Fasten the seat belt.
WARNING
Before starting the engine, check that the seat, steering wheel and mirrors are adjusted properly. Make sure the brake
pedal can be depressed completely. Adjust the seat if necessary.
1. Insert the remote key into the ignition slot. Press the key until it is drawn into the slot
1.
NOTE
The remote key should be inserted into the ignition slot with the key blade end of the remote pointing out. See the
illustration on page 75
.
2. Depress the brake pedal
2.
WARNING
An extra mat on the driver's floor can cause the accelerator and/or brake pedal to catch. Check that the movement of
these pedals is not impeded. Not more than one protective floor covering may be used at one time.
1On vehicles with the optional keyless drive, it is only necessary to have a remote control in the passenger's compartment.
2If the vehicle is moving, it is only necessary to press the start/stop button to start the vehicle.
3. Press and release the start/stop button. The autostart function will operate the starter motor until the engine starts.
The starter motor operates for a maximum of 10 seconds. If the engine has not started, repeat the procedure.
WARNING
Always remove the remote key from the ignition slot when leaving the vehicle, especially if there are children in
the vehicle.
Never remove the remote key from the ignition slot while driving or when the vehicle is being towed. The
steering lock could otherwise be activated, making it impossible to steer the vehicle. Never remove the remote key
with keyless drive function (option) from the vehicle while driving or during towing.
Always place the gear selector in Park and apply the parking brake before leaving the vehicle. Never leave the
vehicle unattended with the engine running.
Always open garage doors fully before starting the engine inside a garage to ensure adequate ventilation. The
exhaust gases contain carbon monoxide, which is invisible and odorless but very poisonous.
NOTE
The idling speed can be noticeably higher than normal during cold starts. This is to enable emission control system
can reach normal operating temperature as quickly as possible, which helps reduce exhaust emissions.
Keylock: Your vehicle is equipped with a keylock system. When the engine is switched off, the gear selector must
be in the Park position before the key can be removed
1 from the ignition slot.
ProCarManuals.com
Page 96 of 251
1Does not apply to vehicles with the optional keyless drive.
103 03 Your driving environment
Starting the engine
CAUTION
When starting in cold weather, the automatic transmission may shift up at slightly higher engine speeds than
normal until the automatic transmission fluid reaches normal operating temperature.
Do not race a cold engine immediately after starting. Oil flow may not reach some lubrication points fast enough
to prevent engine damage.
The engine should be idling when you move the gear selector. Never accelerate until after you feel the
transmission engage. Accelerating immediately after selecting a gear will cause harsh engagement and premature
transmission wear.
Selecting P or N when idling at a standstill for prolonged periods of time will help prevent overheating of the
automatic transmission fluid.
Keyless drive (option)
Follow steps 2-3 for starting the engine.
NOTE
For the vehicle to start, one of the vehicle's remote keys must be in the passenger compartment.
Steering wheel lock
The steering wheel lock is deactivated when the remote key is inserted into the ignition slot
1 and activated when the
remote key is removed from the ignition slot.
Always take the remote key or keyless drive remote when leaving the vehicle to help reduce the risk of theft.
1On vehicles with the optional keyless drive, the steering lock is deactivated when the start button is pressed for the first time (assuming that a
remote control is in the passenger's compartment). It is activated when the ignition is switched off and the driver's door is opened.
104 03 Your driving environment
Starting the engine
Jump starting
ProCarManuals.com
Page 112 of 251

118 04 Comfort and driving pleasure
Climate system
Introduction
Air conditioning
The vehicle is equipped with Electronic Climate Control (ECC). The climate control system cools, heats or
dehumidifies the air in the passenger compartment.
NOTE
The air conditioning can be switched off, but to ensure the best possible climate comfort in the passenger
compartment and to prevent the windows from misting, it should always be on.
In warm weather, a small amount of water may accumulate under the car when it has been parked. This water is
condensation from the A/C system and is normal.
Sensor location
The sun sensor is located on the top side of the dashboard.
The temperature sensor for the passenger compartment is located below the climate control panel.
The outside temperature sensor is located on the door mirror.
The humidity sensor (option) is located in the interior rearview mirror.
NOTE
Do not cover or block the sensors with clothing or other objects.
Side windows and moonroof
To ensure that the air conditioning works optimally, the side windows, and the optional moonroof should be closed.
ProCarManuals.com
Page 116 of 251
A/C - On/Off
Heated rear window and door mirrors, see page 95.
Defroster
Recirculation/Air quality system
Temperature control, driver's side
121 04 Comfort and driving pleasure
Climate system
Ventilated front seats (option)
The ventilation system consists of fans in the seats and backrests that draw air through the seat upholstery. The cooling
effect increases as the air in the passenger compartment becomes cooler.
The ventilation is controlled by the ECC system, which takes into account the seat temperature, sunlight in the
passenger compartment, and the ambient temperature.
The ventilation can be used at the same time as seat heating. For example, the function can be used to dry damp
clothing.
The ventilation system can be activated when the engine is running. There are three comfort levels that produce
different cooling and dehumidification effects:
Level three: press the button once for maximum output - three indicator lights come on.
Level two: press the button twice for a lower output - two indicator lights come on.
Level one: press the button three times for the lowest output - one indicator light comes on.
Press the button a fourth time to switch off the function - the indicator light will go out.
Blower control
Turn the control clockwise to increase or counterclockwise to decrease the blower speed. Pressing the AUTO switch
will automatically regulate blower speed and override manual adjustment.
NOTE
If the blower is turned off completely, the air conditioning is disengaged.
Heated front seats (option)
ProCarManuals.com