2007 VOLVO S80 parking brake
[x] Cancel search: parking brakePage 174 of 251

Refueling
or components, altering emission system components or location or removing components, and/or repeated use of
leaded fuel.
NOTE
Unleaded fuel is required for vehicles with three-way catalytic converters.
Heated oxygen sensors
The heated oxygen sensors monitor the oxygen content of the exhaust gases. Readings are fed into a control module
that continuously monitors engine functions and controls fuel injection. The ratio of fuel to air into the engine is
continuously adjusted for efficient combustion to help reduce harmful emissions.
179 05 During your trip
Loading
Introduction
The load carrying capacity of your vehicle is determined by factors such as the number of passengers, the amount of
cargo, the weight of any accessories that may be installed, etc.
NOTE
To increase loading space, the rear seat backrests can be folded down, see page 80
.
The trunk lid can be opened via the button located on the lighting panel, see page 60.
Load the cargo in the trunk against the backrest.
Load wide cargo in the trunk on both sides of the rear seat split.
Unstable loads can be secured to the load anchoring eyelets with straps or web lashings to help keep them from
shifting.
WARNING
The vehicle's driving characteristics may change depending on the weight and distribution of the load.
A 44-pound (20 kg) object produces a force of 2,200 pounds (1,000 kg) in a head-on collision at 30 mph (50
km/h).
Loading the cargo area
Stop the engine and apply the parking brake when loading or unloading long objects. The gear selector can be knocked
out of position by long loads, which could set the vehicle in motion. To increase loading space, the rear seat backrests
can be folded down, see page 80
.
WARNING
Stop the engine, put the gear selector in P , and apply the parking brake when loading or unloading long objects.
The rear seat should not be loaded to a level higher than 2 in. (5 cm) below the upper edge of the rear side
windows. Objects placed higher than this level could impede the function of the Volvo Inflatable Curtain.
ProCarManuals.com
Page 176 of 251
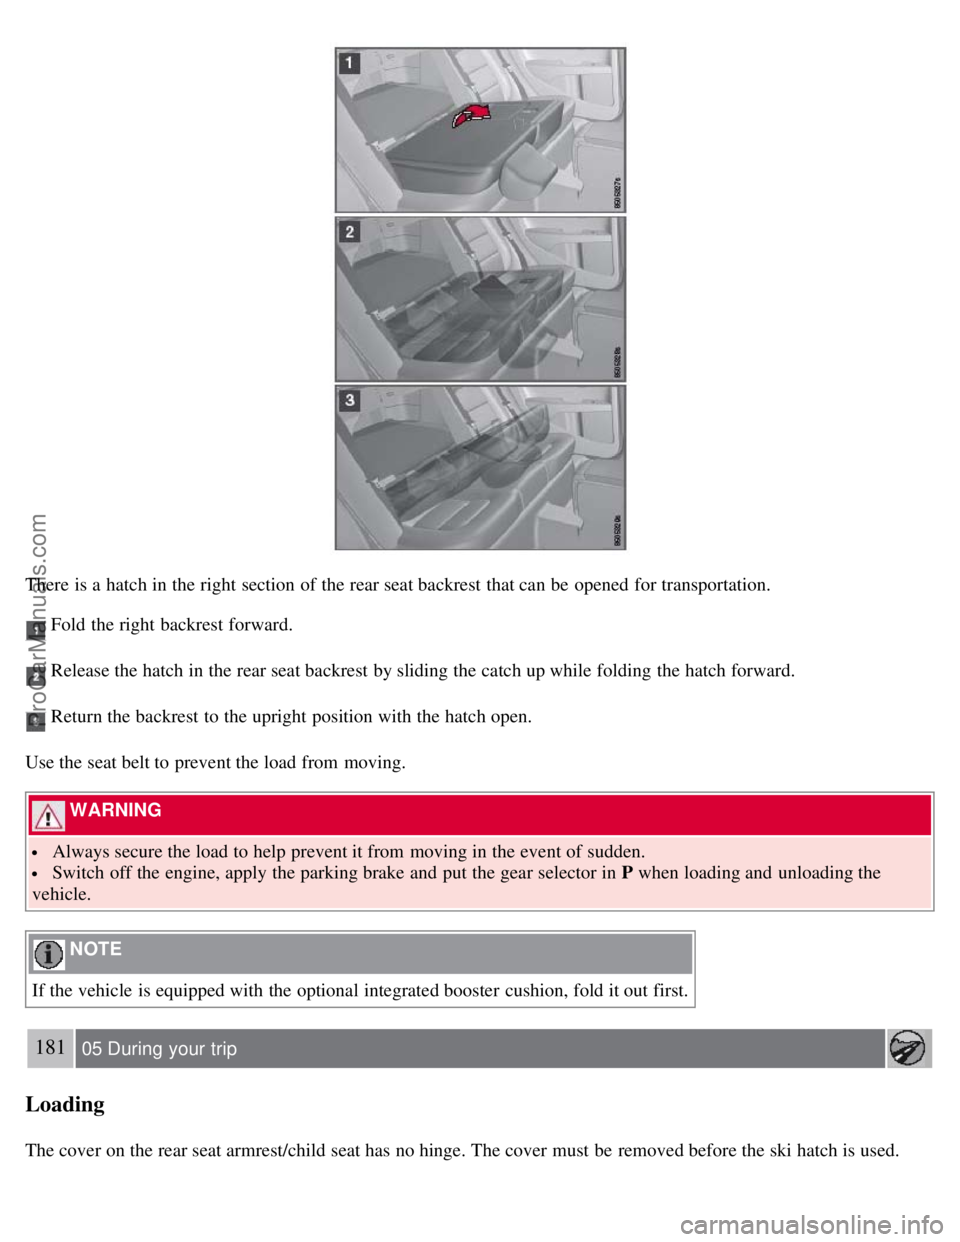
There is a hatch in the right section of the rear seat backrest that can be opened for transportation.
Fold the right backrest forward.
Release the hatch in the rear seat backrest by sliding the catch up while folding the hatch forward.
Return the backrest to the upright position with the hatch open.
Use the seat belt to prevent the load from moving.
WARNING
Always secure the load to help prevent it from moving in the event of sudden.
Switch off the engine, apply the parking brake and put the gear selector in P when loading and unloading the
vehicle.
NOTE
If the vehicle is equipped with the optional integrated booster cushion, fold it out first.
181 05 During your trip
Loading
The cover on the rear seat armrest/child seat has no hinge. The cover must be removed before the ski hatch is used.
ProCarManuals.com
Page 178 of 251
Hauling a trailer affects handling, durability, and economy.
It is necessary to balance trailer brakes with the towing vehicle brakes to provide a safe stop (check and observe
state/local regulations).
Do not connect the trailer's brake system directly to the vehicle's brake system.
More frequent vehicle maintenance is required.
Remove the ball and drawbar assembly when the hitch is not being used.
Volvo recommends the use of synthetic engine oil when towing a trailer over long distances or in mountainous
areas.
WARNING
Bumper-attached trailer hitches must not be used on Volvos, nor should safety chains be attached to the bumper.
Trailer hitches attaching to the vehicle rear axle must not be used.
Never connect a trailer's hydraulic brake system directly to the vehicle brake system, nor a trailer's lighting system
directly to the vehicle lighting system. Consult your nearest authorized Volvo retailer for correct installation.
When towing a trailer, the trailer's safety wire must be correctly fastened to the hole or hook provided in the
trailer hitch on the vehicle. The safety wire should never be fastened to or wound around the drawbar ball.
183 05 During your trip
Towing a trailer
NOTE
When parking the vehicle with a trailer on a hill, apply the parking brake before putting the gear selector in P .
Always follow the trailer manufacturer's recommendations for wheel chocking.
When starting on a hill, put the gear selector in D before releasing the parking brake. See also page 111 for more
detailed information about starting off on a hill while towing a trailer.
If you use the manual (Geartronic) shift positions while towing a trailer, make sure the gear you select does not
put too much strain on the engine (using too high a gear).
The drawbar assembly/trailer hitch may be rated for trailers heavier than the vehicle is designed to tow. Please
adhere to Volvo's recommended trailer weights.
Avoid driving with a trailer on inclines of more than 15 %.
Trailer cable
An adapter is required if the vehicle's trailer hitch has a 13-pin connector and the trailer has 7 pins. Use an adapter
cable approved by Volvo. Make sure the cable does not drag on the ground.
184 05 During your trip
Towing a trailer
Detachable trailer hitch (accessory)
ProCarManuals.com
Page 180 of 251
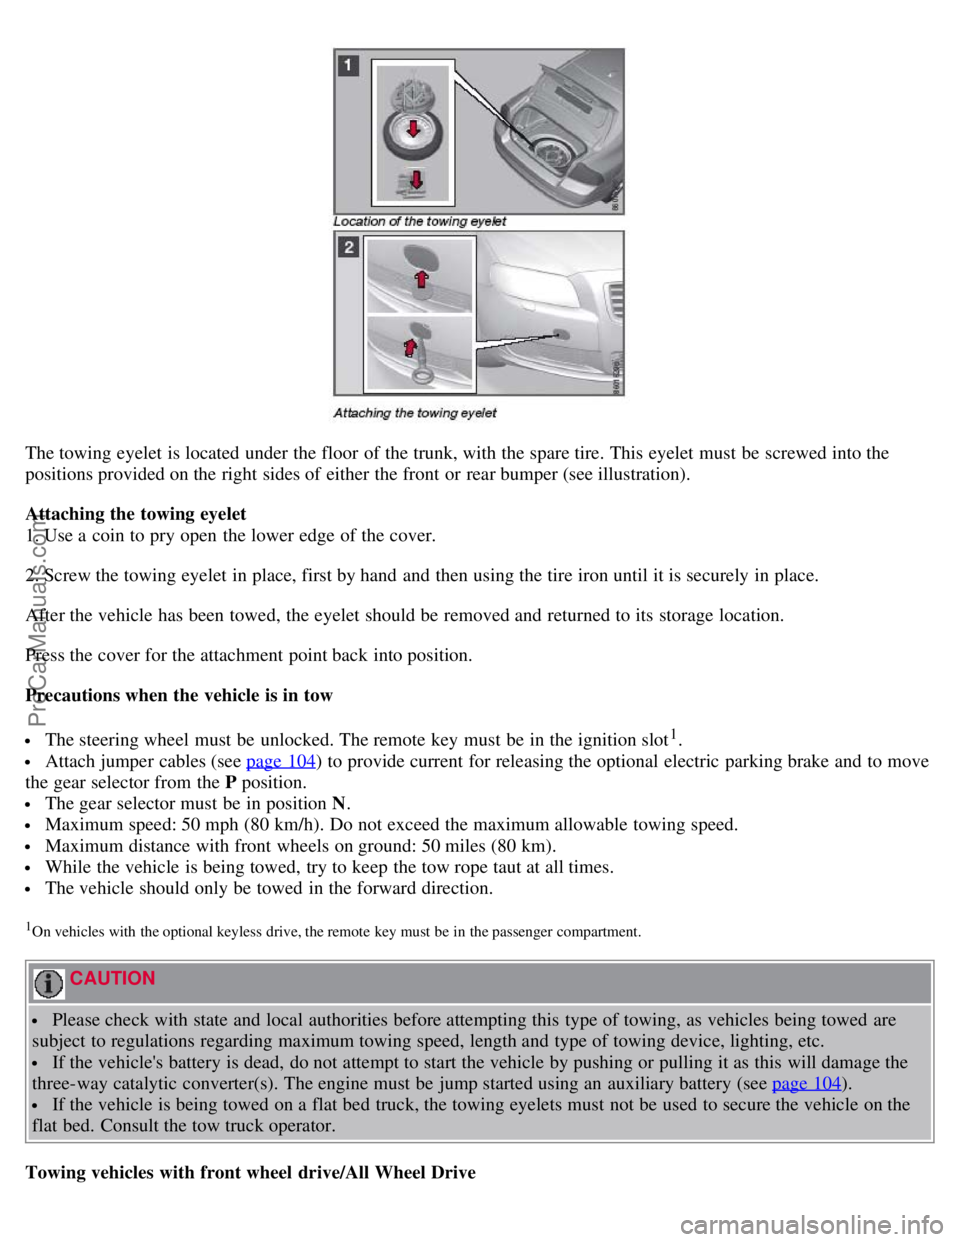
The towing eyelet is located under the floor of the trunk, with the spare tire. This eyelet must be screwed into the
positions provided on the right sides of either the front or rear bumper (see illustration).
Attaching the towing eyelet
1. Use a coin to pry open the lower edge of the cover.
2. Screw the towing eyelet in place, first by hand and then using the tire iron until it is securely in place.
After the vehicle has been towed, the eyelet should be removed and returned to its storage location.
Press the cover for the attachment point back into position.
Precautions when the vehicle is in tow
The steering wheel must be unlocked. The remote key must be in the ignition slot1.
Attach jumper cables (see page 104) to provide current for releasing the optional electric parking brake and to move
the gear selector from the P position.
The gear selector must be in position N .
Maximum speed: 50 mph (80 km/h). Do not exceed the maximum allowable towing speed.
Maximum distance with front wheels on ground: 50 miles (80 km).
While the vehicle is being towed, try to keep the tow rope taut at all times.
The vehicle should only be towed in the forward direction.
1On vehicles with the optional keyless drive, the remote key must be in the passenger compartment.
CAUTION
Please check with state and local authorities before attempting this type of towing, as vehicles being towed are
subject to regulations regarding maximum towing speed, length and type of towing device, lighting, etc.
If the vehicle's battery is dead, do not attempt to start the vehicle by pushing or pulling it as this will damage the
three-way catalytic converter(s). The engine must be jump started using an auxiliary battery (see page 104
).
If the vehicle is being towed on a flat bed truck, the towing eyelets must not be used to secure the vehicle on the
flat bed. Consult the tow truck operator.
Towing vehicles with front wheel drive/All Wheel Drive
ProCarManuals.com
Page 196 of 251
4. Plug in the connector.
5. Press the bulb holder until it clicks into place and reinstall the cover.
202 06 Maintenance and specifications
Replacing bulbs
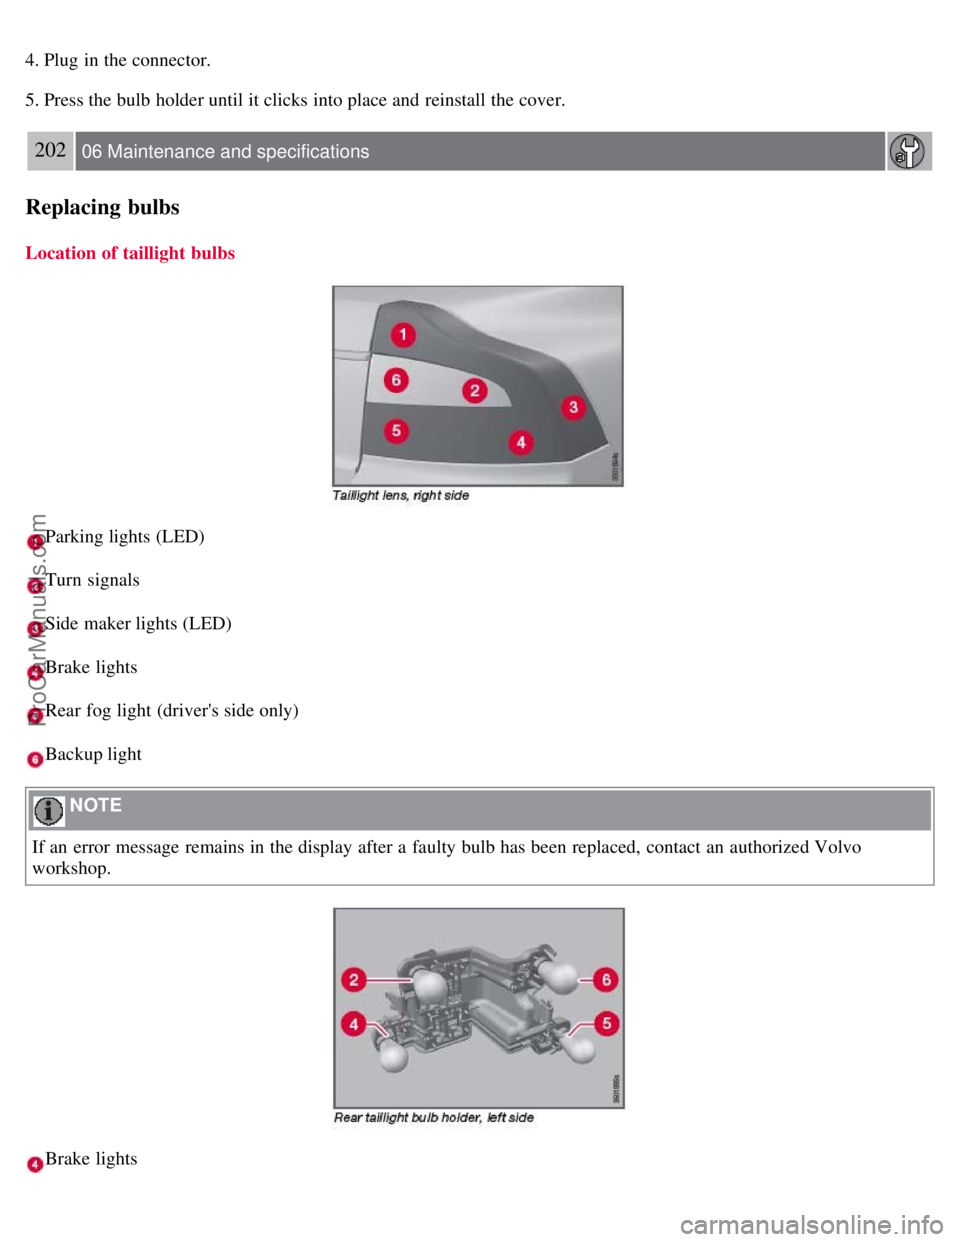
Location of taillight bulbs
Parking lights (LED)
Turn signals
Side maker lights (LED)
Brake lights
Rear fog light (driver's side only)
Backup light
NOTE
If an error message remains in the display after a faulty bulb has been replaced, contact an authorized Volvo
workshop.
Brake lights
ProCarManuals.com
Page 227 of 251
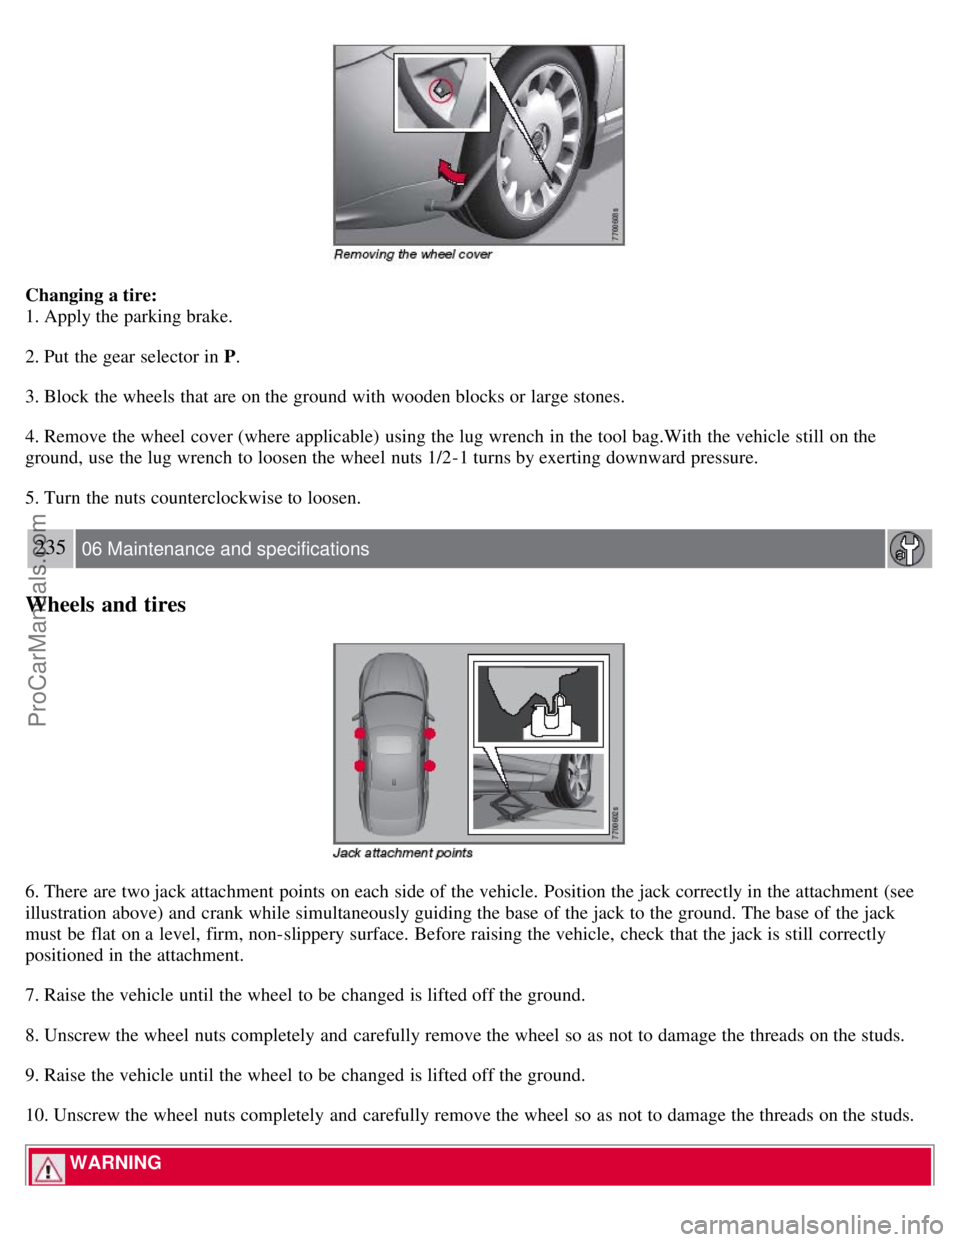
Changing a tire:
1. Apply the parking brake.
2. Put the gear selector in P.
3. Block the wheels that are on the ground with wooden blocks or large stones.
4. Remove the wheel cover (where applicable) using the lug wrench in the tool bag.With the vehicle still on the
ground, use the lug wrench to loosen the wheel nuts 1/2-1 turns by exerting downward pressure.
5. Turn the nuts counterclockwise to loosen.
235 06 Maintenance and specifications
Wheels and tires
6. There are two jack attachment points on each side of the vehicle. Position the jack correctly in the attachment (see
illustration above) and crank while simultaneously guiding the base of the jack to the ground. The base of the jack
must be flat on a level, firm, non-slippery surface. Before raising the vehicle, check that the jack is still correctly
positioned in the attachment.
7. Raise the vehicle until the wheel to be changed is lifted off the ground.
8. Unscrew the wheel nuts completely and carefully remove the wheel so as not to damage the threads on the studs.
9. Raise the vehicle until the wheel to be changed is lifted off the ground.
10. Unscrew the wheel nuts completely and carefully remove the wheel so as not to damage the threads on the studs.
WARNING
ProCarManuals.com
Page 228 of 251

The jack must correctly engage the jack attachment.
Be sure the jack is on a firm, level, non-slippery surface.
Never allow any part of your body to be extended under a vehicle supported by a jack.
Use the jack intended for the vehicle when changing a tire. For any other job, use stands to support the vehicle.
Apply the parking brake and put the gear selector in the (P)ark position.
Block the wheels standing on the ground, use rigid wooden blocks or large stones. The jack should be kept well-
greased.
Re-installing the wheel
1. Clean the contact surfaces on the wheel and hub.
2. Lift the wheel and place it on the hub.
3. Install the wheel nuts and tighten hand -tight. Using the lug wrench, tighten crosswise until all nuts are snug.
4. Lower the vehicle to the ground and alternately tighten the bolts crosswise to 62 ft. lbs. (85 Nm).
5. Install the wheel cap (where applicable).
Contents | Top of Page
ProCarManuals.com
Page 243 of 251
ECC120-124
Economical driving170
Electric parking brake110
Electronic Climate Control120-123
air distribution table124
Interior Air Quality System123
ventilated seats121
Emergency brake lights86
Emergency locking retractor31
Emergency starting104
Emergency towing185-186
Emission inspection readiness192
Engine
specifications245
starting102
starting with keyless drive103
Engine compartment overview193
Engine oil
checking194
low pressure warning light72
specifications246
volumes247
Environment9
Eyelets for anchoring loads179
F
Federal Clean Air Act190
Fluid specifications248
Fog lights
front72
front, changing bulbs201
front/rear86
Four C (active chassis system)141
Front airbags18-20
disconnecting passenger's side airbag21-23
Front fog lights72, 86
changing bulbs201
Front park assist153-154
Front seats79
heated121
Fuel filler cap177
Fuel filler door, opening176
Fuel level warning light72
Fuel requirements174-175
Fuses210-215
ProCarManuals.com