2007 VOLKSWAGEN GOLF PLUS light
[x] Cancel search: lightPage 130 of 541
Windshield wiper lever
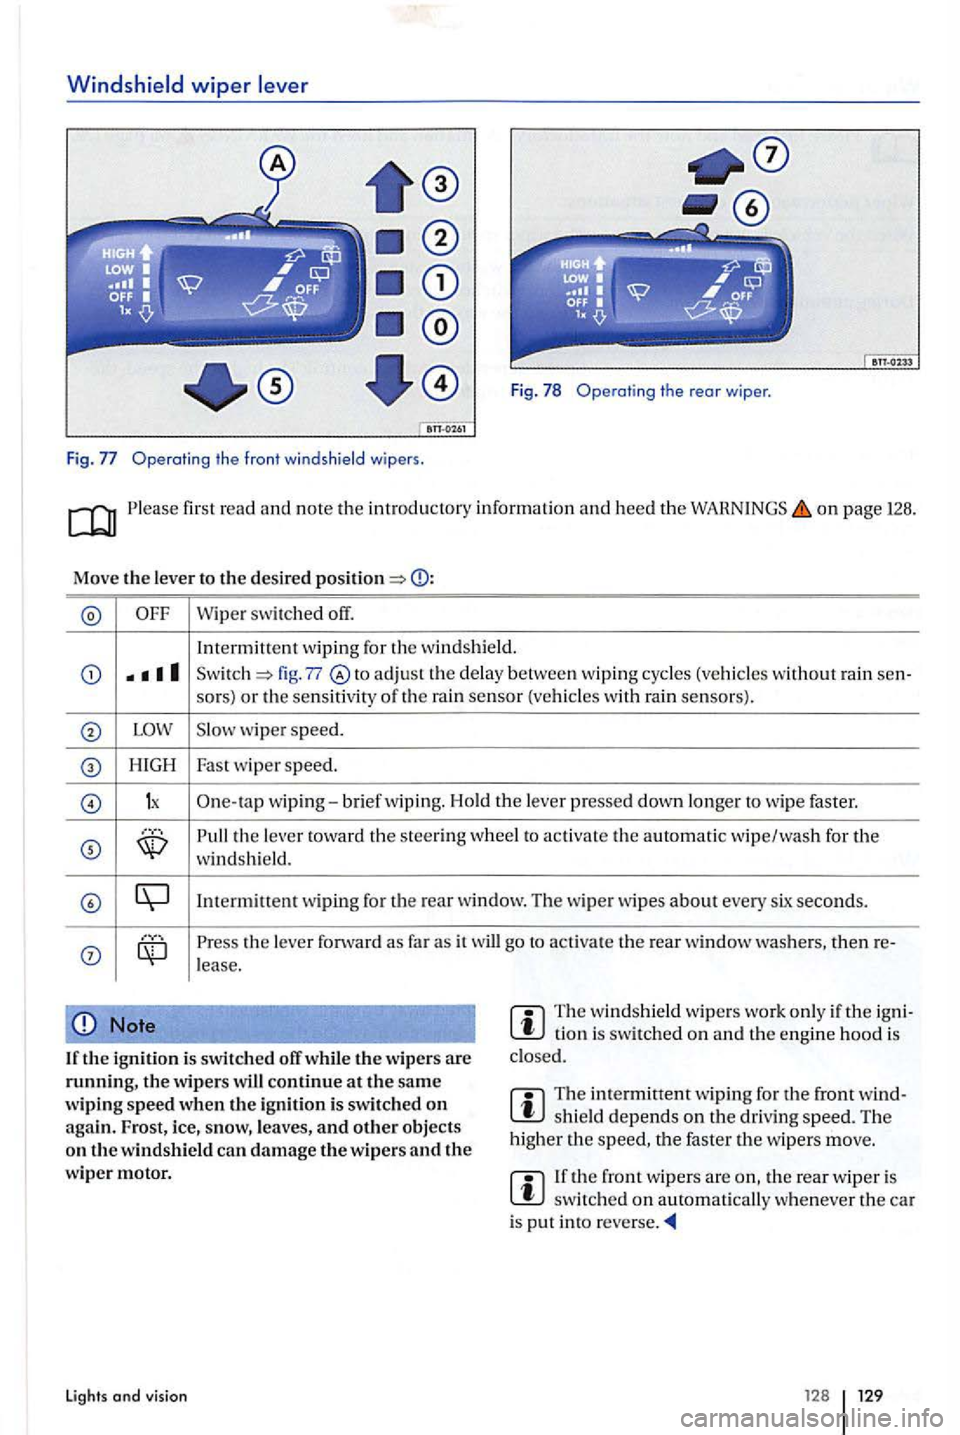
Fig . 78 Operating the rear wiper .
Fig. Operatin g t he front windsh ie ld wipers .
on page 128.
Move the leve r to t he des ired
Wipe r switched off.
In term itt
ent wiping for the w ind shield.
fig. 77 to adj ust the delay between wip ing cycles (vehicles wit hout rain sen-
so rs) or the sensit iv ity of th e rain sensor (vehicle s w ith rain senso rs).
w iper speed.
H IGH Fast wipe r speed.
1x One-ta p wip ing-brief wiping. Hold th e lever presse d down longer to wipe faster.
the le ve r towa rd t he stee ring whee l to activat e the au toma tic wipe/wa sh for the windsh ie ld.
the leve r forward as far as it will go to ac tiva te the rear window then re-lease.
Note
If the ig n it io n i s swi tc h ed off whil e the w ipers are th e w ipers continue a t the sa me
w ip ing sp eed when the ign ition i s swi tched on agai n.
The w in ds hield wipe rs work only if th e tio n i s sw itched on and th e engine hood is
clo sed.
Th e intermittent wip ing for the front shield depends on the driving speed. The
h igh er the the faster th e wipers move.
th e rear w ip e r is s witc hed on automatically w henever the car is pu t in to
Lights and visi o n 12 8
Page 131 of 541
Wiper functions
first read and note th e introductory informat ion an d heed the on page 126.
Wip
er p erformanc e in diffe rent situations:
W he n th e veh icle is
not mov ing : The wip er speed changes tempo ra ril y to the next lower speed.
W hil e
the washer sys te m is wo rking, the climate control
During automatic wipe/wash: sys
te m switches to recircul ation for about seconds h elp prevent th e w asher flu id odor from enterin g the ve hicl e int e-rior.
D urin g int e
rmittent wip ing: S
peed-dependent interval con tro l: The high er th e speed, the faste r the wipers m ove.
Heated washer nozzles
The heatin g tha ws frozen wash er nozzles, but not the fluid suppl y hoses. When the ig niti on is
sw itch ed on, th e heat applied to the was he r zles is au to mat ically regulate d d ep ending o n th e
outs id e ai r t emperature .
Headlight washer system
T he headlight washer sys te m clea ns the headli ght
glass.
I f th e ign it io n
and the headli ghts (high or lo w arc swit ch ed on, the headlight s time and every fifth time th e front windshi eld washers a re activa te d. Thi s happen s only when the low or hig h beams are on whe n th e
Windshiel d wi pe r service posit ion
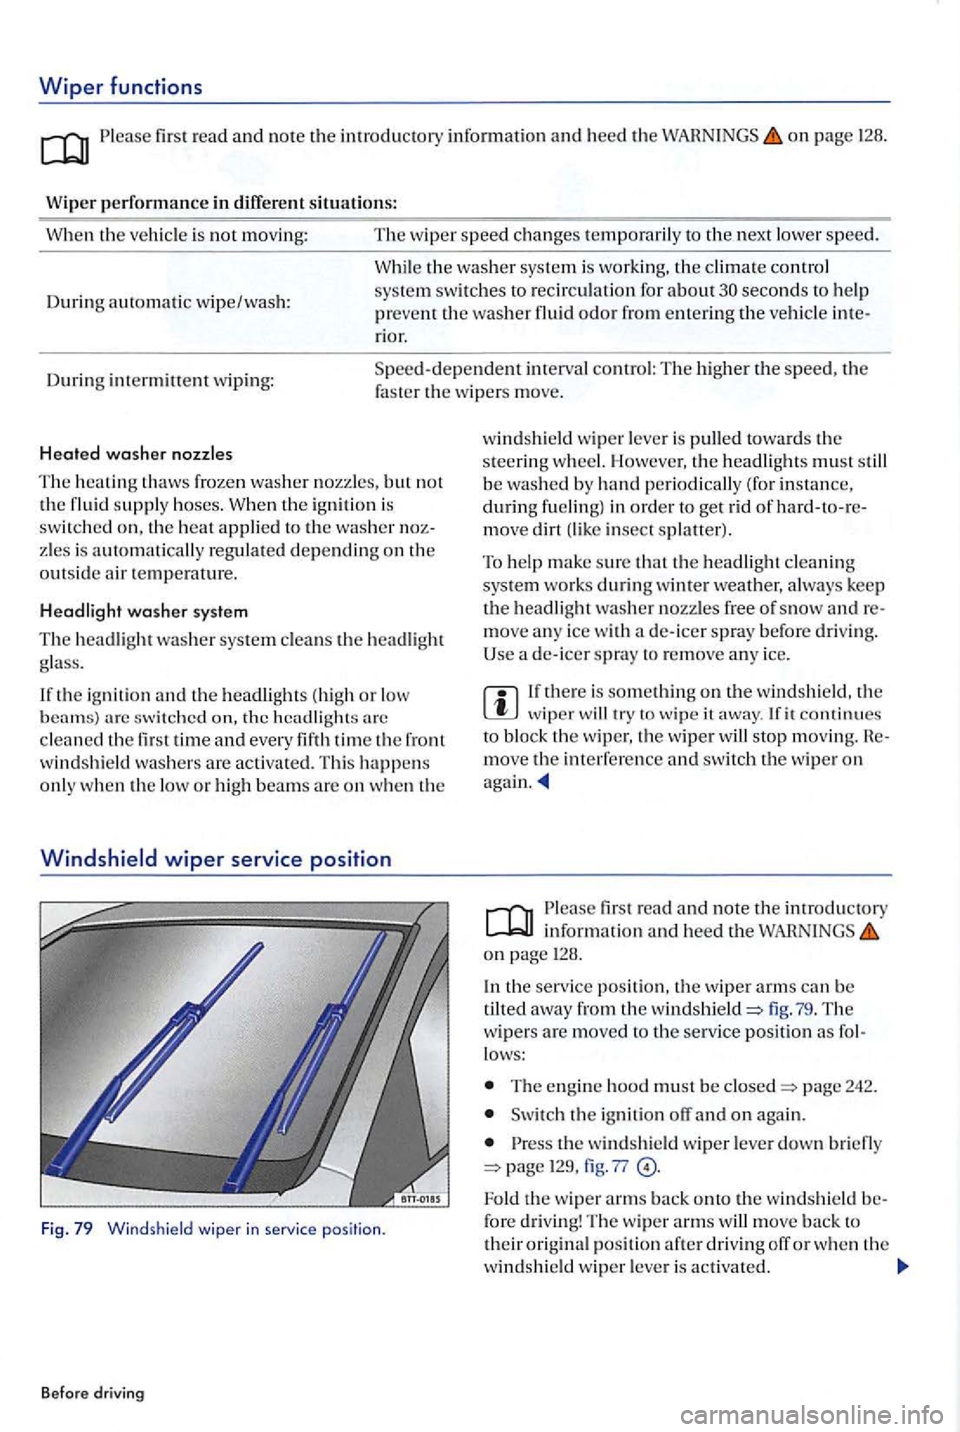
Fig. 79 Wind sh ield wiper in ser vice position .
Before driving
windshi eld wip er leve r is pulle d towards th e
s teering w heel. Howeve r, th e headli ghts must s till
b e was hed by ha nd periodically (for i nstance, during fue ling) in order to get riel of move dirt insect splaller).
T o hel p
make sure th at th e headli gh t cleanin g syste m wo rk s during winter weather, a lways keep the headlight washer nozzles fre e of snow move an y ice w ith de- icer spray before drivi ng.
Use a de- icer spra y to re m ove an y ice.
wiper will try to wip e it away . fit continues bloc k the wiper, th e wiper wil l s top moving. move th e in terfer ence and swit ch th e wip er on
firs t read and note the introductory in formation and heed th e o n page 128 .
I n
the service posit io n, th e wiper arms can be
tilted away from the windshield=> lig . 7 9 . The w ipers are move d to the ser vice pos it io n as lows:
T he e ngin e hood must b e closed=> page 242.
Switch the ig nition o n again .
th e windshie ld wiper leve r down brie fly page 129, fig . 77
Fold the wipe r arm s back onto the w indshi eld fo re driving! Th e w iper arms will move back t o their origin al positi on afte r dri vin g off or w he n th e
winds hi eld wip e r leve r is activa te d .
Page 132 of 541
lifting and folding the wiper blades away from
th e
windshield
Move the wiper arm s th e serv ice position
Do not handle the wiper b lades; h andle the
wipe r arms o nl y at the a uachment above the w iper blades.
Rai n sens or
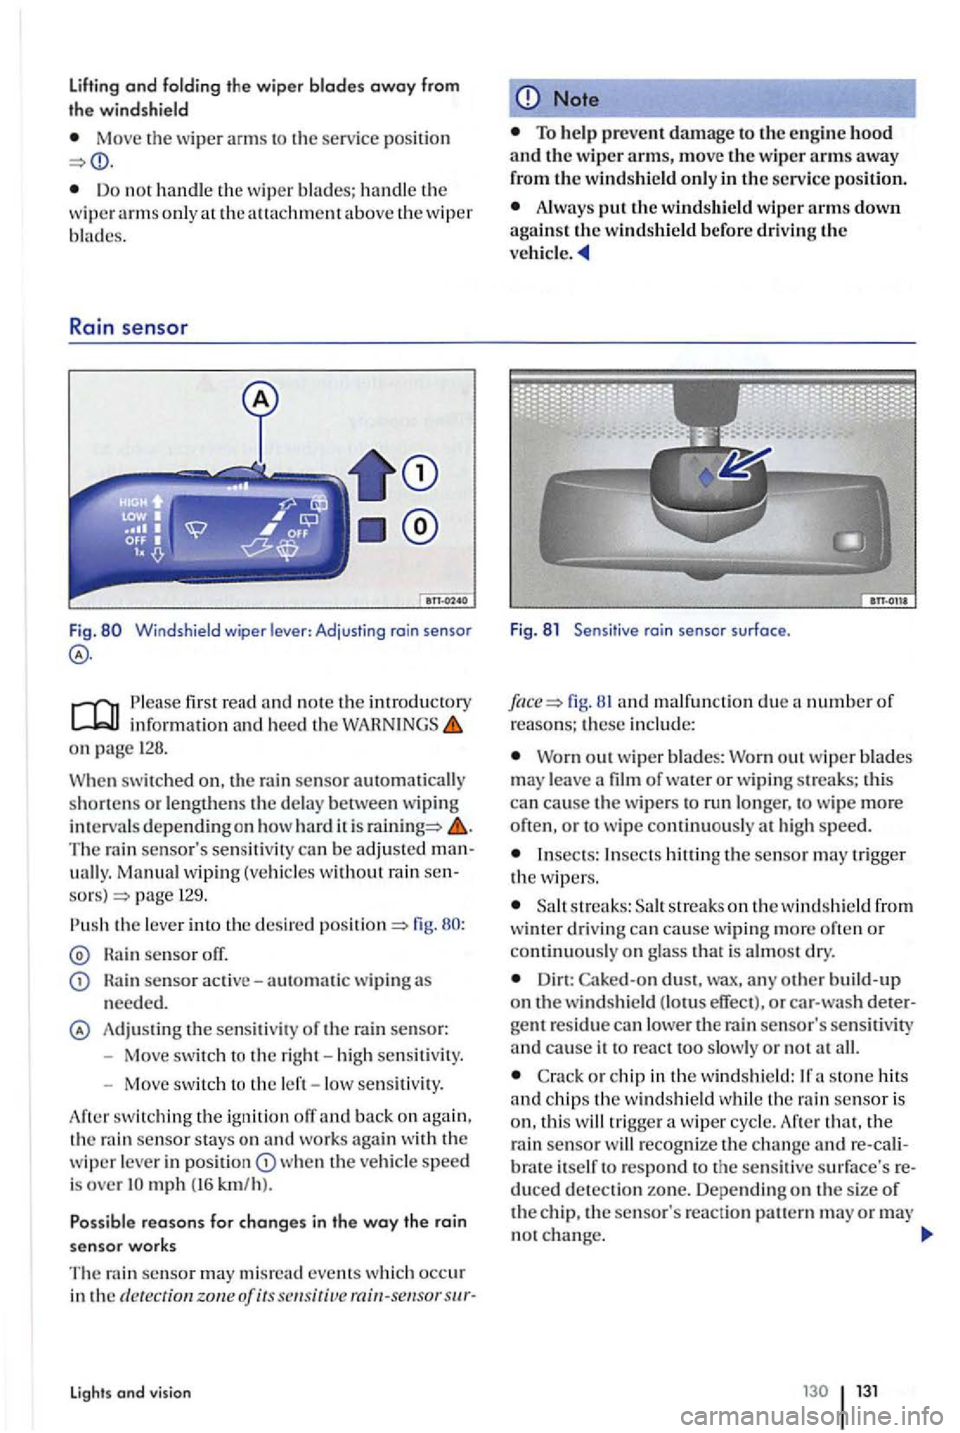
Fig. Windshield wiper lever : Adjusting rain senso r
first read and note the introductory information and heed th e WARNINGS on page 128.
When
swit ched on. the rain sensor automatically
shorte n s or le ngthens the de lay betwee n wiping in tervals depend in g on how hard it is The rain sensor's sensiti vity can be adjusted manuall y. Manual wiping (vehicle s w ith out rain sensors) page 129.
Rain sensor off.
sensor active-automatic wiping needed.
Adju stin g the sensit iv it y of the rain sensor:
- Move switc h t o the right -hi gh sen siti vity.
- Move sw itch to the left - low se nsitivity.
swit ch in g th e ignition off an d back on again ,
t h e ra in sensor stays o n and works agai n with the wiper leve r in w he n the vehicle speed is over
events which occur in the dete ction zone of its
Lights and vision
Note
Always the windshield wiper arms down against the windshield before driving the ve hicle.
Fig . 8 1 Sensit ive rai n sensor surface .
fig. 81 an d malfu nction due number of reasons; these in clu de:
Worn out w ip er blades: Wo rn out w iper blades m ay lea ve a film of water or w ipi ng streaks; thi s can cause the wipers run longe r, to wip e more often , o r to w ipe continu ously at h ig h speed.
Insects: Insects the sensor may tri gger the w ipers .
s tr eaks: streaks o n th e w indsh ie ld from
w inter drivin g can cause wiping more often or continu ously on g lass that is almos t dry.
Dirt: Caked-on dust, wax, any build- up on the windshield (lotus effect), or car -w ash detergent residue can lower the rain sensor's sen siti vity and cause it to react too slowly or n o t all.
C ra ck or chip in the wind shi eld :
th at, th e
rai n sensor will recog nize the c ha nge re -cal iitself to respond to the sensit ive su rface's reduced detection zone. Depending on th e s ize of the chip, the sensor's reaction ern may or may no t change.
Page 133 of 541
The sensor cannot always recognize rain and activate the wipers.
Switch the wipers on manually when water on the windshield reduces visibility.
131, fig. 81 (arrow) regularl y and check the wipe r b lades fo r damage.
T o remove wax and coats of polish safely, we recommend usin g a n alcoho l-based s hi eld
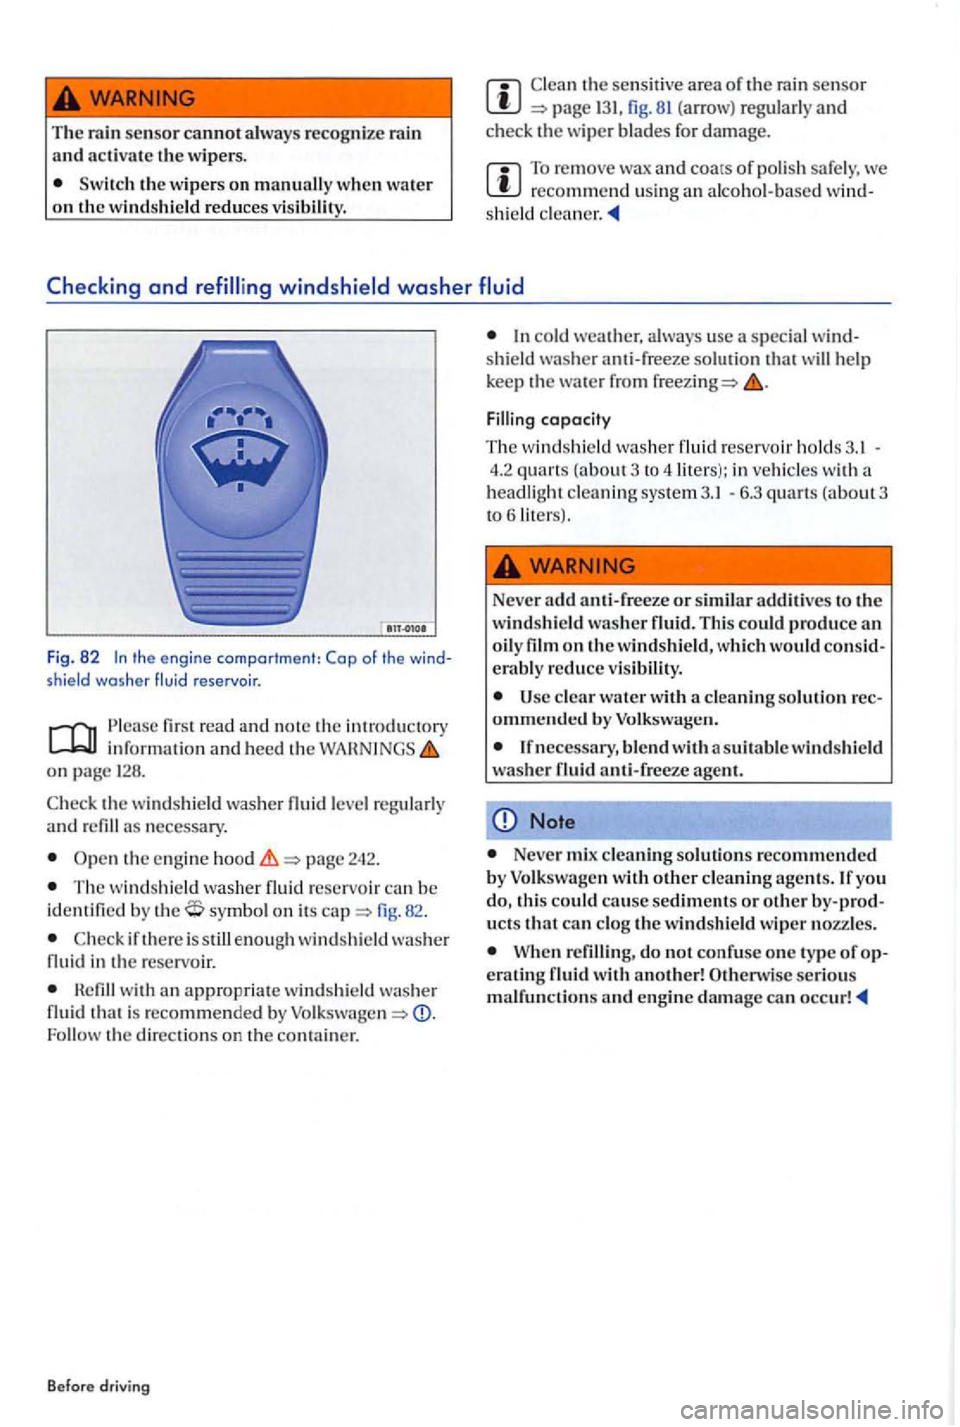
Fig. 82 the engine compartme nt: Cap of the shield washer fluid reservoir .
Ple ase first read and the int rod uctory information and heed th e on pa ge
the windshi eld was her necess ary.
page 242.
The wind shi eld washer fluid reservoi r can be identifi ed by symbol on its fig. 82.
H efill w ith an appropriat e windshie ld was he r
fluid i s recommended by Follow th e directio ns on the co ntainer.
Before driving
co ld weather. u sc a speci al
Filling capacity
The w indshi eld washer fluid reservoir holds 4.2 quarts (a bout 3 to 4 liters ): in vehicles with headlight cleaning sys te m - 6.3 quarts (about3 to 61it e rs).
Never add anti-freeze or simila r to the windshie ld was her fluid . This could produce
erabl y reduce v is ibility.
Note
Neve r mix cleaning solutions recommended by Volkswagen with other cl eaning agcnts.lfyo u
ucts that can clog the windshield wiper nozz les.
When refilling, do not confuse one type of
Page 135 of 541
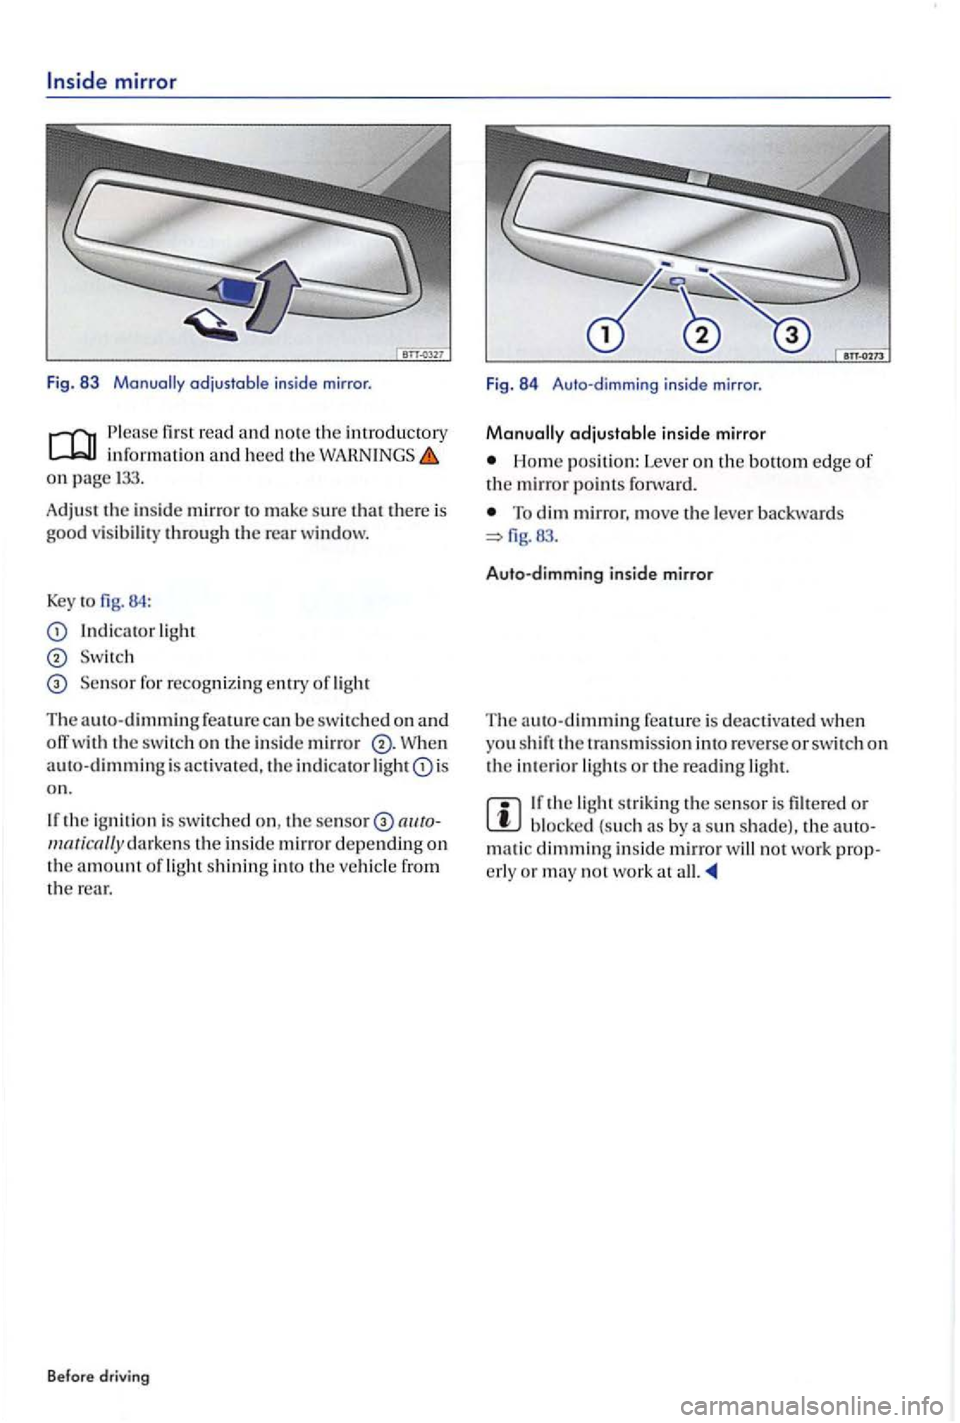
mirror
Fig. 83
read informatio n and heed the on page
Adjust the in sid e mirror to make su re that there is good v is ibilit y throug h the rear window.
Key to 84 :
light
Se nsor for recognizin g e ntry of ligh t
The auto-dimming feature b e swit ched o n and th e switch on th e in side mirror W hen
a u to-dimm in g is activate d , th e indicator light is
o n.
the ig nition is switched on , the se nsor the insid e mirror depending on th e amount of light shining into the vehicle from the
Before driv ing F
ig.
84 Auto -dimmi ng inside mirror .
adjustable insid e mirror
Home position: Lever on the bottom edge of the mirror point s forward.
To dim mirror, move lever b ac kwards
Auto -d imm ing inside mirro r
T he a uto-
dimming feature is deactiva ted when
you shift th e tra nsm issio n int o reverse or switch o n the in terior lights or the reading light.
the light striking the sensor is filt ere d or bl ocke d (suc h as by sun shade). the matic dimming insid e mirror no t work o r may not work at
Page 136 of 541
Outside mirrors
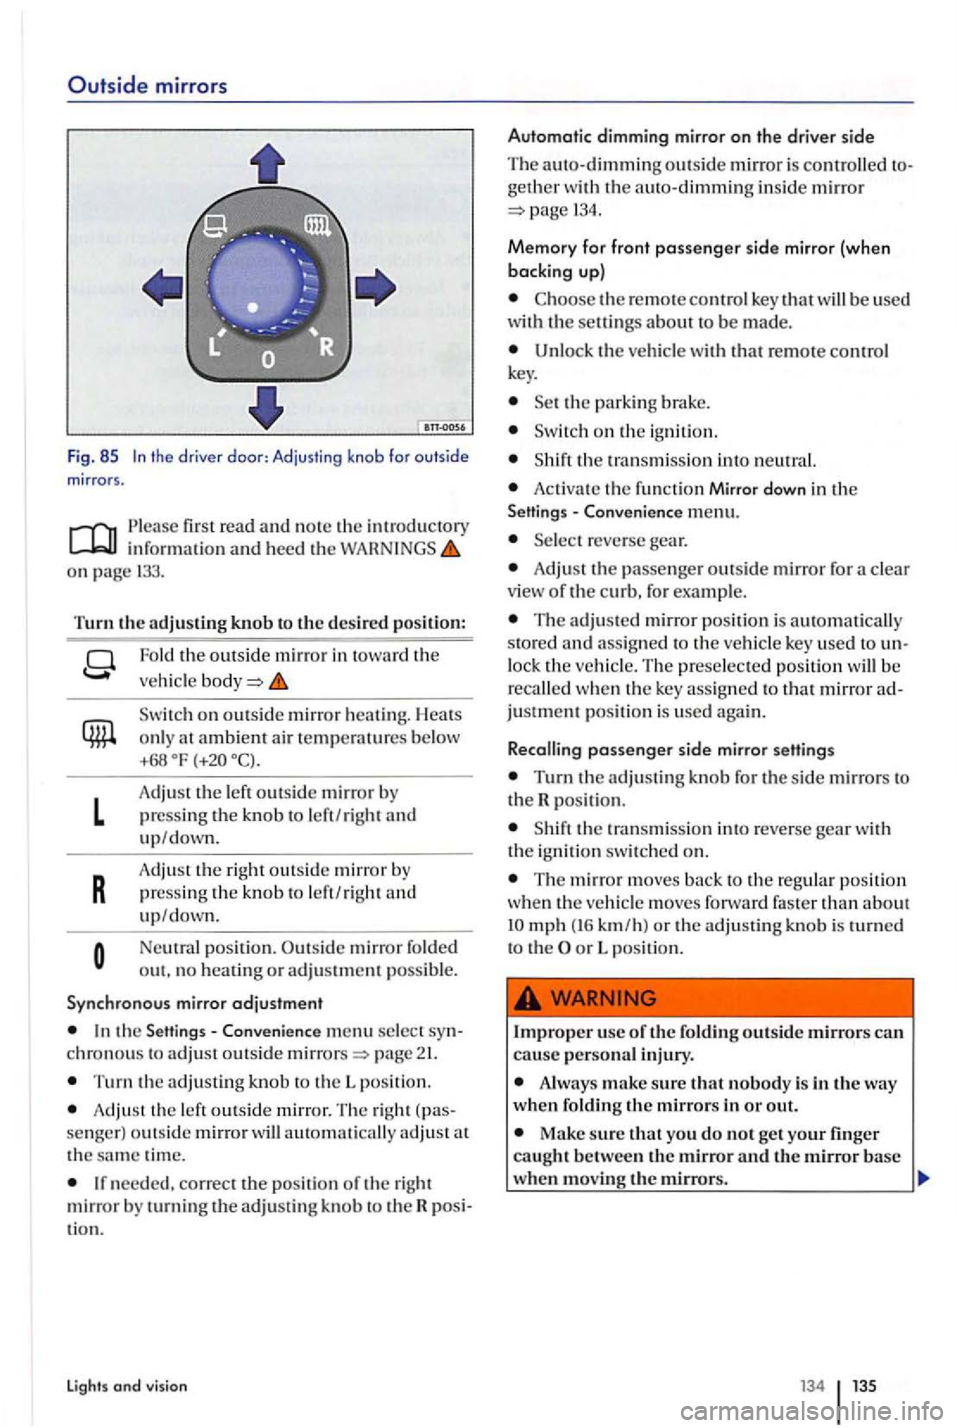
Fig. 85 the driver doo r: Adjusting knob for outside mirror s.
o n page 133.
Turn the adjusting knob to the desired po siti on :
L
R
Fold the outsi de mirror in toward the
veh i
cle
on outsid e mirror heating. Heats
o nl y at ambient air tempe ratures b e low +68
A dju st the left outside mirro r press ing the knob to le ft/righ t
pressing the knob to le ft/rig h t and up/down.
Neutral position . mirror fo ld ed out. no heatin g or adjustment possib le .
Syn ch rono us mirror adjustment
the Sett ing s- Conveni ence men u select chronous to adju st outside page
T urn the adj ustin g knob to th e L positi on.
Adjust th e left outs ide m irror. Th e righ t
th e sa m e tim e.
needed, correct the positi on of the right mirror turning the adjust in g kn ob to th e tio n.
Lights and vision
Automatic dimming mirror on the drive r side
Th e auto-dimming outs ide mirror is contr olled geth e r w ith the auto-dimming inside mirror 13 4.
Memory for front passenger sid e mirror (when
backing up)
the re m ote contr ol key that will be use d
with th e settin gs about be made.
Unloc k the veh icle with tha t re mote control
k ey.
o n the ign ition.
the transmiss ion into ne ut ral.
Acti vate the fun ctio n Mirror down in the - C onvenience menu.
reverse gear.
Adjus t the passenge r outsid e mirror for a clear view of the curb, for example.
The adjusted mirror positio n is automatically
s to red and ass igned to the ve hicl e key used to lock the vehicle. The preselecte d po sit ion w ill recalled w hen the ke y ass igned to that mirror justment pos it io n is used again .
Recalling
passenger s id e mirror setting s
Turn the adjusting for the sid e mirrors to the R posit ion.
T he mirror m ove s back to the re g ul ar position wh en the ve hicl e m oves forward faster than about mph (16 km /h) or the adjusting knob is to th e or L po sition.
use of the foldin g outside mirrors can cause persona l injury.
Alway s make sure that nobody is in the way w hen f oldin g the mirrors in or out.
Make sure that you do not get yo ur finger caught between the mirror and the mirror base when moving the mirrors.
Page 138 of 541
Transporting
Driving tips
In this sec tion yo u'll find informatio n on th e fol
l o w ing:
obj ects in th e luggage m ent and make su re
the vehic le lo ad, as well how it is di stributed, can vehicle hand ling and
page 45
F o lding th e pa sse nger backrest forward
page
Lugg age page
pag e
Trail er pag e
Tires and 27 6
Transporting
Uns ecured or in correc tly s tow ed item s can fly
through the vehicl e, causing serious personal injury during hard braking or sharp s teering or in an a cci dent. Loose items can also be s truck
a nd throw n through the passenge r compartment by an airbag if it infl ate s. To help reduce
the risk of inju ry:
all objects secure ly in the vehicl e. Always keep storage compartments closed dri vin g. Do not stow hard , heavy, or sharp objects in open bins in the ve hicl e or on top of the instrument panel.
A lways secure objects properly with s uitabl e
s traps so that th ey
Always secure objects in the passenger compartment properly so th at they cannot com e
int o the deploy ment area of a sid e or front airbag w hen the vehi cle is m ov ing.
Always keep stora ge compartments closed
w hil e dri ving.
A lways make sure th at the re is nothin g on the front passe nge r sca t w hen the backres t is fo lded forward. When the backres t is folded for ward,
eve n light objects could be pushed int o the scat
c ushion and cau se the we ight- sensin g mat in
th e seat to registe r e n o ugh weig ht to turn th e airbagon.
Always make su re that the AIR BAG
must n eve r assume an incorrec t seating positi on becaus e of objects stow ed in th e vehicle_
No person should ev er sit in a seat that is
blocked by objec ts s towe d in the vehicle.
136 137
Page 145 of 541
A re d m ark on the button ®indicates that the backrest i s no t l atc h ed int o pla ce. Always
check to m ake sure tha t the re d marking is no t visibl e wh en eve r the rear backrest is in the
the
Pleas e firs t r ead and note the introdu ctory informa tion and heed th e on p age 14 2 .
W hen yo u open or cl ose th e rear hatc h , th e po rti ng straps, w he n att ac h ed . w ill au toma tically
rais e or lo w er th e lugg age co mpartmen t co ver.
You ca n p ut light articles of clot hin g o n th e gage co mpartm ent cove r. B ut rem ember th a t your view th ro ug h th e r ea r window must n ot be
N o one, including
Note
Befo re fo lding th e rear b ackres t forward, adjust the front seats so that th e rear seat's head restraint or backres t cu shi on n ot butt up again st th e
front seats .
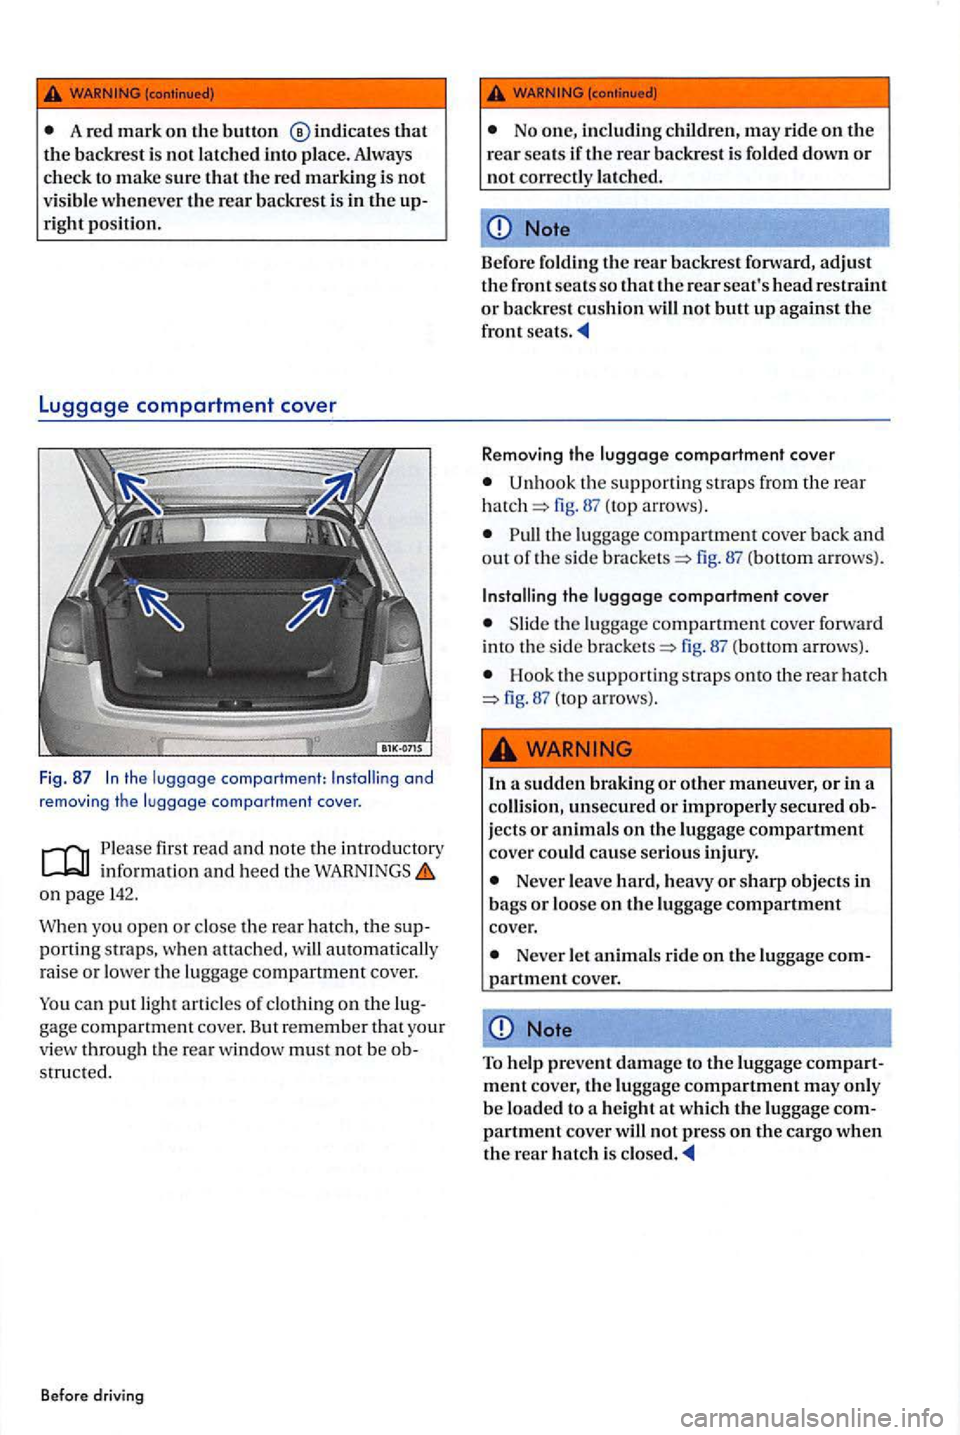
R emoving
U nh oo k t he suppo rtin g str ap s from th e rea r 87 (top a rro ws).
Pull th e luggag e compartm ent cover ba ck and out of th e s ide fig. 8 7 (bottom a rro ws) .
Installing the luggage compartment cover
th e lugga ge compartment cover forward
int o th e s id e fig. 87 (bottom arrows).
H oo k th e s upporti ng strap s onto t he rear h a tc h fig. 87 (top arr ows).
a sudde n b raking or otJ1er maneuver , or in a
c olli sio n , unsecured or imprope rl y secured
N eve r le a ve hard , h e avy or s h arp obj ects in
ba gs or loo se o n the lu gg ag e compartment co ver.
Never le t a nim als rid e o n the lu ggage
Note
T o h elp preve nt damage to the luggage m en t cove r, the lu gga ge compartmen t m ay onl y
b e loaded to a he ig ht at whic h th e lu gga ge