Page 157 of 611

1482007 TUNDRA from Jul. ’07 Prod. (OM34463U)
CAUTION
�When using the lower anchorages
for the child restraint system, be
sure that there are no irregular ob-
jects around the anchorages or that
the seat belt is not caught.
�Push and pull the child restraint
system in different directions to be
sure it is secure. Follow all the
installation instructions provided by
its manufacturer.
�After securing the child restraint
system, never slide or recline the
seat.
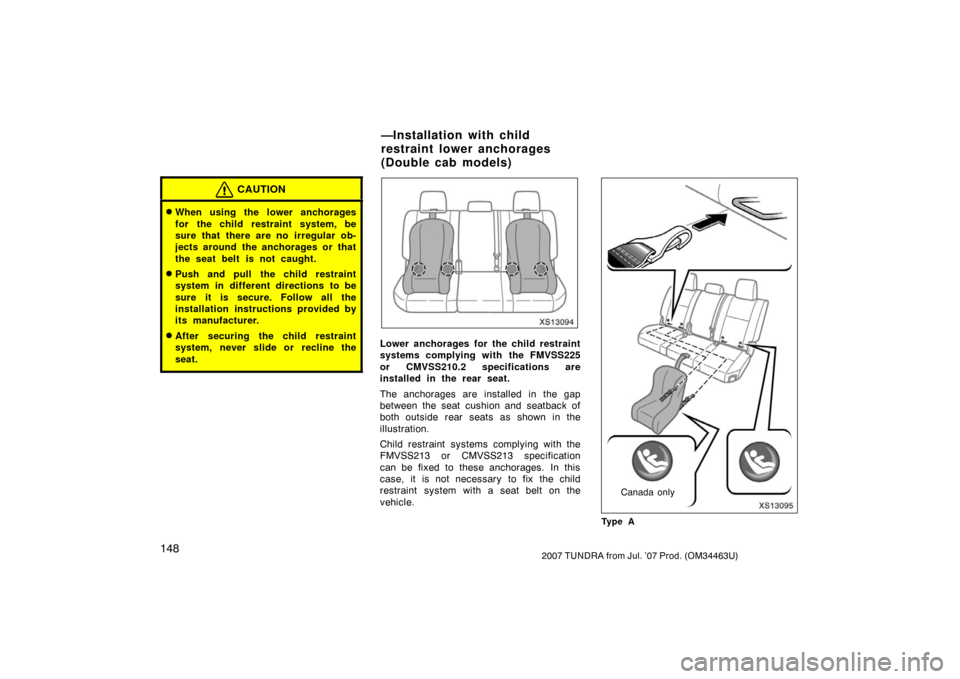
XS13094
Lower anchorages for the child restraint
systems complying with the FMVSS225
or CMVSS210.2 specifications are
installed in the rear seat.
The anchorages are installed in the gap
between the seat cushion and seatback of
both outside rear seats as shown in the
illustration.
Child restraint systems complying with the
FMVSS213 or CMVSS213 specification
can be fixed to these anchorages. In this
case, it is not necessary to fix the child
restraint system with a seat belt on the
vehicle.XS13095
Canada only
Ty p e A
—Installation with child
restraint lower anchorages
(Double cab models)
Page 158 of 611

1492007 TUNDRA from Jul. ’07 Prod. (OM34463U)
XS13096
Canada only
Ty p e B
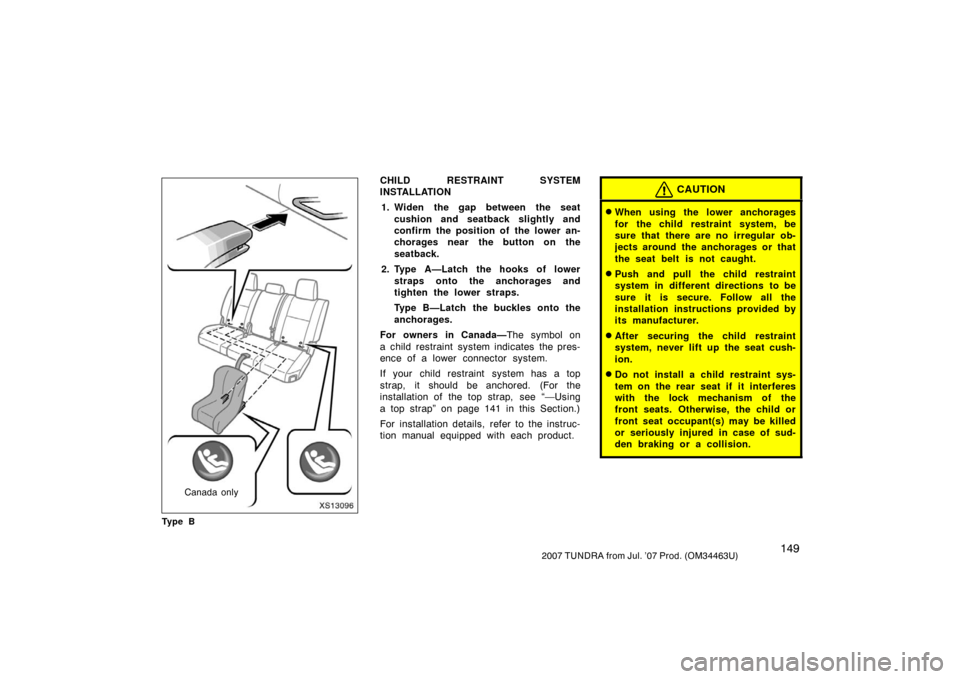
CHILD RESTRAINT SYSTEM
INSTALLATION1. Widen the gap between the seat cushion and seatback slightly and
confirm the position of the lower an-
chorages near the button on the
seatback.
2. Type A—Latch the hooks of lower straps onto the anchorages and
tighten the lower straps.
Type B—Latch the buckles onto the
anchorages.
For owners in Canada— The symbol on
a child restraint system indicates the pres-
ence of a lower connector system.
If your child restraint system has a top
strap, it should be anchored. (For the
installation of the top strap, see “—Using
a top strap” on page 141 in this Section.)
For installation details, refer to the instruc-
tion manual equipped with each product.CAUTION
�When using the lower anchorages
for the child restraint system, be
sure that there are no irregular ob-
jects around the anchorages or that
the seat belt is not caught.
�Push and pull the child restraint
system in different directions to be
sure it is secure. Follow all the
installation instructions provided by
its manufacturer.
�After securing the child restraint
system, never lift up the seat cush-
ion.
�Do not install a child restraint sys-
tem on the rear seat if it interferes
with the lock mechanism of the
front seats. Otherwise, the child or
front seat occupant(s) may be killed
or seriously injured in case of sud-
den braking or a collision.
Page 159 of 611
1502007 TUNDRA from Jul. ’07 Prod. (OM34463U)
XS13203
Lower anchorages for the child restraint
systems complying with the FMVSS225
or CMVSS210.2 specifications are
installed in the rear seat.
The anchorages are installed in the gap
between the seat cushion and seatback of
both outside rear seats as shown in the
illustration.
Child restraint systems complying with the
FMVSS213 or CMVSS213 specification
can be fixed to these anchorages. In this
case, it is not necessary to fix the child
restraint system with a seat belt on the
vehicle.
XS13206
3rd lock
position1st lock
position
CHILD RESTRAINT SYSTEM
INSTALLATION
1. Fold down the seatback and back to the 1st lock position (most upright
position) until it locks into place.
Adjust the seatback to the 3rd lock
position.
Make sure the seatback is locked secure-
ly.XS13204
Canada only
Ty p e A
—Installation with child
restraint lower anchorages
( C rew Max mo d els)
Page 160 of 611

1512007 TUNDRA from Jul. ’07 Prod. (OM34463U)
XS13205
Canada only
Ty p e B
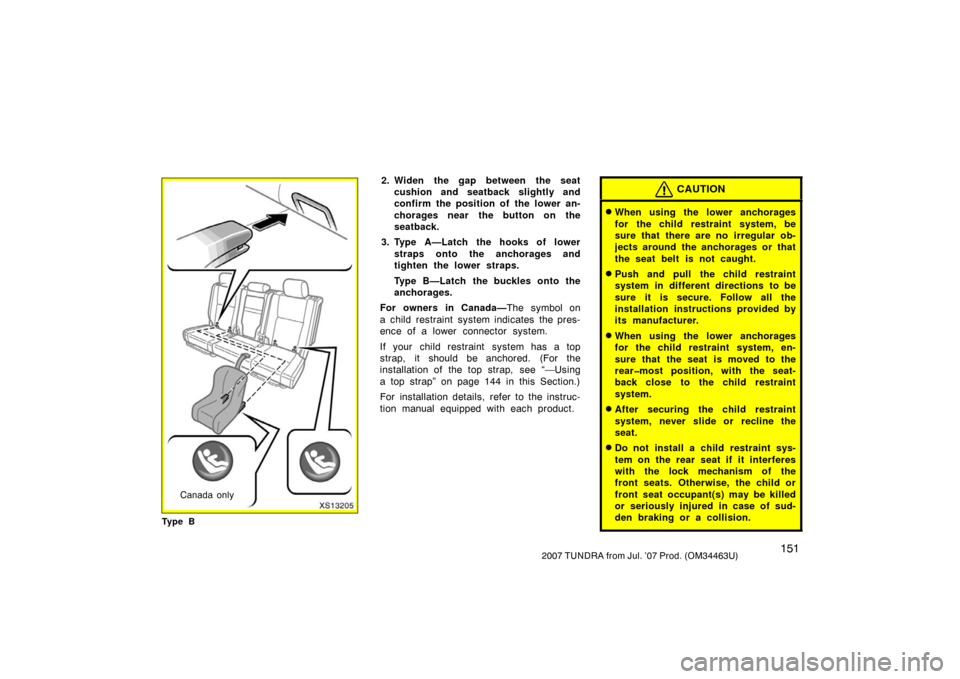
2. Widen the gap between the seat cushion and seatback slightly and
confirm the position of the lower an-
chorages near the button on the
seatback.
3. Type A—Latch the hooks of lower straps onto the anchorages and
tighten the lower straps.
Type B—Latch the buckles onto the
anchorages.
For owners in Canada— The symbol on
a child restraint system indicates the pres-
ence of a lower connector system.
If your child restraint system has a top
strap, it should be anchored. (For the
installation of the top strap, see “—Using
a top strap” on page 144 in this Section.)
For installation details, refer to the instruc-
tion manual equipped with each product.CAUTION
�When using the lower anchorages
for the child restraint system, be
sure that there are no irregular ob-
jects around the anchorages or that
the seat belt is not caught.
�Push and pull the child restraint
system in different directions to be
sure it is secure. Follow all the
installation instructions provided by
its manufacturer.
�When using the lower anchorages
for the child restraint system, en-
sure that the seat is moved to the
rear�most position, with the seat-
back close to the child restraint
system.
�After securing the child restraint
system, never slide or recline the
seat.
�Do not install a child restraint sys-
tem on the rear seat if it interferes
with the lock mechanism of the
front seats. Otherwise, the child or
front seat occupant(s) may be killed
or seriously injured in case of sud-
den braking or a collision.
Page 305 of 611
2962007 TUNDRA from Jul. ’07 Prod. (OM34463U)
Separate seats type
The rear seat entertainment system con-
sists of the following components.
1. Power outlet main switch
2. Front audio system
3. DVD player
4. Rear seat entertainment system display
5. Rear seat entertainment system con- troller
6. A/V input adapter
7. Power outlet
Rear seat entertainment system—
XS18030b
Page 346 of 611
3372007 TUNDRA from Jul. ’07 Prod. (OM34463U)
XS18032
Separate seats type
XS18033
Bench seat type
To use the adapter, open the cover.
The A/V input adapter is composed of 3
input adapters.
Yellow: Image input adapter
Red: Audio input adapter
White: Audio input adapter
NOTICE
Close the cover when the A/V input
adapter is not in use. Inserting a for-
eign object other than the appropriate
plug may cause electrical failure or
short circuit.
—Power outlet
XS10094
Separate seats type
XS10092
Bench seat type
Page 391 of 611

3822007 TUNDRA from Jul. ’07 Prod. (OM34463U)
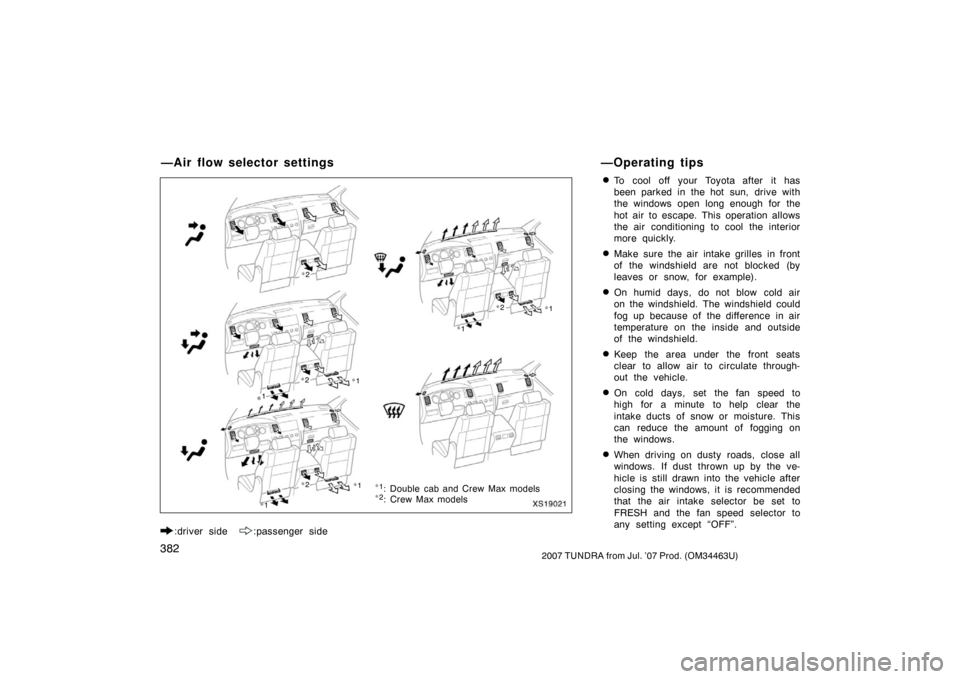
:driver side :passenger side
�To cool off your Toyota after it has
been parked in the hot sun, drive with
the windows open long enough for the
hot air to escape. This operation allows
the air conditioning to cool the interior
more quickly.
�Make sure the air intake grilles in front
of the windshield are not blocked (by
leaves or snow, for example).
�On humid days, do not blow cold air
on the windshield. The windshield could
fog up because of the difference in air
temperature on the inside and outside
of the windshield.
�Keep the area under the front seats
clear to allow air to circulate through-
out the vehicle.
�On cold days, set the fan speed to
high for a minute to help clear the
intake ducts of snow or moisture. This
can reduce the amount of fogging on
the windows.
�When driving on dusty roads, close all
windows. If dust thrown up by the ve-
hicle is still drawn into the vehicle after
closing the windows, it is recommended
that the air intake selector be set to
FRESH and the fan speed selector to
any setting except “OFF”.
—Air flow selector settings—Operating tips
XS19021
∗
1: Double cab and Crew Max models
∗1
∗ 1 ∗
1
∗2
: Crew Max models
∗1 ∗
1
∗2
∗2
∗ 2
∗ 2
∗1
Page 399 of 611

3902007 TUNDRA from Jul. ’07 Prod. (OM34463U)
:driver side :passenger side
�To cool off your Toyota after it has
been parked in the hot sun, drive with
the windows open for a few minutes.
This vents the hot air, allowing the air
conditioning to cool the interior more
quickly.
�Make sure the air intake grilles in front
of the windshield are not blocked (by
leaves or snow, for example).
�On humid days, do not blow cold air
on the windshield. The windshield could
fog up because of the difference in air
temperature on the inside and outside
of windshield.
�Keep the area under the front seats
clear to allow air to circulate through-
out the vehicle.
�On cold days, set the fan speed to
high for a minute to help clear the
intake ducts of snow or moisture. This
can reduce the amount of fogging on
the windows.
�When driving on dusty roads, close all
windows. If dust thrown up by the ve-
hicle is still drawn into the vehicle after
closing the windows, it is recommended
that the air intake selector be set to
FRESH and the fan speed to any set-
ting except off.
—Air flow selector settings—Operating tips
XS19022a
∗
∗
∗: Crew Max models
∗ ∗