Page 326 of 611
3172007 TUNDRA from Jul. ’07 Prod. (OM34463U)
Z18013
OPERATING THE “”, “”, “”
AND “
” SWITCHES/BUTTONS
“
” switch/button: Push this switch/but-
ton to pause the disc or to cancel the
pause and return to normal playing.
“
” switch/button: This switch/button
stops a screen when the DVD player is
operated.
“
” and “” switches/buttons: Push
and hold the “
” or “” switch/button
to fast forward or reverse. When you re-
lease the switch/button, the DVD player
will resume playing.
Push the “
” switch/button while paus-
ing, the DVD video plays the slow −motion
video replay.
Z17409
Page 329 of 611
3202007 TUNDRA from Jul. ’07 Prod. (OM34463U)
Z17414
Each time you push the “Sub Title” switch,
another language stored on the disc is se-
lected.
To turn off the subtitles, push the “Hide
Buttons” switch.
Push the “Back” switch to return to the
previous screen.
The selected subtitle language will appear
on the screen.Z17415
CHANGING AUDIO LANGUAGE
Push the “Audio” switch on the screen
and then the changing audio language
screen will appear. You can also display
the screen by pushing the “AUDIO” button
on the controller.
Page 330 of 611
3212007 TUNDRA from Jul. ’07 Prod. (OM34463U)
Z17416
Each time you push the “Audio” switch,
another language stored on the disc is se-
lected.
To turn off the audio language screen,
push the “Hide Buttons” switch.
Push the “Back” switch to return to the
previous screen.
The selected audio language will appear
on the screen.Z17417
CHANGING ANGLE SCREEN
Push the “Angle” switch on the screen,
and then the changing angle screen will
appear. You can also display the screen
by pushing the “ANGLE” button on the
controller.
Page 331 of 611
3222007 TUNDRA from Jul. ’07 Prod. (OM34463U)
Z17413
The angle can be selected for discs that
are multi−angle compatible when the “
”
mark appears on the screen. Each time
you push the “Angle” switch, the angle
changes. The angle number which you
can select will appear on the screen.
To turn off the screen, push the “Hide
Buttons” switch.
Push the “Back” switch to return to the
previous screen.Z17419
CHANGING THE INITIAL SETTING
Push the “Set Up” switch on the screen,
and then the initial setting screen will ap-
pear. You can also display the screen by
pushing the “SET UP” button on the con-
troller. You can change the initial setting.
After the setting is done, the player plays
from the beginning of the chapter or the
track.
Page 361 of 611
3522007 TUNDRA from Jul. ’07 Prod. (OM34463U)
1. “AUDIO/CONTROL” knob
Turning the “AUDIO/CONTROL” knob dis-
plays the menu items, names, numbers,
etc. to be selected. To select an item,
push the “AUDIO/CONTROL” knob. Due to
safety concerns, the “AUDIO/CONTROL”
knob does not function while the vehicle
is in motion.
2. Display
Displays such items as the reception lev-
el, a party’s name and phone number. See
“DISPLAY” described on the following
page for further details about the display.
3. “TEXT” button
When the party’s name or phone number
is too long to be displayed, pushing and
holding the “TEXT” button displays the re-
maining characters.
4. Preset buttons
Pushing the preset button displays the
registered speed dial numbers.
�
Audio unit
XS18014
Page 382 of 611

3732007 TUNDRA from Jul. ’07 Prod. (OM34463U)
If the cellular phone is not registered, this
system cannot be used. See page 353 for
registering a cellular phone. Make sure
that “BT” is displayed and get the cellular
phone ready to use.
There are 3 way to make a phone call
with this system.
�Speed dial
A phone call can be made with a preset
button in which a phone number is regis-
tered. See page 369 for setting the preset
buttons.
�Dial by Name
The system dials the numbers correspond-
ing to the spoken names registered in the
system.
�Dial by Number
The system dials to the spoken numbers.
To make a phone call
Push the off −hook switch to turn the
hands −free system on. To speed dial
1. Push the preset button where the de- sired number is set. The name or tele-
phone number is displayed.
2. Push the off −hook switch to dial.
To dial by Name 1. Push the talk switch and say “Dial by name”.
“Dial by name. Please push the talk
switch and say the stored name, or say
list names.” is heard and “Dial by Name”
is displayed.
2. Push the talk switch and say “XXXX”, or turn the “AUDIO/CONTROL” knob
until the phone name that you want to
dial is displayed and push the knob. When using a voice command:
“XXXX Push the off
−hook switch to dial.
Otherwise, push the talk switch and say
dial, or go back.” is heard. After that, do
the one of the following:
�Push the off −hook switch.
�Push the talk switch and say “Dial”.
�Turn the “AUDIO/CONTROL” knob until
“Dial” is displayed and push the knob.
When using the knob:
It calls the number.
The system may not function in the follow-
ing cases:
�If there is no number registered in the
preset button.
�If the system does not recognize the
voice command.
—Making a phone call
Page 425 of 611

4162007 TUNDRA from Jul. ’07 Prod. (OM34463U)
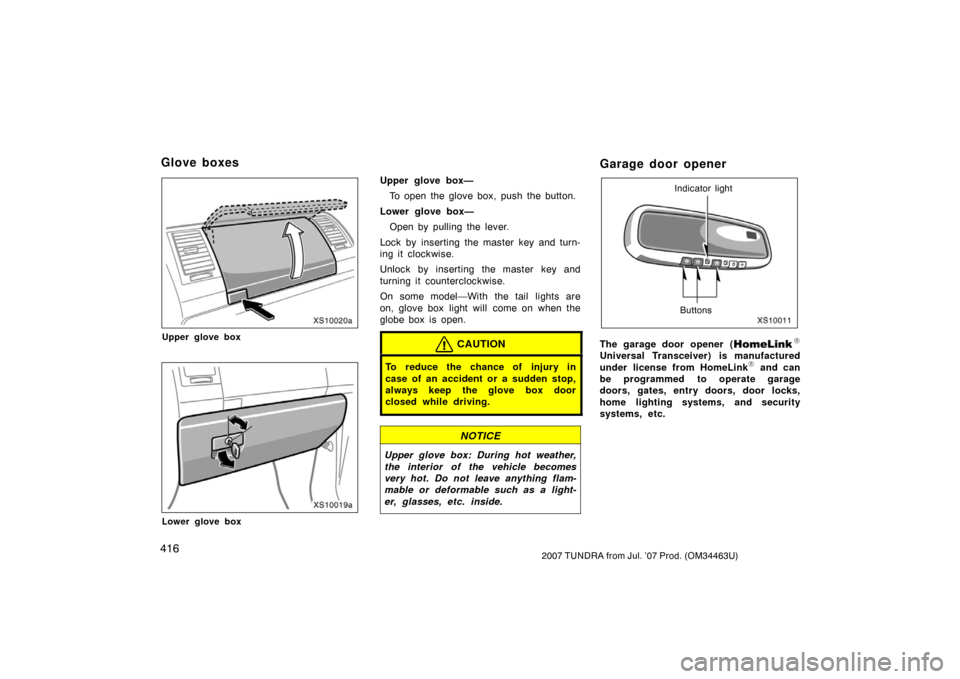
XS10020a
Upper glove box
XS10019a
Lower glove box
Upper glove box—To open the glove box, push the button.
Lower glove box— Open by pulling the lever.
Lock by inserting the master key and turn-
ing it clockwise.
Unlock by inserting the master key and
turning it counterclockwise.
On some model—With the tail lights are
on, glove box light will come on when the
globe box is open.
CAUTION
To reduce the chance of injury in
case of an accident or a sudden stop,
always keep the glove box door
closed while driving.
NOTICE
Upper glove box: During hot weather,
the interior of the vehicle becomes
very hot. Do not leave anything flam-
mable or deformable such as a light-
er, glasses, etc. inside.
Garage door opener
XS10011
Indicator light
Buttons
The garage door opener (\b
Universal Transceiver) is manufactured
under license from HomeLink\b and can
be programmed to operate garage
doors, gates, entry doors, door locks,
home lighting systems, and security
systems, etc.
Glove boxes
Page 426 of 611

4172007 TUNDRA from Jul. ’07 Prod. (OM34463U)
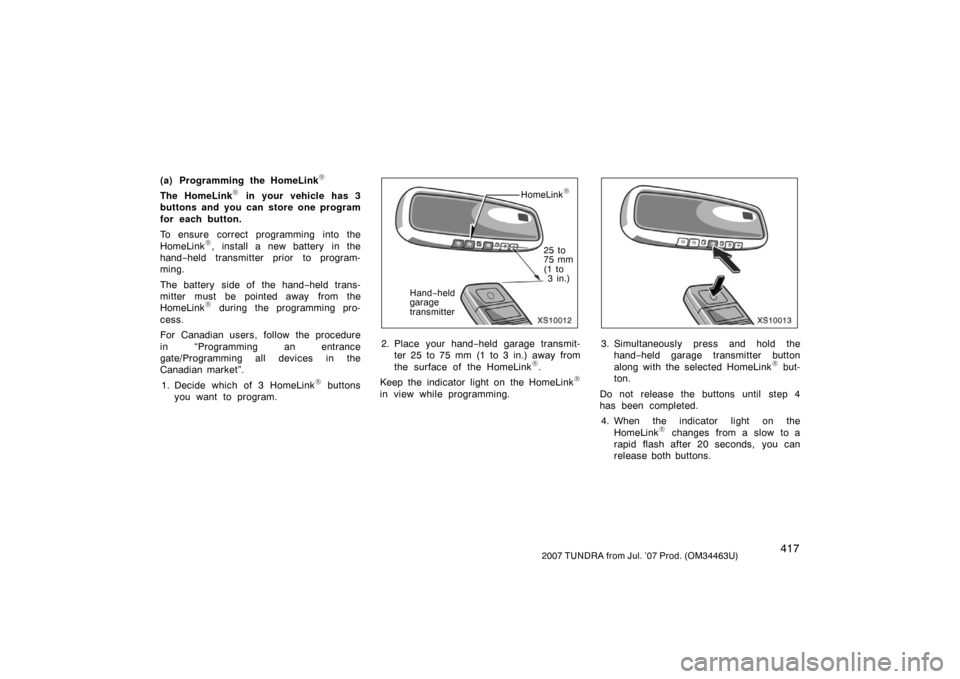
(a) Programming the HomeLink\b
The HomeLink\b in your vehicle has 3
buttons and you can store one program
for each button.
To ensure correct programming into the
HomeLink
\b, install a new battery in the
hand− held transmitter prior to program-
ming.
The battery side of the hand −held trans-
mitter must be pointed away from the
HomeLink
\b during the programming pro-
cess.
For Canadian users, follow the procedure
in “Programming an entrance
gate/Programming all devices in the
Canadian market”.
1. Decide which of 3 HomeLink
\b buttons
you want to program.
XS10012
HomeLink\b
25 to
75 mm
(1 to 3 in.)
Hand −held
garage
transmitter
2. Place your hand −held garage transmit-
ter 25 to 75 mm (1 to 3 in.) away from
the surface of the HomeLink
\b.
Keep the indicator light on the HomeLink
\b
in view while programming.
XS10013
3. Simultaneously press and hold the hand− held garage transmitter button
along with the selected HomeLink
\b but-
ton.
Do not release the buttons until step 4
has been completed. 4. When the indicator light on the HomeLink
\b changes from a slow to a
rapid flash after 20 seconds, you can
release both buttons.