Page 294 of 611
2852007 TUNDRA from Jul. ’07 Prod. (OM34463U)
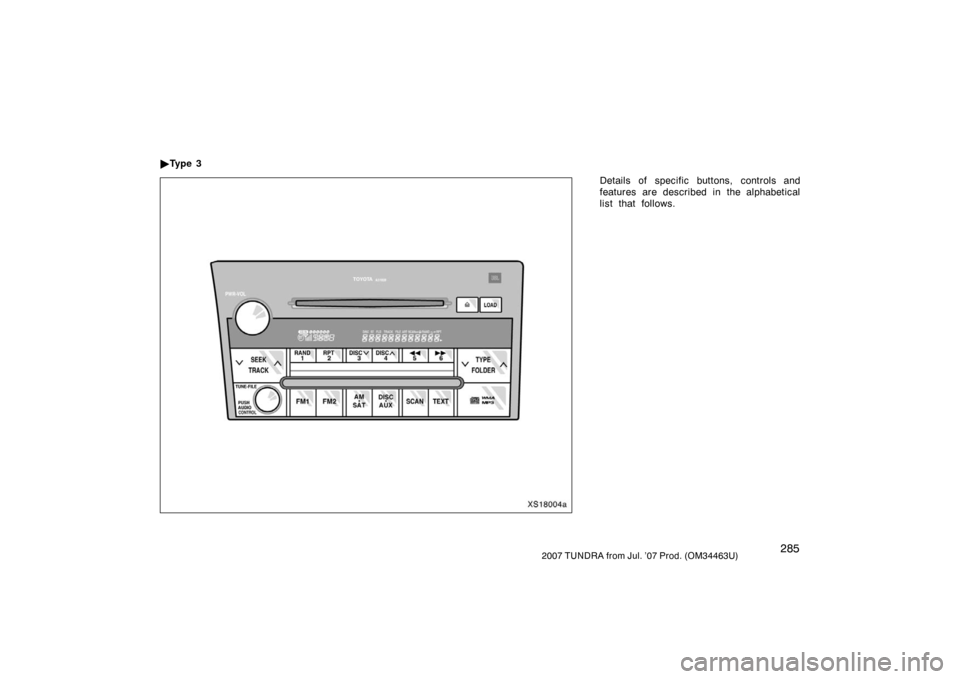
Details of specific buttons, controls and
features are described in the alphabetical
list that follows.
�
Ty p e 3
XS18004a
Page 295 of 611

1 2 3 4 5 6 (Preset buttons)
These buttons are used to preset and
tune in radio stations.
To preset a station to a button: Tune in
the desired station.")
2862007 TUNDRA from Jul. ’07 Prod. (OM34463U)
1 2 3 4 5 6 (Preset buttons)
These buttons are used to preset and
tune in radio stations.
To preset a station to a button: Tune in
the desired station. (See “TUNE·FILE” or
“SEEK/TRACK”.) Push and hold down the
button until you hear a beep—this will set
the station to the button. The preset but-
ton number will appear on the display.
To recall a preset station: Push the button
for the station you want. The preset but-
ton number and station frequency will ap-
pear on the display.
This radio can store one AM and two FM
stations for each button. (The display will
show “AM”, “FM1” or “FM2” when you
push “AM·SAT”
∗, “FM1” or “FM2” button.)
XM
� Satellite Radio∗—
These buttons are used to preset and
tune in radio channels.
To preset a channel to a button: Tune in
the desired channel. (See “TUNE·FILE” or
“SEEK/TRACK”.) Push and hold down the
button until you hear a beep—this will set
the channel to the button. The preset but-
ton number will appear on the display. To recall a preset channel: Push the but-
ton for the channel you want. The preset
button number and channel number will
appear on the display.
This radio can store three XM
� channels
for each button. (The display will show
“SAT1”, “SAT2” or “SAT3” when you push
“AM·SAT”
∗ button.)
∗: Use of satellite radio requires XM�
tuner and service. Contact your Toyota
dealer for details.
(Eject button)
This button is used to eject one or all
compact discs.
To eject the current compact disc, push
and release the compact disc eject button.
To eject a specific disc, push “ �” (preset
button 3) or “ �” (preset button 4) until the
number of the disc you want to eject is
displayed. Push and release the eject but-
ton.
To eject all discs at a time, press and
hold the eject button until you hear a
beep. The last compact disc played before
pushing the button will be ejected first. If
the ejected disc is not removed for a long
time, the eject function will be cancelled.
(Reverse/Fast�forward button)
Push and hold “
” (preset button 6) or
“
” (preset button 5) to fast forward or
reverse within a compact disc. When you
release the button, the compact disc play-
er will resume playing.
AM·SAT (AM band and XM
� Satellite Ra-
dio∗)
Push the “AM·SAT”
∗ button to turn on the
radio and select the AM or XM
� band.
“AM”, “SAT1”, “SAT2” or “SAT3” will ap-
pear on the display.
Error messages
If the satellite radio tuner malfunctions,
your audio system will display following
error messages.
“ANTENNA”:
�The XM� antenna is not connected.
Check whether the XM
� antenna cable
is attached securely.
�A short −circuit occurs in the antenna or
the surrounding antenna cable. See a
Toyota certified dealer.
Page 297 of 611

Error messages
If the player malfunctions, your audio sys-
tem will display following error messages.
“WAIT”: The compact disc player unit
may be to")
2882007 TUNDRA from Jul. ’07 Prod. (OM34463U)
Error messages
If the player malfunctions, your audio sys-
tem will display following error messages.
“WAIT”: The compact disc player unit
may be too hot. Allow the player to cool
down.
“ERROR 1”: The disc may be dirty, dam-
aged or inserted incorrectly (up −side
down). Clean the disc and re −insert it.
“NO DISC”: Eject the disc. Set the disc
again.
“ERROR 3”: There is a problem inside
the system. Eject the disc. Set the disc
again.
“ERROR 4”: Over−current. Ask your
Toyota dealer to inspect.
If “NO MUSIC” appears on the display,
it indicates that a disc with no MP3/WMA
data has been inserted. Remove the disc
from the player and insert an MP3/WMA
data disc.
If the malfunction still exists, take your
vehicle to your Toyota dealer. �
DISC �
Use these buttons to select a disc you
want to listen to.
Push “ �” (preset button 3) or “� ” (preset
button 4) until the number of the disc you
want to listen appears on the display.
FM1 FM2
Push the “FM1” or “FM2” button to turn on
the radio and select the FM band. “FM1”
or “FM2” will appear on the display. This
system allows you to set twelve FM sta-
tions, two for each of the preset button.
TYPE/FOLDER (Type/Folder up/down)
XM
� Satellite Radio∗—
When you push the “� ” or “�” side of
the “TYPE/FOLDER” button while receiving
a XM
� channel, the current channel cate-
gory appears on the display.
When the channel category appears, push
either “ �” or “ �” side of the
“TYPE/FOLDER” button to switch to the
next or previous category.
∗: Use of satellite radio requires XM�
tuner and service. Contact your Toyota
dealer for details. MP3/WMA player
To skip up or down to a different folder:
Push “
�” or “ �” side of the
“TYPE/FOLDER” several times until the
number of the folder you want to listen to
appears on the display.
To jump to the first file in the first folder:
Push and hold the “� ” side of the button
until you hear a beep.
When playing a disc featuring both audio
data (CD −DA) and MP3/WMA files, audio
data (CD −DA) is played.
Page 309 of 611
3002007 TUNDRA from Jul. ’07 Prod. (OM34463U)
The rear seat entertainment system can
be operated with the rear seat entertain-
ment system controller and buttons on the
DVD player unit. The system cannot be
operated by touching the switches on the
screen directly.
CAUTION
Do not disassemble or modify the
controller. It may cause an accident,
fire or electric shock.
NOTICE
Keep the controller away from direct
sunlight, high heat and high humidity.
These conditions could cause the
case to deform or the battery to ex-
plode or leak.
BEFORE USING THE CONTROLLER
(for new vehicle owners)
A battery is already set in the control-
ler with an insulating sheet, which pre-
vents the battery from being dis-
charged. Before using the controller,
remove the insulating sheet according
to the following procedure.
Z17448
1. Remove the cover of the controlleras shown.
—Rear seat entertainment
system controller
Page 312 of 611
3032007 TUNDRA from Jul. ’07 Prod. (OM34463U)
1. “DVD” buttonThis button turns on the DVD mode.
2. “VIDEO” button This button causes the display to use
the video signal from an external video
device.
3. “OFF” button
This button turns off the rear seat en-
tertainment system.
4. Joystick This joystick selects a control switch,
mode switch on the screen or the
menu for the disc.
5. “ENT” button
This button inputs the selected switch
or the selected menu for the disc.
6. “FOLDER
” button
This button selects a desired folder.
7. “FOLDER
” button
This button selects a desired folder.
8. “
” button
This button fast forwards a screen
when the DVD player is operated.
—Control buttons
� Controller
Z18004y
Page 315 of 611
3062007 TUNDRA from Jul. ’07 Prod. (OM34463U)
1. “DVD” buttonThis button turns on the rear seat en-
tertainment system and selects the
mode.
2. “VIDEO” button
This button causes the display to use
the video signal from an external video
device.
3. “
TRACK·CHAPTER” button
This button skips directly to a desire
track or chapter.
4. “
” button
This button plays or pauses a screen
when the DVD player is operated.
5. “OPTION” button
This button indicates the control
switches on the screen when the DVD
player is operated.
6. Joystick/“ENT” button
The joystick selects a control switch
mode switch on the screen or the
menu for the disc.
The “ENT” button inputs the selected
switch or the selected menu for the
disc.
�
Buttons on the DVD player unit
XS18021
Page 320 of 611
3112007 TUNDRA from Jul. ’07 Prod. (OM34463U)
8 cm (3 in.) compact disc singles
Your compact disc player needs an adap-
tor to play compact disc singles. Compact
disc singles are about 8 cm (3 in.) in di-
ameter−smaller than standard di scs.
XS18024
EJECTING THE DISC
Push the “
” button.
Z17461
The DVD player can be operated with the
controller buttons directly.
1. “DVD” button
2. “SET UP” button
3. “MENU” button
4. “AUDIO” button
5. “SUB TITLE” button
6. “ANGLE” button
7. “SIZE” button
8. “SEARCH” button
9. “TOP MENU” button
10. “
”, “”, “” and “” buttons
—DVD player operation
switches
Page 324 of 611

XS18026
DVD player unit
To turn off the switches on the screen,
push the “OPTION” button on the control-
ler once again or push the “Hide Buttons")
3152007 TUNDRA from Jul. ’07 Prod. (OM34463U)
XS18026
DVD player unit
To turn off the switches on the screen,
push the “OPTION” button on the control-
ler once again or push the “Hide Buttons”
on the screen.
—DVD player operation
NOTE: The playback condition of some
DVD video discs may be determined by
the DVD video software producer. This
DVD player plays discs as the software
producer intended. Therefore, some
functions may not work properly. Be
sure to read the instruction manual for
the DVD video disc separately provided.
For detailed information about DVD
video discs, see “—DVD video disc
information” on page 335 in this
Section.
Precautions for DVD video discs
When recording on a DVD video, video
CD or audio tracks may not record in
some cases while the menu is displayed.
As audio will not play in this case, verify
that the video tracks are playing and then
activate playback.
The title/chapter number and playback
time display may not appear while playing
back certain DVD video discs.CAUTION
Conversational speech on some DVDs
is recorded at a low volume to em-
phasize the impact of sound effects.
If you adjust the volume assuming
that the conversations represent the
maximum volume level available for
the DVD, you may be startled by
louder sound effects or when you
change to a different audio source.
Loud sounds may have a significant
impact on the human body or pose a
driving hazard. Keep this in mind
when you adjust the volume.

The rear seat entertainment system can
be operated with the rear seat entertain-
ment system controller and buttons on the
DVD player unit. The system")

1. “DVD” buttonThis button turns on the DVD mode.
2. “VIDEO” button This button causes the display to use
the video signal from an external vide")

1. “DVD” buttonThis button turns on the rear seat en-
tertainment system and selects the
mode.
2. “VIDEO” button
This button causes the display")

8 cm (3 in.) compact disc singles
Your compact disc player needs an adap-
tor to play compact disc singles. Compact
disc singles are about 8 cm (3 in.)")