Page 85 of 161
72
(b) Editing memory points
The icon, attribute, name, location and/or
telephone number of a registered memory
point can be edited.
1. Push the
“MENU” button to display
the “Menu” screen and touch the
“My
Places”
switch.
3U020c
2. Touch the “Edit” switch of the
“Memory Points”.
3U021a
The screen lists the memory points.
“Date”: Touch this switch to list the memory
points in order of the registered date.
“Icon”: Touch this switch to list the memory
points in order of the icon type.
“Name”: Touch this switch to list the memory
points in alphabetical order.
“Attribute”: Touch this switch to list the
memory points in order of the home and quick
access number.
Touch the desired memory point switch to dis-
play the memory point data screen.
3U022c
3. Touch the switch which you wish to
edit.
Page 86 of 161
73
�To change “Icon”
3U023a
Touch the desired icon.
You can turn the page by touching
“Page
1”
, “Page 2” or “With Sound” switch.
“With Sound”: To display sound icons.
When your vehicle approaches the memory
point, the sound which you chose will sound.
3U024a
Touch the desired sound icon.
The next screen appears when you touch the
“Bell (with direction)” switch.
3U100a
Touch the direction switches and adjust the
direction. Touch the
“Enter” switch. The
bell sounds only when your vehicle ap-
proaches this point in the direction that you
set.
Page 88 of 161
75
3U028c
To delete an attribute, touch the “Yes”
switch. To return to the previous screen,
touch the “No” or “Back” switch.
�To change “Name”
3U029a
Touch the alphabet and/or numeral keys.
When the entry has been completed, touch
the
“OK” switch on the screen.
The previous screen will be displayed.
�“Show Name”
You can set the name of a memory point to
be displayed or not on the map.
To show the name, touch the
“On”
switch. Not to show it, touch the “Off”switch.
�To change “Location”
3U030a
Touch the eight direction switch to move
the cursor to the desired point on the
map.
Touch the
“Enter” switch and the previous
screen will be displayed.
Page 89 of 161
76
�To change “Phone #” (telephone num-
ber)
3U031a
Touch numeral keys.
When the entry has been completed, touch
the
“OK” switch on the screen.
The previous screen will be displayed.
(c) Deleting memory points
1. Push the “MENU” button to display
the “Menu” screen and touch the
“My
Places”
switch.
3U032b
2. Touch the “Delete” switch of the
“Memory Points”.
3U033a
3. Touch the corresponding switch. To
delete all memory points, touch the
“Delete All” switch.
For efficient memory point search, memory
points can be sorted by the
“Date”,
“Icon”, “Name” or “Attribute” switch.
To delete, touch the
“Yes” switch. To cancel
the deletion, touch the “No” switch.
Page 90 of 161

77
Area to avoid
Areas you wish to avoid because of traffic
jams, construction work or other reasons
can be registered as areas to avoid.
Push the
“MENU” button to display the
“Menu” screen and then touch the
“My
Places”
switch to display the following
screen.
3U037b
INFORMATION
If a destination is inputted in the area to
avoid or the route calculation cannot be
made without running through the area
to avoid, a route passing through the
area to avoid may be shown.
(a) Registering area to avoid
1. Touch the “Register” switch of the
“Areas to avoid”.
3U038b
2. Enter the location in the same way as
inputting a destination, or display the map
of the area you wish to avoid. (See page
24.)
INFORMATION
Up to 10 locations can be registered as
point/area to avoid. If there are 10 loca-
tions already registered, the message
“Unable to register additional points.
Perform operation again after deleting
unnecessary points.” appears on the
screen.
3U039a
3. Set the cursor in the center of the area
to avoid, and touch the
“Enter” switch.
Page 91 of 161
78
3U040a
4. Touch either or switch to
change the size of the area to avoid.
(b) Editing area to avoid
1. Touch the “Edit” switch of the “Areas
to Avoid” to display the “Edit Area to
Avoid” screen.
3U041a
2. To edit an area to avoid, touch the cor-
responding switch.
3U042a
3. Touch the “Name”, “Location” or
“Area Size” switch on this screen.
Page 92 of 161
79
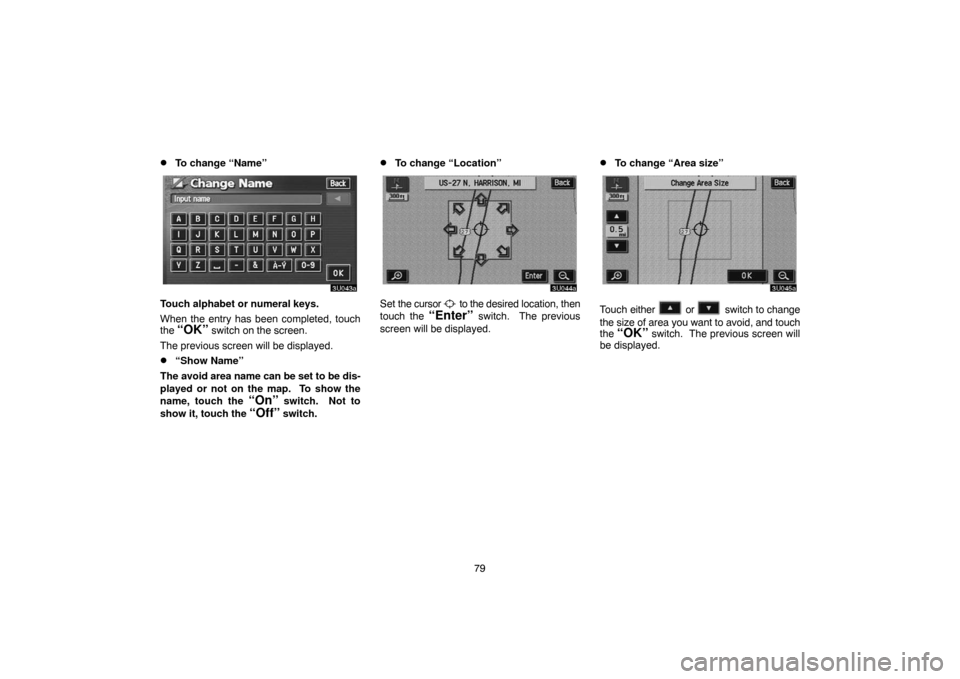
�To change “Name”
3U043a
Touch alphabet or numeral keys.
When the entry has been completed, touch
the
“OK” switch on the screen.
The previous screen will be displayed.
�“Show Name”
The avoid area name can be set to be dis-
played or not on the map. To show the
name, touch the
“On” switch. Not to
show it, touch the
“Off” switch.
�To change “Location”
3U044a
Set the cursor to the desired location, then
touch the
“Enter” switch. The previous
screen will be displayed.
�To change “Area size”
3U045a
Touch either or switch to change
the size of area you want to avoid, and touch
the
“OK” switch. The previous screen will
be displayed.
Page 93 of 161
 Deleting area to avoid
1. Touch the “Delete” switch of the
“Areas to Avoid” to display the “Delete
Area to Avoid” screen.
3U046a
2. Touch the area you wish to delete from
the list.")
80
(c) Deleting area to avoid
1. Touch the “Delete” switch of the
“Areas to Avoid” to display the “Delete
Area to Avoid” screen.
3U046a
2. Touch the area you wish to delete from
the list.
“Delete all”: To delete all registered areas to
avoid in the system.
3. To delete, touch the
“Yes” switch. To
cancel the deletion, touch the
“No”
switch.
Setup
You can set the items shown on the “Set-
up” screen.
1. Push the
“MENU” button.
3U047c
2. To display the “Setup” menu screen,
touch the
“Setup” switch. Touch the
items you wish to set.
3U048b
3. Touch the “OK” switch on the screen
and then the previous screen will be dis-
played.
“Default”: This switch initializes all of the set-
tings.
“Calibration”: You can adjust the current ve-
hicle position mark manually.
“Distance”: You can select “km” or “miles” as
the distance unit.
“Estimated Travel Time”: You can set the
system to display the travel time to the des-
tination on the route guidance screen.
“Auto Reroute”: You can set the system to
automatically search for a new route to the
destination.
“Adjust Time Zone”: You can select your de-
sired time zone.
“Auto Voice Guidance”: You can set the au-
tomatic voice guidance.
 Editing memory points
The icon, attribute, name, location and/or
telephone number of a registered memory
point can be edited.
1. Push the
“MENU” button to display
the “Menu” screen and")


 Editing area to avoid
1. Touch the “Edit” switch of the “Areas
to Avoid” to display the “Edit Area to
Avoid")