Page 223 of 458
223
27p300
b) all at once1. Touch the “Delete All” switch on the “Outgoing Calls” or “Incoming Calls”
screen.
27p301
2. Touch the “Yes” switch. (f) Setting the security
When you set the security, you can pre-
vent people from using some functions
of the hands�free system. It is useful
when you leave your vehicle with the
hotel or you do not want others to see
the data you registered.
When you set or unlock the security, you
have to input the security code. Be sure
to change the default code when you use
the security for the first time.
Page 224 of 458
224
27p302
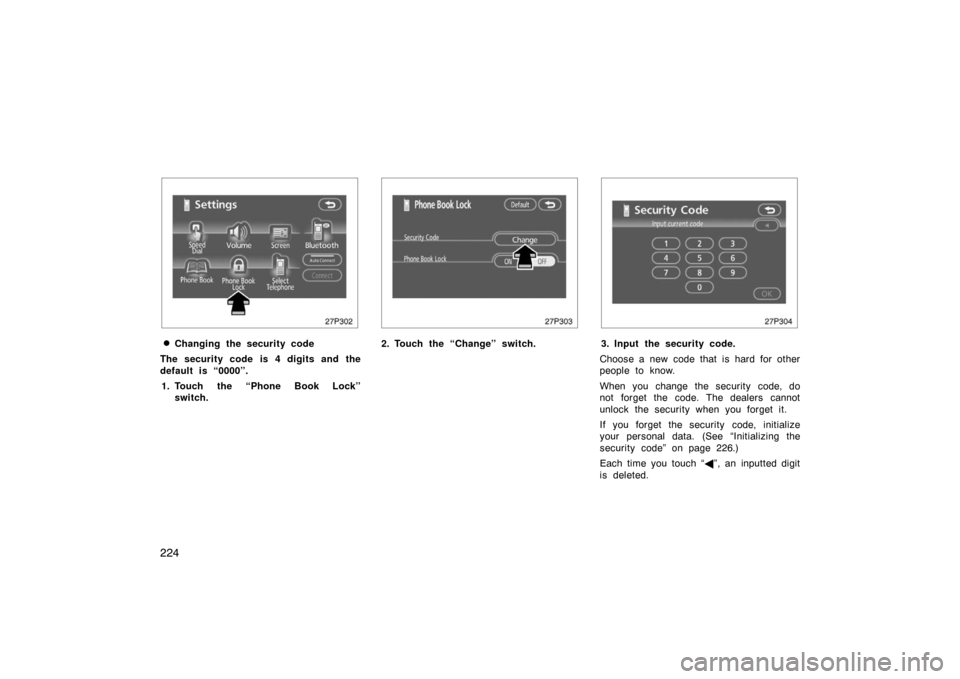
�Changing the security code
The security code is 4 digits and the
default is “0000”. 1. Touch the “Phone Book Lock” switch.
27p303
2. Touch the “Change” switch.
27p304
3. Input the security code.
Choose a new code that is hard for other
people to know.
When you change the security code, do
not forget the code. The dealers cannot
unlock the security when you forget it.
If you forget the security code, initialize
your personal data. (See “Initializing the
security code” on page 226.)
Each time you touch “ �”, an inputted digit
is deleted.
Page 225 of 458
225
27p305
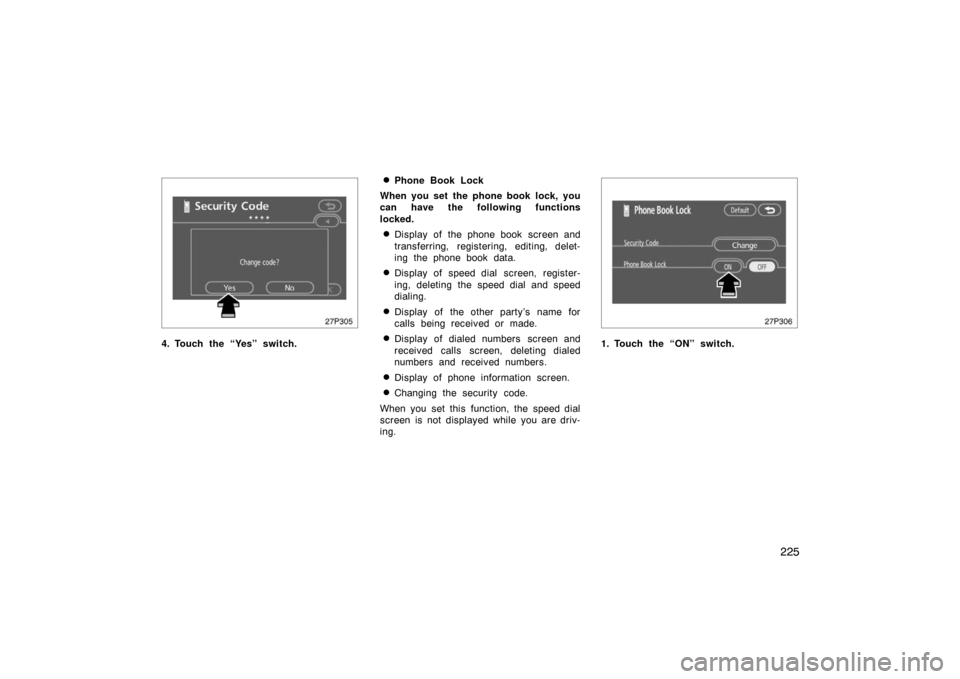
4. Touch the “Yes” switch.
�Phone Book Lock
When you set the phone book lock, you
can have the following functions
locked.
�Display of the phone book screen and
transferring, registering, editing, delet-
ing the phone book data.
�Display of speed dial screen, register-
ing, deleting the speed dial and speed
dialing.
�Display of the other party’s name for
calls being received or made.
�Display of dialed numbers screen and
received calls screen, deleting dialed
numbers and received numbers.
�Display of phone information screen.
�Changing the security code.
When you set this function, the speed dial
screen is not displayed while you are driv-
ing.
27p306
1. Touch the “ON” switch.
Page 251 of 458

(Type 1 and Type 2 only)
When the audio sound becomes difficult to
be heard due to road noise, wind noise,
etc. during driving, the system adjusts to
the optimum")
251
AUTOMATIC SOUND LEVELIZER (ASL)
(Type 1 and Type 2 only)
When the audio sound becomes difficult to
be heard due to road noise, wind noise,
etc. during driving, the system adjusts to
the optimum volume and tone quality ac-
cording to the noise level.
Vehicles with compact disc changer:
Touch the “ASL” switch.
When the system is on, the sound adjust-
ment level is displayed on the screen.
Vehicles without compact disc changer:
Touch the “DSP” switch to display the
“ASL” screen.
Touch “High”, “Mid” or “Low” and then
“OK”.
When you touch “High”, you can obtain
higher sensitivity of the sound levelizer.
When you touch “Low”, the sensitivity will
be lowered.
Touching “Off” turns the system off.YOUR RADIO ANTENNA
To remove an antenna on the roof, care-
fully turn it counterclockwise.
NOTICE
To prevent damage to the antenna,
make sure to remove it before driving
through an automatic car wash.
YOUR COMPACT DISC PLAYER
When you insert a disc, gently push it in
with the label side up.
The discs set in the player are played
continuously, starting with disc number 1.
The disc number of the disc currently be-
ing played, the track number and the time
from the beginning of the program appear
on the display.
Type 1 only:
When play of one disc ends, the first
track of the following disc starts. When
play of the final disc ends, play of the
first disc starts again.
The player will skip any empty disc num-
ber.
Page 274 of 458
274
26p239b
(d) Selecting a desired folder
“FOLDER” switch:
Touch either side of the “FOLDER” switch.
The player will start playing the file in the
selected folder.
Folder list screen:
Touch the desired folder displayed on the
folder list screen.
The folder list screen cannot be displayed
while driving.
For details the folder list screen, see “Dis-
playing the folder list” on page 276.
26p240a
(e) Selecting a desired file
“TRACK” button:
Push the “SEEK·TRACK” button. The play-
er will start playing the selected file from
the beginning.
File list screen:
Touch the desired file displayed on the file
list screen.
The file list screen cannot be displayed
while driving.
For details about the file list screen, see
“Displaying the file list” on page 276.“TUNE·FILE” knob:
Turn the knob clockwise to search up the
files. Turn the knob counterclockwise to
search down the files.
Page 279 of 458

279
If you install an audio system other than
a genuine audio system, you will not be
able to use the AUX adapter.NOTICE
To ensure correct audio system op-
erations:
�Be careful not to spill beverages
over the audio system.
� The use of a cellular phone inside
or near the vehicle may cause a
noise from the speakers of the au-
dio system which you are listening
to. However, this does not indicate
a malfunction.
RADIO RECEPTION
Usually, a problem with radio reception
does not mean there is a problem with
your radio—it is just the normal result of
conditions outside the vehicle.
For example, nearby buildings and terrain
can interfere with FM reception. Power
lines or telephone wires can interfere with
AM signals. And of course, radio signals
have a limited range. The farther you are
from a station, the weaker its signal will
be. In addition, reception conditions
change constantly as your vehicle moves. Here are some common reception prob-
lems that probably do not indicate a prob-
lem with your radio:
FM
Fading and drifting stations—Generally, the
effective range of FM is about 40 km (25
miles). Once outside this range, you may
notice fading and drifting, which increase
with the distance from the radio transmit-
ter. They are often accompanied by distor-
tion.
Multi
−path—FM signals are reflective,
making it possible for two signals to reach
your antenna at the same time. If this
happens, the signals will cancel each oth-
er out, causing a momentary flutter or
loss of reception.
Static and fluttering—These occur when
signals are blocked by buildings, trees, or
other large objects. Increasing the bass
level may reduce static and fluttering.
Station swapping—If the FM signal you
are listening to is interrupted or weak-
ened, and there is another strong station
nearby on the FM band, your radio may
tune in the second station until the origi-
nal signal can be picked up again.
Audio system operating hints
Page 298 of 458

298
CAUTION
Do not use the windshield air flow
switch during cooled air operation in
extremely humid weather. The differ-
ence between the temperature of the
outside air and that of the windshield
could cause the outer surface of the
windshield to fog up blocking your
vision.
27p126
�The light sensor is located on the driv-
er ’s side edge of the instrument panel.
If you put anything on this area or
cover the area, the sensor function
may be adversely affected.
�To cool off your Toyota after it has
been parked in the hot sun, drive with
the windows open for a few minutes.
This vents the hot air, allowing the air
conditioning to cool the interior more
quickly.
�Make sure the air intake grilles in front
of the windshield are not blocked (by
leaves or snow, for example).
�On humid days, do not blow cold air
on the windshield. The windshield could
fog up because of the difference in air
temperature on the inside and outside
of the windshield.
�Keep the area under the front seats
clear to allow air to circulate through-
out the vehicle.
�On cold days, set the fan speed to
high for a minute to help clear the
intake ducts of snow or moisture. This
can reduce the amount of fogging on
the windows.
�When driving on dusty roads, close all
windows. If dust thrown up by the ve-
hicle is still drawn into the vehicle after
closing the windows, it is recommended
that the air intake selector be set to
OUTSIDE AIR and the fan speed se-
lector to any setting except “OFF”.
�If following another vehicle on a dusty
road, or driving in windy and dusty
conditions, it is recommended that the
air intake selector be temporarily set to
RECIRCULATE, which will close off the
outside passage and prevent outside
air and dust from entering the vehicle
interior.
(c) Operating tips
Page 303 of 458

303
OPERATION OF INSTRUMENTS AND
CONTROLS
Other equipment
Clock304
. . . . . . . . . . . . . . . . . . . . . . . . . . . . . . . . . . . . .\
. . . . . . . . . . . . . . . . .
Rear view monitor system 304
. . . . . . . . . . . . . . . . . . . . . . . . . . . . . . . . . . .
Power outlets 307
. . . . . . . . . . . . . . . . . . . . . . . . . . . . . . . . . . . . \
. . . . . . . . . .
Rear console box 308
. . . . . . . . . . . . . . . . . . . . . . . . . . . . . . . . . . . . \
. . . . . . .
Glove boxes 308
. . . . . . . . . . . . . . . . . . . . . . . . . . . . . . . . . . . . \
. . . . . . . . . . .
Garage door opener 309
. . . . . . . . . . . . . . . . . . . . . . . . . . . . . . . . . . . . \
. . . .
Auxiliary boxes 313
. . . . . . . . . . . . . . . . . . . . . . . . . . . . . . . . . . . . \
. . . . . . . . .
Cup holders 314
. . . . . . . . . . . . . . . . . . . . . . . . . . . . . . . . . . . . \
. . . . . . . . . . . .
Bottle holders 314
. . . . . . . . . . . . . . . . . . . . . . . . . . . . . . . . . . . . \
. . . . . . . . . .
Tie −down hooks 315
. . . . . . . . . . . . . . . . . . . . . . . . . . . . . . . . . . . . \
. . . . . . . .
Luggage storage box 315
. . . . . . . . . . . . . . . . . . . . . . . . . . . . . . . . . . . . \
. . .
Luggage cover 316
. . . . . . . . . . . . . . . . . . . . . . . . . . . . . . . . . . . . \
. . . . . . . . .
Floor mat 317
. . . . . . . . . . . . . . . . . . . . . . . . . . . . . . . . . . . . \
. . . . . . . . . . . . . .
SECTION 2– 10
 all at once1. Touch the “Delete All” switch on the “Outgoing Calls” or “Incoming Calls”
screen.
27p301
2. Touch the “Yes” switch. (f) Setting the security
When you set th")
 Selecting a desired folder
“FOLDER” switch:
Touch either side of the “FOLDER” switch.
The player will start playing the file in the
selected folder.
Folder list screen:
Touch t")