Page 133 of 374

11 9
When the headlight switch is on with all
the doors locked, pushing the “LOCK” but-
ton on the wireless remote control key
turns off the headlights.
NOTE: *The time before turning off the
lights can be changed. Ask your Toyota
dealer for details.
NOTICE
To prevent the battery from being dis-
charged, do not leave the lights on
for a long period when the engine is
not running.
Daytime running light system
The headlights turn on at reduced intensi-
ty when the parking brake is released with
the engine started, even with the light
switch in the “OFF” position. They will not
go off until the ignition switch is turned
off.
To turn on the other exterior lights and
instrument panel lights, twist the knob to
the position 1.
Twist the knob to the position 2 to turn
the headlights to full intensity for driving
at night.High�Low beams—For high beams, turn
the headlights on and push the lever away
from you (position 1). Pull the lever to-
ward you (position 2) for low beams.
The headlight high beam indicator light
(blue light) on the instrument panel will
tell you that the high beams are on.
Flashing the high beam headlights
(position 3)—Pull the lever all the way
back. The high beam headlights turn off
when you release the lever.
You can flash the high beam headlights
with the knob turned to “OFF”.TURN SIGNALS
To signal a turn, push the headlight/
turn signal lever up or down to position
1.
The key must be in the “ON” position.
The lever automatically returns after you
make a turn, but you may have to return
it by hand after you change lanes.
To signal a lane change, move the lever
up or down to the pressure point (position
2) and hold it.
If the turn signal indicator lights (green
lights) on the instrument panel flash faster
than normal, a front or rear turn signal
bulb is burned out. See “Replacing light
bulbs” on page 343.
Page 205 of 374

191
TRAF (Traffic announcement function)
button
When you push the “TRAF” button, “TRAF
SEEK” appears on the display and the
radio will start seeking any traffic program
station.
If no traffic program station is found, “NO
TRAF INFO” appears on the display for a
few seconds and the display returns to
the previous mode.
TYPE (Program type) button
When you push this button, the current
program type receiving from RDS station
appears on the display.
If the system receives no RDS stations,
“NO PTY” appears on the display.
Each time you push the “�” or “ �”, the
program type changes as in the following:
�ROCK
�EASY LIS (Easy listening)
�CLS/JAZZ (Classical music and jazz)
�R&B (Rhythm and Blues)
�INFORM (Information)
�RELIGION
�MISC
�ALERT (Emergency message)
With the program type displayed, push the
“SEEK/TRACK” or “SCAN” button. You can
seek or scan for the station broad casting
the same type of program.
XM \b satellite radio*—
When you push the “� ” or “�” side of
the “TYPE” button while receiving a XM \b
channel, the current channel category ap-
pears on the display.
When the channel category appears, push
either “ �” or “ �” side of the “TYPE” but-
ton to switch to the next or previous cate-
gory.
*: Use of satellite radio requires XM \b tuner
and service. Contact your Toyota dealer
for details.NOTICE
To ensure correct audio system op-
erations:
� Be careful not to spill beverages
over the audio system.
� Do not put anything other than a
cassette tape or Compact Disc into
the slot.
� The use of a cellular phone inside
or near the vehicle may cause a
noise from the speakers of the au-
dio system which you are listening
to. However, this does not indicate
a malfunction.
RADIO RECEPTION
Usually, a problem with radio reception
does not mean there is a problem with
your radio—it is just the normal result of
conditions outside the vehicle.
For example, nearby buildings and terrain
can interfere with FM reception. Power
lines or telephone wires can interfere with
AM signals. And of course, radio signals
have a limited range. The farther you are
from a station, the weaker its signal will
be. In addition, reception conditions
change constantly as your vehicle moves.
Audio system operating hints
Page 355 of 374

341
NOTICE
�Be sure the engine and all accesso-
ries are off before performing main-
tenance.
� When checking the battery, remove
the ground cable from the negative
terminal (“–” mark) first and rein-
stall it last.
� Be careful not to cause a short cir-
cuit with tools.
� Take care no solution gets into the
battery when washing it.
If the battery terminal is disconnected
or the battery is run down, the moon
roof may not operate automatically and
the jam protection function will not operate
correctly after you reconnect, replace or
recharge the battery with the moon roof
slide −opened or tilted up. In any of these
cases, you should return the moon roof to
normal. To return the moon roof to normal,
see “Electric moon roof” on page 31.
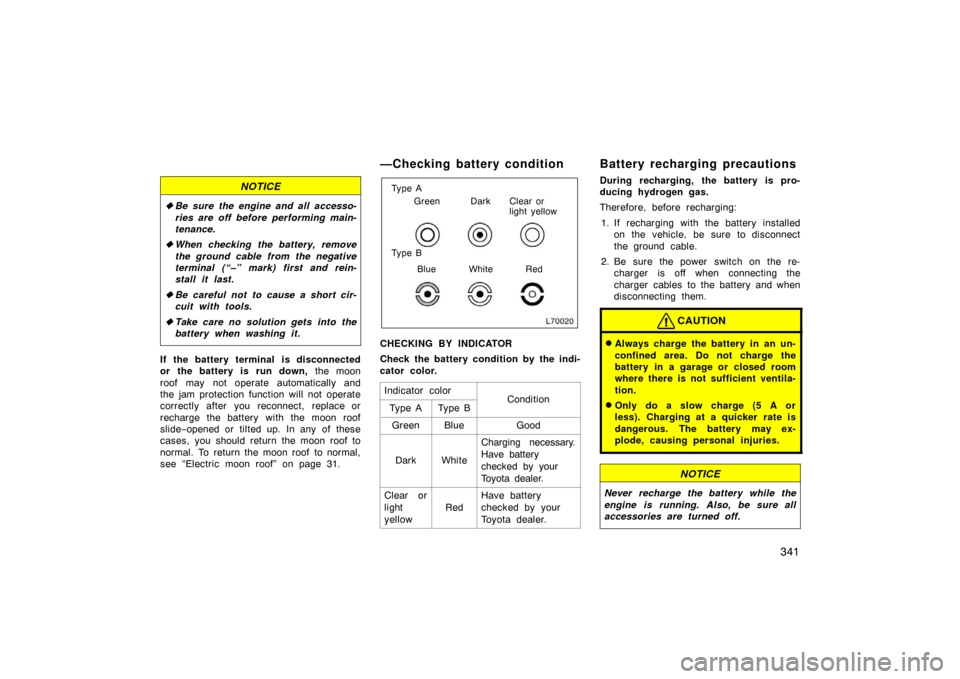
—Checking battery c ondition
Ty p e A
Ty p e BGreen Dark Clear or
light yellow
Blue White Red
CHECKING BY INDICATOR
Check the battery condition by the indi-
cator color. Indicator color
ConditionTy p e ATy p e B
GreenBlueGood
DarkWhite
Charging necessary.
Have battery
checked by your
Toyota dealer.
Clear or
light
yellow
Red
Have battery
checked by your
Toyota dealer.
Battery recharging precautions
During recharging, the battery is pro-
ducing hydrogen gas.
Therefore, before recharging:1. If recharging with the battery installed on the vehicle, be sure to disconnect
the ground cable.
2. Be sure the power switch on the re- charger is off when connecting the
charger cables to the battery and when
disconnecting them.
CAUTION
�Always charge the battery in an un-
confined area. Do not charge the
battery in a garage or closed room
where there is not sufficient ventila-
tion.
�Only do a slow charge (5 A or
less). Charging at a quicker rate is
dangerous. The battery may ex-
plode, causing personal injuries.
NOTICE
Never recharge the battery while the
engine is running. Also, be sure all
accessories are turned off.