Page 117 of 374
103
13C005
4. Replace the head restraint.
13C529
The lower anchorages for the child re-
straint system interfaced with the
FMVSS225 specification are installed in
the second seat.
The anchorages are installed in the clear-
ance between the seat cushion and seat-
back of left and center second seats.
Child restraint system interfaced with the
FMVSS213 specification can be fixed with
these anchorages. In this case, it is not
necessary to fix the child restraint system
with a seat belt on the vehicle.
13c571
Most upright
position
CHILD RESTRAINT SYSTEM INSTALLA-
TION1. Fold down the seatback and back to the most upright position until it
locks into place.
Make sure the seatback is locked secure-
ly.
—Installation with child
restraint lower anchorages
Page 119 of 374
105
CAUTION
�When using the lower anchorages
for the child restraint system, be
sure that there are no irregular ob-
jects around the anchorages or that
the seat belt is not caught.
�Push and pull the child restraint
system in different directions to be
sure it is secure. Follow all the
installation instructions provided by
its manufacturer.
�After securing the child restraint
system, never recline the seat.
�Do not install a child restraint sys-
tem on the rear seat if it interferes
with the lock mechanism of the
front seats. Otherwise, the child or
front seat occupant(s) may be killed
or seriously injured in case of sud-
den braking or a collision.
Page 211 of 374

197
(c) When the “TAPE” mode is selected
“
PROG ” button: Push this button
to select the other side of a cassette
tape.
“
TRACK ” button: Push the left or
right side to skip forward or backward to
locate the song you want to hear. For
details, see “SEEK TRACK button” on
page 189.
(d) When the “CD” or “DVD” mode is selected
“
DISC ” button: Use this button to
search a desired disc.
“
TRACK ” button: Use this button
to search a desired track or push this
button and hold it to fast forward or rever-
se. (e) Some basics
This system cannot be used if the audio
system is not turned on.
You cannot select “AM” or “FM” mode in
the rear seat if the “FM” or “AM” mode
is used on the front seats side.
If you select the same mode as the front
seats side, operating the controller will
affect the mode on the front seats side.
Vehicles with navigation system only:
�When the XM
\b satellite radio* is se-
lected in the front seat, the “CD” or
“DVD” mode cannot be selected in the
rear seat.
�When the “CD” or “DVD” mode is se-
lected in the rear seat, selecting the
XM \b satellite radio* in the front seat
will automatically change the “CD” or
“DVD” to “AM” mode in the rear seat.
CAUTION
This system is not designed for a
driver. So, the driver should not use
this system while driving.
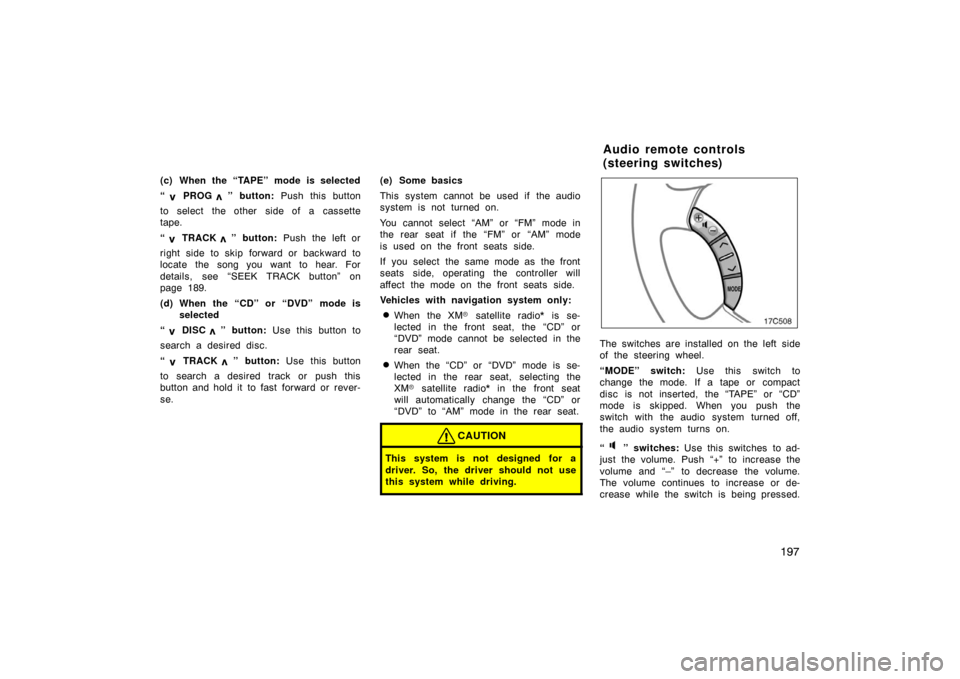
The switches are installed on the left side
of the steering wheel.
“MODE” switch: Use this switch to
change the mode. If a tape or compact
disc is not inserted, the “TAPE” or “CD”
mode is skipped. When you push the
switch with the audio system turned off,
the audio system turns on.
“
” switches: Use this switches to ad-
just the volume. Push “+” to increase the
volume and “–” to decrease the volume.
The volume continues to increase or de-
crease while the switch is being pressed.
Audio remote controls
(steering switches)
Page 218 of 374

204
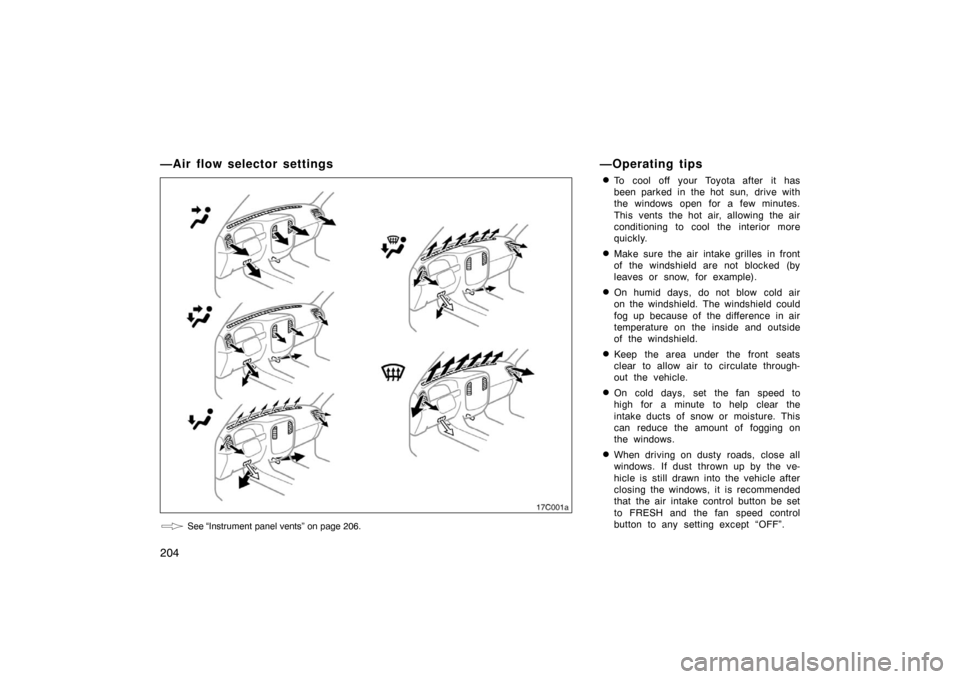
—Air flow selector settings
See “Instrument panel vents” on page 206.
—Operating tips
�To cool off your Toyota after it has
been parked in the hot sun, drive with
the windows open for a few minutes.
This vents the hot air, allowing the air
conditioning to cool the interior more
quickly.
�Make sure the air intake grilles in front
of the windshield are not blocked (by
leaves or snow, for example).
�On humid days, do not blow cold air
on the windshield. The windshield could
fog up because of the difference in air
temperature on the inside and outside
of the windshield.
�Keep the area under the front seats
clear to allow air to circulate through-
out the vehicle.
�On cold days, set the fan speed to
high for a minute to help clear the
intake ducts of snow or moisture. This
can reduce the amount of fogging on
the windows.
�When driving on dusty roads, close all
windows. If dust thrown up by the ve-
hicle is still drawn into the vehicle after
closing the windows, it is recommended
that the air intake control button be set
to FRESH and the fan speed control
button to any setting except “OFF”.
17C001a
Page 240 of 374
226
For front seats
The cup holder can be adjusted to the
size of cups by changing the separator
position or moving the separator arms.
You can use it as an accessory box by
removing the separator inside.
19C008
For front seat
To use a cup holder in the console box.1. Open the console box lid. Pull down the knob so that the cup holder swings
down.
2. While holding the console box lid with your hand, push down the cup holder
to be secured.
NOTICE
�When you use the cup holder in the
console box, make sure it is se-
curely locked.
� Do not rest your arm on the cup
holder in the console box.
� Wipe up spilt drink at once.
For second seats
For third seats (right�hand side)
Page 241 of 374
227
For third seats (left�hand side)
Card holder
You can store a card in the slot as
shown in the illustration.
Tie�down hooks
To secure your luggage, use the tie�
down hooks as shown above.
See “Cargo and luggage” on page 257 for
precautions when loading luggage.
NOTICE
Do not use the seat anchors instead
of the tie�down hooks.
Page 267 of 374

253
Ti r e relat ed ter m
Meaning
Cold tire inflation pressure
tire inflation pressure when the vehicl
e has been parked for at leas t 3 hour s
or more, or it has not been driven more than 1.5 km or 1 mile under that
condition
Maximum inflation pressurethe maximum cold inflation pressure to which a tire may be inflated and it is
shown on the sidewall of the tire
Recommended inflation pressurecold tire inflation pressure recommended by a manufacturer
Accessory weight
the combined weight (in excess of those standard items which may be replaced)
of automatic transmission, power steering, power brakes, power windows, pow-
er seats, radio, and heater, to the extent that these items are available as
factory −installed equipment (whether installed or not)
Curb weight
the weight of a motor vehicle with standard equipment including the maximum
capacity of fuel, oil, and coolant, and, if so equipped, air conditioning and addi-
tional weight optional engine
Maximum loaded vehicle weight
t he sum of —
(a) curb weight;
(b) accessory weight;
(c) vehicle capacity weight; and
(d) production options weight
Normal occupant weight68 kg (150 lb.) times the number of occupants specified in the second column
of Table 1 that follows
—Glossary of tire terminology
Page 271 of 374

257
When stowing cargo and luggage in
or on the vehicle, observe the follow-
ing:
� Put cargo and luggage in the lug-
gage compartment when at all
possible. Be sure all items are se-
cured in place.
� Be careful to keep the vehicle bal-
anced. Locating the weight as far
forward as possible helps maintain
the balance.
� For better fuel economy, do not
carry unneeded weight.
CAUTION
�To prevent cargo and l uggage
from sliding forward during
braking, do not stack anything
in the luggage compartment
higher than the seatbacks.
� Do not place anything on the
flattened seat or it may slide
forward during braking.
�Never allow anyone to ride in
the luggage compartment. It is
not designed for passengers.
They should ride in their seats
with their seat belts properly
fastened. Otherwise, they are
much more likely to suffer seri-
ous bodily injury, in the event
of sudden braking or a colli-
sion.
� Do not place anything on the
luggage cover. Such items may
be thrown about and possibly
injure people in the vehicle
during sudden braking or an
accident. Secure all items in a
safe place.
� Do not drive with objects left
on top of the instrument panel.
They may interfere with the
driver’s field of view. Or they
may move during sharp vehicle
acceleration or turning, and im-
pair the driver’s control of the
vehicle. In an accident they
may injure the vehicle occu-
pants.NOTICE
Do not load the vehicle beyond
the vehicle capacity weight giv-
en in Section 8.
Cargo and luggage—
—Stowage precautions