Page 137 of 177
 Radio Data System
Your audio system is equipped with Radio
Data Systems (RDS). RDS mode allows you
to receive text messages from radio stations
that utilize RDS transmitters.
When RDS is on,")
127
(d) Radio Data System
Your audio system is equipped with Radio
Data Systems (RDS). RDS mode allows you
to receive text messages from radio stations
that utilize RDS transmitters.
When RDS is on, the radio can
— only select stations of a particular program
type,
— display messages from radio stations,
— search for a stronger signal station.
RDS features are available for use only on FM
stations which broadcast RDS information.“TYPE � �” switch:
If the system receives no RDS stations, “NO
PTY” appears on the display.
Each time you touch the “TYPE �” or “TYPE
�” switch, the program type changes as fol-
lows:
�ROCK
�MISC (Miscellaneous)
�Inform (Information)
�Easy Lis (Easy listening)
�Cls/Jazz (Classical music and Jazz)
�R & B (Rhythm and Blues)
�Religion
�Alert (Emergency message)
“TYPE SEEK” switch:
When a program is set, “TYPE SEEK” switch
appears. Touch the switch and the system
starts to seek the station in the relevant pro-
gram type.
If any type program station is not found,
“NOTHING” appears on the display.
“MSG” (MESSAGE) switch:
If the system receives a radio text from an
RDS station, “MSG” appears on the display.
Touch the “MSG” switch, and a text message
is displayed on the screen.
In case a text message is not accepted in a
screen, you can touch the “MSG” switch and
hold it to display the rest of the message.
When the system can show the station name,
“RDS” appears on the display. Each time you
touch the “MSG” switch, indication on the dis-
play changes from the band to the station
name, to radio text in this order. After six sec-
onds pass, indication returns to the band.
Page 138 of 177
 Traffic announcement
“TRAF” switch:
A station that regularly broadcasts traffic in-
formation is automatically located.
When you push the “TRAF” switch, “TRAF
SEEK” appears on the")
128
(e) Traffic announcement
“TRAF” switch:
A station that regularly broadcasts traffic in-
formation is automatically located.
When you push the “TRAF” switch, “TRAF
SEEK” appears on the display and the radio
will start seeking any traffic program station.
If any traffic program station is not found,
“NOTHING” appears on the display.
If the traffic program station is found, the
name for traffic program station is displayed
and “TRAF” is lit for a while until traffic an-
nouncement is received.
— Cassette tape player
operation
(a) Inserting or ejecting a cassette tape
Put the cassette tape in the slot with the
exposed tape side to the right and lightly
push it in.
To stop and eject the cassette tape, push
the “
” button.
The player will automatically start when you
insert the cassette tape. At this time, “TAPE”
appears on the screen.
If a metal or chrome equivalent cassette tape
is put in the cassette player, the player will au-
tomatically recognize it and “MTL” appears
on the screen.
(b) Playing a cassette tape
Push the “TAPE” button if a cassette tape
is already in the slot.
Dolby
B NR∗:
If you are listening to a tape that was recorded
with Dolby Noise Reduction, touch the
switch on the screen. The symbol is high-
lighted in yellow.
The Dolby NR mode reduces tape noise by
about 10 dB. For best sound reproduction,
play your tapes with the Dolby NR on or off ac-
cording to the mode used for recording the
tape.
To play a tape recorded without Dolby NR,
touch the switch once again.
Page 139 of 177

129
∗ Dolby noise reduction manufactured under
license from Dolby Laboratories Licensing
Corporation.
“DOLBY” and the double D sym-
bol are trademarks of Dolby Laboratories
Licensing Corporation.
(c) Manual program selection
Program switch: Touch the “
��” switch
on the screen to select the other side of a cas-
sette tape. The display indicates which side
is currently selected (� indicates top side, �
indicates bottom side).
Fast forward switch: Touch the “��”
switch on the screen to fast forward a cas-
sette tape. “FF” appears on the screen.
To stop fast forwarding, touch the same
switch or push the “TAPE” button.
Rewind switch: Touch the “��” switch on
the screen to rewind a cassette tape. “REW”
appears on the screen.
To stop rewinding, touch the same switch or
push the “TAPE” button.Auto�reverse feature: After the cassette
player reaches the end of a tape, it automati-
cally reverses and begins to play the other
side, regardless of whether the cassette was
playing or fast forwarding.
(d) Automatic program selection
“RPT” switch: The repeat feature automati-
cally replays the current program.
Touch the “RPT” switch while the program is
playing. When the program ends, it will auto-
matically be rewound and replayed. Touch
the switch again to turn off the repeat feature.
There must be at least 5 seconds of blank
space between programs for the repeat fea-
ture to work correctly.
“SKIP” switch: The skip feature allows you
to fast forward past long stretches of blank
tape. This is especially useful at the end of
cassettes.
Touch the “SKIP” switch. The player will auto-
matically skip any blank portions of 15 se-
conds or more and play the next program. To
cancel it, touch the switch once again.
Page 140 of 177

130
“SEEK·TRACK” button: The automatic pro-
gram selection feature allows you to program
your cassette player to skip forward or back-
ward to locate the track you want to listen to.
You can skip up to 9 programs at a time.
Push this button on the “�” side to skip for-
ward. “FF” and the number will appear on the
screen. Push the button until the number of
programs you want to skip appears on the
screen. After that, the player will automatical-
ly skip forward.
When the end of the tape is reached, the play-
er automatically reverses sides and resumes
normal play.
Push this button on the “�” side to skip back-
ward. Push the button until “REW” and the
number of programs you want to skip appears
on the screen.
�If you set “REW 1”, the player will rewind
to the beginning of the current program.
�When counting the number of programs
you want to rewind, remember to count
the current program as well. For example,
if you want to rewind to a program that is
two before the program you are listening
to, push this button until “REW 3” appears
on the screen.
When the beginning of the tape is reached,
the player automatically resumes normal
play.
There must be at least 5 seconds of blank
space between programs for this feature to
work correctly.
“RPT”, “SKIP” or Automatic program
selection features: These features may not
work well with some spoken word, live or clas-
sical recordings.
— Compact disc player with
changer operation
(a) Inserting compact discs
The ignition switch must be in the “ACC” or
“ON” position.
Your compact disc player with changer can
store up to 6 discs.
�Setting a single compact disc:
1. Push the “LOAD” button briefly.
You can set a disc at the lowest empty disc
number.
Page 141 of 177

131 2. The red indicators of the slot start
blinking. After the red indicators change
to green, insert only one disc. If you need
to insert the next disc, repeat the same
procedure to insert another disc.
After insertion, the set disc is automatically
loaded.
If the label faces down, the disc cannot be
played. In this case, “CD CHECK” appears
on the display.
�Setting all the discs:
1. Push the “LOAD” button until you hear
a beep.
2. The red indicators of the slot start
blinking. After the red indicators change
to green, insert only one disc. After the
disc is loaded, the red indicators of the
slot start blinking again. It changes to
green, you can insert the next disc. Re-
peat this procedure until you insert all the
disc.
If you do not insert the discs within 15 sec-
onds after pushing the “LOAD” button, the op-
eration will be canceled automatically.
NOTICE
Do not insert one disc stacked on top of
another one or feed them in continuous-
ly, to prevent discs from getting stuck in
the player.
(b) Ejecting compact discs
�A single disc alone:
1. Touch the disc number you want to
eject on the screen.
The selected disc number is highlighted in
green.
2. Push the “
” button for the compact
disc briefly.
At this time, the red indicators of the slot start
blinking. After the disc is ejected, the red indi-
cators change to green.
�All the discs:
Push the “
” button for the compact
disc until you hear a beep.
Page 142 of 177
 Playing a compact disc
Push the “DISC” button if the discs are al-
ready loaded in the player.
“CD CHANGER” appea")
132
The numbers of the trays where the compact
disc is not set are dimmed.
(c) Playing a compact disc
Push the “DISC” button if the discs are al-
ready loaded in the player.
“CD CHANGER” appears on the screen.
The discs set in the player are played continu-
ously, starting with the last disc you inserted.
The disc number of the disc currently being
played, the track number and the time from
the beginning of the program appear on the
screen.
When play of one disc ends, the first track of
the following disc starts. When play of the fi-
nal disc ends, play of the first disc starts
again.
The player will skip any empty disc trays.
(d) Selecting a desired disc
Touch the desired disc number on the
screen.
The selected disc number is highlighted in
green.
The player will start playing the selected disc
from the first track.
(e) Searching for a desired disc
Touch the “DISC SCAN” switch.
With “DISC SCAN” highlighted in yellow, the
program at the beginning of each disc will be
played for 10 seconds. To continue listening
to the program of your choice, touch the
“DISC SCAN” switch a second time.
After all the tracks are scanned in one pass,
normal play resumes.
Page 143 of 177
 Selecting a desired track
“SEEK·TRACK” button: Use for direct ac-
cess to a desired track.
Push either side of the “SEEK·TRACK” but-
ton and hold it until the desired track number
ap")
133
(f) Selecting a desired track
“SEEK·TRACK” button: Use for direct ac-
cess to a desired track.
Push either side of the “SEEK·TRACK” but-
ton and hold it until the desired track number
appears on the screen. As you release the
button, the player will start playing the se-
lected track from the beginning.Fast forward:
Touch the
switch and hold it to fast for-
ward the disc. When you release the switch,
the compact disc player will resume playing
from that position.
Reverse:
Touch the
switch and hold it to reverse
the disc. When you release the switch, the
compact disc player will resume playing.
(g) Searching for a desired track
Touch the “SCAN” switch on the screen or
push the “SCAN” button.
“SCAN” will be highlighted in yellow on the
screen. The compact disc player will play the
next track for 10 seconds, then scan again.
To select a track, touch the “SCAN” switch on
the screen or push the “SCAN” button a sec-
ond time. If the player reaches the end of the
disc, it will continue scanning at track 1.
After all the tracks are scanned in one pass,
normal play resumes.
Page 144 of 177
 Other compact disc player functions
“RPT” switch: Use it for automatic repeat of
the track you are currently listening to.
Touch the switch while the track is playing.
When the track is fi")
134 (h) Other compact disc player functions
“RPT” switch: Use it for automatic repeat of
the track you are currently listening to.
Touch the switch while the track is playing.
When the track is finished, the player will au-
tomatically go back to the beginning of the
track and play the track again. To cancel it,
touch the switch once again.
“DISC RPT” switch: Use it for automatic re-
peat of the disc you are currently listening to.
Touch the switch while the disc is playing.
When the disc is finished, the player will auto-
matically go back to the beginning of the disc
and play the disc again. To cancel it, touch the
button once again.
“DISC RAND” switch: Use it for automatic
track selection for all the discs and play by the
system.
When the switch is touched, the system se-
lects a track in the discs of all the trays which
are set and plays it. To cancel it, touch the
switch once again.
When a track is skipped or the system is inop-
erative, touch the switch to reset.“RAND” switch: Use it for automatic and
random selection of the disc which you are
currently listening to.
When the switch is touched, the system se-
lects a track in the disc you are currently lis-
tening to. To cancel it, touch the switch once
again.
CD text only — To display the title of the disc
and truck, touch the “TITLE” switch. When
the “TITLE OFF” switch is touched, the dis-
play changes to the disc number screen.(i) If the player malfunctions
If the player or another unit equipped with the
player malfunctions, your audio system will
display following error messages.
If “CD CHECK” appears on the display: It
indicates that the disc is dirty, damaged or it
was inserted up− side down. Clean the disc
or insert it correctly.
If “CD ERROR” appears on the display:
The following causes are possible.
�There is a trouble inside the system. Eject
the disc.
�The inside of the player unit may be too
hot due to the very high ambient tempera-
ture. Eject the disc and allow the player to
cool down.
If the malfunction is not rectified: Take
your vehicle to your dealer.
 1
1 2
2 3
3 4
4 5
5 6
6 7
7 8
8 9
9 10
10 11
11 12
12 13
13 14
14 15
15 16
16 17
17 18
18 19
19 20
20 21
21 22
22 23
23 24
24 25
25 26
26 27
27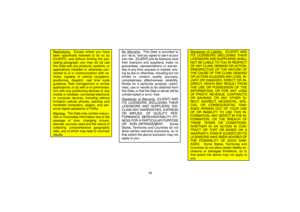 28
28 29
29 30
30 31
31 32
32 33
33 34
34 35
35 36
36 37
37 38
38 39
39 40
40 41
41 42
42 43
43 44
44 45
45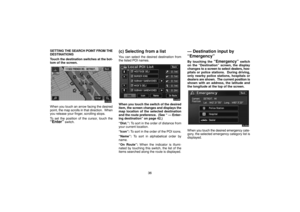 46
46 47
47 48
48 49
49 50
50 51
51 52
52 53
53 54
54 55
55 56
56 57
57 58
58 59
59 60
60 61
61 62
62 63
63 64
64 65
65 66
66 67
67 68
68 69
69 70
70 71
71 72
72 73
73 74
74 75
75 76
76 77
77 78
78 79
79 80
80 81
81 82
82 83
83 84
84 85
85 86
86 87
87 88
88 89
89 90
90 91
91 92
92 93
93 94
94 95
95 96
96 97
97 98
98 99
99 100
100 101
101 102
102 103
103 104
104 105
105 106
106 107
107 108
108 109
109 110
110 111
111 112
112 113
113 114
114 115
115 116
116 117
117 118
118 119
119 120
120 121
121 122
122 123
123 124
124 125
125 126
126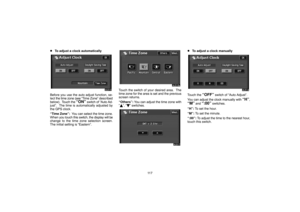 127
127 128
128 129
129 130
130 131
131 132
132 133
133 134
134 135
135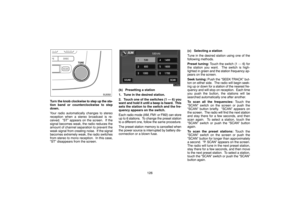 136
136 137
137 138
138 139
139 140
140 141
141 142
142 143
143 144
144 145
145 146
146 147
147 148
148 149
149 150
150 151
151 152
152 153
153 154
154 155
155 156
156 157
157 158
158 159
159 160
160 161
161 162
162 163
163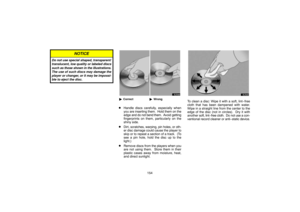 164
164 165
165 166
166 167
167 168
168 169
169 170
170 171
171 172
172 173
173 174
174 175
175 176
176