Page 98 of 138
xcviii
The entire route from the starting point to
the destination is displayed.You can preview the route from the
starting point to the destination.
1. Push the “MENU” button on the
navigation controller to display the
“Menu” screen and select the
“Route preview” switch on the
screen. The route preview screen ap-
pears.
To display the next destination
To preview the route to the next
destination
To preview the route to the next
destination fast
To stop previewing
To preview the route to the pre-
vious departure position
To preview the route to the pre-
vious departure position fast
To display the previous departure
position
Route preview
Page 102 of 138

cii
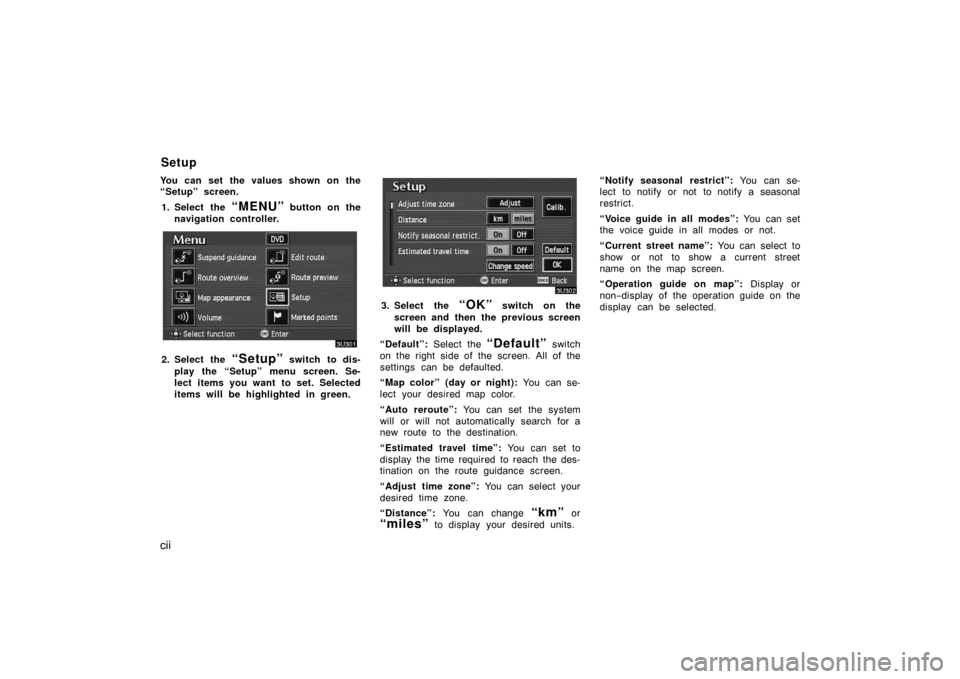
You can set the values shown on the
“Setup” screen.
1. Select the
“MENU” button on the
navigation controller.
2. Select the “Setup” switch to dis-
play the “Setup” menu screen. Se-
lect items you want to set. Selected
items will be highlighted in green.
3. Select the “OK” switch on the
screen and then the previous screen
will be displayed.
“Default”: Select the
“Default” switch
on the right side of the screen. All of the
settings can be defaulted.
“Map color” (day or night): You can se-
lect your desired map color.
“Auto reroute”: You can set the system
will or will not automatically search for a
new route to the destination.
“Estimated travel time”: You can set to
display the time required to reach the des-
tination on the route guidance screen.
“Adjust time zone”: You can select your
desired time zone.
“Distance”: You can change
“km” or
“miles” to display your desired units.“Notify seasonal restrict”: You can se-
lect to notify or not to notify a seasonal
restrict.
“Voice guide in all modes”: You can set
the voice guide in all modes or not.
“Current street name”: You can select to
show or not to show a current street
name on the map screen.
“Operation guide on map”: Display or
non−display of the operation guide on the
display can be selected.
Setup
Page 103 of 138
ciii
1. Push the “MENU” button on the
navigation controller.
2. Select the “Setup” switch.
3. Select your desired day and/or night
map color and then select the
“OK” switch to return the map
screen.
Select the
“Normal” switch to default
the map color.
Select the
“Auto” switch to select the
map color automatically.
When you select the
“Auto” switch, the
map color is changed in every three
month.When the “Auto reroute” feature is
turned on, the system will automatically
search for a new route to the destina-
tion if you leave the guidance route.
This feature does not operate while you
are driving on roads where the guid-
ance is not available.
To turn the “Auto reroute” mode on:
1. Push the
“MENU” button on the
navigation controller.
2. Select the “Setup” switch.
Map color Automatic rerouting
Page 104 of 138
civ
3. Select the “On” switch of “Auto
reroute”.
Selected switch is highlighted in green.
INFORMATION
If your vehicle leaves the guidance
route, the system searches for a new
route to the destination. The new
route may or may not take you back
to the previous route depending on
how far you are off the original guid-
ance route.
When the “Estimated travel time” fea-
ture is turned on, the time estimated to
reach the destination is displayed on
the route guidance screen.
To turn the “Estimated travel time”
mode on:
1. Push the
“MENU” button on the
navigation controller.
2. Select the “Setup” switch.
3. Select the “Change speed”
switch on the “Setup” screen.
Time to destination
Page 105 of 138

cv
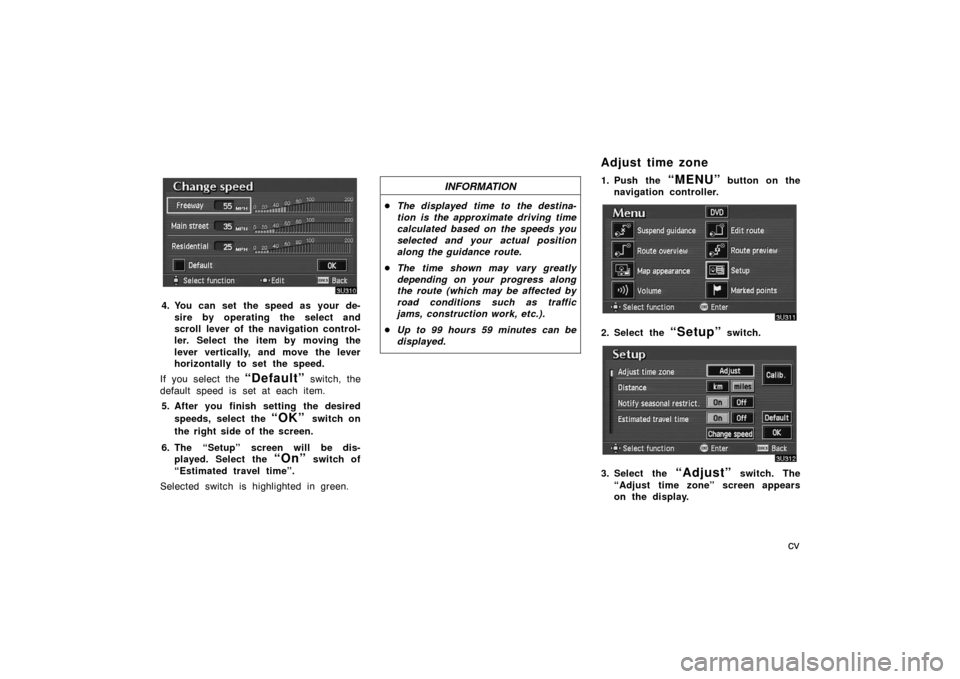
4. You can set the speed as your de-
sire by operating the select and
scroll lever of the navigation control-
ler. Select the item by moving the
lever vertically, and move the lever
horizontally to set the speed.
If you select the
“Default” switch, the
default speed is set at each item.
5. After you finish setting the desired
speeds, select the
“OK” switch on
the right side of the screen.
6. The “Setup” screen will be dis-
played. Select the
“On” switch of
“Estimated travel time”.
Selected switch is highlighted in green.
INFORMATION
�The displayed time to the destina-
tion is the approximate driving time
calculated based on the speeds you
selected and your actual position
along the guidance route.
�The time shown may vary greatly
depending on your progress along
the route (which may be affected by
road conditions such as traffic
jams, construction work, etc.).
�Up to 99 hours 59 minutes can be
displayed.
1. Push the “MENU” button on the
navigation controller.
2. Select the “Setup” switch.
3. Select the “Adjust” switch. The
“Adjust time zone” screen appears
on the display.
Adjust time zone
Page 106 of 138
cvi
4. Select your desired time zone.
Selected switch is highlighted in green.
“Daylight saving time”: Select the
“On” switch on the screen and then
select
or to set the day light
saving time.
5. Select the
“OK” switch on the
screen and the “Setup” screen will
be displayed.1. Push the
“MENU” button on the
navigation controller.
2. Select the “Setup” switch on the
screen.
3. Choose the “km” or “miles”
switch of “Distance” to select your
desired units.
Selected switch is highlighted in green.
4. Select the
“OK” switch.
Distance
Page 107 of 138
cvii
1. Push the “MENU” button on the
navigation controller.
2. Select the “Setup” switch on the
screen.
3. Select the “On” switch of “Notify
seasonal restrict.” and select the
“OK” switch.
The restricted road icon and the message
may appear on the screen.1. Push the
“MENU” button on the
navigation controller.
2. Select the “Setup” switch on the
screen.
Notify seasonal restrict Voice guide in all modes
Page 108 of 138
cviii
3. Select the “On” switch of “Voice
guide in all modes” and select the
“OK” switch.1. Push the
“MENU” button on the
navigation controller.
2. Select the “Setup” switch on the
screen.
3. Select the “On” switch of “Current
street name” and select the
“OK”
switch.
The current street name appears on the
map screen.
Current street name