2007 SUZUKI GRAND VITARA engine type
[x] Cancel search: engine typePage 153 of 211

Downloaded from www.Manualslib.com manuals search engine 9-15 INSPECTION AND MAINTENANCE
66J21-03E
Gear Oil ReplacementTo change the gear oil in the manual trans-
mission, transfer case, extension case or
differential(s), use the following procedure:
1) Remove the oil filler plug (1).
2) Remove the drain plug (2), drain the oil
and reinstall the drain plug.
3) Pour new gear oil of the specified type
through the filler hole until the oil level
reaches the bottom of the filler hole.
4) Reinstall the filler plug.Tightening torque
Automatic Transmission
FluidSpecified FluidUse an automatic transmission fluid
SUZUKI ATF 3317 or Mobil ATF 3309.Fluid Level CheckYou must check the fluid level with the
automatic transmission fluid at normal
operating temperature.
To check the fluid level:
1) To warm up the transmission fluid, drive
the vehicle or idle the engine until the
temperature gauge indicates normal
operating temperature.
2) Then drive for ten more minutes.
WARNING
After driving the vehicle, gear oil tem-
perature may be high enough to burn
you. Wait until the oil filler plug is
cool enough to touch with your bare
hands before inspecting or replacing
gear oil.
CAUTION
When tightening these plugs, apply
sealing compound “SUZUKI Bond
No. 1215” or equivalent to the plug
threads to prevent oil leakage and
tighten them to the specified torque
shown below.
Oil Filler
PlugOil Drain
Plug
Manual
transmission23 Nm
(17.0 lb-ft)
(2.3 kg-m) 23 Nm
(17.0 lb-ft)
(2.3 kg-m)
Transfer23 Nm
(17.0 lb-ft)
(2.3 kg-m) 23 Nm
(17.0 lb-ft)
(2.3 kg-m)
Extension
case23 Nm
(17.0 lb-ft)
(2.3 kg-m) 23 Nm
(17.0 lb-ft)
(2.3 kg-m)
Front
differential23 Nm
(17.0 lb-ft)
(2.3 kg-m) 23 Nm
(17.0 lb-ft)
(2.3 kg-m)
Rear
differential23 Nm
(17.0 lb-ft)
(2.3 kg-m) 23 Nm
(17.0 lb-ft)
(2.3 kg-m)
CAUTION
Driving with too much or too little
fluid can damage the transmission.
CAUTION
Be sure to use the specified auto-
matic transmission fluid. Using auto-
matic transmission fluid other than
SUZUKI ATF 3317 or Mobil ATF 3309
may damage the automatic transmis-
sion of your vehicle.
Automatic Transmission Fluid: 10
Engine Coolant: 1, 2
Page 155 of 211
Downloaded from www.Manualslib.com manuals search engine 9-17 INSPECTION AND MAINTENANCE
66J21-03E
Engine Coolant
64J151
60A208
Selection of CoolantTo maintain optimum performance and
durability of your engine, use SUZUKI
Genuine Coolant or equivalent.
This type of coolant is best for your cooling
system as it:
Helps maintain proper engine tempera-
ture.
Gives proper protection against freezing
and boiling.
Gives proper protection against corro-
sion and rust.
Failure to use the proper coolant can dam-
age your cooling system. Your authorized
SUZUKI dealer can help you select the
proper coolant.
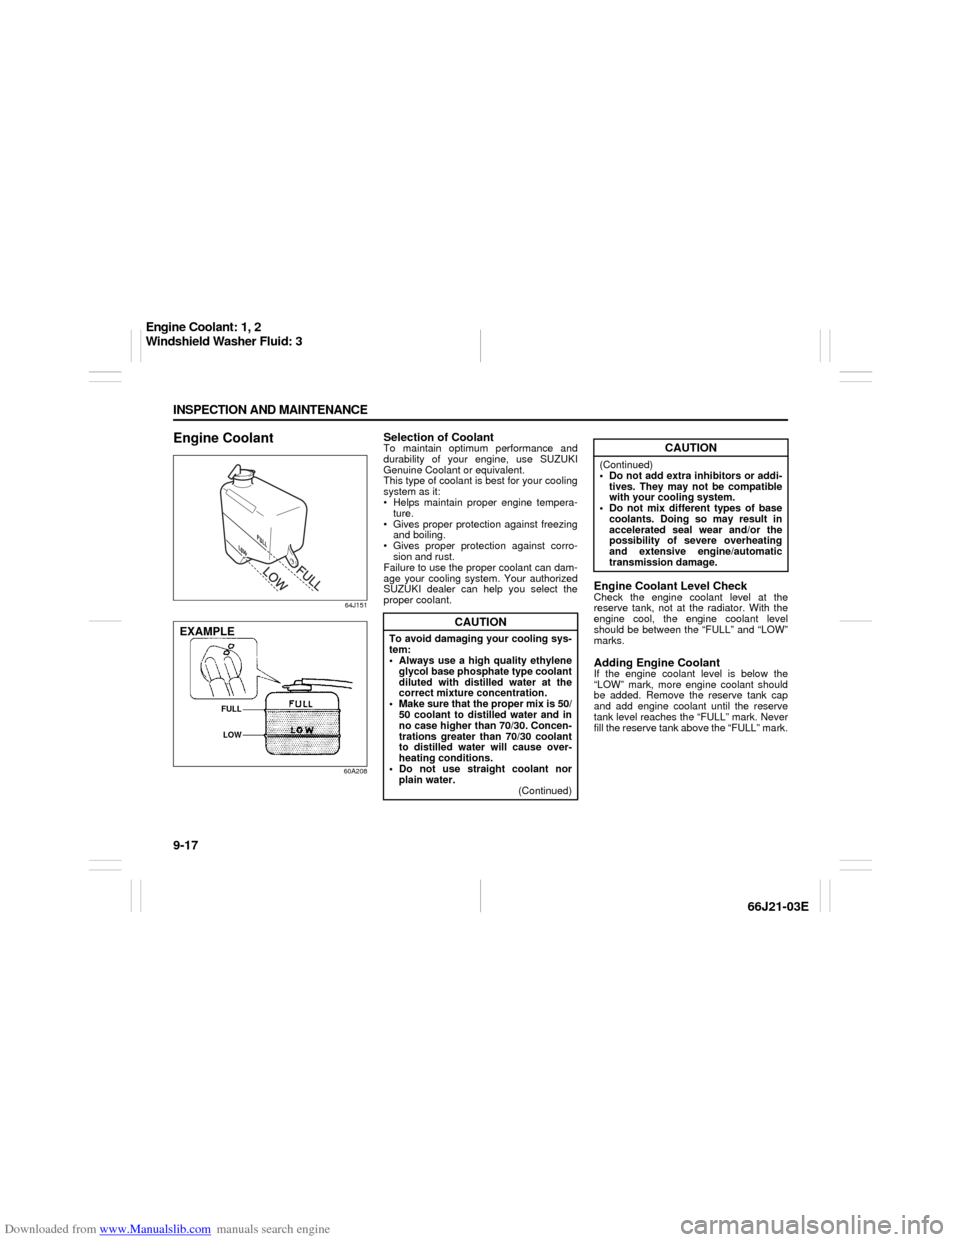
Engine Coolant Level CheckCheck the engine coolant level at the
reserve tank, not at the radiator. With the
engine cool, the engine coolant level
should be between the “FULL” and “LOW”
marks.Adding Engine CoolantIf the engine coolant level is below the
“LOW” mark, more engine coolant should
be added. Remove the reserve tank cap
and add engine coolant until the reserve
tank level reaches the “FULL” mark. Never
fill the reserve tank above the “FULL” mark.
EXAMPLE
FULL
LOW
CAUTION
To avoid damaging your cooling sys-
tem:
Always use a high quality ethylene
glycol base phosphate type coolant
diluted with distilled water at the
correct mixture concentration.
Make sure that the proper mix is 50/
50 coolant to distilled water and in
no case higher than 70/30. Concen-
trations greater than 70/30 coolant
to distilled water will cause over-
heating conditions.
Do not use straight coolant nor
plain water.
(Continued)
CAUTION
(Continued)
Do not add extra inhibitors or addi-
tives. They may not be compatible
with your cooling system.
Do not mix different types of base
coolants. Doing so may result in
accelerated seal wear and/or the
possibility of severe overheating
and extensive engine/automatic
transmission damage.
Engine Coolant: 1, 2
Windshield Washer Fluid: 3
Page 158 of 211

Downloaded from www.Manualslib.com manuals search engine 9-20 INSPECTION AND MAINTENANCE
66J21-03E
Air Cleaner
66J167
If the air cleaner is clogged with dust, there
will be greater intake resistance, resulting
in decreased power output and increased
fuel consumption.
Check and clean periodically according to
the following procedure:
1) Take off the air cleaner case cover.
Remove the element from the air
cleaner case cover.
2) This air cleaner element is of dry type.
Remember that it needs cleaning
according to the following method.
3) Blow off dust on cleaner element by
compressed air from inside the ele-
ment, or replace the element as neces-
sary.
Spark Plugs
66J009
65D434
You should inspect spark plugs periodically
for carbon deposits. When carbon accu-
mulates on a spark plug, a strong spark
may not be produced. Remove carbon
CAUTION
The air cleaner element should be
replaced every 50000 km (30000
miles). More frequent replacement is
necessary when you drive under
dusty conditions.
Brakes: 6
Page 159 of 211

Downloaded from www.Manualslib.com manuals search engine 9-21 INSPECTION AND MAINTENANCE
66J21-03E
deposits with a wire or pin and adjust the
spark plug gap.
To access the spark plugs:
1) Remove the engine cover.
2) Disconnect the coupler (1) while push-
ing the release lever.
3) Remove the bolt.
4) Pull the ignition coil out.
80G093
BrakesBrake Fluid
64J154
Check the brake fluid level by looking at
the reservoir in the engine compartment.
Check that the fluid level is between the
“MAX” and “MIN” lines. If the brake fluid
level is near the “MIN” line, fill it up to the
“MAX” line with DOT3 brake fluid.
65D477
CAUTION
When replacing spark plugs, you
should use the brand and type speci-
fied for your vehicle. For the speci-
fied plugs, refer to the
“SPECIFICATIONS” section at the
end of this book. If you wish to use a
brand of spark plug other than the
specified plugs, consult your SUZUKI
dealer.1.0 – 1.1 mm
(0.039 – 0.043 in.)
WARNING
Failure to follow the guidelines below
can result in personal injury or seri-
ous damage to the brake system.
If the brake fluid in the reservoir
drops below a certain level, the
brake warning light on the instru-
ment panel will come on (the
engine must be running with the
parking brake fully disengaged.)
Should the light come on, immedi-
ately ask your SUZUKI dealer to
inspect the brake system.
A rapid fluid loss indicates a leak in
the brake system which should be
inspected by your SUZUKI dealer
immediately.
Brake fluid can harm your eyes and
damage painted surfaces. Use cau-
tion when refilling the reservoir.
(Continued)
Brakes: 6
Page 162 of 211
Downloaded from www.Manualslib.com manuals search engine 9-24 INSPECTION AND MAINTENANCE
66J21-03E
Power Steering (if equipped)
64J155
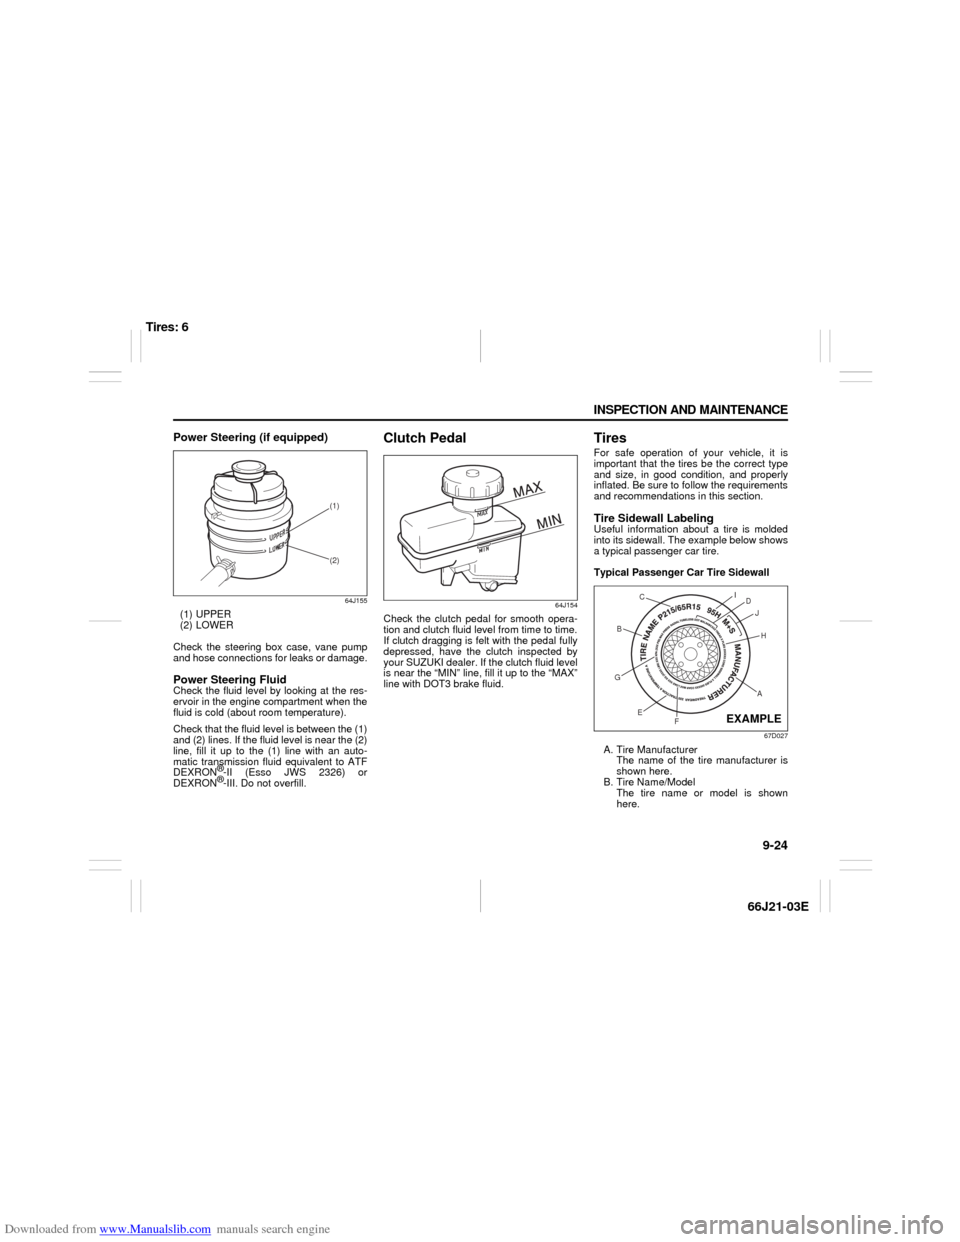
(1) UPPER
(2) LOWER
Check the steering box case, vane pump
and hose connections for leaks or damage.Power Steering FluidCheck the fluid level by looking at the res-
ervoir in the engine compartment when the
fluid is cold (about room temperature).
Check that the fluid level is between the (1)
and (2) lines. If the fluid level is near the (2)
line, fill it up to the (1) line with an auto-
matic transmission fluid equivalent to ATF
DEXRON
®-II (Esso JWS 2326) or
DEXRON®-III. Do not overfill.
Clutch Pedal
64J154
Check the clutch pedal for smooth opera-
tion and clutch fluid level from time to time.
If clutch dragging is felt with the pedal fully
depressed, have the clutch inspected by
your SUZUKI dealer. If the clutch fluid level
is near the “MIN” line, fill it up to the “MAX”
line with DOT3 brake fluid.
TiresFor safe operation of your vehicle, it is
important that the tires be the correct type
and size, in good condition, and properly
inflated. Be sure to follow the requirements
and recommendations in this section.Tire Sidewall LabelingUseful information about a tire is molded
into its sidewall. The example below shows
a typical passenger car tire.
Typical Passenger Car Tire Sidewall
67D027
A. Tire Manufacturer
The name of the tire manufacturer is
shown here.
B. Tire Name/Model
The tire name or model is shown
here.
(1)
(2)
AH B
G
E
FD
J I
C
EXAMPLE
Tires: 6
Page 163 of 211
Downloaded from www.Manualslib.com manuals search engine 9-25 INSPECTION AND MAINTENANCE
66J21-03E
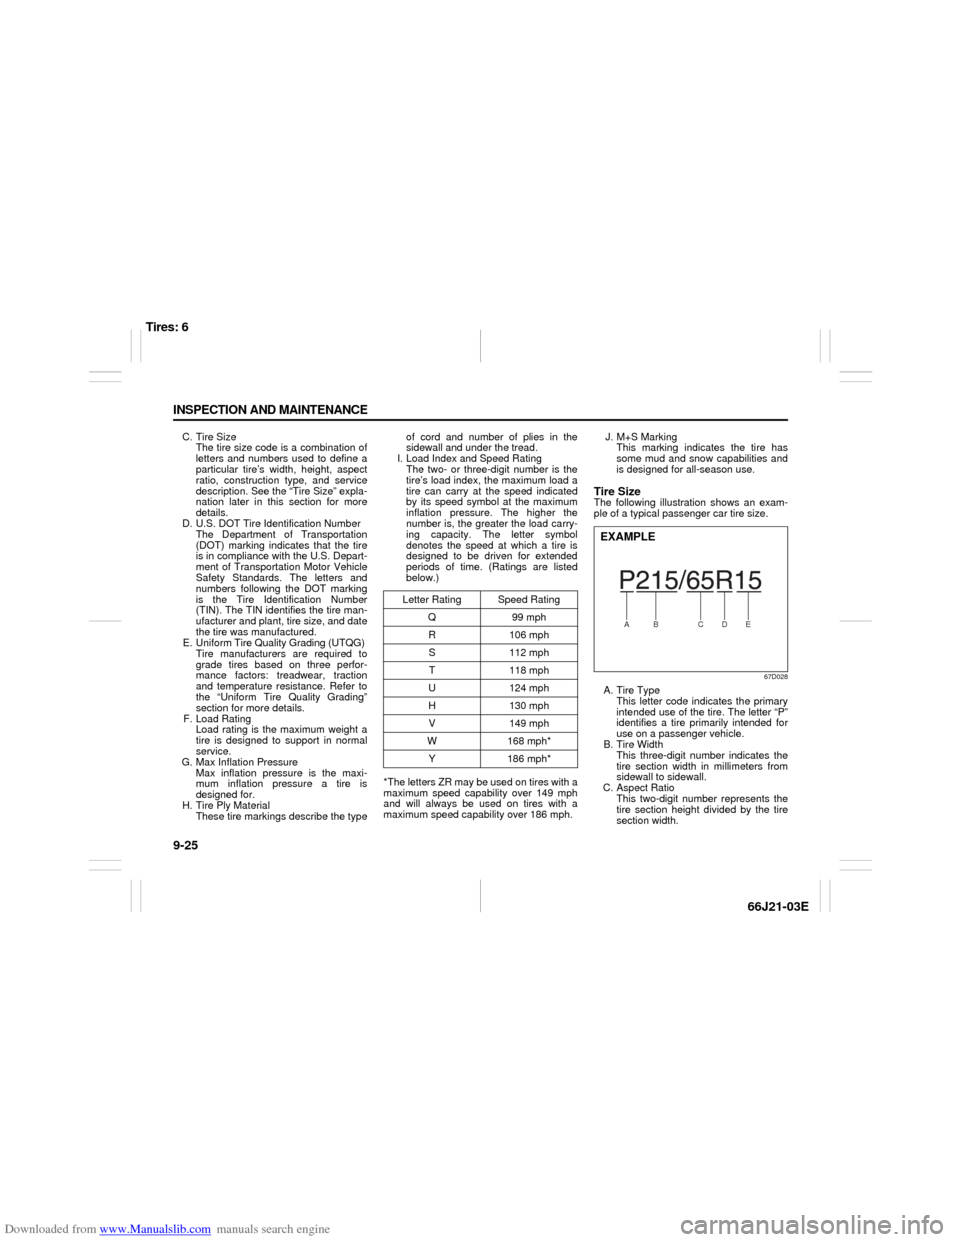
C. Tire Size
The tire size code is a combination of
letters and numbers used to define a
particular tire’s width, height, aspect
ratio, construction type, and service
description. See the “Tire Size” expla-
nation later in this section for more
details.
D. U.S. DOT Tire Identification Number
The Department of Transportation
(DOT) marking indicates that the tire
is in compliance with the U.S. Depart-
ment of Transportation Motor Vehicle
Safety Standards. The letters and
numbers following the DOT marking
is the Tire Identification Number
(TIN). The TIN identifies the tire man-
ufacturer and plant, tire size, and date
the tire was manufactured.
E. Uniform Tire Quality Grading (UTQG)
Tire manufacturers are required to
grade tires based on three perfor-
mance factors: treadwear, traction
and temperature resistance. Refer to
the “Uniform Tire Quality Grading”
section for more details.
F. Load Rating
Load rating is the maximum weight a
tire is designed to support in normal
service.
G. Max Inflation Pressure
Max inflation pressure is the maxi-
mum inflation pressure a tire is
designed for.
H. Tire Ply Material
These tire markings describe the typeof cord and number of plies in the
sidewall and under the tread.
I. Load Index and Speed Rating
The two- or three-digit number is the
tire’s load index, the maximum load a
tire can carry at the speed indicated
by its speed symbol at the maximum
inflation pressure. The higher the
number is, the greater the load carry-
ing capacity. The letter symbol
denotes the speed at which a tire is
designed to be driven for extended
periods of time. (Ratings are listed
below.)
*The letters ZR may be used on tires with a
maximum speed capability over 149 mph
and will always be used on tires with a
maximum speed capability over 186 mph.J. M+S Marking
This marking indicates the tire has
some mud and snow capabilities and
is designed for all-season use.
Tire SizeThe following illustration shows an exam-
ple of a typical passenger car tire size.
67D028
A. Tire Type
This letter code indicates the primary
intended use of the tire. The letter “P”
identifies a tire primarily intended for
use on a passenger vehicle.
B. Tire Width
This three-digit number indicates the
tire section width in millimeters from
sidewall to sidewall.
C. Aspect Ratio
This two-digit number represents the
tire section height divided by the tire
section width. Letter Rating Speed Rating
Q 99 mph
R106 mph
S112 mph
T118 mph
U124 mph
H130 mph
V149 mph
W 168 mph*
Y 186 mph*
A
B
C
D
E
EXAMPLE
Tires: 6
Page 164 of 211

Downloaded from www.Manualslib.com manuals search engine 9-26 INSPECTION AND MAINTENANCE
66J21-03E
D. Construction Code
This letter code is used to indicate the
type of ply construction in the tire. The
letter “R” means radial ply tire con-
struction, the letter “D” means diago-
nal or bias ply construction, and the
letter “B” means belted-bias ply con-
struction.
E. Rim Diameter
This two-digit number is the wheel or
rim diameter in inches.
Tire Inflation PressureTire inflation pressure should be checked
when the tire is cold. “Cold tire inflation
pressure” is the pressure in a tire that has
been driven less than 1 mile (1.6 km) or
has been standing for three hours or more.
54G307
The front, rear and spare tire pressure
specifications for your vehicle are shown
below and are listed on the Tire and Load-
ing Information Label, which is located on
the driver’s door lock pillar. The Tire and
Loading Information Label contains the fol-
lowing information:
Seating Capacity
Maximum Allowed Combined Weight of
Occupants and Cargo
Original Tire Size
Recommended Cold Tire Inflation Pres-
sure of Original TiresMeasuring air pressure
Use the following steps to achieve proper
tire inflation:
1) Identify the recommended tire pressure
on the vehicle’s Tire and Loading Infor-
mation Label or in the owner’s manual.
2) Remove the valve cap from the tire
valve stem.
3) Using a reliable pressure gauge, mea-
sure the tire inflation pressure by press-
ing the tire gauge firmly onto the valve
to get a pressure measurement.
Remember that inflation pressures
should be checked when the tires are
“cold”, meaning before they have been
driven one mile or after sitting for three
hours or more allowing the tire to cool
to ambient air temperature.
4) If the air pressure is too high, slowly
release the air by pressing on the tire
valve stem with the edge of the tire
gauge until you reach the correct pres-
sure.
WARNING
Your SUZUKI is equipped with tires
which are all the same type and size.
This is important to ensure proper
steering and handling of the vehicle.
Never mix tires of different size or
type on the four wheels of your vehi-
cle. Mixing tires could cause you to
lose control while driving which may
lead to an accident. The size and type
of tires used should be only those
approved by SUZUKI Motor Corpora-
tion as standard or optional equip-
ment for your vehicle.
Recommended Cold Tire Inflation
Pressures
Front Tires220 kPa
32 psi
Rear Tires220 kPa
32 psi
Spare220 kPa
32 psi
Tires: 6
Page 165 of 211

Downloaded from www.Manualslib.com manuals search engine 9-27 INSPECTION AND MAINTENANCE
66J21-03E
5) If the air pressure is too low, fill the tire
with air at a service station until it
reaches the recommended pressure.
6) Make sure all tires have the same air
pressure (unless the owner’s manual
indicates otherwise).
Tire InspectionInspect your vehicle’s tires at least once a
month by performing the following checks:
1) Measure the air pressure with a tire
gauge. Adjust the pressure if neces-
sary. Remember to check the spare
tire, too. Refer to the “Measuring Air
Pressure” section.
54G136
(1) Tread wear indicator
(2) Indicator location mark
2) Check that the depth of the tread
groove is more than 1.6 mm (0.06 in.).
To help you check this, the tires have
molded-in tread wear indicators in the
grooves. When the indicators appear
on the tread surface, the remaining
depth of the tread is 1.6 mm (0.06 in.)
or less and the tire should be replaced.
3) Check for abnormal wear, cracks and
damage. Any tires with cracks or otherdamage should be replaced. If any tires
show abnormal wear, have them
inspected by your SUZUKI dealer.
4) Check for loose wheel nuts.
5) Check that there are no nails, stones or
other objects sticking into the tires.
WARNING
Air pressures should be checked
when the tires are cold or you may
get inaccurate readings.
Check the inflation pressure from
time to time while inflating the tire
gradually, until the specified pres-
sure is obtained.
Never underinflate or overinflate
the tires.
Underinflation can cause unusual
handling characteristics or can
cause the rim to slip on the tire
bead, resulting in an accident or
damage to the tire or rim.
Underinflation can also cause tires
to overheat, leading to tire failure.
Overinflation can cause the tire to
burst, resulting in personal injury.
Overinflation can also cause
unusual handling characteristics
which may result in an accident.
WARNING
Hitting curbs and running over rocks
can damage tires and affect wheel
alignment. Be sure to have tires and
wheel alignment checked periodically
by your SUZUKI dealer.
WARNING
Your SUZUKI is equipped with tires
which are all the same type and size.
This is important to ensure proper
steering and handling of the vehicle.
Never mix tires of different size or
type on the four wheels of your vehi-
cle. The size and type of tires used
should be only those approved by
SUZUKI Motor Corporation as stan-
dard or optional equipment for your
vehicle.
Tires: 6