2007 SUZUKI GRAND VITARA check engine
[x] Cancel search: check enginePage 142 of 211

Downloaded from www.Manualslib.com manuals search engine 9-4 INSPECTION AND MAINTENANCE
66J21-03E
R: Replace or change
I : Inspect and correct, replace or lubricate if necessary
#1: Inspect at 250000 km (150000 miles) or 180 months.
NOTE:
The maintenance services enclosed with rectangle are recommended maintenance items.
Item 6 (R) is applicable to the exhaust mounting rubber only.Interval: This interval should be judged by odometer
reading or months, whichever comes first.miles (x 1000) 82.5 90 97.5 105 112.5 120 127.5 135 142.5 150
km (x 1000) 137.5 150 162.5 175 187.5 200 212.5 225 237.5 250
months 82.5 90 97.5 105 112.5 120 127.5 135 142.5 150ENGINE & EMISSION CONTROL
1. Drive beltTension check, *adjustment, *replacement
–
I
–
–
–
R
–
–
–
I
*2. Valve lash (clearance) – I – – I – – I – –3.Engine oil and oil filter
R
R
R
R
R
R
R
R
R
R
*4. Cooling system hoses and connections – I – – – I – – – I5.Engine coolant
–
R
–
–
–
R
–
–
–
R
*6. Exhaust pipes and mountings – I – – – I&(R) – – – I*7.
EVAP canister
Replace every 250000 km (150000 miles) or 180 months
*8. Emission-related hoses & tubes – – – – – I – – – I9.Spark plugs
–
–
–
–
–
R
–
–
–
–
*10. Ignition coil (Plug cap) – I – – – I – – – I*11.
Fuel tank & cap
–
I
–
–
–
I
–
–
–
I (#1)
12. Air cleaner filter element – R – – – R – – – R*13.
Fuel filter
–
–
–
–
–
–
–
–
–
R
*14. Fuel lines and connections – I – – – I – – – I (#1)*15.
Canister air suction filter
Replace every 250000 km (150000 miles) or 180 months
The U.S. Environmental Protection Agency or the California Air Resources Board has determined that the failure to perform recom-
mended maintenance items enclosed with a rectangle will not nullify the emission warranty or limit recall liability prior to the completion
of the vehicle’s useful life. SUZUKI, however, urges that all recommended maintenance services be performed at the indicated inter-
vals and the maintenance recorded.
Periodic Maintenance Schedule: 1, 2, 3, 4, 5, 6, 9, 10
Page 143 of 211

Downloaded from www.Manualslib.com manuals search engine 9-5 INSPECTION AND MAINTENANCE
66J21-03E
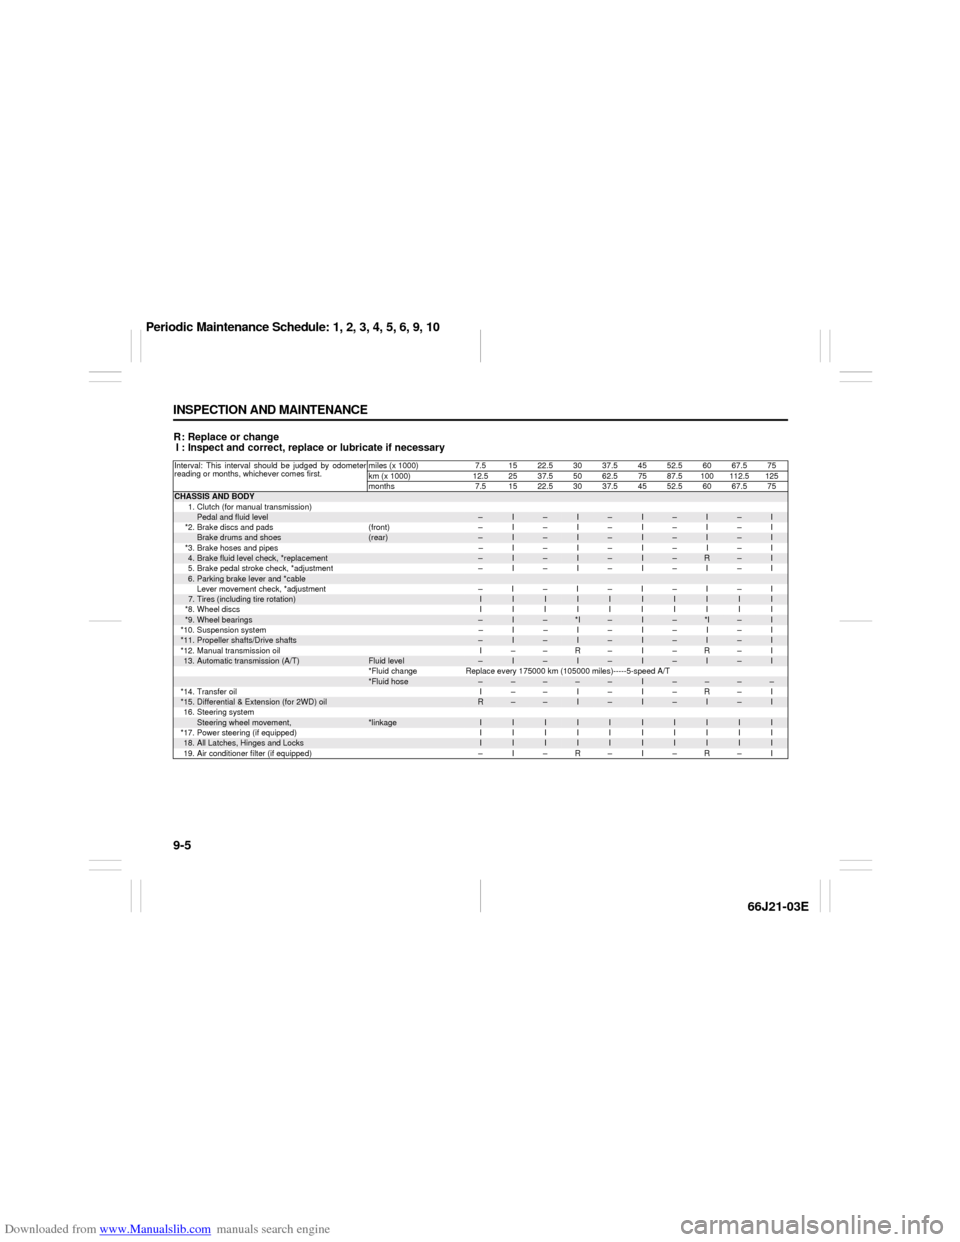
R: Replace or change
I : Inspect and correct, replace or lubricate if necessaryInterval: This interval should be judged by odometer
reading or months, whichever comes first.miles (x 1000) 7.5 15 22.5 30 37.5 45 52.5 60 67.5 75
km (x 1000) 12.52537.55062.57587.5100112.5125
months 7.5 1522.53037.54552.56067.575CHASSIS AND BODY
1. Clutch (for manual transmission)
Pedal and fluid level
–
I
–
I
–
I
–
I
–
I
*2. Brake discs and pads (front) – I – I – I – I – I
Brake drums and shoes
(rear)
–
I
–
I
–
I
–
I
–
I
*3. Brake hoses and pipes – I – I – I – I – I
4.Brake fluid level check, *replacement
–
I
–
I
–
I
–
R
–
I
5. Brake pedal stroke check, *adjustment – I – I – I – I – I
6.Parking brake lever and *cableLever movement check, *adjustment –I–I–I–I–I7.Tires (including tire rotation)
I
I
I
I
I
I
I
I
I
I
*8.Wheel discs IIIIIIIIII
*9.
Wheel bearings
–
I
–
*I
–
I
–
*I
–
I
*10. Suspension system – I – I – I – I – I
*11.
Propeller shafts/Drive shafts
–
I
–
I
–
I
–
I
–
I
*12. Manual transmission oil I – – R – I – R – I
13.
Automatic transmission (A/T)
Fluid level
–
I
–
I
–
I
–
I
–
I
*Fluid change Replace every 175000 km (105000 miles)-----5-speed A/T
*Fluid hose
–
–
–
–
–
I
–
–
–
–
*14. Transfer oil I – – I – I – R – I
*15.
Differential & Extension (for 2WD) oil
R
–
–
I
–
I
–
I
–
I
16. Steering system
Steering wheel movement,
*linkage
I
I
I
I
I
I
I
I
I
I
*17. Power steering (if equipped) I I I I I I I I I I
18.
All Latches, Hinges and Locks
I
I
I
I
I
I
I
I
I
I
19. Air conditioner filter (if equipped) – I – R – I – R – I
Periodic Maintenance Schedule: 1, 2, 3, 4, 5, 6, 9, 10
Page 144 of 211

Downloaded from www.Manualslib.com manuals search engine 9-6 INSPECTION AND MAINTENANCE
66J21-03E
R: Replace or change
I : Inspect and correct, replace or lubricate if necessary
NOTE:
This table shows the service schedule up to 250000 km (150000 miles).
Beyond 250000 km (150000 miles), perform the same services at the same intervals shown in the chart.
Beyond 250000 km (150000 miles), the maintenance services enclosed with a rectangle are required.
Item 9 *I - inspect for wear.Interval: This interval should be judged by odometer
reading or months, whichever comes first.miles (x 1000) 82.5 90 97.5 105112.5 120 127.5 135 142.5 150
km (x 1000) 137.5 150 162.5 175 187.5 200 212.5 225 237.5 250
months 82.5 90 97.5 105 112.5 120 127.5 135 142.5 150CHASSIS AND BODY
1. Clutch (for manual transmission)
Pedal and fluid level
–
I
–
I
–
I
–
I
–
I
*2. Brake discs and pads (front) – I – I – I – I – I
Brake drums and shoes
(rear)
–
I
–
I
–
I
–
I
–
I
*3. Brake hoses and pipes – I – I – I – I – I
4.Brake fluid level check, *replacement
–
I
–
I
–
R
–
I
–
I
5. Brake pedal stroke check, *adjustment – I – I – I – I – I
6.Parking brake lever and *cableLever movement check, *adjustment –I–I–I–I–I7.Tires (including tire rotation)
I
I
I
I
I
I
I
I
I
I
*8.Wheel discs IIIIIIIIII
*9.
Wheel bearings
–
*I
–
I
–
*I
–
I
–
I
*10. Suspension system – I – I – I – I – I
*11.
Propeller shafts/Drive shafts
–
I
–
I
–
I
–
I
–
I
*12. Manual transmission oil – R – I – R – I – R
13.
Automatic transmission (A/T)
Fluid level
–
I
–
I
–
I
–
I
–
I
*Fluid change Replace every 175000 km (105000 miles)-----5-speed A/T
*Fluid hose
–
I
–
–
–
–
–
I
–
–
*14. Transfer oil – I – I – R – I – I
*15.
Differential & Extension (for 2WD) oil
–
I
–
I
–
I
–
I
–
I
16. Steering system
Steering wheel movement,
*linkage
I
I
I
I
I
I
I
I
I
I
*17. Power steering (if equipped) I I I I I I I I I I
18.
All Latches, Hinges and Locks
I
I
I
I
I
I
I
I
I
I
19. Air conditioner filter (if equipped) – R – I – R – I – R
Periodic Maintenance Schedule: 1, 2, 3, 4, 5, 6, 9, 10
Page 148 of 211

Downloaded from www.Manualslib.com manuals search engine 9-10 INSPECTION AND MAINTENANCE
66J21-03E
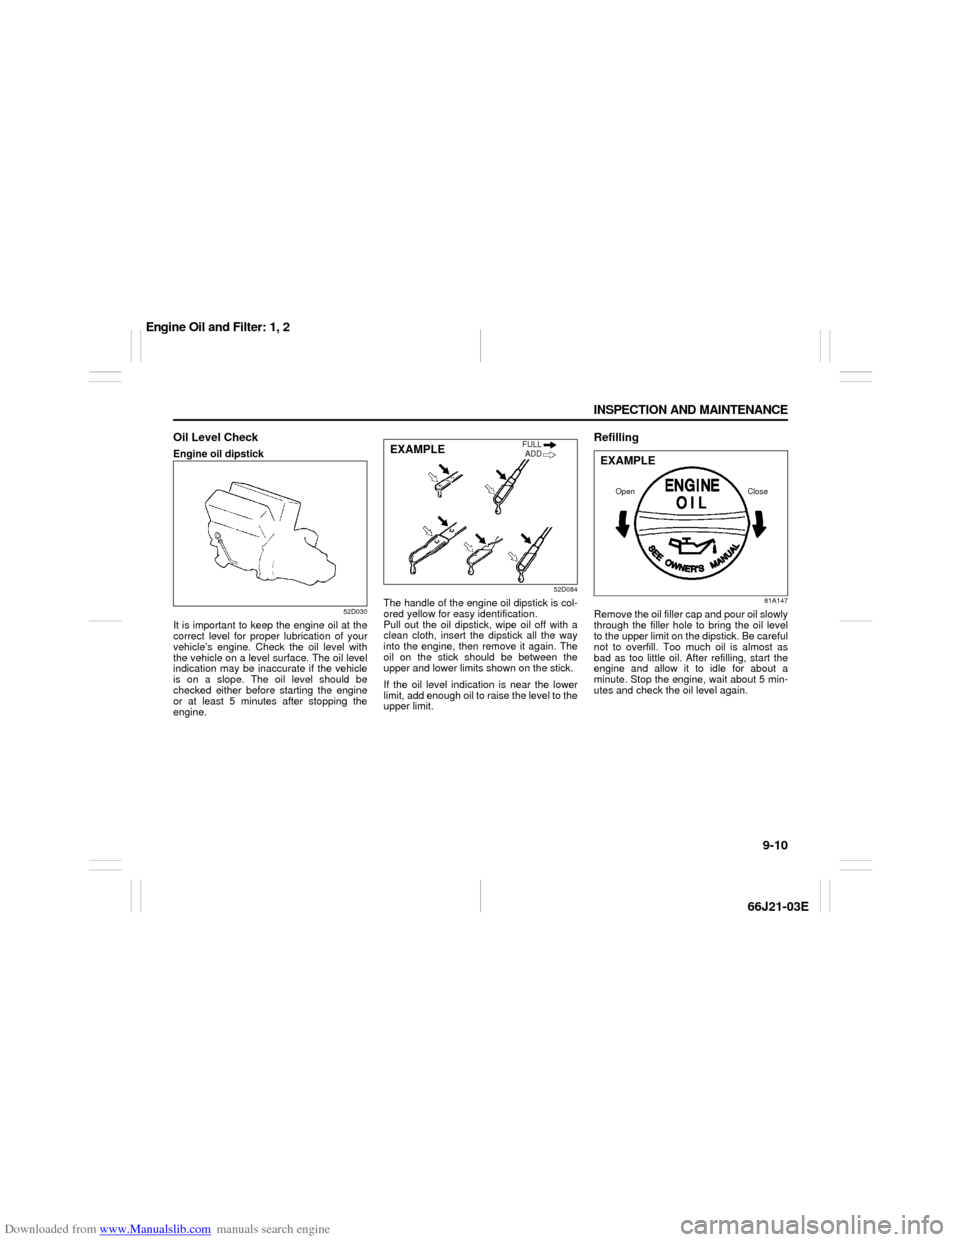
Oil Level CheckEngine oil dipstick
52D030
It is important to keep the engine oil at the
correct level for proper lubrication of your
vehicle’s engine. Check the oil level with
the vehicle on a level surface. The oil level
indication may be inaccurate if the vehicle
is on a slope. The oil level should be
checked either before starting the engine
or at least 5 minutes after stopping the
engine.
52D084
The handle of the engine oil dipstick is col-
ored yellow for easy identification.
Pull out the oil dipstick, wipe oil off with a
clean cloth, insert the dipstick all the way
into the engine, then remove it again. The
oil on the stick should be between the
upper and lower limits shown on the stick.
If the oil level indication is near the lower
limit, add enough oil to raise the level to the
upper limit.
Refilling
81A147
Remove the oil filler cap and pour oil slowly
through the filler hole to bring the oil level
to the upper limit on the dipstick. Be careful
not to overfill. Too much oil is almost as
bad as too little oil. After refilling, start the
engine and allow it to idle for about a
minute. Stop the engine, wait about 5 min-
utes and check the oil level again.
EXAMPLE
FULL
ADD
Close Open
EXAMPLE
Engine Oil and Filter: 1, 2
Page 150 of 211

Downloaded from www.Manualslib.com manuals search engine 9-12 INSPECTION AND MAINTENANCE
66J21-03E
52D086
(1) Oil filter
(2) Oil filter wrench
(3) 3/4 turn
6) Tighten the filter 3/4 turn from the point
of contact with the mounting surface (or
to the specified torque) using an oil filter
wrench.
7) Reinstall the engine under cover.
Refill with Oil and Check for Leaks1) Pour oil through the filler hole and
install the filler cap.
For the approximate capacity of the oil,
refer to the “Capacities” item in the
“SPECIFICATIONS” section.
2) Start the engine and look carefully for
leaks at the oil filter and drain plug. Run
the engine at various speeds for at least
5 minutes.
3) Stop the engine and wait about 5 min-
utes. Check the oil level again and add
oil if necessary. Check for leaks again.
83E010
Tightening torque specification
14 Nm (10.1 lb-ft, 1.4 kg-m)
CAUTION
To prevent oil leakage, make sure
that the oil filter is tight, but do not
overtighten it.
CAUTION
When replacing the oil filter, it is rec-
ommended that you use a genuine
SUZUKI replacement filter. If you use
an after-market filter, make sure it is
of equivalent quality and carefully fol-
low the manufacturer’s instructions
and precautions.
CAUTION
Oil leaks from around the oil filter or
drain plug indicate incorrect installa-
tion or gasket damage. If you find any
leaks or are not sure that the filter
has been properly tightened, have
the vehicle inspected by your SUZUKI
dealer.EXAMPLE
Engine Oil and Filter: 1, 2
Page 152 of 211

Downloaded from www.Manualslib.com manuals search engine 9-14 INSPECTION AND MAINTENANCE
66J21-03E
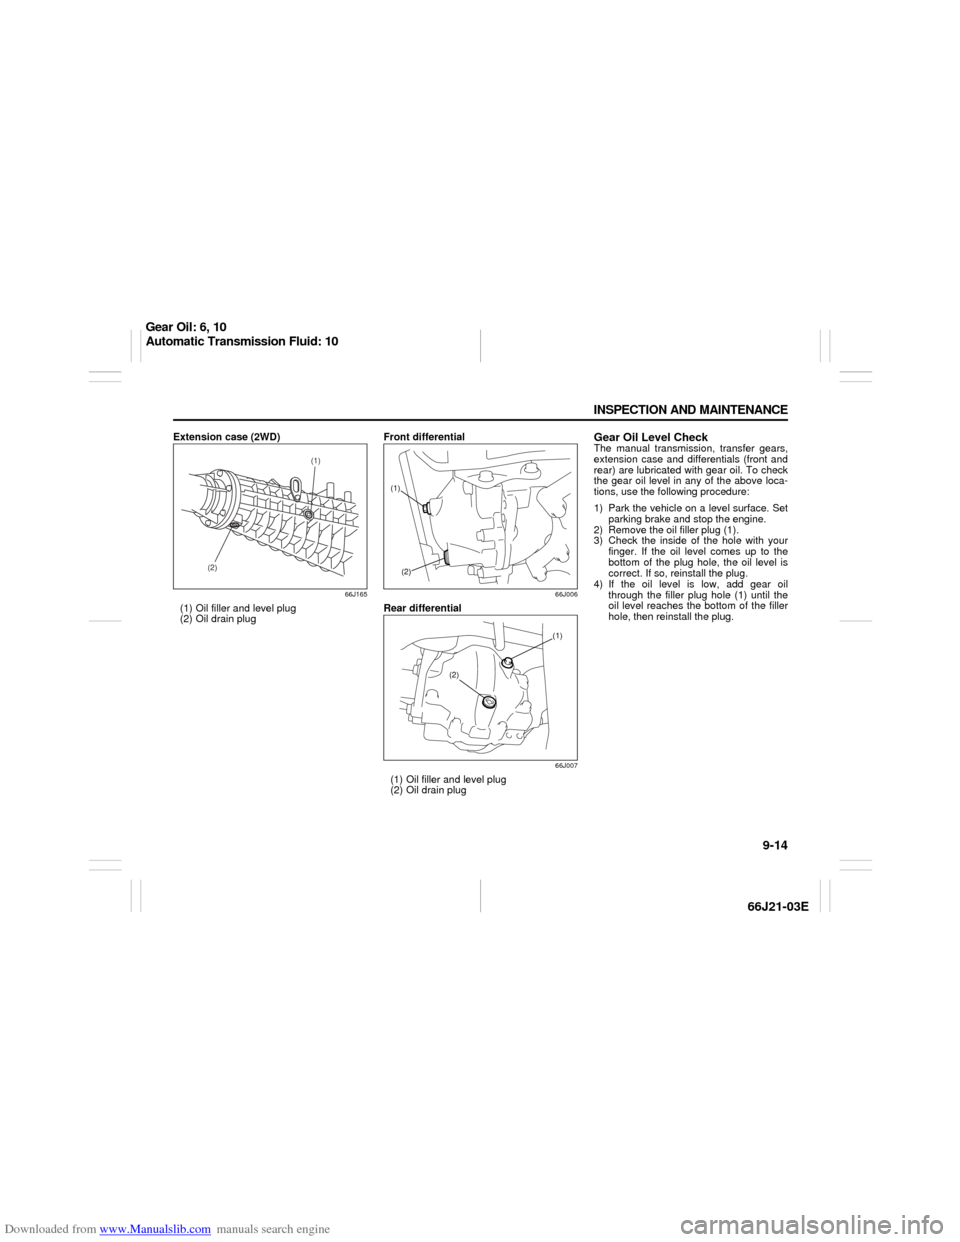
Extension case (2WD)
66J165
(1) Oil filler and level plug
(2) Oil drain plugFront differential
66J006
Rear differential
66J007
(1) Oil filler and level plug
(2) Oil drain plug
Gear Oil Level CheckThe manual transmission, transfer gears,
extension case and differentials (front and
rear) are lubricated with gear oil. To check
the gear oil level in any of the above loca-
tions, use the following procedure:
1) Park the vehicle on a level surface. Set
parking brake and stop the engine.
2) Remove the oil filler plug (1).
3) Check the inside of the hole with your
finger. If the oil level comes up to the
bottom of the plug hole, the oil level is
correct. If so, reinstall the plug.
4) If the oil level is low, add gear oil
through the filler plug hole (1) until the
oil level reaches the bottom of the filler
hole, then reinstall the plug.
(2)(1)
(1)
(2)
(1)
(2)
Gear Oil: 6, 10
Automatic Transmission Fluid: 10
Page 153 of 211

Downloaded from www.Manualslib.com manuals search engine 9-15 INSPECTION AND MAINTENANCE
66J21-03E
Gear Oil ReplacementTo change the gear oil in the manual trans-
mission, transfer case, extension case or
differential(s), use the following procedure:
1) Remove the oil filler plug (1).
2) Remove the drain plug (2), drain the oil
and reinstall the drain plug.
3) Pour new gear oil of the specified type
through the filler hole until the oil level
reaches the bottom of the filler hole.
4) Reinstall the filler plug.Tightening torque
Automatic Transmission
FluidSpecified FluidUse an automatic transmission fluid
SUZUKI ATF 3317 or Mobil ATF 3309.Fluid Level CheckYou must check the fluid level with the
automatic transmission fluid at normal
operating temperature.
To check the fluid level:
1) To warm up the transmission fluid, drive
the vehicle or idle the engine until the
temperature gauge indicates normal
operating temperature.
2) Then drive for ten more minutes.
WARNING
After driving the vehicle, gear oil tem-
perature may be high enough to burn
you. Wait until the oil filler plug is
cool enough to touch with your bare
hands before inspecting or replacing
gear oil.
CAUTION
When tightening these plugs, apply
sealing compound “SUZUKI Bond
No. 1215” or equivalent to the plug
threads to prevent oil leakage and
tighten them to the specified torque
shown below.
Oil Filler
PlugOil Drain
Plug
Manual
transmission23 Nm
(17.0 lb-ft)
(2.3 kg-m) 23 Nm
(17.0 lb-ft)
(2.3 kg-m)
Transfer23 Nm
(17.0 lb-ft)
(2.3 kg-m) 23 Nm
(17.0 lb-ft)
(2.3 kg-m)
Extension
case23 Nm
(17.0 lb-ft)
(2.3 kg-m) 23 Nm
(17.0 lb-ft)
(2.3 kg-m)
Front
differential23 Nm
(17.0 lb-ft)
(2.3 kg-m) 23 Nm
(17.0 lb-ft)
(2.3 kg-m)
Rear
differential23 Nm
(17.0 lb-ft)
(2.3 kg-m) 23 Nm
(17.0 lb-ft)
(2.3 kg-m)
CAUTION
Driving with too much or too little
fluid can damage the transmission.
CAUTION
Be sure to use the specified auto-
matic transmission fluid. Using auto-
matic transmission fluid other than
SUZUKI ATF 3317 or Mobil ATF 3309
may damage the automatic transmis-
sion of your vehicle.
Automatic Transmission Fluid: 10
Engine Coolant: 1, 2
Page 154 of 211

Downloaded from www.Manualslib.com manuals search engine 9-16 INSPECTION AND MAINTENANCE
66J21-03E
NOTE:
Do not check the fluid level if you have just
driven the vehicle for a long time at high
speed, if you have driven in city traffic in
hot weather, or if the vehicle has been pull-
ing a trailer. Wait until the fluid cools down
(about 30 minutes), or the fluid level indica-
tion will not be correct.
3) Park your vehicle on level ground.
4) Apply the parking brake and then start
the engine in “P” (Park). Let it idle for
two minutes and keep it running during
the fluid level check.
5) With your foot on the brake pedal, move
the gearshift lever through each gear,
pausing for about three seconds in
each range. Then move it back to the
“P” (Park) position.
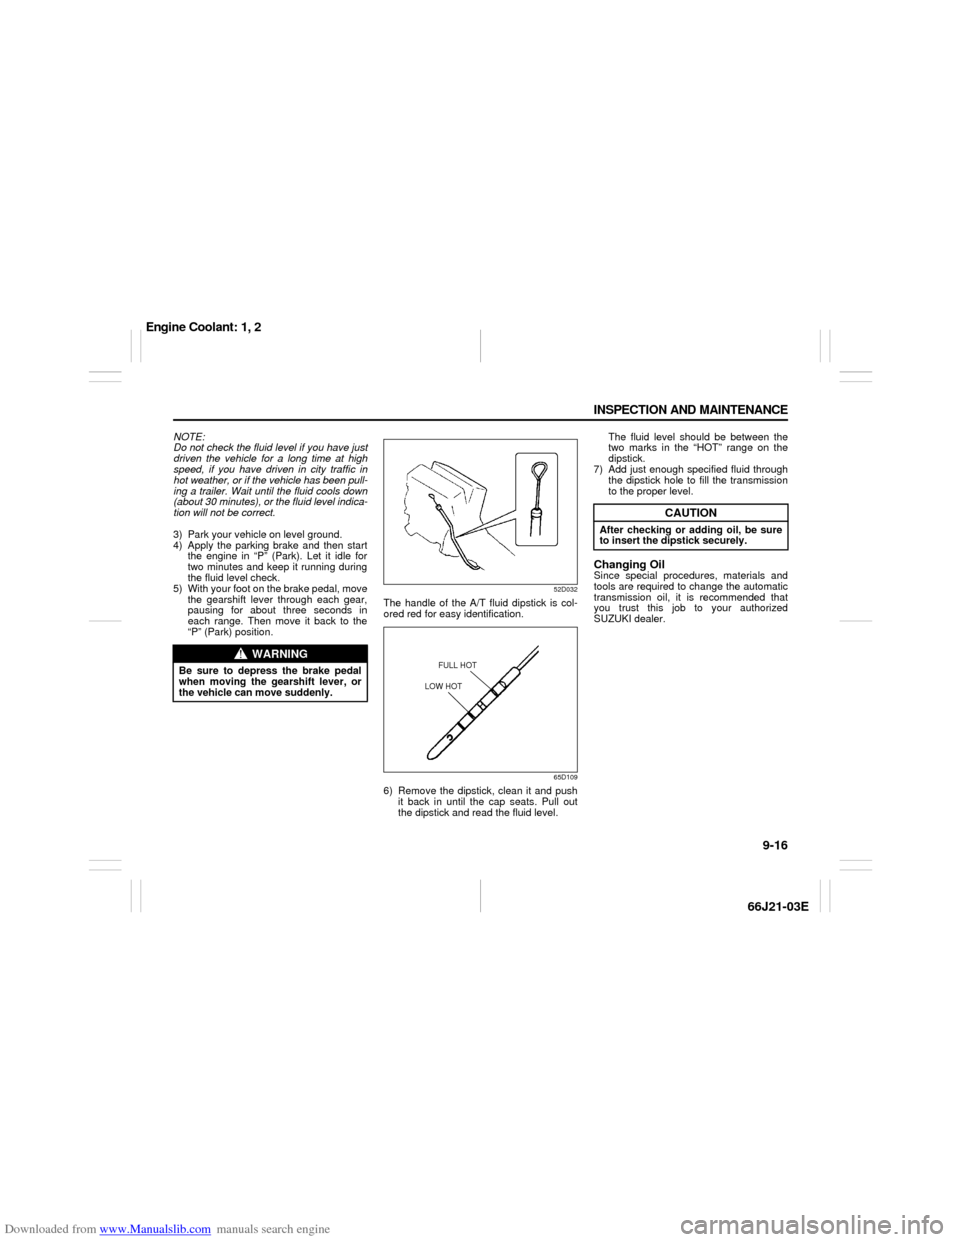
52D032
The handle of the A/T fluid dipstick is col-
ored red for easy identification.
65D109
6) Remove the dipstick, clean it and push
it back in until the cap seats. Pull out
the dipstick and read the fluid level. The fluid level should be between the
two marks in the “HOT” range on the
dipstick.
7) Add just enough specified fluid through
the dipstick hole to fill the transmission
to the proper level.
Changing OilSince special procedures, materials and
tools are required to change the automatic
transmission oil, it is recommended that
you trust this job to your authorized
SUZUKI dealer.
WARNING
Be sure to depress the brake pedal
when moving the gearshift lever, or
the vehicle can move suddenly.
FULL HOT
LOW HOT
CAUTION
After checking or adding oil, be sure
to insert the dipstick securely.
Engine Coolant: 1, 2