2007 SUZUKI FORENZA height
[x] Cancel search: heightPage 14 of 225
1-2 SEATS AND RESTRAINT SYSTEMS
85Z03-03E
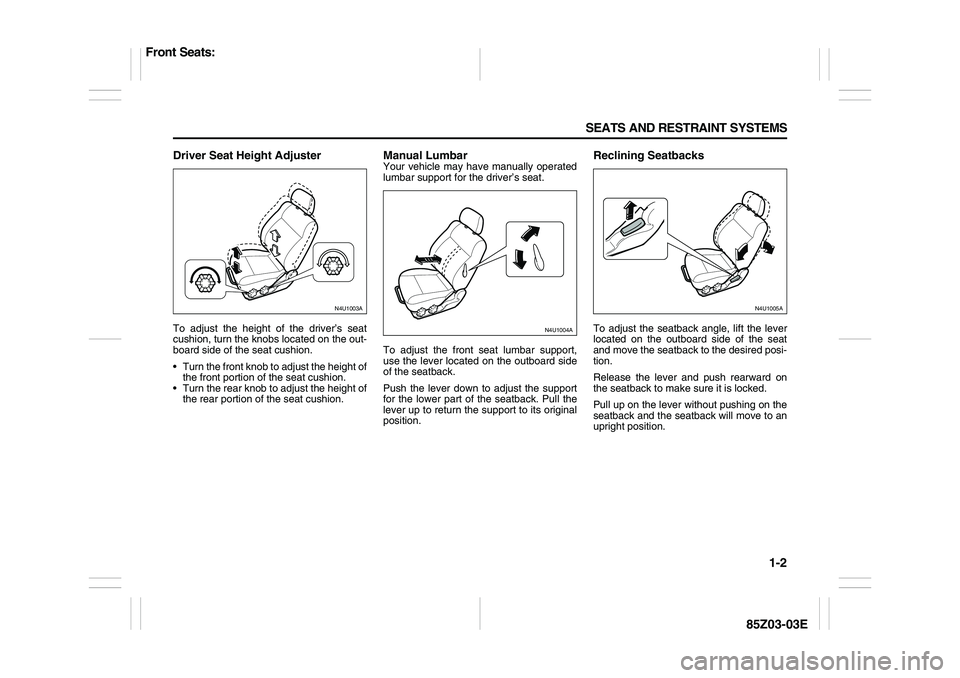
Driver Seat Height AdjusterTo adjust the height of the driver’s seat
cushion, turn the knobs located on the out-
board side of the seat cushion.
Turn the front knob to adjust the height of
the front portion of the seat cushion.
Turn the rear knob to adjust the height of
the rear portion of the seat cushion.
Manual LumbarYour vehicle may have manually operated
lumbar support for the driver’s seat.
To adjust the front seat lumbar support,
use the lever located on the outboard side
of the seatback.
Push the lever down to adjust the support
for the lower part of the seatback. Pull the
lever up to return the support to its original
position.
Reclining SeatbacksTo adjust the seatback angle, lift the lever
located on the outboard side of the seat
and move the seatback to the desired posi-
tion.
Release the lever and push rearward on
the seatback to make sure it is locked.
Pull up on the lever without pushing on the
seatback and the seatback will move to an
upright position.
N4U1003A
N4U1004A
N4U1005A
Front Seats:
Page 20 of 225
1-8 SEATS AND RESTRAINT SYSTEMS
85Z03-03E
able to unbuckle the safety belt quickly
if you ever had to.
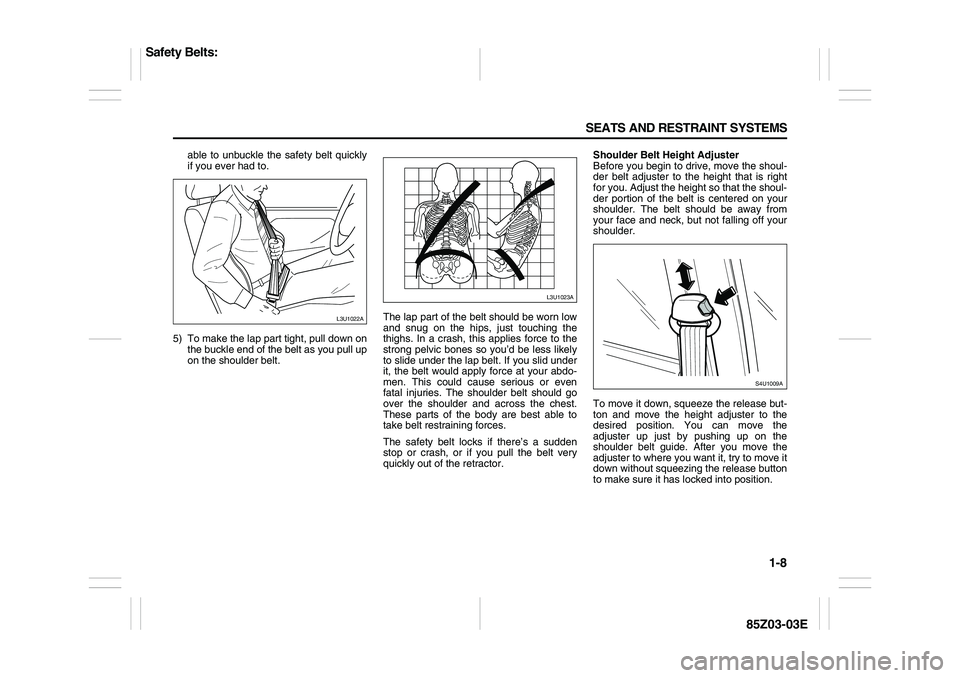
5) To make the lap part tight, pull down on
the buckle end of the belt as you pull up
on the shoulder belt. The lap part of the belt should be worn low
and snug on the hips, just touching the
thighs. In a crash, this applies force to the
strong pelvic bones so you’d be less likely
to slide under the lap belt. If you slid under
it, the belt would apply force at your abdo-
men. This could cause serious or even
fatal injuries. The shoulder belt should go
over the shoulder and across the chest.
These parts of the body are best able to
take belt restraining forces.
The safety belt locks if there’s a sudden
stop or crash, or if you pull the belt very
quickly out of the retractor.Shoulder Belt Height Adjuster
Before you begin to drive, move the shoul-
der belt adjuster to the height that is right
for you. Adjust the height so that the shoul-
der portion of the belt is centered on your
shoulder. The belt should be away from
your face and neck, but not falling off your
shoulder.
To move it down, squeeze the release but-
ton and move the height adjuster to the
desired position. You can move the
adjuster up just by pushing up on the
shoulder belt guide. After you move the
adjuster to where you want it, try to move it
down without squeezing the release button
to make sure it has locked into position.
L3U1022A
L3U1023A
S4U1009A
Safety Belts:
Page 30 of 225
1-18 SEATS AND RESTRAINT SYSTEMS
85Z03-03E
Question: What are the different types
of add-on child restraints?
Answer: Add-on child restraints, which are
purchased by the vehicle’s owner, are
available in four basic types. Selection of a
particular restraint should take into consid-
eration not only the child’s weight, height
and age but also whether or not the
restraint will be compatible with the motor
vehicle in which it will be used.
For most basic types of child restraints,
there are many different models available.
When purchasing a child restraint, be sure
it is designed to be used in a motor vehicle.
If it is, the restraint will have a label saying
that it meets federal motor vehicle safety
standards.
The restraint manufacturer’s instructions
that come with the restraint, state the
weight and height limitations for a particu-
lar child restraint. In addition, there are
many kinds of restraints available for chil-
dren with special needs.
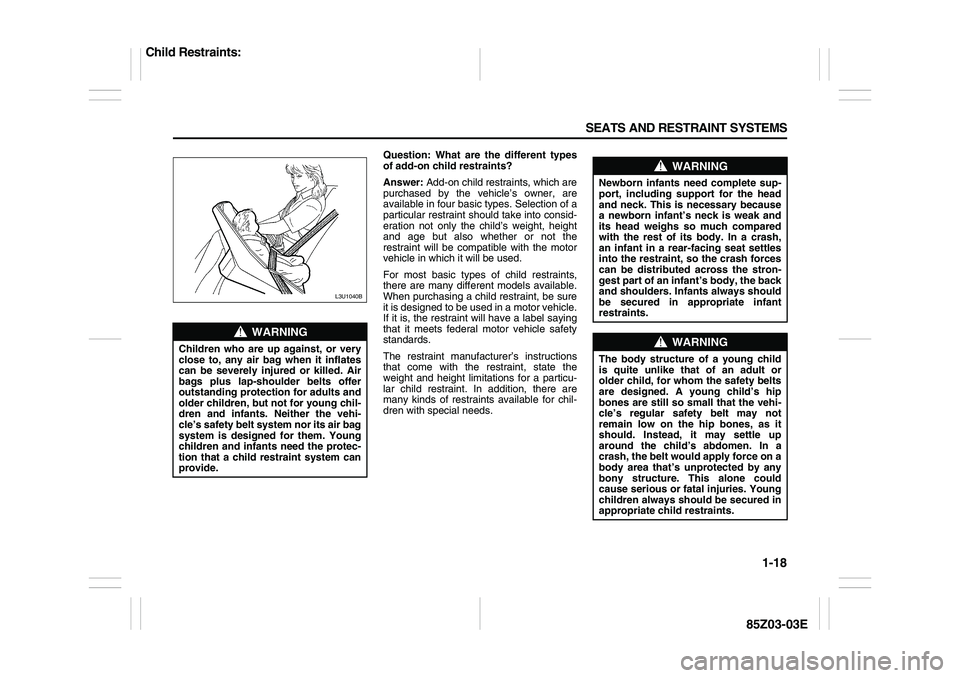
WARNING
Children who are up against, or very
close to, any air bag when it inflates
can be severely injured or killed. Air
bags plus lap-shoulder belts offer
outstanding protection for adults and
older children, but not for young chil-
dren and infants. Neither the vehi-
cle’s safety belt system nor its air bag
system is designed for them. Young
children and infants need the protec-
tion that a child restraint system can
provide.
L3U1040B
WARNING
Newborn infants need complete sup-
port, including support for the head
and neck. This is necessary because
a newborn infant’s neck is weak and
its head weighs so much compared
with the rest of its body. In a crash,
an infant in a rear-facing seat settles
into the restraint, so the crash forces
can be distributed across the stron-
gest part of an infant’s body, the back
and shoulders. Infants always should
be secured in appropriate infant
restraints.
WARNING
The body structure of a young child
is quite unlike that of an adult or
older child, for whom the safety belts
are designed. A young child’s hip
bones are still so small that the vehi-
cle’s regular safety belt may not
remain low on the hip bones, as it
should. Instead, it may settle up
around the child’s abdomen. In a
crash, the belt would apply force on a
body area that’s unprotected by any
bony structure. This alone could
cause serious or fatal injuries. Young
children always should be secured in
appropriate child restraints.
Child Restraints:
Page 80 of 225
3-4 INSTRUMENT PANEL
85Z03-03E
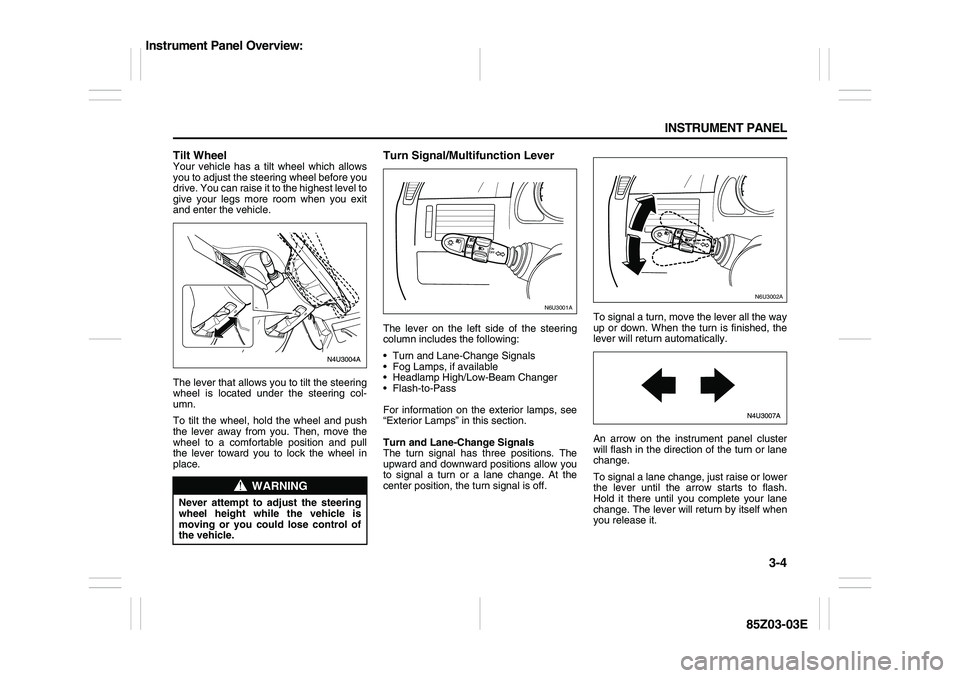
Tilt WheelYour vehicle has a tilt wheel which allows
you to adjust the steering wheel before you
drive. You can raise it to the highest level to
give your legs more room when you exit
and enter the vehicle.
The lever that allows you to tilt the steering
wheel is located under the steering col-
umn.
To tilt the wheel, hold the wheel and push
the lever away from you. Then, move the
wheel to a comfortable position and pull
the lever toward you to lock the wheel in
place.
Turn Signal/Multifunction LeverThe lever on the left side of the steering
column includes the following:
Turn and Lane-Change Signals
Fog Lamps, if available
Headlamp High/Low-Beam Changer
Flash-to-Pass
For information on the exterior lamps, see
“Exterior Lamps” in this section.
Turn and Lane-Change Signals
The turn signal has three positions. The
upward and downward positions allow you
to signal a turn or a lane change. At the
center position, the turn signal is off.To signal a turn, move the lever all the way
up or down. When the turn is finished, the
lever will return automatically.
An arrow on the instrument panel cluster
will flash in the direction of the turn or lane
change.
To signal a lane change, just raise or lower
the lever until the arrow starts to flash.
Hold it there until you complete your lane
change. The lever will return by itself when
you release it.
WARNING
Never attempt to adjust the steering
wheel height while the vehicle is
moving or you could lose control of
the vehicle.
N6U3001A
N6U3002A
Instrument Panel Overview:
Page 164 of 225

5-20 SERVICE AND APPEARANCE CARE
85Z03-03E
Brake Pedal Travel
See your SUZUKI dealer if the brake pedal
does not return to normal height, or if there
is a rapid increase in pedal travel. This
could be a sign of brake trouble.
Brake Adjustment
Every time you make a moderate brake
stop, your disc brakes adjust for wear. If
you rarely make a moderate or heavier
stop, then your brakes might not adjust
correctly. If you drive in that way, then –
very carefully – make a few moderate
brake stops about every 1,000 miles
(1,600 km), so your brakes will adjust prop-
erly.
Replacing Brake System Parts
The braking system on a vehicle is com-
plex. Its many parts have to be of top qual-
ity and work well together if the vehicle is
to have really good braking. When you
replace parts of your braking system – for
example, when your brake linings wear
down and you need new ones put in – be
sure you get new approved SUZUKI
replacement parts. If you don’t, your
brakes may no longer work properly. For
example, if someone puts in brake linings
that are wrong for your vehicle, the balance
between your front and rear brakes can
change – for the worse. The braking per-
formance you’ve come to expect can
change in many other ways if someone
puts in the wrong replacement brake parts.
BatteryYour new vehicle comes with a mainte-
nance free battery. When it’s time for a new
battery, get one that has the replacement
number shown on the original battery’s
label. See “Engine Compartment Over-
view” in this section for battery location.
Vehicle Storage
If you’re not going to drive your vehicle for
25 days or more, remove the black, nega-
tive (–) cable from the battery. This will
help keep your battery from running down.
Contact your SUZUKI dealer to learn how
to prepare your vehicle for longer storage
periods.
Jump StartingIf your battery has run down, you may want
to use another vehicle and some jumper
cables to start your vehicle. Be sure to fol-
low the steps below to do it safely.
1) Check the other vehicle. It must have a
12-volt battery with a negative ground
system.
WARNING
Battery posts, terminals and related
accessories contain lead and lead
compounds, chemicals known to the
State of California to cause cancer
and reproductive harm. Wash hands
after handling.
WARNING
Batteries have acid that can burn you
and gas that can explode. You can be
badly hurt if you aren’t careful. See
the next section, “Jump Starting”, for
tips on working around a battery
without getting hurt.
WARNING
Batteries can hurt you. They can be
dangerous because:
They contain acid that can burn
you.
They contain gas that can explode
or ignite.
They contain enough electricity to
burn you.
If you don’t follow these steps
exactly, some or all of these things
can hurt you.
CAUTION
Ignoring the following steps could
result in costly damage to your vehi-
cle that wouldn’t be covered by your
warranty.
Trying to start your vehicle by push-
ing or pulling it won’t work, and it
could damage your vehicle.
Checking Things Under the Hood:
Page 172 of 225
5-28 SERVICE AND APPEARANCE CARE
85Z03-03E
Windshield Wiper Blade
ReplacementWindshield wiper blades should be
inspected at least twice a year for wear or
cracking. If the wiper blades become brittle
or damaged, or make streaks when wiping,
replace the wiper blades for optimum driv-
ing visibility. Replacement blades come in
different types and are removed in different
ways.
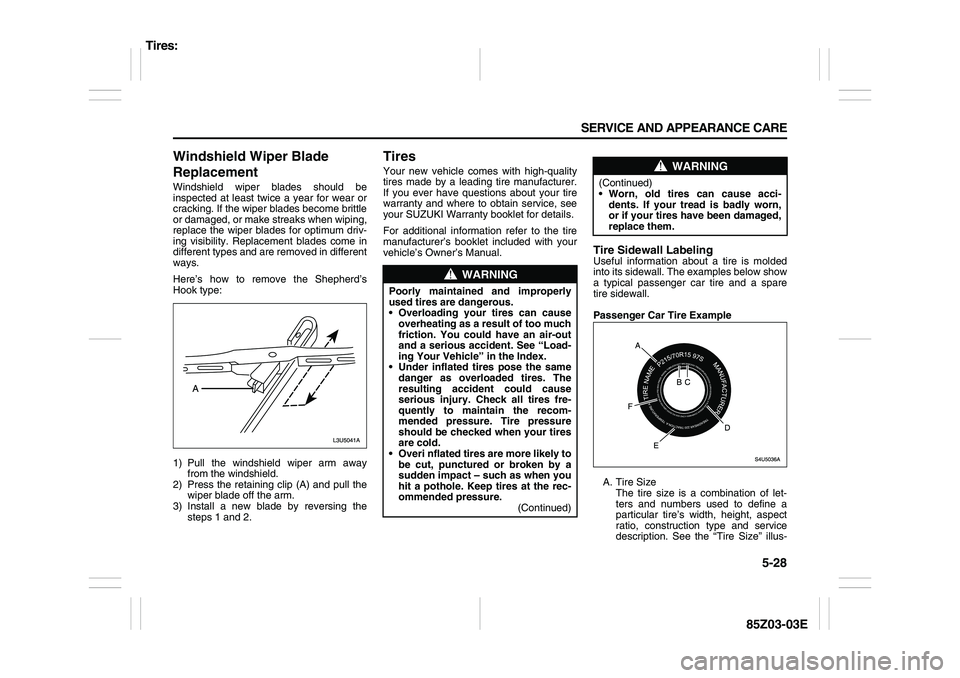
Here’s how to remove the Shepherd’s
Hook type:
1) Pull the windshield wiper arm away
from the windshield.
2) Press the retaining clip (A) and pull the
wiper blade off the arm.
3) Install a new blade by reversing the
steps 1 and 2.
TiresYour new vehicle comes with high-quality
tires made by a leading tire manufacturer.
If you ever have questions about your tire
warranty and where to obtain service, see
your SUZUKI Warranty booklet for details.
For additional information refer to the tire
manufacturer’s booklet included with your
vehicle’s Owner’s Manual.
Tire Sidewall LabelingUseful information about a tire is molded
into its sidewall. The examples below show
a typical passenger car tire and a spare
tire sidewall.
Passenger Car Tire Example
A. Tire Size
The tire size is a combination of let-
ters and numbers used to define a
particular tire’s width, height, aspect
ratio, construction type and service
description. See the “Tire Size” illus-
WARNING
Poorly maintained and improperly
used tires are dangerous.
Overloading your tires can cause
overheating as a result of too much
friction. You could have an air-out
and a serious accident. See “Load-
ing Your Vehicle” in the Index.
Under inflated tires pose the same
danger as overloaded tires. The
resulting accident could cause
serious injury. Check all tires fre-
quently to maintain the recom-
mended pressure. Tire pressure
should be checked when your tires
are cold.
Overi nflated tires are more likely to
be cut, punctured or broken by a
sudden impact – such as when you
hit a pothole. Keep tires at the rec-
ommended pressure.
(Continued)
WARNING
(Continued)
Worn, old tires can cause acci-
dents. If your tread is badly worn,
or if your tires have been damaged,
replace them.
Tires:
Page 174 of 225

5-30 SERVICE AND APPEARANCE CARE
85Z03-03E
and the maximum pressure needed to
support that load. See “Compact
Spare Tire” in this section and “Load-
ing Your Vehicle” in section 4.
E. Tire Inflation Pressure
The temporary use tire or compact
spare tire should be inflated to 60 psi
(420 kPa). For more information on
tire pressure and inflation, see “Tire
Inflation Pressure” in this section.
F. Tire Size
A combination of letters and numbers
defining a tire’s width, height, aspect
ratio, construction type and service
description. The letter “T” as the first
character in the tire size means the
tire is for temporary use only.
Tire Size
The following illustration shows an exam-
ple of a typical passenger car tire size.
A. Tire Type
This letter code indicates the primary
intended use of the tire. The “P” as
the first character in the tire size
means a passenger vehicle tire engi-
neered to standards set by the U.S.
Tire and Rim Association.
B. Tire Width
The three-digit number indicates the
tire section width in millimeters from
sidewall to sidewall.
C. Aspect Ratio
A two-digit number that indicates the
tire height-to-width measurements.
For example, if the tire size aspect
ratio is “70”, as shown in item “C” of
the illustration, it would mean that thetire’s sidewall is 70% as high as it is
wide.
D. Construction Code
A letter code is used to indicate the
type of ply construction in the tire. The
letter “R” means radial ply construc-
tion, the letter “D” means diagonal or
bias ply construction; and the letter
“B” means belted-bias ply construc-
tion.
E. Rim Diameter
Diameter of the wheel in inches.
F. Service Description
These characters represent the load
range and the speed rating of a tire.
The load range represents the load
carrying capacity a tire is certified to
carry. The speed rating is the maxi-
mum speed a tire is certified to carry
a load. Speed ratings range from “A”
to “Z”.
WARNING
Your SUZUKI is equipped with tires
which are all the same type and size.
This is important to ensure proper
steering and handling of the vehicle.
Never mix tires of different size or
type on the four wheels of your vehi-
cle. Mixing tires could cause you to
lose control while driving which may
lead to an accident. The size and type
of tires used should be only those
approved by SUZUKI Motor Corpora-
tion as standard or optional equip-
ment for your vehicle.
Tires:
Page 175 of 225
5-31 SERVICE AND APPEARANCE CARE
85Z03-03E
Glossary of Tire TerminologyAir Pressure:
The amount of air inside the tire pressing
outward on each square inch of the tire. Air
pressure is expressed in pounds per
square inch (psi) or kilopascal (kPa).
Accessory Weight:
This means the combined weight of
optional accessories. Some examples of
optional accessories are automatic trans-
mission, power steering, power brakes,
power windows, power seats, and air con-
ditioning.
Aspect Ratio:
The relationship of a tire’s height to its
width.
Belt:
A rubber coated layer of cords that is
located between the plies and the tread.
Cords may be made from steel or other
reinforcing materials.
Bead:
The tire bead contains steel wires wrapped
by steel cords that hold the tire onto the
rim.
Bias Ply Tire:
A pneumatic tire in which the plies are laid
at alternate angles less than 90 degrees to
the centerline of the tread.Cold Inflation Pressure:
The amount of air pressure in a tire, mea-
sured in pounds per square inch (psi)
before a tire has built up heat from driving.
Curb Weight:
This means the weight of a motor vehicle
with standard and optional equipment
including the maximum capacity of fuel, oil
and coolant, but without passengers and
cargo.
DOT Markings:
A code molded into the sidewall of a tire
signifying that the tire is in compliance with
the U.S. Department of Transportation
motor vehicle safety standards. The DOT
code includes the Tire Identification Num-
ber (TIN), an alphanumeric designator
which can also identify the tire manufac-
turer, production plant, brand and date of
production.
GVWR:
Gross Vehicle Weight Rating.
This is the maximum permissible overall
weight of the fully loaded vehicle (including
all occupants, accessories and cargo).
GAWR:
Gross Axle Weight Rating.
This is the maximum permissible weight on
an individual axle.
Intended Outboard Sidewall:
The side of an asymmetrical tire that must
always face outward when mounted on a
vehicle.Kilopascal (kPa):
The metric unit for air pressure. There are
6.9 kPa’s to one psi.
Light Truck (LT-Metric) Tire:
A tire used on light duty trucks and some
multipurpose passenger vehicles.
Load Index:
An assigned number ranging from 1 to 279
that corresponds to the load carrying
capacity of a tire.
Maximum Inflation Pressure:
The maximum air pressure to which a cold
tire may be inflated. The maximum air
pressure is molded onto the sidewall.
Maximum Load Rating:
The load rating for a tire at the maximum
permissible inflation pressure for that tire.
Maximum Loaded Vehicle Weight:
The sum of curb weight; accessory weight;
vehicle capacity weight; and production
options weight.
Normal Occupant Weight:
The number of occupants a vehicle is
designed to seat multiplied by 150 pounds
(68 kg).
Occupant Distribution:
Distribution of occupants in a vehicle as
specified in the third column of Table 1
(shown below).
Outward Facing Sidewall:
The side of a asymmetrical tire that has a
particular side that faces outward when
Tires: