2007 SUZUKI AERIO car seat
[x] Cancel search: car seatPage 20 of 232

Downloaded from www.Manualslib.com manuals search engine 2-7 BEFORE DRIVING
54G27-03E
Trunk Lid
54G287
54G495
To unlock the lid, insert the key and turn it
clockwise. You can also unlock the lid by
pulling the release lever (if equipped)located to the outboard side of the driver’s
seat.
To lock the lid, lower the lid and press
down on it. The lid is locked automatically.
Internal Trunk Release
54G297
There is a release lever located inside the
trunk, on the rear part of the trunk lid. This
lever is for emergency use so that if a per-
son, such as a child, gets trapped in the
trunk compartment, he can exit the vehicle.
The lever glows in the dark, after a brief
exposure to ambient light, so it can be
found easily. It is operated by pushing it
down in the direction of the arrow.
EXAMPLE
WARNING
Always make sure that the trunk lid is
closed and latched securely. Other-
wise, it may open unexpectedly while
driving. Also completely closing it
helps keep exhaust gases from enter-
ing the car.
CAUTION
Do not use the key to lift up the trunk
lid, or the key may break off in the
lock.
WARNING
To help avoid situations where some-
one might get trapped in the trunk,
keep your vehicle locked when unat-
tended, and do not allow anyone to
play in the trunk.EXAMPLE
Door Locks: 3, 5, 8
Page 26 of 232

Downloaded from www.Manualslib.com manuals search engine 2-13 BEFORE DRIVING
54G27-03E
54G017
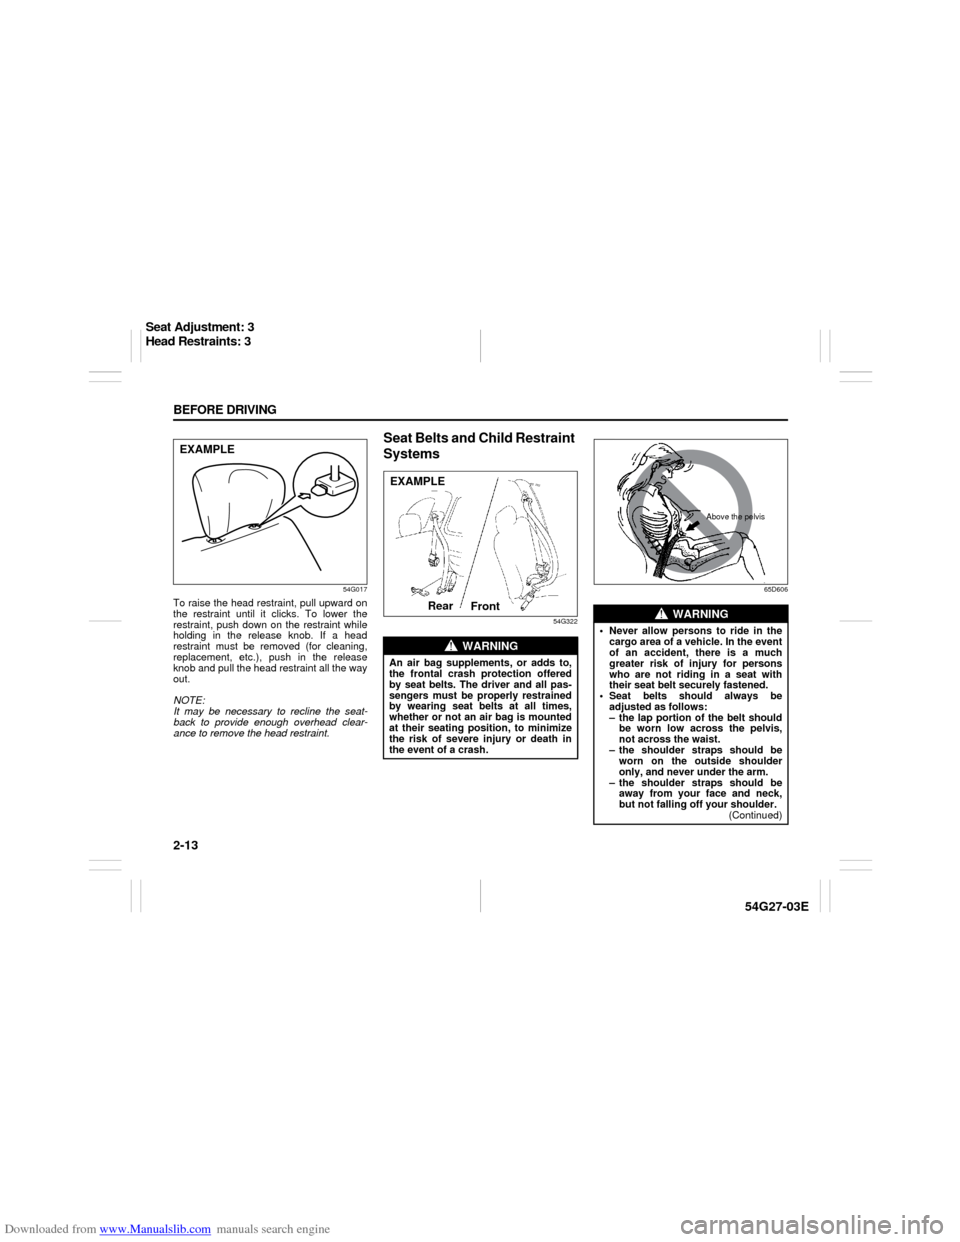
To raise the head restraint, pull upward on
the restraint until it clicks. To lower the
restraint, push down on the restraint while
holding in the release knob. If a head
restraint must be removed (for cleaning,
replacement, etc.), push in the release
knob and pull the head restraint all the way
out.
NOTE:
It may be necessary to recline the seat-
back to provide enough overhead clear-
ance to remove the head restraint.
Seat Belts and Child Restraint
Systems
54G32265D606
EXAMPLE
WARNING
An air bag supplements, or adds to,
the frontal crash protection offered
by seat belts. The driver and all pas-
sengers must be properly restrained
by wearing seat belts at all times,
whether or not an air bag is mounted
at their seating position, to minimize
the risk of severe injury or death in
the event of a crash.EXAMPLE
Rear
Front
WARNING
Never allow persons to ride in the
cargo area of a vehicle. In the event
of an accident, there is a much
greater risk of injury for persons
who are not riding in a seat with
their seat belt securely fastened.
Seat belts should always be
adjusted as follows:
– the lap portion of the belt should
be worn low across the pelvis,
not across the waist.
– the shoulder straps should be
worn on the outside shoulder
only, and never under the arm.
– the shoulder straps should be
away from your face and neck,
but not falling off your shoulder.
(Continued)
Above the pelvis
Seat Adjustment: 3
Head Restraints: 3
Page 28 of 232

Downloaded from www.Manualslib.com manuals search engine 2-15 BEFORE DRIVING
54G27-03E
Lap-Shoulder BeltEmergency Locking Retractor (ELR)
The seat belt has an emergency locking
retractor (ELR), which is designed to lock
the seat belt only during a sudden stop or
impact. It also may lock if you pull the belt
across your body very quickly. If this hap-
pens, let the belt go back to unlock it, then
pull the belt across your body more slowly.
Automatic Locking Retractor (ALR)
The front passenger’s seat belt and the
rear seat belts have emergency locking
retractors (ELRs) that can be temporarily
converted to function as automatic locking
retractors (ALRs). The ALR mode should
be used if you need to secure a child
restraint system in the seat. Refer to the
“Child Restraint Systems” section for
details.Safety reminder
60A038
60A040
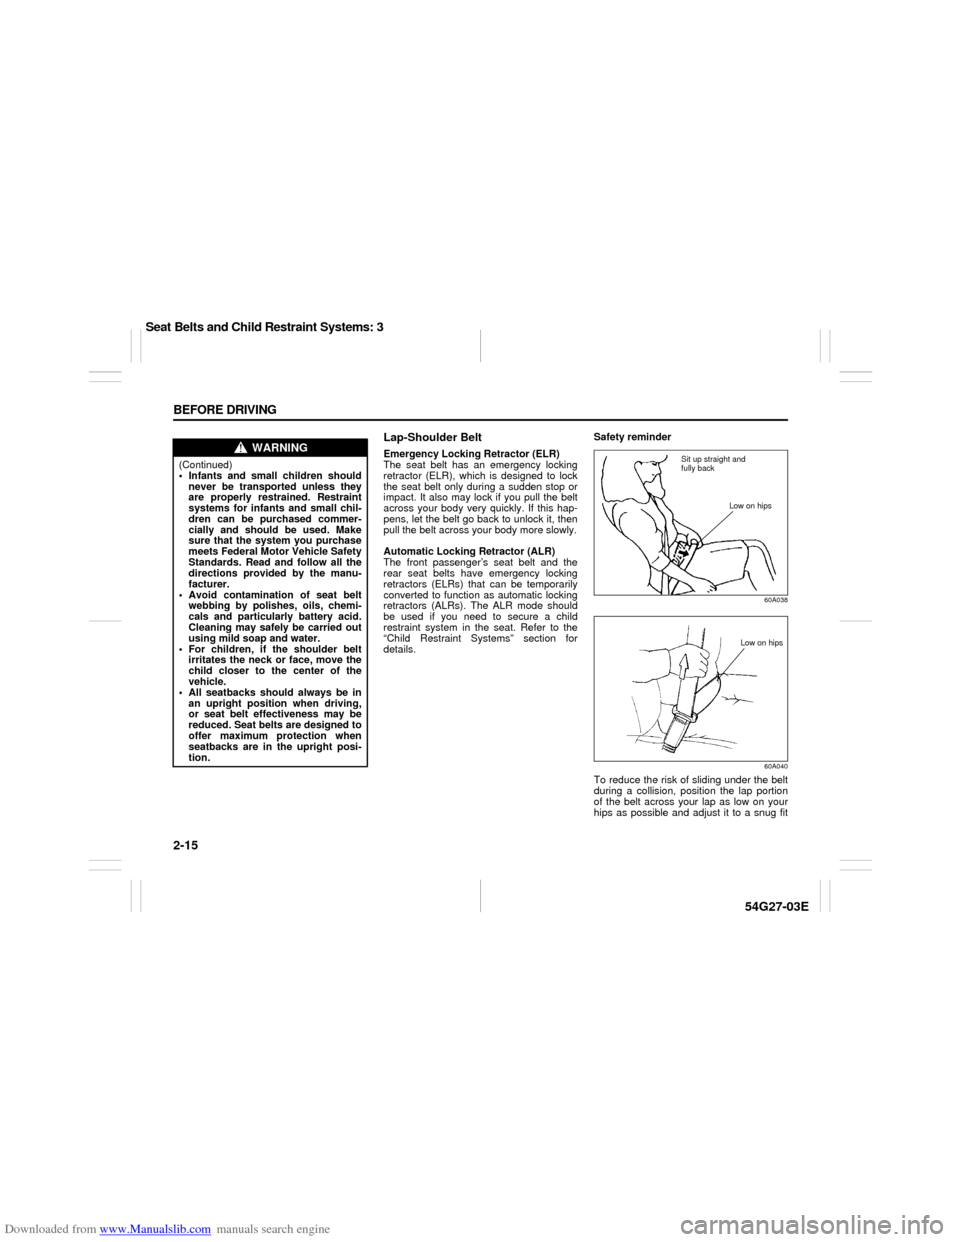
To reduce the risk of sliding under the belt
during a collision, position the lap portion
of the belt across your lap as low on your
hips as possible and adjust it to a snug fit
WARNING
(Continued)
Infants and small children should
never be transported unless they
are properly restrained. Restraint
systems for infants and small chil-
dren can be purchased commer-
cially and should be used. Make
sure that the system you purchase
meets Federal Motor Vehicle Safety
Standards. Read and follow all the
directions provided by the manu-
facturer.
Avoid contamination of seat belt
webbing by polishes, oils, chemi-
cals and particularly battery acid.
Cleaning may safely be carried out
using mild soap and water.
For children, if the shoulder belt
irritates the neck or face, move the
child closer to the center of the
vehicle.
All seatbacks should always be in
an upright position when driving,
or seat belt effectiveness may be
reduced. Seat belts are designed to
offer maximum protection when
seatbacks are in the upright posi-
tion.
Sit up straight and
fully back
Low on hips
Low on hips
Seat Belts and Child Restraint Systems: 3
Page 32 of 232

Downloaded from www.Manualslib.com manuals search engine 2-19 BEFORE DRIVING
54G27-03E
Stowing Rear Center Lap-Shoulder
BeltBe sure to stow the belt after the belt is
retracted completely.
54G368
To stow the belt, insert the latch plate (A)
into the slot of the holder. To pull the belt
out, simply pull the latch plate.
Seat Belt ReminderDriver’s seat belt reminder light
54G530
Front passenger’s seat belt reminder
light
54G515
When the driver and front passenger don’t
buckle their seat belts, the driver’s seat belt
reminder light in the instrument cluster and
the front passenger’s seat belt reminder
light in the information display will come on
and a buzzer will sound as a reminder to
the driver and front passenger to buckle
their seat belts.
The seat belt reminder functions as shown
in the figure below. There are some differ-
ences between the driver’s seat belt
reminder and the front passenger’s seat
belt reminder. For more details, refer to the
explanation below.
WARNING
If you park your vehicle outdoors in
direct sunlight or in hot weather, an
exposed latch plate can get hot
enough to burn you. Be careful not to
touch a hot latch plate.
(A)
WARNING
It is absolutely essential that the
driver and passengers wear their seat
belts at all times. Persons who are
not wearing seat belts have a much
greater risk of injury if an accident
occurs. Make a regular habit of buck-
ling your seat belt before putting the
key in the ignition.
Seat Belts and Child Restraint Systems: 3
Page 40 of 232

Downloaded from www.Manualslib.com manuals search engine 2-27 BEFORE DRIVING
54G27-03E
Anchors and Tethers for Children.) The
anchors are located where the rear of the
seat cushion meets the bottom of the seat-
back. Their position is identified by a small
round label affixed to the seatback as
shown in the illustration.
Install a LATCH-type child restraint system
according to the instructions provided by
the child restraint system manufacturer.
After installing the child restraint system,
try moving it in all directions, especially for-
ward, to make sure the flexible straps or
rigid connecting bars are securely latched
to the anchors.
NOTE:
Although there are three second row seat-
ing positions, you cannot install three
LATCH type child restraints in the second
row seats. You can install one or two
LATCH restraint(s). Be sure to install the
LATCH type child restraint(s) in the out-
board seating positions.If your LATCH restraint has flexible lower
connecting straps, these general instruc-
tions apply:
1) If possible, fold the seatback rearward
for easier installation.
65D339
2) Place the child restraint in the second
row seat, feeding the strap hooks
through the slots in the seat cushion or
the slots in the seatback bottom.
65D340
3) Snap the strap hooks to the anchors.
Take care not to pinch your fingers.
65D341
4) Return the seatback to the normal,
upright position. Tighten the lower
straps as described in the child restraint
EXAMPLE
EXAMPLEEXAMPLE
Seat Belts and Child Restraint Systems: 3
Page 41 of 232

Downloaded from www.Manualslib.com manuals search engine 2-28 BEFORE DRIVING
54G27-03E
owner’s manual. Attach the top tether
strap, if applicable.
65D342
5) Make sure the child restraint is securely
fastened by trying to move the child
restraint system in all directions, espe-
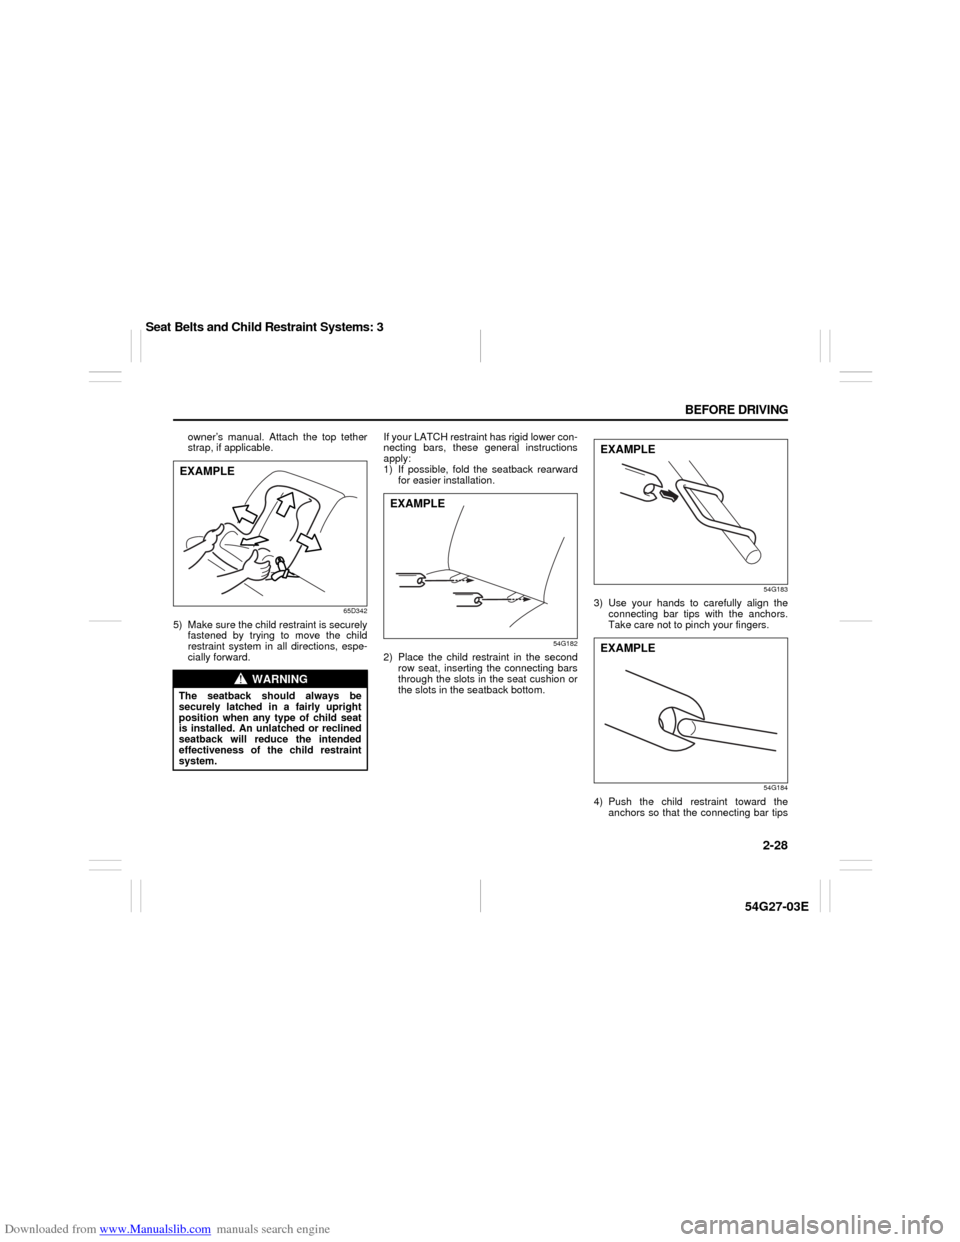
cially forward.If your LATCH restraint has rigid lower con-
necting bars, these general instructions
apply:
1) If possible, fold the seatback rearward
for easier installation.
54G182
2) Place the child restraint in the second
row seat, inserting the connecting bars
through the slots in the seat cushion or
the slots in the seatback bottom.
54G183
3) Use your hands to carefully align the
connecting bar tips with the anchors.
Take care not to pinch your fingers.
54G184
4) Push the child restraint toward the
anchors so that the connecting bar tips
WARNING
The seatback should always be
securely latched in a fairly upright
position when any type of child seat
is installed. An unlatched or reclined
seatback will reduce the intended
effectiveness of the child restraint
system.EXAMPLE
EXAMPLE
EXAMPLEEXAMPLE
Seat Belts and Child Restraint Systems: 3
Page 42 of 232

Downloaded from www.Manualslib.com manuals search engine 2-29 BEFORE DRIVING
54G27-03E
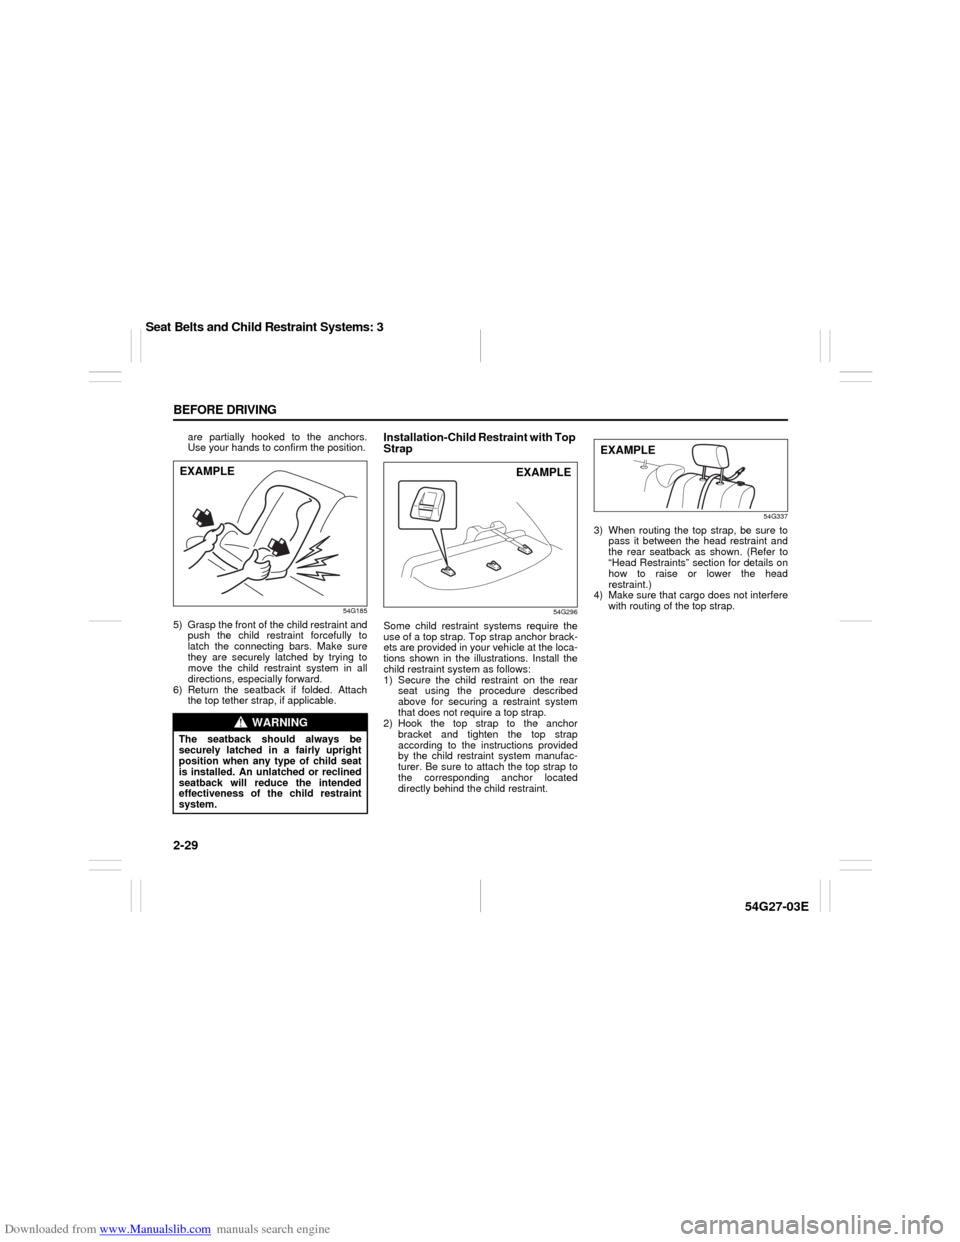
are partially hooked to the anchors.
Use your hands to confirm the position.
54G185
5) Grasp the front of the child restraint and
push the child restraint forcefully to
latch the connecting bars. Make sure
they are securely latched by trying to
move the child restraint system in all
directions, especially forward.
6) Return the seatback if folded. Attach
the top tether strap, if applicable.
Installation-Child Restraint with Top
Strap
54G296
Some child restraint systems require the
use of a top strap. Top strap anchor brack-
ets are provided in your vehicle at the loca-
tions shown in the illustrations. Install the
child restraint system as follows:
1) Secure the child restraint on the rear
seat using the procedure described
above for securing a restraint system
that does not require a top strap.
2) Hook the top strap to the anchor
bracket and tighten the top strap
according to the instructions provided
by the child restraint system manufac-
turer. Be sure to attach the top strap to
the corresponding anchor located
directly behind the child restraint.
54G337
3) When routing the top strap, be sure to
pass it between the head restraint and
the rear seatback as shown. (Refer to
“Head Restraints” section for details on
how to raise or lower the head
restraint.)
4) Make sure that cargo does not interfere
with routing of the top strap.
WARNING
The seatback should always be
securely latched in a fairly upright
position when any type of child seat
is installed. An unlatched or reclined
seatback will reduce the intended
effectiveness of the child restraint
system.EXAMPLE
EXAMPLE
EXAMPLE
Seat Belts and Child Restraint Systems: 3
Page 44 of 232

Downloaded from www.Manualslib.com manuals search engine 2-31 BEFORE DRIVING
54G27-03E
Seat Belt Pretensioner System
52D011
Your vehicle is equipped with a seat belt
pretensioner system at the front seating
positions. You can use the pretensioner
seat belts in the same manner as ordinary
seat belts.
The seat belt pretensioner system is acti-
vated based on crash severity. This system
does not work when the seat belt is
unbuckled. The crash sensors and theelectronic controller of the air bag system
also control the seat belt pretensioners.
For precautions and general information
including servicing the pretensioner sys-
tem, refer to the “Supplemental Restraint
System (air bags)” section in addition to
this “Seat Belt Pretensioner System” sec-
tion, and follow all those precautions.
The pretensioner is located in each front
seat belt retractor. The pretensioner tight-
ens the seat belt so the belt fits the occu-
pant’s body more snugly in the event of a
frontal crash. The retractors will remain
locked after the pretensioners are acti-
vated. Upon activation, some noise will
occur and some smoke may be released.
These conditions are not harmful and do
not indicate a fire in the vehicle.
The driver and all passengers must be
properly restrained by wearing seat belts
at all times, whether or not a pretensioner
is equipped at their seating position, to
minimize the risk of severe injury or death
in the event of a crash. Sit fully back in the
seat; sit up straight; do not lean forward or
sideways. Adjust the belt so the lap portion
of the belt is worn low across the pelvis,
not across the waist. Please refer to the
“Seat Adjustment” section and the instruc-
tions and precautions about the seat belts
in this “Seat Belts and Child Restraint Sys-
tems” section for details on proper seat
and seat belt adjustments.
Please note that the pretensioners will acti-
vate only in severe frontal collisions. They
WARNING
(Continued)
To avoid turning off the front passen-
ger’s air bag when using a seat belt
extender in the front passenger’s
seat, be sure to follow these instruc-
tions.
First insert the latch plate of the
vehicle seat belt into the buckle of
the seat belt extender.
While you are sitting in the seat,
insert the latch plate of the seat
belt extender into the vehicle seat
belt buckle.
Confirm that the “PASS AIRBAG
OFF” indicator is not illuminated
when you are sitting in the seat
with the seat belt buckled.
When unfastening the seat belt,
unlatch the latch plate of the seat
belt extender from the vehicle seat
belt buckle first.
When not using the seat belt
extender, remove and stow it.
WARNING
This section of the owner’s manual
describes your SUZUKI’s SEAT BELT
PRETENSIONER SYSTEM. Please
read and follow ALL these instruc-
tions carefully to minimize your risk
of severe injury or death.EXAMPLE
Seat Belts and Child Restraint Systems: 3