2007 SUBARU TRIBECA maintenance reset
[x] Cancel search: maintenance resetPage 178 of 377

Audio 5-7
– CONTINUED –
matically search for a receivable station
and stop at the first one it finds. This func-
tion may not be available, however, when
radio signals are weak. In such a situation,
perform manual tuning to select the de-
sired station. �V
Automatic tuning (SCAN)
Press the “SCAN” button (7) to change the
radio to the SCAN mode. In this mode, the
radio scans through the radio band until a
station is found. The radio will stop at the
station for five seconds while displaying
the frequency, after which scanning will
continue until the entire band has been
scanned from the low end to the high end.
Press the “SCAN” button again to cancel
the SCAN mode and to stop on any dis-
played frequency.
Press the “ ” or “ ” side of the SEEK
FLDR (6) button again to cancel the scan
mode and to stop on any displayed fre-
quency.
When the “SCAN” button is pressed for
automatic tuning, stations are scanned in
the direction of low frequencies to high fre-
quencies only.
Automatic tuning may not function proper-
ly if the station reception is weakened by
distance from the station or proximity to
tall buildings and hills. �T
Selecting preset stations
Presetting a station with a preset button
(9) allows you to select that station in a
single operation. Up to six, AM, FM1 and
FM2 stations each may be preset. �T How to preset stations
1. Press the “FM” (2) or “AM” (1) button to
select FM1, FM2, or AM reception.
2. Press the “SCAN” button (7) or tune
the radio manually until the desired station
frequency is displayed.
3. Press one of the preset buttons (9) for
more than 1.5 seconds to store the fre-
quency. If the button is pressed for less
than 1.5 seconds, the preceding selection
will remain in memory.
NOTE �y If the connection between the radio
and battery is broken for any reason
such as vehicle maintenance or radio
removal, all stations stored in the pre-
set buttons are cleared. If this occurs,
it is necessary to reset the preset but- tons.�y If a cell phone is placed near the ra-
dio, it may cause the radio to emit
noise when it receives calls. This noise
does not indicate a radio fault. �T Rear seat entertainment
If your vehicle is equipped with a Rear Seat Entertainment System, you can en-
joy audio outputs from the system through
the vehicle’s speakers by pressing the
“RSE AUX” button. Press the button again
to return to the audio set sound.
Page 187 of 377

5-16 Audio
matically search for a receivable station
and stop at the first one it finds. This func-
tion may not be available, however, when
radio signals are weak. In such a situation,
perform manual tuning to select the de- sired station. �VScan tuning (SCAN)
Press the “SCAN” button (7) to change the
radio to the SCAN mode. In this mode, the
radio scans through the radio band until a
station is found. The radio will stop at the
station for five seconds while displaying
the frequency, after which scanning will
continue until the entire band has been
scanned from the low end to the high end.
Press the “SCAN” button again to cancel
the SCAN mode and to stop on any dis-
played frequency.
Press the “ ” or “ ” side of the SEEK
FLDR button (6) again to cancel the scan
mode and to stop on any displayed fre-
quency.
When the “SCAN” button is pressed for
automatic tuning, stations are scanned in
the direction of low frequencies to high fre-
quencies only.
Automatic tuning may not function proper-
ly if the station reception is weakened by
distance from the station or proximity to
tall buildings and hills. �T
Selecting preset stations
Presetting a station with a preset button
allows you to select that station in a single
operation. Up to six AM, FM1 and FM2
stations each may be preset. �T How to preset stations
1. Press the “FM” (2) or “AM” (1) button to
select FM1, FM2 or AM reception.
2. Press the “SCAN” button (7) or tune
the radio manually until the desired station
frequency is displayed.
3. Press one of the preset buttons for
more than 1.5 seconds to store the fre-
quency. If the button is pressed for less
than 1.5 seconds, the preceding selection
will remain in memory.
NOTE �y If the connection between the radio
and battery is broken for any reason
such as vehicle maintenance or radio
removal, all stations stored in the pre-
set buttons are cleared. If this occurs,
it is necessary to reset the preset but- tons.�y If a cell phone is placed near the ra-
dio, it may cause the radio to emit
noise when it receives calls. This noise
does not indicate a radio fault. �T Rear seat entertainment
If your vehicle is equipped with a Rear Seat Entertainment System, you can en-
joy audio outputs from the system through
the vehicle’s speakers by pressing the
“RSE AUX” button. Press the button again
to return to the audio set sound.
Page 321 of 377

11 - 2 4 Maintenance and service
ery difference of 10 °F (5.6 °C) between the
temperature in the garage and the tem-
perature outside. By way of example, the
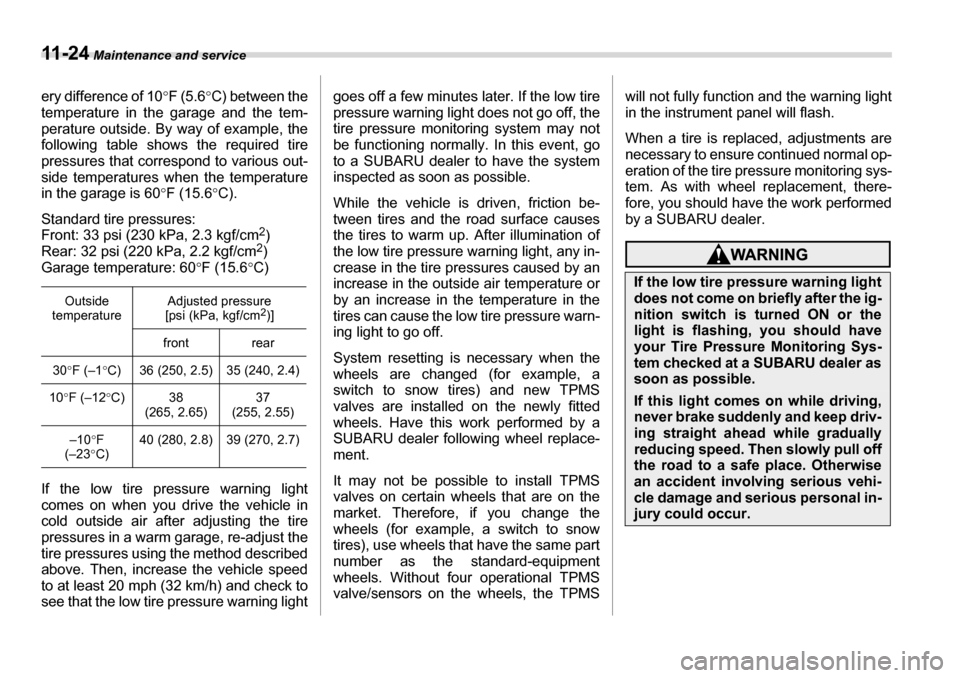
following table shows the required tire
pressures that correspond to various out-
side temperatures when the temperature
in the garage is 60 °F (15.6 °C).
Standard tire pressures:
Front: 33 psi (230 kPa, 2.3 kgf/cm 2
)
Rear: 32 psi (220 kPa, 2.2 kgf/cm 2
)
Garage temperature: 60 °F (15.6 °C)
If the low tire pressure warning light
comes on when you drive the vehicle in
cold outside air after adjusting the tire
pressures in a warm garage, re-adjust the
tire pressures using the method described
above. Then, increase the vehicle speed
to at least 20 mph (32 km/h) and check to
see that the low tire pressure warning light goes off a few minutes later. If the low tire
pressure warning light does not go off, the
tire pressure monitoring system may not
be functioning normally. In this event, go
to a SUBARU dealer to have the system
inspected as soon as possible.
While the vehicle is driven, friction be-
tween tires and the road surface causes
the tires to warm up. After illumination of
the low tire pressure warning light, any in-
crease in the tire pressures caused by an
increase in the outside air temperature or
by an increase in the temperature in the
tires can cause the low tire pressure warn-
ing light to go off.
System resetting is necessary when the
wheels are changed (for example, a
switch to snow tires) and new TPMS
valves are installed on the newly fitted
wheels. Have this work performed by a
SUBARU dealer following wheel replace- ment.
It may not be possible to install TPMS
valves on certain wheels that are on the
market. Therefore, if you change the
wheels (for example, a switch to snow
tires), use wheels that have the same part
number as the standard-equipment
wheels. Without four operational TPMS
valve/sensors on the wheels, the TPMS
will not fully function and the warning light
in the instrument panel will flash.
When a tire is replaced, adjustments are
necessary to ensure continued normal op- eration of the tire pressure monitoring sys-
tem. As with wheel replacement, there-
fore, you should have the work performed
by a SUBARU dealer.
Outside
temperature Adjusted pressure
[psi (kPa, kgf/cm 2
)]
front rear
30 °F (–1 °C) 36 (250, 2.5) 35 (240, 2.4)
10 °F (–12 °C) 38
(265, 2.65) 37
(255, 2.55)
–10 °F
(–23 °C) 40 (280, 2.8) 39 (270, 2.7)
If the low tire pressure warning light
does not come on briefly after the ig-
nition switch is turned ON or the
light is flashing, you should have
your Tire Pressure Monitoring Sys-
tem checked at a SUBARU dealer as
soon as possible.
If this light comes on while driving,
never brake suddenly and keep driv-
ing straight ahead while gradually
reducing speed. Then slowly pull off
the road to a safe place. Otherwise
an accident involving serious vehi-
cle damage and serious personal in-
jury could occur.
Page 322 of 377

Maintenance and service 11 - 2 5
– CONTINUED –
�„
Tire inspection
Check on a daily basis that the tires are
free from serious damage, nails, and
stones. At the same time, check the tires
for abnormal wear.
Contact your SUBARU dealer immediate-
ly if you find any problem.
NOTE �y When the wheels and tires strike curbs or are subjected to harsh treat-
ment as when the vehicle is driven on a
rough surface, they can suffer damage
that cannot be seen with the naked eye.
This type of damage does not become
evident until time has passed. Try not
to drive over curbs, potholes or on oth-
er rough surfaces. If doing so is un-
avoidable, keep the vehicle’s speed
down to a walking pace or less, and ap-
proach the curbs as squarely as possi-
ble. Also, make sure the tires are not
pressed against the curb when you
park the vehicle. �y
If you feel unusual vibration while
driving or find it difficult to steer the ve-
hicle in a straight line, one of the tires
and/or wheels may be damaged. Drive
slowly to the nearest authorized
SUBARU dealer and have the vehicle
inspected. �„ Tire pressures and wear
Maintaining the correct tire pressures
helps to maximize the tires’ service lives
and is essential for good running perfor-
mance. Check and, if necessary, adjust
the pressure of each tire (including the
spare) at least once a month (for example,
during a fuel stop) and before any long
journey. Check the tire pressures when the tires
are cold. Use a pressure gauge to adjust
the tire pressures to the values shown on
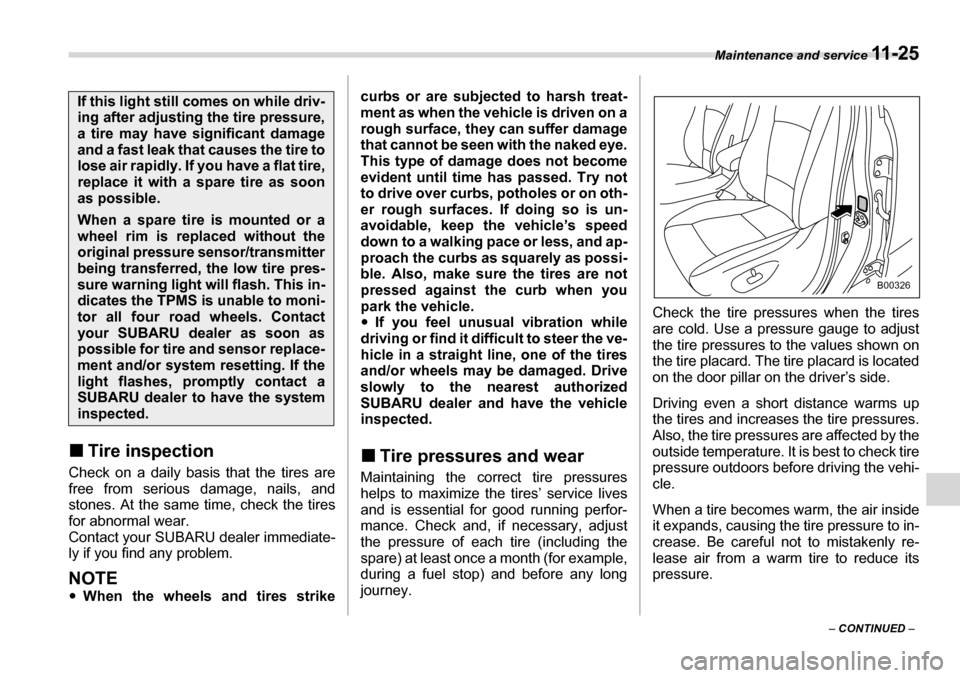
the tire placard. The tire placard is located
on the door pillar on the driver’s side.
Driving even a short distance warms up
the tires and increases the tire pressures. Also, the tire pressures are affected by the
outside temperature. It is best to check tire
pressure outdoors before driving the vehi- cle.
When a tire becomes warm, the air inside
it expands, causing the tire pressure to in-
crease. Be careful not to mistakenly re-
lease air from a warm tire to reduce its
pressure.
If this light still comes on while driv-
ing after adjusting the tire pressure,
a tire may have significant damage
and a fast leak that causes the tire to
lose air rapidly. If you have a flat tire,
replace it with a spare tire as soon
as possible.
When a spare tire is mounted or a
wheel rim is replaced without the
original pressure sensor/transmitter
being transferred, the low tire pres-
sure warning light will flash. This in-
dicates the TPMS is unable to moni-
tor all four road wheels. Contact
your SUBARU dealer as soon as
possible for tire and sensor replace-
ment and/or system resetting. If the
light flashes, promptly contact a
SUBARU dealer to have the system
inspected.
B00326