2007 SUBARU TRIBECA warning lights
[x] Cancel search: warning lightsPage 131 of 377
3-10 Instruments and controls
: Rear differential oil temperature
warning light
: Windshield washer fluid warning
light
: Door open warning light: Security indicator light
If any lights fail to come on, it indicates a
burned-out bulb or a malfunction of the
corresponding system.
Consult your authorized SUBARU dealer for repair.
�„ Seatbelt warning light and chime
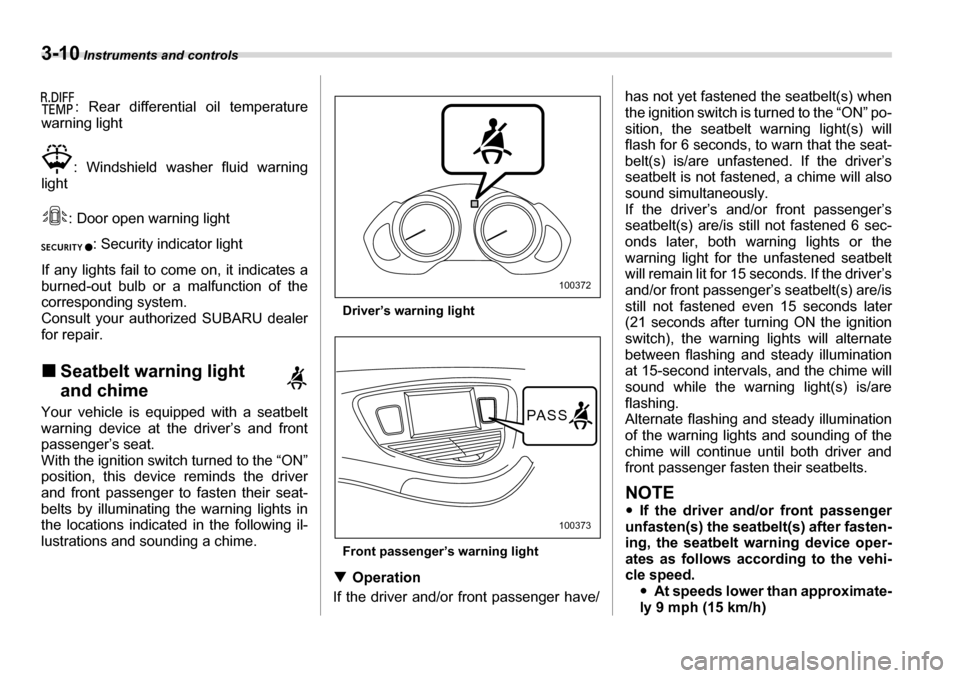
Your vehicle is equipped with a seatbelt
warning device at the driver’s and front
passenger’s seat.
With the ignition switch turned to the “ON”
position, this device reminds the driver
and front passenger to fasten their seat-
belts by illuminating the warning lights in
the locations indicated in the following il-
lustrations and sounding a chime. Driver’s warning light
Front passenger’s warning light
�T Operation
If the driver and/or front passenger have/ has not yet fastened the seatbelt(s) when
the ignition switch is turned to the “ON” po-
sition, the seatbelt warning light(s) will
flash for 6 seconds, to warn that the seat-
belt(s) is/are unfastened. If the driver’s
seatbelt is not fastened, a chime will also
sound simultaneously.
If the driver’s and/or front passenger’s
seatbelt(s) are/is still not fastened 6 sec-
onds later, both warning lights or the
warning light for the unfastened seatbelt
will remain lit for 15 seconds. If the driver’s
and/or front passenger’s seatbelt(s) are/is still not fastened even 15 seconds later
(21 seconds after turning ON the ignition
switch), the warning lights will alternate
between flashing and steady illumination
at 15-second intervals, and the chime will
sound while the warning light(s) is/are
flashing.
Alternate flashing and steady illumination
of the warning lights and sounding of the
chime will continue until both driver and
front passenger fasten their seatbelts.
NOTE �y
If the driver and/or front passenger
unfasten(s) the seatbelt(s) after fasten-
ing, the seatbelt warning device oper-
ates as follows according to the vehi-
cle speed. �yAt speeds lower than approximate-
ly 9 mph (15 km/h)
100372
PASS
100373
Page 138 of 377
Instruments and controls 3-17
– CONTINUED –
warning light illuminate simultaneously,
take the following steps:
1. Stop the vehicle in the nearest safe, flat
place.
2. Shut down the engine, then restart it.
3. Release the parking brake. If both
warning lights go out, the EBD system
may be faulty.
Drive carefully to the nearest SUBARU
dealer and have the system inspected.
4. If both warning lights come on again
and stay illuminated after the engine has
been restarted, shut down the engine
again, apply the parking brake, and check
the brake fluid level.
5. If the brake fluid level is not below the
“MIN” mark, the EBD system may be
faulty. Drive carefully to the nearest
SUBARU dealer and have the system in-
spected.
6. If the brake fluid level is below the
“MIN” mark, DO NOT drive the vehicle. In-
stead, have the vehicle towed to the near-
est SUBARU dealer for repair. �„
Low fuel warning light
The low fuel warning light comes on when
the tank is nearly empty approximately 2.6
US gal (10 liters, or 2.2 Imp gal). It only op-
erates when the ignition switch is in the
“ON” position.
NOTE
This light does not go out unless the
tank is replenished up to an internal
fuel quantity of approximately 4.0 US
gal (15 liters, 3.3 Imp gal). �„ Door open warning light
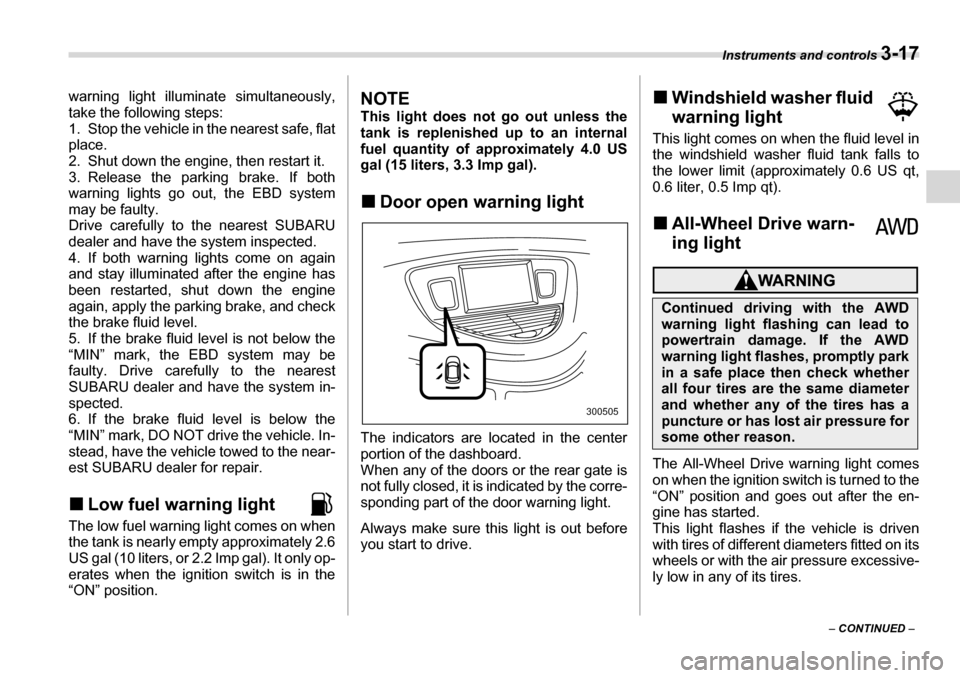
The indicators are located in the center
portion of the dashboard.
When any of the doors or the rear gate is
not fully closed, it is indicated by the corre-
sponding part of the door warning light.
Always make sure this light is out before
you start to drive. �„
Windshield washer fluid
warning light
This light comes on when the fluid level in
the windshield washer fluid tank falls to
the lower limit (approximately 0.6 US qt,
0.6 liter, 0.5 Imp qt). �„ All-Wheel Drive warn-
ing light
The All-Wheel Drive warning light comes
on when the ignition switch is turned to the
“ON” position and goes out after the en-
gine has started.
This light flashes if the vehicle is driven
with tires of different diameters fitted on its
wheels or with the air pressure excessive-
ly low in any of its tires.
300505
Continued driving with the AWD
warning light flashing can lead to
powertrain damage. If the AWD
warning light flashes, promptly park
in a safe place then check whether
all four tires are the same diameter
and whether any of the tires has a
puncture or has lost air pressure for
some other reason.
Page 219 of 377
7-4 Starting and operating
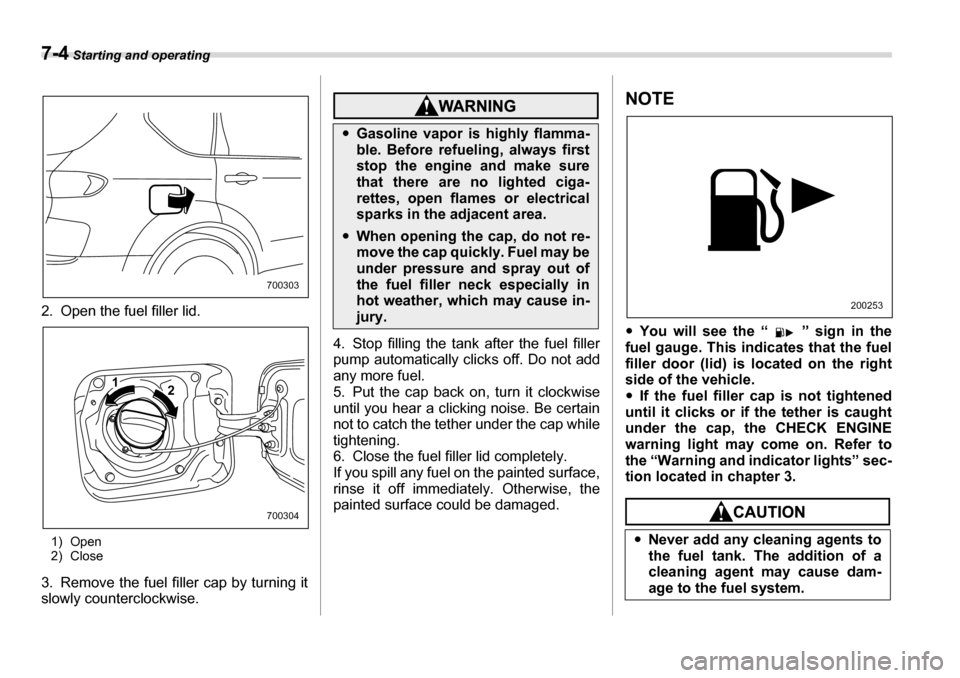
2. Open the fuel filler lid.
1) Open
2) Close
3. Remove the fuel filler cap by turning it
slowly counterclockwise.
4. Stop filling the tank after the fuel filler
pump automatically clicks off. Do not add
any more fuel.
5. Put the cap back on, turn it clockwise
until you hear a clicking noise. Be certain
not to catch the tether under the cap while
tightening.
6. Close the fuel filler lid completely.
If you spill any fuel on the painted surface,
rinse it off immediately. Otherwise, the
painted surface could be damaged.
NOTE �y You will see the “ ” sign in the
fuel gauge. This indicates that the fuel filler door (lid) is located on the right
side of the vehicle. �y If the fuel filler cap is not tightened
until it clicks or if the tether is caught
under the cap, the CHECK ENGINE
warning light may come on. Refer to
the “Warning and indicator lights” sec-
tion located in chapter 3.
700303
2
1
700304
�y
Gasoline vapor is highly flamma-
ble. Before refueling, always first
stop the engine and make sure
that there are no lighted ciga-
rettes, open flames or electrical
sparks in the adjacent area.
�yWhen opening the cap, do not re-
move the cap quickly. Fuel may be
under pressure and spray out of
the fuel filler neck especially in
hot weather, which may cause in-jury.
�yNever add any cleaning agents to
the fuel tank. The addition of a
cleaning agent may cause dam-
age to the fuel system.
200253
Page 221 of 377
7-6 Starting and operating
Under no circumstances should the rear
wheels be jacked off the ground, nor
should the driveshaft be disconnected for
state emission testing. The EPA has issued regulations for in-
specting the On-Board Diagnostic (OBD)
system as part of the state emissions in-
spection. The OBD system is designed to
detect engine and transmission problems
that might cause vehicle emissions to ex-
ceed allowable limits. These inspections
apply to all 1996 model year and newer
passenger cars and light trucks. Over 30
states plus the District of Columbia have
implemented the OBD system inspection. �yThe inspection of the OBD system con-
sists of a visual operational check of the “ CHECK ENGINE ” warning light/malfunc-
tion indicator lamp (MIL) and an examina-
tion of the OBD system with an electronic
scan tool while the engine is running. �y A vehicle passes
the OBD system in-
spection if proper the “ CHECK ENGINE”
warning light/MIL illumination is observed,
there is no stored diagnostic trouble
codes, and the OBD system readiness
monitors are complete. �y A vehicle fails
the OBD inspection if the
“ CHECK ENGINE ” warning light/MIL is
not properly operating or there is one or
more diagnostic trouble codes stored in vehicle’s computer with the “
CHECK EN-
GINE ” warning light/MIL illuminated.
�y A state emission inspection may reject
(not pass or fail) a vehicle if the number of
OBD system readiness monitors “ Not
Ready ” is greater than one. Under this
condition, the vehicle operator should be
instructed to drive his/her vehicle for a few
days to set the monitors and return for an
emission re-inspection. �y Owners of rejected or failing vehicles
should contact their SUBARU Dealer for service.
Preparing to drive
You should perform the following checks
and adjustments every day before you
start driving.
1. Check that all windows, mirrors, and
lights are clean and unobstructed.
2. Check the appearance and condition of
the tires. Also check tires for proper infla-
tion.
3. Look under the vehicle for any sign of
leaks.
4. Check that the hood and rear gate are
fully closed.
5. Check the adjustment of the seat.
6. Check the adjustment of the inside and outside mirrors.
7. Fasten your seatbelt. Check that your
passengers have fastened their seatbelts.
8. Check the operation of the warning and
indicator lights when the ignition switch is
turned to the “ON” position.
9. Check the gauges, indicator and warn-
ing lights after starting the engine.
NOTE
Engine oil, engine coolant, brake fluid,
washer fluid and other fluid levels
should be checked daily, weekly or at
fuel stops.
Page 222 of 377
Starting and operating 7-7
Starting the engine
1. Apply the parking brake.
2. Turn off unnecessary lights and acces- sories.
3. Shift the selector lever to the “P” or “N”
position (preferably “P” position). The
starter will only operate when the select
lever is at the “P” or “N” position.
4. Turn the ignition switch to the “ON” po-
sition and check the operation of the warn-
ing and indicator lights. Refer to the
“Warning and indicator lights” section
(chapter 3).
5. Turn the ignition switch to the “START”position without depressing the accelera-
tor pedal. Release the key immediately af- ter the engine has started.
If the engine does not start, try the follow-
ing.
1) Turn the ignition switch to the “OFF”
position and wait for at least 10 sec-
onds. After checking that the parking
brake is firmly set, turn the ignition
switch to the “START” position while de-
pressing the accelerator pedal slightly(approximately a quarter of the full
stroke). Release the accelerator pedal
as soon as the engine starts.
2) If this fails to start the engine, turn the
ignition switch back to the “OFF” posi-
tion and wait for at least 10 seconds.
Then fully depress the accelerator ped-
al and turn the ignition switch to the
“START” position. If the engine starts,
quickly release the accelerator pedal.
3) If this fails to start the engine, turn the
ignition switch again to the “OFF” posi-
tion. After waiting for 10 seconds or
longer, turn the ignition switch to the
“START” position without depressing
the accelerator pedal.
4) If the engine still refuses to start, con-
tact your nearest SUBARU dealer for
assistance.
6. Confirm that all warning and indicator
lights have gone out after the engine has
started. The fuel injection system auto-
matically lowers the idle speed as the en- gine warms up.
While the engine is warming up, make
sure that the selector lever is at the “P” or
“N” position and that the parking brake is
applied.
�y
Do not operate the starter motor
continuously for more than ten
seconds. If the engine fails to start
after operating the starter for five
to ten seconds, wait for ten sec-
onds or more before trying again.
�y If you restart the engine while the
vehicle is moving, shift the selec-
tor lever into the “N” position. Do
not attempt to place the selector
lever of a moving vehicle into the “P” position.
Page 234 of 377
Starting and operating 7-19
– CONTINUED –
warning light illuminate simultaneously,
take the following steps:
1. Stop the vehicle in the nearest safe, flat
place.
2. Shut down the engine, then restart it.
3. Release the parking brake. If both
warning lights go out, the EBD system
may be faulty.
Drive carefully to the nearest SUBARU
dealer and have the system inspected.
4. If both warning lights come on again
and stay illuminated after the engine has
been restarted, shut down the engine
again, apply the parking brake, and check
the brake fluid level.
5. If the brake fluid level is not below the
“MIN” mark, the EBD system may be
faulty. Drive carefully to the nearest
SUBARU dealer and have the system in-
spected.
6. If the brake fluid level is below the
“MIN” mark, DO NOT drive the vehicle. In-
stead, have the vehicle towed to the near-
est SUBARU dealer for repair.
Vehicle Dynamics Control
system�y
Driving with the brake system
warning light on is dangerous.
This indicates your brake system
may not be working properly. If
the light remains on, have the
brakes inspected by a SUBARU
dealer immediately.
�yIf at all in doubt about whether the
brakes are operating properly, do
not drive the vehicle. Have your
vehicle towed to the nearest
SUBARU dealer for repair.
Always use the utmost care in driv-
ing – overconfidence because you
are driving with a Vehicle Dynamics
Control system equipped vehicle
could easily lead to a serious acci-
dent. �yEven if your vehicle is equipped
with Vehicle Dynamics Control,
winter tires or snow chains
should be used when driving on
snow-covered or icy roads; in ad-
dition, vehicle speed should be re-
duced considerably. Simply hav-
ing a Vehicle Dynamics Control
system does not guarantee that
the vehicle will be able to avoid
accidents in any situation.
Page 241 of 377
7-26 Starting and operating
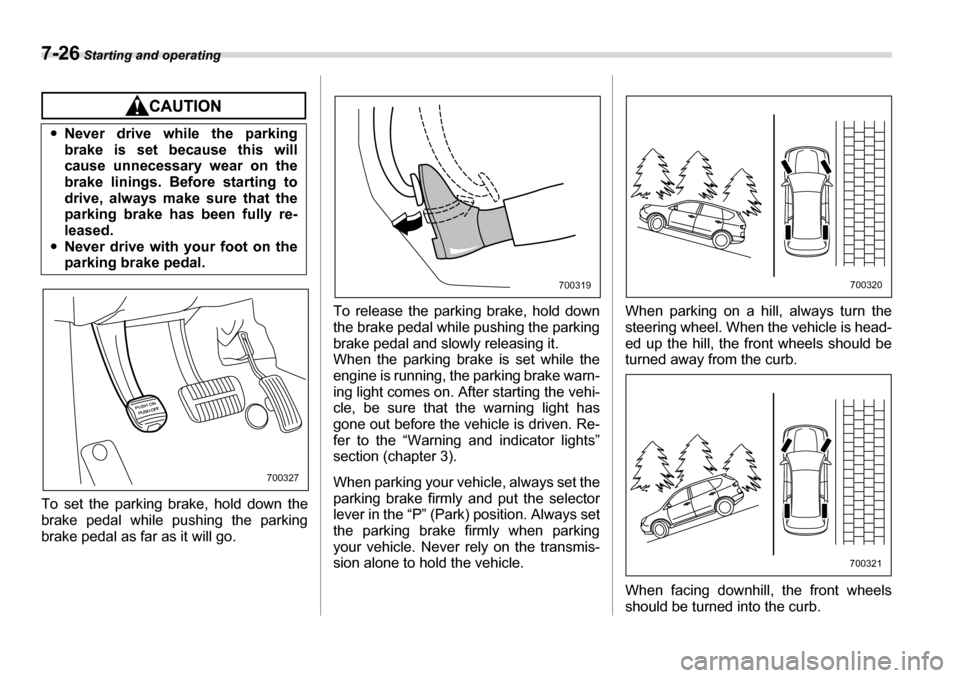
To set the parking brake, hold down the
brake pedal while pushing the parking
brake pedal as far as it will go. To release the parking brake, hold down
the brake pedal while pushing the parking
brake pedal and slowly releasing it.
When the parking brake is set while the
engine is running, the parking brake warn-
ing light comes on. After starting the vehi-
cle, be sure that the warning light has
gone out before the vehicle is driven. Re-
fer to the “Warning and indicator lights”
section (chapter 3).
When parking your vehicle, always set the
parking brake firmly and put the selector
lever in the “P” (Park) position. Always set
the parking brake firmly when parking
your vehicle. Never rely on the transmis-
sion alone to hold the vehicle. When parking on a hill, always turn the
steering wheel. When the vehicle is head-
ed up the hill, the front wheels should be
turned away from the curb.
When facing downhill, the front wheels
should be turned into the curb.
�y
Never drive while the parking
brake is set because this will
cause unnecessary wear on the
brake linings. Before starting to
drive, always make sure that the
parking brake has been fully re-
leased.
�y Never drive with your foot on the
parking brake pedal.
700327
700319700320
700321
Page 269 of 377
8-24 Driving tips
�TBefore starting out on a trip
�y Check that the vehicle and vehicle-to-
hitch mounting are in good condition. If
any problems are apparent, do not tow the
trailer. �y Check that the vehicle sits horizontally
with the trailer attached. If the vehicle is
tipped sharply up at the front and down at
the rear, check the total trailer weight,
GVW, GAWs and tongue load again, then
confirm that the load and its distribution
are acceptable. �y Check that the tire pressures are cor-
rect. �y Check that the vehicle and trailer are
connected properly. Confirm that – the trailer tongue is connected prop-
erly to the hitch ball.
– the trailer lights connector is connect-
ed properly and trailer’s brake lights illu-
minate when the vehicle’s brake pedal
is pressed, and that the trailer’s turn sig-
nal lights flash when the vehicle’s turn
signal lever is operated.
– the safety chains are connected prop- erly.
– all cargo in the trailer is secured safe- ty in position.
– the side mirrors provide a good rear-
ward field of view without a significant
blind spot.
�y Sufficient time should be taken to learn the “feel” of the vehicle/trailer combination
before starting out on a trip. In an area free
of traffic, practice turning, stopping and
backing up. �T
Driving with a trailer
�y You should allow for considerably more
stopping distance when towing a trailer.
Avoid sudden braking because it may re-
sult in skidding or jackknifing and loss of control.�y Avoid uneven steering, sharp turns and
rapid lane changes.�y Slow down before turning. Make a long-
er than normal turning radius because the
trailer wheels will be closer than the vehi-
cle wheels to the inside of the turn. In a
tight turn, the trailer could hit your vehicle.�y Crosswinds will adversely affect the
handling of your vehicle and trailer, caus-
ing sway. Crosswinds can be due to
weather conditions or the passing of large
trucks or buses. If swaying occurs, firmly
grip the steering wheel and slow down im-
mediately but gradually. �y When passing other vehicles, consider-
able distance is required because of the
added weight and length caused by at-
taching the trailer to your vehicle. 1) Left turn
2) Right turn
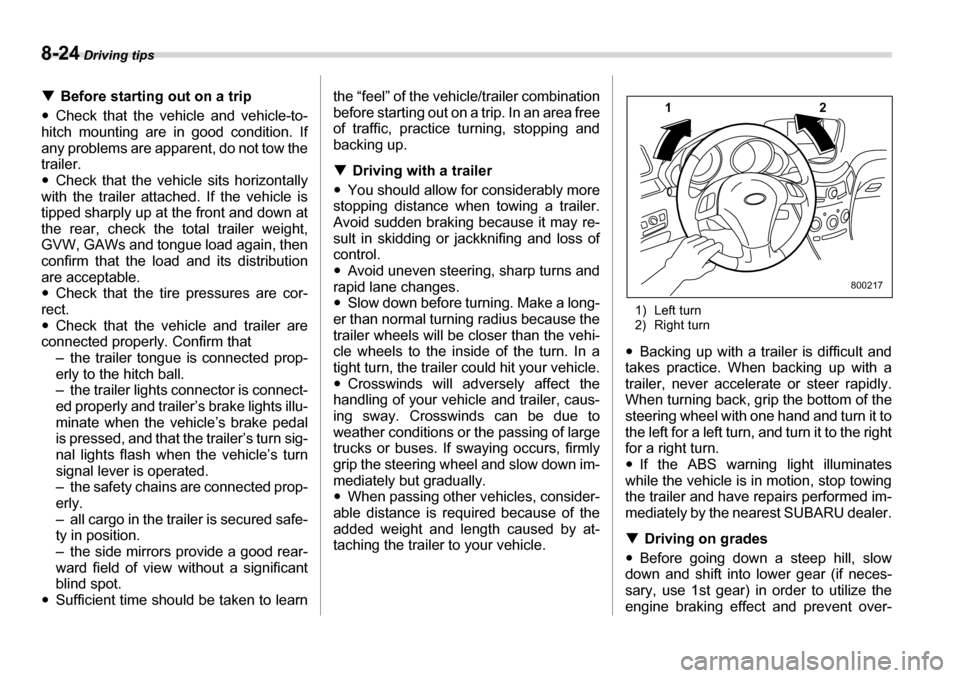
�y Backing up with a trailer is difficult and
takes practice. When backing up with a
trailer, never accelerate or steer rapidly.
When turning back, grip the bottom of the
steering wheel with one hand and turn it to
the left for a left turn, and turn it to the right
for a right turn. �y If the ABS warning light illuminates
while the vehicle is in motion, stop towing
the trailer and have repairs performed im-
mediately by the nearest SUBARU dealer. �T Driving on grades
�y Before going down a steep hill, slow
down and shift into lower gear (if neces-
sary, use 1st gear) in order to utilize the
engine braking effect and prevent over-12
800217