2007 SUBARU OUTBACK recommended oil
[x] Cancel search: recommended oilPage 344 of 442

Maintenance schedule....................................... 11-3
Maintenance precautions ................................... 11-3
Before checking or servicing in the engine compartment .................................................... 11-4
When you do checking or servicing in the engine compartment while the engine is running .......... 11-4
Engine hood ....................................................... 11-4
Engine compartment overview .......................... 11-6
2.5-liter non-turbo models ................................... 11-6
2.5-liter turbo models ......................................... 11-7
3.0-liter models .................................................. 11-8
Engine oil ............................................................ 11-9
Checking the oil level ......................................... 11-9
Changing the oil and oil filter ............................ 11-10
Recommended grade and viscosity .................. 11-12
Recommended grade and viscosity under severe driving conditions .......................................... 11-13
Cooling system ................................................ 11-13
Hose and connections ...................................... 11-14
Engine coolant ................................................. 11-14
Air cleaner element .......................................... 11-17
Replacing the air cleaner element ..................... 11-17
Spark plugs ...................................................... 11-20
Recommended spark plugs .............................. 11-20
Drive belts ........................................................ 11-20
2.5-liter models ................................................ 11-20
3.0-liter models ................................................ 11-21
Manual transmission oil .................................. 11-21
Checking the oil level ....................................... 11-21
Recommended grade and viscosity .................. 11-22Automatic transmission fluid
.......................... 11-22
Checking the fluid level .................................... 11-22
Recommended fluid ......................................... 11-23
Front differential gear oil (AT vehicles) .......... 11-24
Checking the oil level ...................................... 11-24
Recommended grade and viscosity .................. 11-25
Rear differential gear oil .................................. 11-25
Checking the gear oil level ............................... 11-25
Recommended grade and viscosity .................. 11-27
Power steering fluid ........................................ 11-28
Checking the fluid level .................................... 11-28
Recommended fluid ......................................... 11-28
Brake fluid ........................................................ 11-29
Checking the fluid level .................................... 11-29
Recommended brake fluid ............................... 11-29
Clutch fluid (MT vehicles) ............................... 11-30
Checking the fluid level .................................... 11-30
Recommended clutch fluid ............................... 11-30
Brake booster .................................................. 11-31
Brake pedal ...................................................... 11-31
Checking the brake pedal free play .................. 11-31
Checking the brake pedal reserve distance ........................................................ 11-31
Clutch pedal (Manual transmission vehicles) ........................................................ 11-32
Checking the clutch function ............................ 11-32
Checking the clutch pedal free play .................. 11-32
Replacement of brake pad and lining ............ 11-32
Breaking-in of new brake pads and linings ........................................................... 11-33Maintenance and service
11
Page 352 of 442
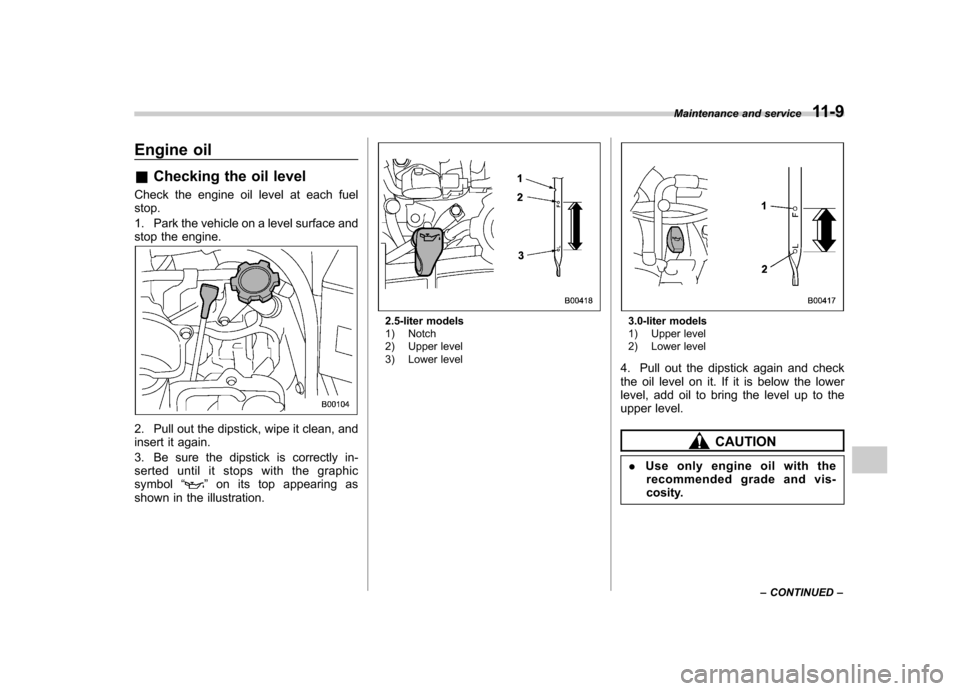
Engine oil &Checking the oil level
Check the engine oil level at each fuel stop.
1. Park the vehicle on a level surface and
stop the engine.
2. Pull out the dipstick, wipe it clean, and
insert it again.
3. Be sure the dipstick is correctly in-
serted until it stops with the graphic
symbol “
”on its top appearing as
shown in the illustration.
2.5-liter models
1) Notch
2) Upper level
3) Lower level3.0-liter models
1) Upper level
2) Lower level
4. Pull out the dipstick again and check
the oil level on it. If it is below the lower
level, add oil to bring the level up to the
upper level.
CAUTION
. Use only engine oil with the
recommended grade and vis-
cosity. Maintenance and service
11-9
– CONTINUED –
Page 355 of 442

11-12Maintenance and service
Oil capacity (Guideline):
2.5-liter models: 4.2 US qt (4.0 liters, 3.5
Imp qt)
3.0-liter models: 5.8 US qt (5.5 liters, 4.8
Imp qt)
The oil quantity indicated above is only a
guideline. The necessary quantity of oil
depends on the quantity of oil that has
been drained. The quantity of drained oil
differs slightly depending on the tempera-
ture of the oil and the time the oil is left
flowing out. After refilling the engine with
oil, therefore, you must use the dipstick to
confirm that the level is correct.
13. Start the engine and make sure that no
oil leaks appear around the filter ’s rubber
seal and drain plug.
14. Run the engine until it reaches the
normal operating temperature. Then stop
the engine and wait a few minutes to allow
the oil drain back. Check the oil level
again and if necessary, add more engineoil. &
Recommended grade and viscosity
CAUTION
Use only engine oil with the recom-
mended grade and viscosity.
Oil grade: ILSAC GF-4, which can be identified with
the ILSAC certification mark (Starburst mark)
or API classification SM with the words“ENERGY CONSERVING ”
These recommended oil grades can be
identified by looking for either or both of
the following marks displayed on the oil
container.
ILSAC Certification Mark (Starburst Mark)
API Service label
1) Indicates the oil quality by API designa- tions
2) Indicates the SAE oil viscosity grade
3) Indicates that the oil has fuel saving capabilities
Page 356 of 442
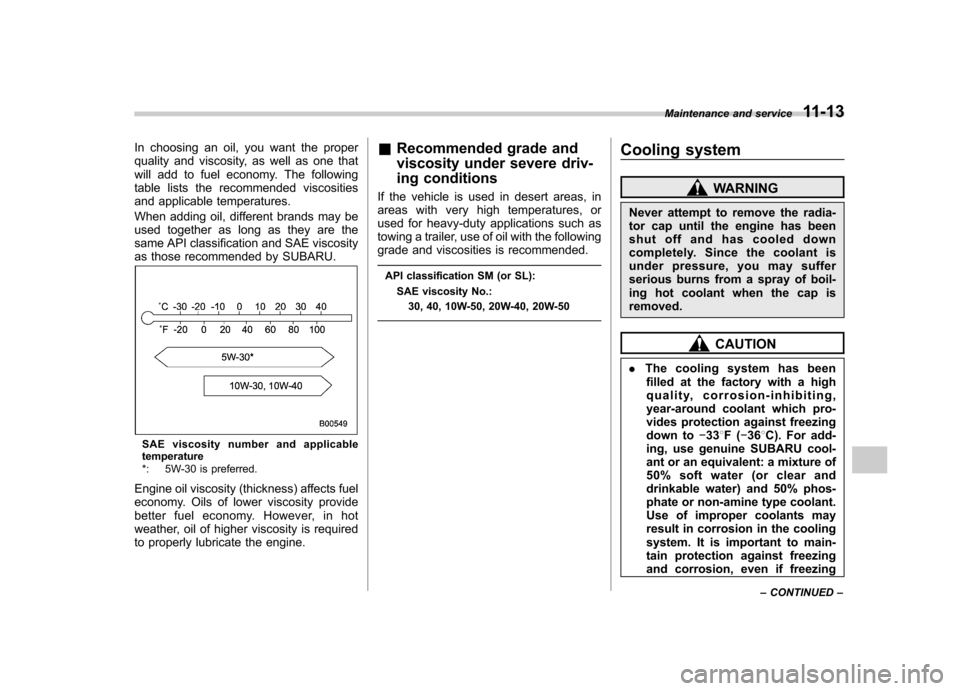
In choosing an oil, you want the proper
quality and viscosity, as well as one that
will add to fuel economy. The following
table lists the recommended viscosities
and applicable temperatures.
When adding oil, different brands may be
used together as long as they are the
same API classification and SAE viscosity
as those recommended by SUBARU.
SAE viscosity number and applicable
temperature
*: 5W-30 is preferred.
Engine oil viscosity (thickness) affects fuel
economy. Oils of lower viscosity provide
better fuel economy. However, in hot
weather, oil of higher viscosity is required
to properly lubricate the engine. &
Recommended grade and
viscosity under severe driv-
ing conditions
If the vehicle is used in desert areas, in
areas with very high temperatures, or
used for heavy-duty applications such as
towing a trailer, use of oil with the following
grade and viscosities is recommended.
API classification SM (or SL): SAE viscosity No.: 30, 40, 10W-50, 20W-40, 20W-50 Cooling system
WARNING
Never attempt to remove the radia-
tor cap until the engine has been
shut off and has cooled down
completely. Since the coolant is
under pressure, you may suffer
serious burns from a spray of boil-
ing hot coolant when the cap isremoved.
CAUTION
. The cooling system has been
filled at the factory with a high
quality, corrosion-inhibiting,
year-around coolant which pro-
vides protection against freezing
down to �33 8F( �36 8C). For add-
ing, use genuine SUBARU cool-
ant or an equivalent: a mixture of
50% soft water (or clear and
drinkable water) and 50% phos-
phate or non-amine type coolant.
Use of improper coolants may
result in corrosion in the cooling
system. It is important to main-
tain protection against freezing
and corrosion, even if freezing Maintenance and service
11-13
– CONTINUED –
Page 365 of 442
11-22Maintenance and service
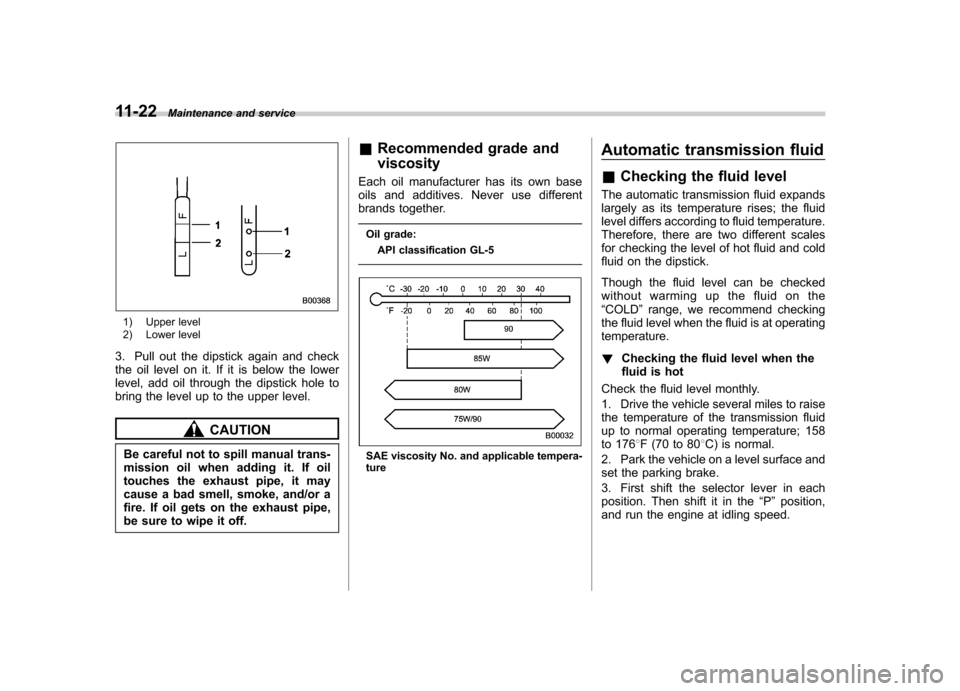
1) Upper level
2) Lower level
3. Pull out the dipstick again and check
the oil level on it. If it is below the lower
level, add oil through the dipstick hole to
bring the level up to the upper level.
CAUTION
Be careful not to spill manual trans-
mission oil when adding it. If oil
touches the exhaust pipe, it may
cause a bad smell, smoke, and/or a
fire. If oil gets on the exhaust pipe,
be sure to wipe it off. &
Recommended grade and viscosity
Each oil manufacturer has its own base
oils and additives. Never use different
brands together.
Oil grade: API classification GL-5
SAE viscosity No. and applicable tempera- ture Automatic transmission fluid &
Checking the fluid level
The automatic transmission fluid expands
largely as its temperature rises; the fluid
level differs according to fluid temperature.
Therefore, there are two different scales
for checking the level of hot fluid and cold
fluid on the dipstick.
Though the fluid level can be checked
without warming up the fluid on the“ COLD ”range, we recommend checking
the fluid level when the fluid is at operatingtemperature. ! Checking the fluid level when the
fluid is hot
Check the fluid level monthly.
1. Drive the vehicle several miles to raise
the temperature of the transmission fluid
up to normal operating temperature; 158
to 176 8F (70 to 80 8C) is normal.
2. Park the vehicle on a level surface and
set the parking brake.
3. First shift the selector lever in each
position. Then shift it in the “P ” position,
and run the engine at idling speed.
Page 366 of 442
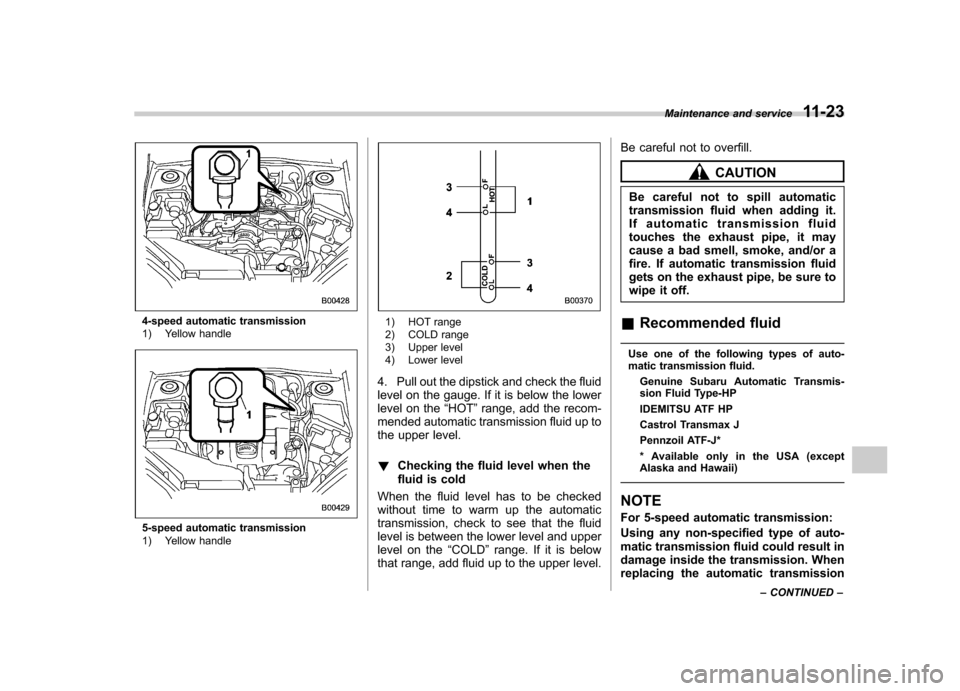
4-speed automatic transmission
1) Yellow handle
5-speed automatic transmission
1) Yellow handle
1) HOT range
2) COLD range
3) Upper level
4) Lower level
4. Pull out the dipstick and check the fluid
level on the gauge. If it is below the lower
level on the “HOT ”range, add the recom-
mended automatic transmission fluid up to
the upper level. ! Checking the fluid level when the
fluid is cold
When the fluid level has to be checked
without time to warm up the automatic
transmission, check to see that the fluid
level is between the lower level and upper
level on the “COLD ”range. If it is below
that range, add fluid up to the upper level. Be careful not to overfill.
CAUTION
Be careful not to spill automatic
transmission fluid when adding it.
If automatic transmission fluid
touches the exhaust pipe, it may
cause a bad smell, smoke, and/or a
fire. If automatic transmission fluid
gets on the exhaust pipe, be sure to
wipe it off.
& Recommended fluid
Use one of the following types of auto-
matic transmission fluid. Genuine Subaru Automatic Transmis-
sion Fluid Type-HP
IDEMITSU ATF HP
Castrol Transmax J
Pennzoil ATF-J*
* Available only in the USA (except
Alaska and Hawaii)
NOTE
For 5-speed automatic transmission:
Using any non-specified type of auto-
matic transmission fluid could result in
damage inside the transmission. When
replacing the automatic transmission Maintenance and service
11-23
– CONTINUED –
Page 367 of 442
11-24Maintenance and service
fluid, be sure to use the kind specified.
For 4-speed automatic transmission:
For optimum transmission perfor-
mance, only use the automatic trans-
mission fluid that is recommended and
provided by Subaru.
If the recommended automatic trans-
mission fluid is unavailable, Dexron III
may be temporarily used. If the Dexron
III is used continuously there will be a
noticeable increase in the vibration and
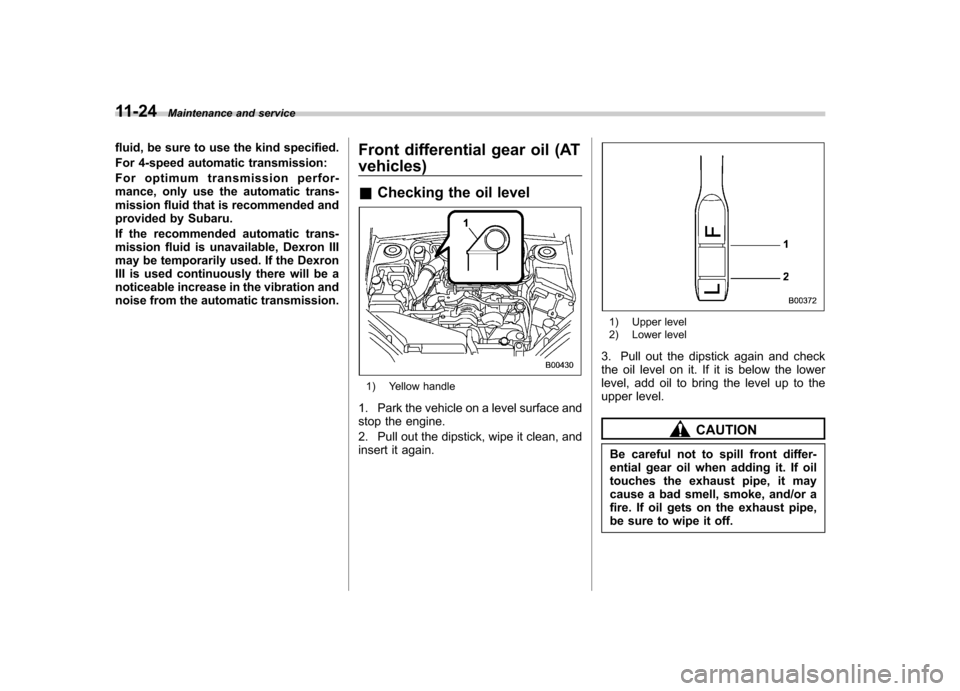
noise from the automatic transmission. Front differential gear oil (AT vehicles) &
Checking the oil level
1) Yellow handle
1. Park the vehicle on a level surface and
stop the engine.
2. Pull out the dipstick, wipe it clean, and
insert it again.
1) Upper level
2) Lower level
3. Pull out the dipstick again and check
the oil level on it. If it is below the lower
level, add oil to bring the level up to the
upper level.
CAUTION
Be careful not to spill front differ-
ential gear oil when adding it. If oil
touches the exhaust pipe, it may
cause a bad smell, smoke, and/or a
fire. If oil gets on the exhaust pipe,
be sure to wipe it off.
Page 368 of 442
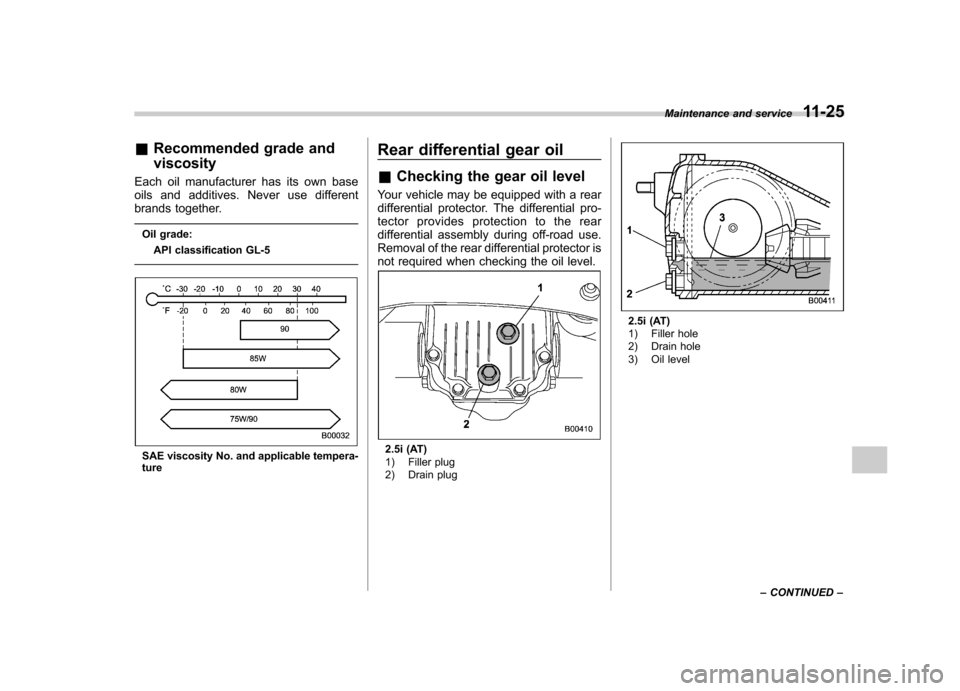
&Recommended grade and viscosity
Each oil manufacturer has its own base
oils and additives. Never use different
brands together.
Oil grade: API classification GL-5
SAE viscosity No. and applicable tempera- ture Rear differential gear oil &
Checking the gear oil level
Your vehicle may be equipped with a rear
differential protector. The differential pro-
tector provides protection to the rear
differential assembly during off-road use.
Removal of the rear differential protector is
not required when checking the oil level.2.5i (AT)
1) Filler plug
2) Drain plug
2.5i (AT)
1) Filler hole
2) Drain hole
3) Oil level Maintenance and service
11-25
– CONTINUED –