2007 SUBARU OUTBACK Head light switch
[x] Cancel search: Head light switchPage 8 of 442

&Child safety
WARNING
. Never hold a child on your lap or
in your arms while the vehicle is
moving. The passenger cannot
protect the child from injury in a
collision, because the child will
be caught between the passen-
ger and objects inside the vehi-cle.
. While riding in the vehicle, in-
fants and small children should
always be placed in the REAR
seat in an infant or child restraint
system which is appropriate for
the child ’s age, height and
weight. If a child is too big for a
child restraint system, the child
should sit in the REAR seat and
be restrained using the seatbelts.
According to accident statistics,
children are safer when properly
restrained in the rear seating
positions than in the front seat-
ing positions. Never allow a child
to stand up or kneel on the seat.
. Put children aged 12 and under in
the REAR seat properly re-
strained at all times in a child
restraint device or in a seatbelt. The SRS airbag deploys with
considerable speed and force
and can injure or even kill chil-
dren, especially if they are 12
years of age and under and are
not restrained or improperly re-
strained. Because children are
lighter and weaker than adults,
their risk of being injured from
deployment is greater.
. NEVER INSTALL A REARWARD
FACING CHILD SAFETY SEAT IN
THE FRONT SEAT. DOING SO
RISKS SERIOUS INJURY OR
DEATH TO THE CHILD BY PLA-
CING THE CHILD ’S HEAD TOO
CLOSE TO THE SRS AIRBAG.
. Always use the child safety locks
whenever a child rides in the rear
seat. Serious injury could result
if a child accidentally opened the
door and fell out. Refer to the“ Door locks ”section in chapter
2.
. Always lock the passenger ’s win-
dows using the lock switch when
children are riding in the vehicle.
Failure to follow this procedure
could result in injury to a child
operating the power window. Re-
fer to the “Power windows ”sec-
tion in chapter 2. .
Never leave unattended children
in the vehicle. They could acci-
dentally injure themselves or
others through inadvertent op-
eration of the vehicle. Also, on
hot or sunny days, temperature
in a closed vehicle could quickly
become high enough to cause
severe or possibly fatal injuries
to them.
. Help prevent young children from
locking themselves in the trunk.
When leaving the vehicle, either
close all windows and lock all
doors or cancel the inside trunk
lid release. Also make certain
that the trunk is closed. On hot
or sunny days, the temperature
in a trunk could quickly become
high enough to cause death or
serious heat-related injuries in-
cluding brain damage to anyone
locked inside, p articularly for
small children.
Carefully read the sections “Child restraint
systems ”, “*SRS airbag (Supplemental
Restraint System airbag) ”, and “Seatbelts ”
in chapter 1 of this owner ’s manual for
instructions and precautions concerning
the child restraint system, seatbelt system
and SRS airbag system. 5
– CONTINUED –
Page 13 of 442

10
Illustrated index &Exterior1) Engine hood lock release (page 11-4)
2) Headlight switch (page 3-39)
3) Bulb replacement (page 11-50)
4) Wiper switch (page 3-44)
5) Moonroof (page 2-26)
6) Roof rail (page 8-15)
7) Door locks (page 2-5)
8) Tire pressure (page 11-36)
9) Flat tires (page 9-4)
10) Tire chains (page 8-12)
11) Fog light switch (page 3-42)
12) Tie-down hooks (page 9-13)
13) Towing hook (page 9-13)
Page 19 of 442

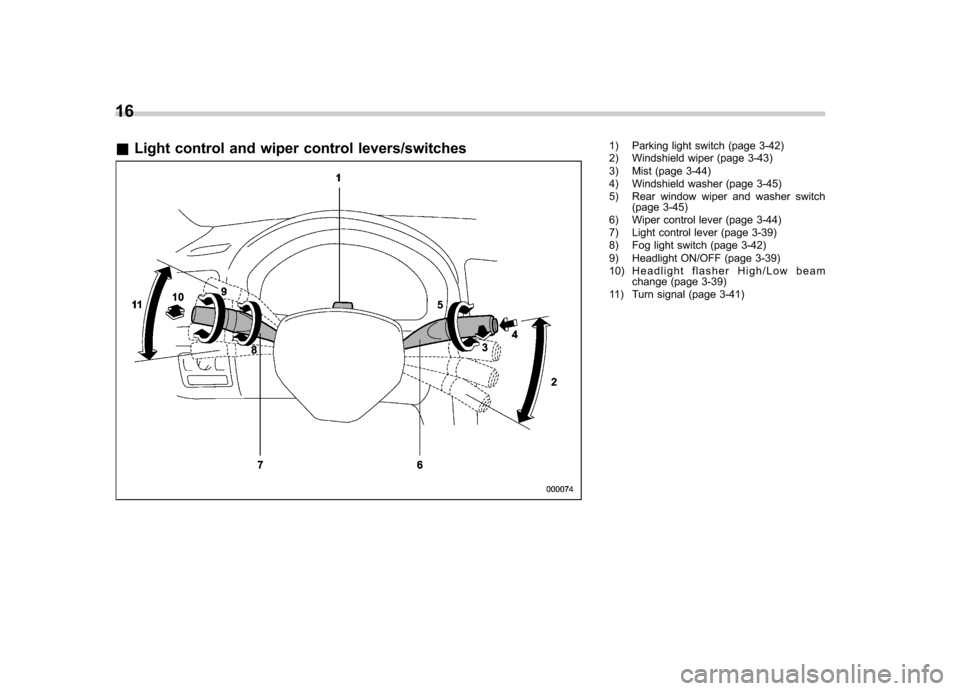
16 &Light control and wiper control levers/switches
1) Parking light switch (page 3-42)
2) Windshield wiper (page 3-43)
3) Mist (page 3-44)
4) Windshield washer (page 3-45)
5) Rear window wiper and washer switch
(page 3-45)
6) Wiper control lever (page 3-44)
7) Light control lever (page 3-39)
8) Fog light switch (page 3-42)
9) Headlight ON/OFF (page 3-39)
10) Headlight flasher High/Low beam change (page 3-39)
11) Turn signal (page 3-41)
Page 75 of 442

1-48Seat, seatbelt and SRS airbags
. Do not apply any strong impact to the
front passenger ’s seat such as by kicking.
. Do not spill liquid on the front passen-
ger ’s seat. If liquid is spilled, wipe it off
immediately. . Do not remove or disassemble the front
passenger ’s seat.
. Do not install any accessory (such as
an audio amplifier) other than a genuine
SUBARU accessory under the front pas-senger ’s seat.
. Do not place anything (shoes, umbrel-
la, etc.) under the front passenger ’s seat.
. The front passenger ’s seat must not be
used with the head restraint removed. . Do not leave any article including a
child restraint system on the front passen- ger ’s seat or the seatbelt tongue and
buckle engaged when you leave yourvehicle. . Do not place a magnet near the
seatbelt buckle and the seatbelt retractor.. Do not use front seats with their back-
ward-forward position and seatback not
being locked into place securely. If any of
them are not locked securely, adjust them
again. For adjusting procedure, refer tothe “Manual seat ”in the front seats section
in Chapter 1 in this owner ’s manual.
(Models equipped with manual seats only)
If the seatbelt buckle switch and/or front passenger
’s occupant detection system
have failed, the SRS airbag system
warning light will illuminate. Have the
system inspected by your SUBARU deal-
er immediately if the SRS airbag system
warning light comes on.
If your vehicle has sustained impact, this
may affect the proper function of the
Subaru advanced frontal airbag system.
Have your vehicle inspected at your
SUBARU dealer.
NOTE
The front passenger ’s SRS side airbag,
SRS curtain airbag and seatbelt pre-
tensioner are not controlled by the
Subaru advanced frontal airbag sys-tem. !
Passenger ’s frontal airbag ON and
OFF indicators
or: Front passenger ’s frontal airbag
ON indicator
or: Front passenger ’s frontal airbag
OFF indicator
The front passenger ’s frontal airbag ON
and OFF indicators show you the status of
the front passenger ’s SRS frontal airbag.
The indicators are located between the
map lights.
When the ignition switch is turned to the “ ON ”position, both the ON and OFF
indicators illuminate for 6 seconds during
which time the system is checked. Follow-
ing the system check, both indicators
extinguish for 2 seconds. After that, one
of the indicators illuminates depending on
the status of the front passenger ’s SRS
Page 111 of 442

2-20Keys and doors
Windows &Power windows
WARNING
To avoid serious personal injury
caused by entrapment, you must
do the following. . When operating the power win-
dows, be extremely careful to
prevent anyone ’s fingers, arms,
neck or head from being caught
in the window.
. Always lock the passengers ’win-
dows using the lock switch when
children are riding in the vehicle.
. Before leaving the vehicle, al-
ways remove the key from the
ignition switch for safety and
never allow an unattended child
to remain in the vehicle. Failure
to follow this procedure could
result in injury to a child operat-
ing the power window.
The power windows operate only when
the ignition switch is in the “ON ”position. !
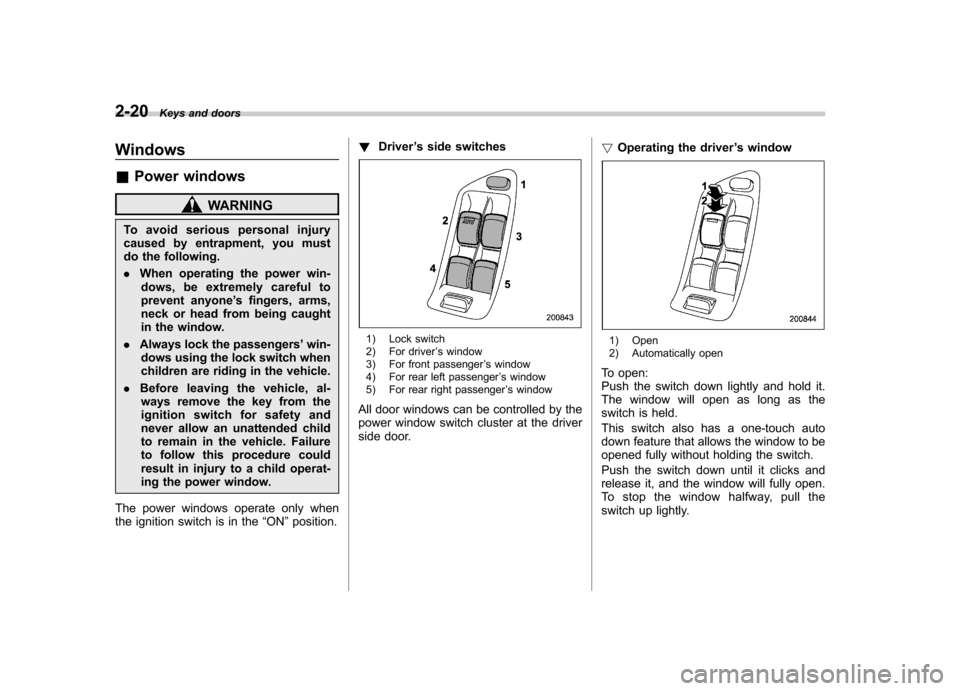
Driver ’s side switches
1) Lock switch
2) For driver ’s window
3) For front passenger ’s window
4) For rear left passenger ’s window
5) For rear right passenger ’s window
All door windows can be controlled by the
power window switch cluster at the driver
side door. !
Operating the driver ’s window1) Open
2) Automatically open
To open:
Push the switch down lightly and hold it.
The window will open as long as the
switch is held.
This switch also has a one-touch auto
down feature that allows the window to be
opened fully without holding the switch.
Push the switch down until it clicks and
release it, and the window will fully open.
To stop the window halfway, pull the
switch up lightly.
Page 123 of 442

Instruments and controlsSelector lever position indicator (AT vehicles)(if equipped) ..................................................... 3-32
Gear position indicator (AT vehicles) (if equipped) ..................................................... 3-32
Selector lever and gear position indicator (AT vehicles) (if equipped) ...................................... 3-33
Turn signal indicator lights ................................. 3-33
High beam indicator light ................................... 3-33
Cruise control indicator light .............................. 3-33
Cruise control set indicator light ......................... 3-33
Headlight indicator light ..................................... 3-33
Front fog light indicator light .............................. 3-33
Clock (Vehicle without Navigation System) ............................................................ 3-34
Information display (Non-turbo models without Navigation System) ........................... 3-34
Outside temperature indicator ............................ 3-35
Current fuel consumption ................................... 3-36
Average fuel consumption .................................. 3-36
Driving range on remaining fuel .......................... 3-37
Journey time ...................................................... 3-38
Light control switch ........................................... 3-39
Headlights. ......................................................... 3-39 High/low beam change (dimmer) ...
..................... 3-39
Headlight flasher ............................................... 3-40
Daytime running light system ............................. 3-40
Turn signal lever ................................................ 3-41
Illumination brightness control ......................... 3-41
Parking light switch ........................................... 3-42
Front fog light switch (if equipped) .................. 3-42
Wiper and washer .............................................. 3-43
Windshield wiper and washer switches .............. 3-44
Rear window wiper and washer switch (Station wagon) ............................................... 3-45
Windshield wiper deicer (if equipped) .............. 3-46
Rear window defogger button .......................... 3-47
Mirrors ................................................................ 3-48
Inside mirror ...................................................... 3-48
Auto-dimming mirror/compass (if equipped) .................................................... 3-48
Outside mirrors ................................................. 3-50
Tilt steering wheel ............................................. 3-51
Horn .................................................................... 3-52
Page 148 of 442

properly. If there is no problem and all tires
are properly inflated, the light will go out.
Each tire, including the spare (if provided),
should be checked monthly when cold
and inflated to the inflation pressure
recommended by the vehicle manufac-
turer on the vehicle placard or tire inflation
pressure label. (If your vehicle has tires of
a different size than the size indicated on
the vehicle placard or tire inflation pres-
sure label, you should determine the
proper inflation pressure for those tires.)
As an added safety feature, your vehicle
has been equipped with a tire pressure
monitoring system (TPMS) that illuminates
a low tire pressure telltale when one or
more of your tires is significantly under-
inflated. Accordingly, when the low tire
pressure telltale illuminates, you should
stop and check your tires as soon as
possible, and inflate them to the proper
pressure. Driving on a significantly under-
inflated tire causes the tire to overheat and
can lead to tire failure. Under-inflation also
reduces fuel efficiency and tire tread life,
and may affect the vehicle’s handling and
stopping ability. Please note that the
TPMS is not a substitute for proper tire
maintenance, and it is the driver ’s respon-
sibility to maintain correct tire pressure,
even if under-inflation has not reached the
level to trigger illumination of the TPMS low tire pressure telltale.
The TPMS gives warning both when a tire
is significantly under-inflated and when
there is a problem in the TPMS. The low
tire pressure warning light operates differ-
ently according to these conditions asfollows:
When a tire is significantly under- inflated:
Steady illumination
When there is a problem in the TPMS:Flashing
Should the warning light flash, have the
system inspected by your nearest
SUBARU dealer as soon as possible.
WARNING
If this light does not come on briefly
after the ignition switch is turned ON
or the light is flashing, you should
have your Tire Pressure Monitoring
System checked at a SUBARU deal-
er as soon as possible.
If this light comes on while driving,
never brake suddenly and keep
driving straight ahead while gradu-
ally reducing speed. Then slowly
pull off the road to a safe place.
Otherwise an accident involving
serious vehicle damage and serious
personal injury could occur.
If this light still comes on while driving after adjusting the tire pres-
sure, a tire may have significant
damage and a fast leak that causes
the tire to lose air rapidly. If you have
a flat tire, replace it with a spare tire
as soon as possible.
When a spare tire is mounted or a
wheel rim is replaced without the
original pressure sensor/transmitter
being transferred, the Low tire pres-
sure warning light will flash. This
indicates the TPMS is unable to
monitor all four road wheels. Con-
tact your SUBARU dealer as soon as
possible for tire and sensor replace-
ment and/or system resetting. If the
light flashes, promptly contact a
SUBARU dealer to have the systeminspected.
CAUTION
The tire pressure monitoring system
is NOT a substitute for manually
checking tire pressure. The tire
pressure should be checked peri-
odically (at least monthly) using a
tire gauge. After any change to tire
pressure(s), the tire pressure mon-
itoring system will not re-check tire
inflation pressures until the vehicle
is first driven more than 20 mph (32 Instruments and controls
3-27
– CONTINUED –
Page 154 of 442

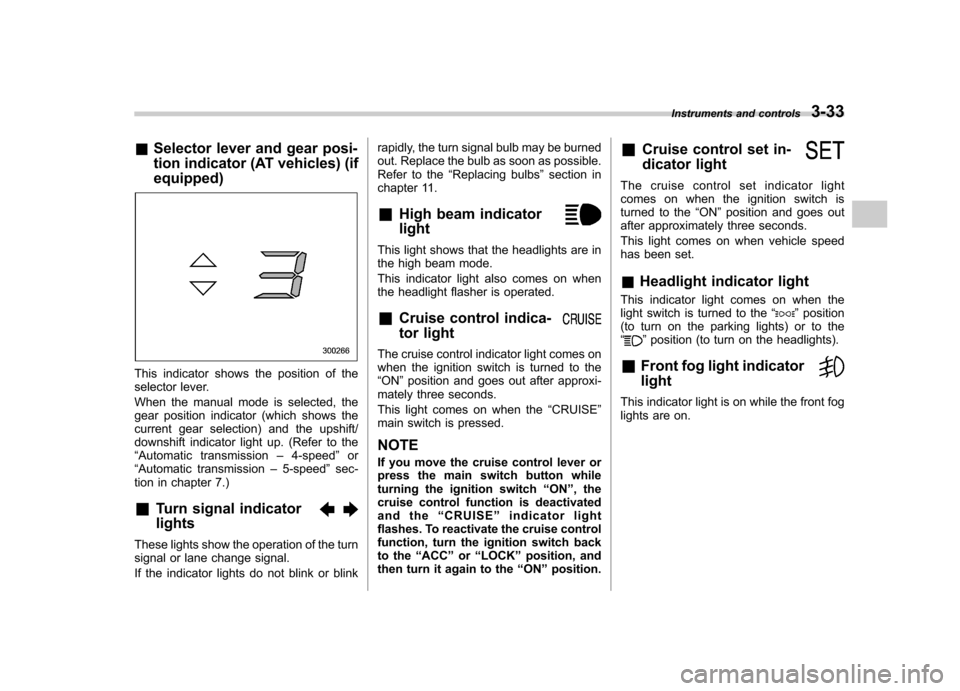
&Selector lever and gear posi-
tion indicator (AT vehicles) (if equipped)
This indicator shows the position of the
selector lever.
When the manual mode is selected, the
gear position indicator (which shows the
current gear selection) and the upshift/
downshift indicator light up. (Refer to the“Automatic transmission –4-speed ”or
“ Automatic transmission –5-speed ”sec-
tion in chapter 7.)
& Turn signal indicator lights
These lights show the operation of the turn
signal or lane change signal.
If the indicator lights do not blink or blink rapidly, the turn signal bulb may be burned
out. Replace the bulb as soon as possible.
Refer to the
“Replacing bulbs ”section in
chapter 11.
& High beam indicator light
This light shows that the headlights are in
the high beam mode.
This indicator light also comes on when
the headlight flasher is operated. &Cruise control indica-
tor light
The cruise control indicator light comes on
when the ignition switch is turned to the“ON ”position and goes out after approxi-
mately three seconds.
This light comes on when the “CRUISE ”
main switch is pressed.
NOTE
If you move the cruise control lever or
press the main switch button while
turning the ignition switch “ON ”, the
cruise control function is deactivated
and the “CRUISE ”indicator light
flashes. To reactivate the cruise control
function, turn the ignition switch back
to the “ACC ”or “LOCK ”position, and
then turn it again to the “ON ”position. &
Cruise control set in-
dicator light
The cruise control set indicator light
comes on when the ignition switch is
turned to the “ON ”position and goes out
after approximately three seconds.
This light comes on when vehicle speed
has been set. & Headlight indicator light
This indicator light comes on when the
light switch is turned to the “
”position
(to turn on the parking lights) or to the “
” position (to turn on the headlights).
& Front fog light indicator light
This indicator light is on while the front fog
lights are on. Instruments and controls
3-33