Page 4 of 364
2
Chapter 4: Climate control
This chapter informs you how to operate
the climate control.
Chapter 5: Audio
This chapter informs you how to operate
your audio system.
Chapter 6: Interior equipment
This chapter informs you how to operate
interior equipment.
Chapter 7: Starting and operating
This chapter informs you how to start and
operate your SUBARU.
Chapter 8: Driving tips
This chapter informs you how to drive your
SUBARU in various conditions and ex-
plains some safety tips on driving.
Chapter 9: In case of emergency
This chapter informs you what to do if you
have a problem while driving, such as a
flat tire or engine overheating.
Chapter 10: Appearance care
This chapter informs you how to keep your
SUBARU looking good.
Chapter 11: Maintenance and service
This chapter informs you when you need
to take your SUBARU to the dealer for
scheduled maintenance and informs you
how to keep your SUBARU running
properly.Chapter 12: Specifications
This chapter informs you about dimension
and capacities of your SUBARU.
Chapter 13: Consumer information and
Reporting safety defects
This chapter informs you about Uniform
tire quality grading standards and Report-
ing safety defects.
Chapter 14: Index
This is an alphabetical listing of all that
’sin
this manual. You can use it to quickly find
something you want to read.
& Safety warnings
You will find a number of WARNINGs,
CAUTIONs and NOTEs in this manual.
These safety warnings alert you to poten-
tial hazards that could result in injury to
you or others.
Please read these safety warnings as well
as all other portions of this manual care-
fully in order to gain a better understand-
ing of how to use your SUBARU vehicle
safely.
WARNING
A WARNING indicates a situation in
which serious injury or death could
result if the warning is ignored.
CAUTION
A CAUTION indicates a situation in
which injury or damage to your
vehicle, or both, could result if the
caution is ignored.
NOTE
A NOTE gives information or sugges-
tions how to make better use of yourvehicle. & Safety symbol
You will find a circle with a slash through it
in this manual. This symbol means “Do
not ”, “Do not do this ”,or “Do not let this
happen ”, depending upon the context.
Page 11 of 364
Table of contents
Seat, seatbelt and SRS airbags1
Keys and doors2
Instruments and controls
Climate control4
Audio5
Interior equipment6
Starting and operating7
Driving tips8
In case of emergency9
Appearance care10
Maintenance and service11
Specifications12
Consumer information and Reporting safety defects13
Index14
3
Page 16 of 364
14 &Instrument panel
1) Door locks (page 2-4)
2) Outside mirror switch (page 3-33)
3) Light control lever (page 3-22)
4) Combination meter (page 3-6)
5) Wiper control lever (page 3-26)
6) Hazard warning flasher switch (page 3-6)
7) Audio (page 5-1)
8) Gear shift lever (5MT) (page 7-11)/
Gear shift lever (6MT) (page 7-9)/
Selector lever (AT) (page 7-15)
9) Climate control (page 4-1)
10) Cruise control (page 7-26)
11) Horn (page 3-35)
12) SRS airbag (page 1-35)
13) Tilt steering (page 3-35)
14) Fuse box (page 11-42)
15) Hood lock release knob (page 11-4)
16) Power windows (page 2-18)
Page 67 of 364
1-42Seat, seatbelt and SRS airbags
. Do not apply any strong impact to the
front passenger ’s seat such as by kicking.
. Do not spill liquid on the front passen-
ger ’s seat. If liquid is spilled, wipe it off
immediately. . Do not remove or disassemble the front
passenger ’s seat.
. Do not install any accessory (such as
an audio amplifier) other than a genuine
SUBARU accessory under the front pas-senger ’s seat.
. Do not place anything (shoes, umbrel-
la, etc.) under the front passenger ’s seat.
. The front passenger ’s seat must not be
used with the head restraint removed. . Do not leave any article including a
child restraint system on the front passen- ger ’s seat or the seatbelt tongue and
buckle engaged when you leave yourvehicle. . Do not place a magnet near the
seatbelt buckle and the seatbelt retractor.. Do not use front seats with their back-
ward-forward position and seatback not
being locked into place securely. If any of
them are not locked securely, adjust them
again. For adjusting procedure, refer tothe “Front seats ”section in this chapter.
. If you use an optional seatbelt exten-
der, remove it after each use. (Refer to the“ Seatbelt extender ”section in this chap- ter.)
If the seatbelt buckle switch and/or front passenger
’s occupant detection system
have failed, the SRS airbag system
warning light will illuminate. Have the
system inspected by your SUBARU deal-
er immediately if the SRS airbag system
warning light comes on.
If your vehicle has sustained impact, this
may affect the proper function of the
Subaru advanced frontal airbag system.
Have your vehicle inspected at your
SUBARU dealer.
NOTE
The front passenger ’s SRS side airbag
and seatbelt pretensioner are not con-
trolled by the Subaru advanced frontal
airbag system. !
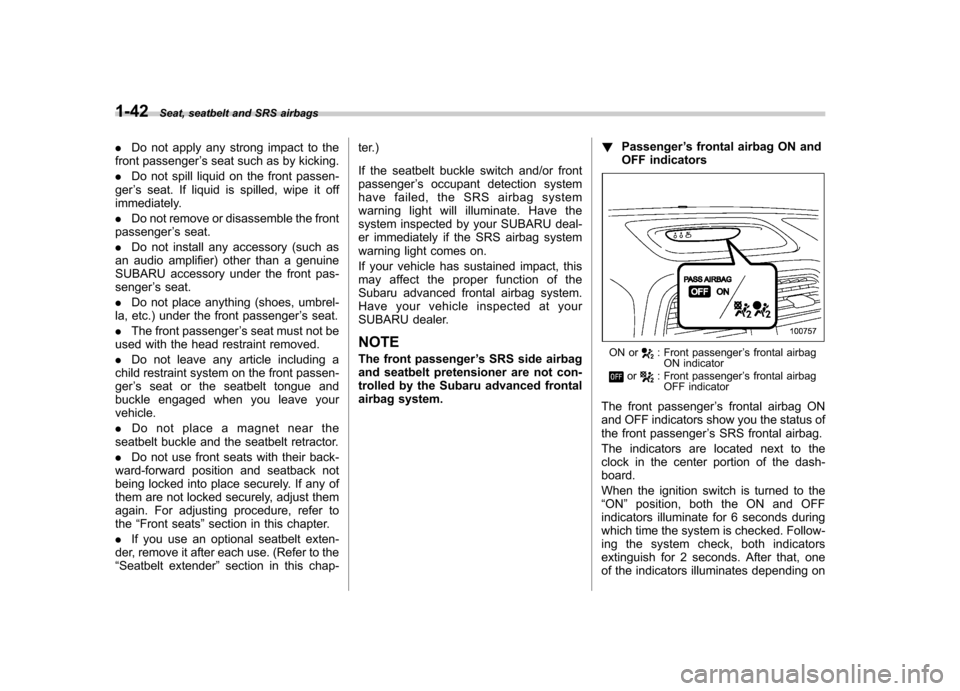
Passenger ’s frontal airbag ON and
OFF indicators
ON or: Front passenger ’s frontal airbag
ON indicator
or: Front passenger ’s frontal airbag
OFF indicator
The front passenger ’s frontal airbag ON
and OFF indicators show you the status of
the front passenger ’s SRS frontal airbag.
The indicators are located next to the
clock in the center portion of the dash-board.
When the ignition switch is turned to the “ ON ”position, both the ON and OFF
indicators illuminate for 6 seconds during
which time the system is checked. Follow-
ing the system check, both indicators
extinguish for 2 seconds. After that, one
of the indicators illuminates depending on
Page 159 of 364
Antenna system.................................................. 5-2
Printed antenna ................................................... 5-2
FM reception ....................................................... 5-2
Installation of accessories .................................. 5-2
Audio set ............................................................. 5-3
Type A audio set ................................................. 5-3
Type B audio set ................................................. 5-3
In-dash 6 CD auto changer (Optional audio unit –
if equipped) ....................................................... 5-3
Type A audio set (if equipped) ........................... 5-4
Radio operation. .................................................. 5-4 Compact disc player operation .
............................ 5-7
CD changer control (if optional in-dash CD changer is connected) ....................................... 5-9
Type B audio set (if equipped) .......................... 5-11
Radio operation ................................................. 5-11
Built-in CD changer control ................................ 5-15
Auxiliary unit operation ...................................... 5-20
In-dash 6 CD auto changer (if equipped) ......... 5-23
Loading and unloading compact discs ............... 5-23
Precautions to observe when handling a compact disc ................................................... 5-25 Audio
5
Page 160 of 364
5-2Audio
Antenna system &Printed antenna
CAUTION
Do not use sharp instruments or
window cleaner containing abra-
sives to clean the inner surface of
the window on which the antenna is
printed. Doing so may damage the
antenna printed on the window.
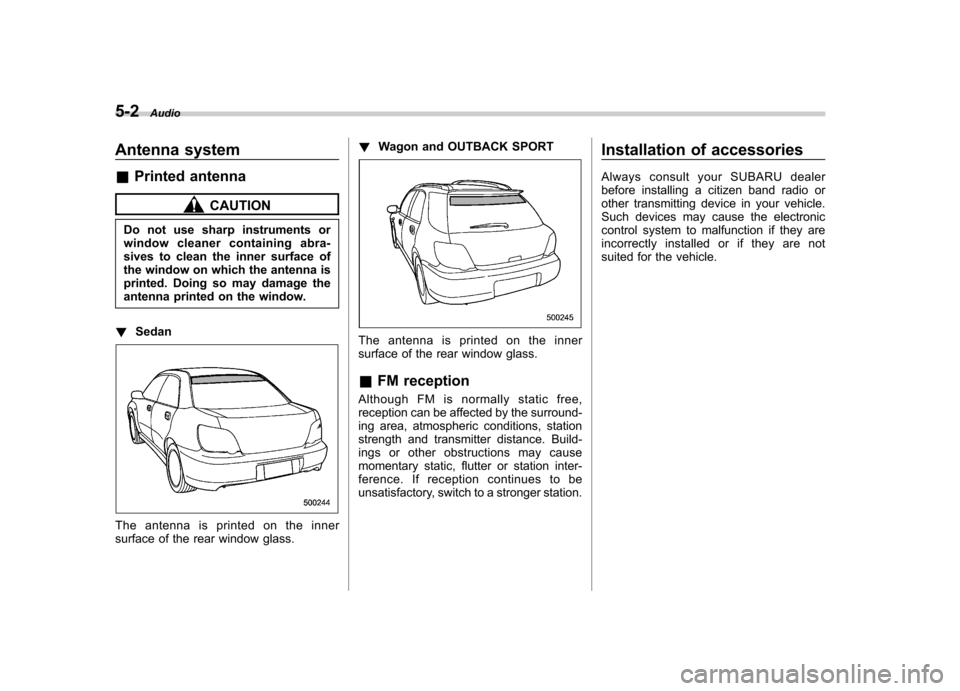
! Sedan
The antenna is printed on the inner
surface of the rear window glass. !
Wagon and OUTBACK SPORT
The antenna is printed on the inner
surface of the rear window glass. &FM reception
Although FM is normally static free,
reception can be affected by the surround-
ing area, atmospheric conditions, station
strength and transmitter distance. Build-
ings or other obstructions may cause
momentary static, flutter or station inter-
ference. If reception continues to be
unsatisfactory, switch to a stronger station. Installation of accessories
Always consult your SUBARU dealer
before installing a citizen band radio or
other transmitting device in your vehicle.
Such devices may cause the electronic
control system to malfunction if they are
incorrectly installed or if they are not
suited for the vehicle.
Page 161 of 364
Audio set
Your SUBARU may be equipped with one
of the following audio sets. See the pages
indicated in this section for operatingdetails. &Type A audio set
.Radio operation: refer to page 5-4
. Compact disc player operation: refer to
page 5-7 . CD changer control: refer to page 5-9 &
Type B audio set
.Radio operation: refer to page 5-11
. Built-in CD changer control: refer to
page 5-15 . Auxiliary unit operation: refer to page 5-
20 &
In-dash 6 CD auto changer
(Optional audio unit –if
equipped)
. Loading and unloading compact discs:
refer to page 5-23 Audio
5-3
Page 162 of 364
5-4Audio
Type A audio set (if equipped)
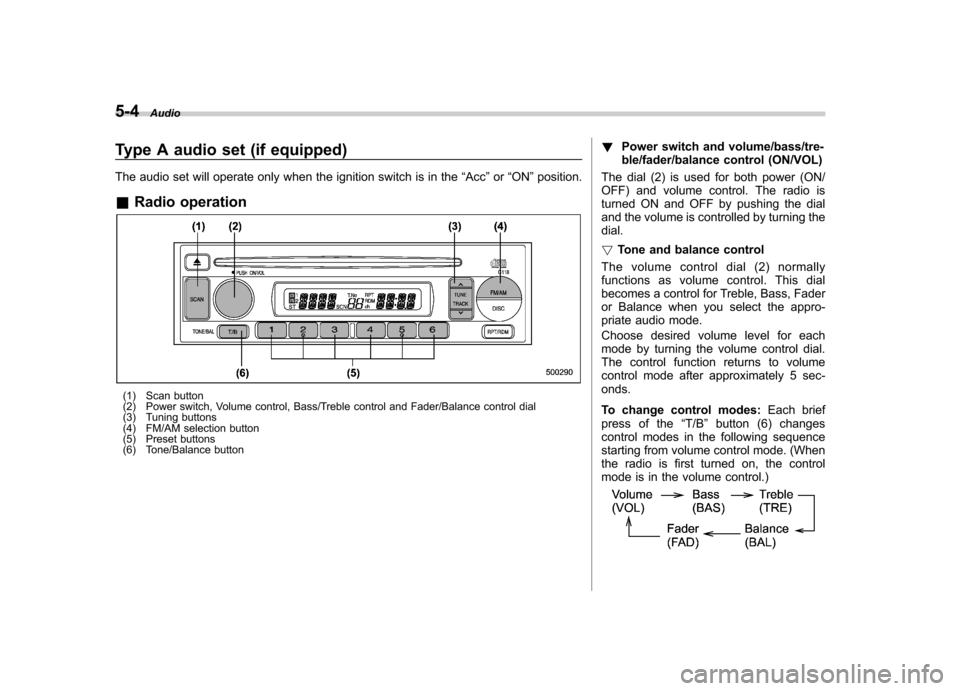
The audio set will operate only when the ignition switch is in the “Acc ”or “ON ”position.
& Radio operation
(1) Scan button
(2) Power switch, Volume control, Bass/Treble control and Fader/Balance control dial
(3) Tuning buttons
(4) FM/AM selection button
(5) Preset buttons
(6) Tone/Balance button !
Power switch and volume/bass/tre-
ble/fader/balance control (ON/VOL)
The dial (2) is used for both power (ON/
OFF) and volume control. The radio is
turned ON and OFF by pushing the dial
and the volume is controlled by turning thedial. ! Tone and balance control
The volume control dial (2) normally
functions as volume control. This dial
becomes a control for Treble, Bass, Fader
or Balance when you select the appro-
priate audio mode.
Choose desired volume level for each
mode by turning the volume control dial.
The control function returns to volume
control mode after approximately 5 sec-onds.
To change control modes: Each brief
press of the “T/B ”button (6) changes
control modes in the following sequence
starting from volume control mode. (When
the radio is first turned on, the control
mode is in the volume control.)