2007 SUBARU IMPREZA lock
[x] Cancel search: lockPage 28 of 364
tems, see the“Child restraint sys-
tems ”section in this chapter.
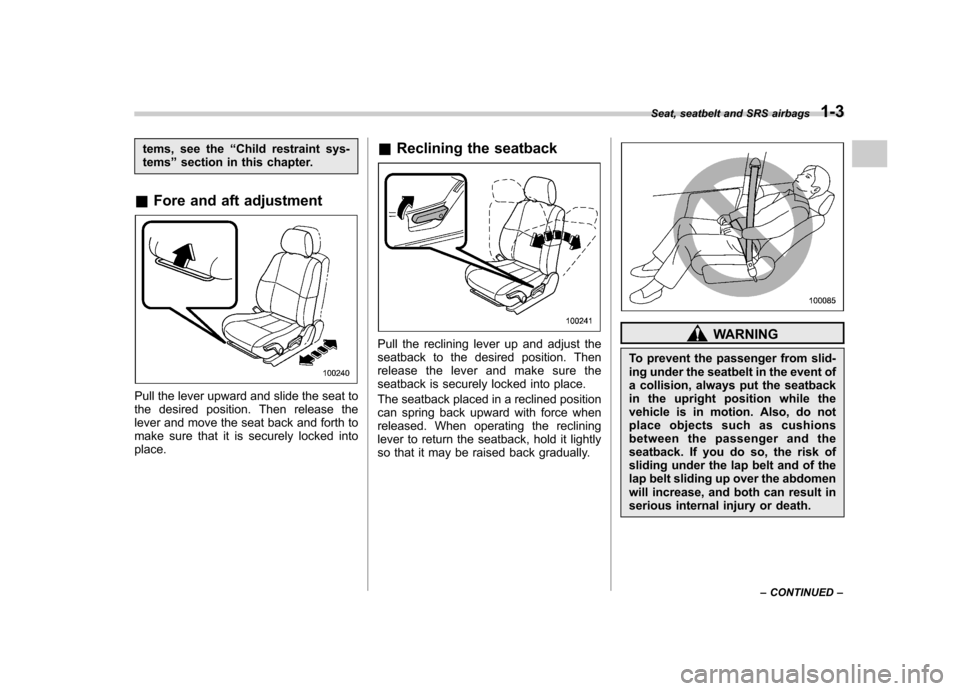
& Fore and aft adjustment
Pull the lever upward and slide the seat to
the desired position. Then release the
lever and move the seat back and forth to
make sure that it is securely locked intoplace. &
Reclining the seatback
Pull the reclining lever up and adjust the
seatback to the desired position. Then
release the lever and make sure the
seatback is securely locked into place.
The seatback placed in a reclined position
can spring back upward with force when
released. When operating the reclining
lever to return the seatback, hold it lightly
so that it may be raised back gradually.WARNING
To prevent the passenger from slid-
ing under the seatbelt in the event of
a collision, always put the seatback
in the upright position while the
vehicle is in motion. Also, do not
place objects such as cushions
between the passenger and the
seatback. If you do so, the risk of
sliding under the lap belt and of the
lap belt sliding up over the abdomen
will increase, and both can result in
serious internal injury or death. Seat, seatbelt and SRS airbags
1-3
– CONTINUED –
Page 34 of 364
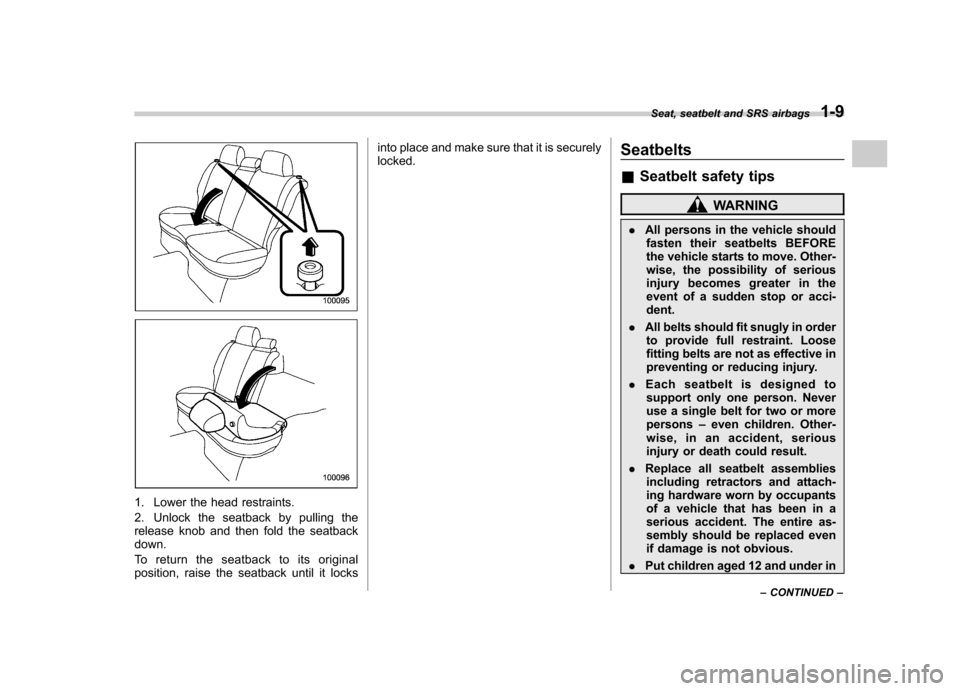
1. Lower the head restraints.
2. Unlock the seatback by pulling the
release knob and then fold the seatbackdown.
To return the seatback to its original
position, raise the seatback until it locksinto place and make sure that it is securelylocked.
Seatbelts &
Seatbelt safety tips
WARNING
. All persons in the vehicle should
fasten their seatbelts BEFORE
the vehicle starts to move. Other-
wise, the possibility of serious
injury becomes greater in the
event of a sudden stop or acci-dent.
. All belts should fit snugly in order
to provide full restraint. Loose
fitting belts are not as effective in
preventing or reducing injury.
. Each seatbelt is designed to
support only one person. Never
use a single belt for two or morepersons –even children. Other-
wise, in an accident, serious
injury or death could result.
. Replace all seatbelt assemblies
including retractors and attach-
ing hardware worn by occupants
of a vehicle that has been in a
serious accident. The entire as-
sembly should be replaced even
if damage is not obvious.
. Put children aged 12 and under inSeat, seatbelt and SRS airbags
1-9
– CONTINUED –
Page 36 of 364

&Emergency Locking Retrac-
tor (ELR)
The driver ’s seatbelt has an Emergency
Locking Retractor (ELR).
The emergency locking retractor allows
normal body movement but the retractor
locks automatically during a sudden stop,
impact or if you pull the belt very quickly
out of the retractor. & Automatic/Emergency Lock-
ing Retractor (A/ELR)
Each passenger ’s seatbelt has an Auto-
matic/Emergency Locking Retractor (A/
ELR). The Automatic/Emergency Locking
Retractor normally functions as an Emer-
gency Locking Retractor (ELR). The A/
ELR has an additional locking mode“ Automatic Locking Retractor (ALR)
mode ”intended to secure a child restraint
system. When the seatbelt is once drawn
out completely and is then retracted even
slightly, the retractor locks the seatbelt in
that position and the seatbelt cannot be
extended. As the belt is rewinding, clicks
will be heard which indicate the retractor
functions as an ALR. When the seatbelt is
retracted fully, the ALR mode is released.
When securing a child restraint system on
the rear seats by the use of the seatbelt,
the seatbelt must be changed over to the Automatic Locking Retractor (ALR) mode.
When the child restraint system is re-
moved, make sure that the seatbelt
retracts fully and the retractor returned to
the Emergency Locking Retractor (ELR) mode.
For instructions on how to convert the
retractor to the ALR mode and restore it to
the ELR mode, see the
“Child restraint
systems ”section in this chapter.
& Seatbelt warning light
and chime
Your vehicle is equipped with a seatbelt
warning device at the driver ’s seat, as
required by current safety standards.
There is a seatbelt warning light in the
combination meter.
If the driver has not yet fastened the
seatbelt when the ignition switch is turned
to the “ON ”position, the seatbelt warning
light will flash for 6 seconds, to warn that
the seatbelt is unfastened. If the driver ’s
seatbelt is not fastened, a chime will also
sound simultaneously.
If the driver ’s seatbelt is still not fastened 6
seconds later, the warning light will remain
lit for 15 seconds. If the driver ’s seatbelt is
still not fastened even 15 seconds later
(21 seconds after turning ON the ignition
switch), the warning lights will alternate between flashing and steady illumination
at 15-second intervals, and the chime will
sound while the warning light is flashing.
Alternate flashing and steady illumination
of the warning lights and sounding of the
chime will continue until the driver fastens
the seatbelt.
NOTE . If the driver unfastens the seatbelt
after fastening, the seatbelt warning
device operates as follows according
to the vehicle speed.
.At speeds lower than approxi-
mately 9 mph (15 km/h)
The warning light will alternate
between flashing and steady illumi-
nation at 15-second intervals. The
chime will not sound. . At speeds higher than approxi-
mately 9 mph (15 km/h)
The warning light will alternate
between flashing and steady illumi-
nation at 15-second intervals and
the chime will sound while the
warning light is flashing.
. It is possible to cancel the warning
operation that follows the 6-second
warning after turning ON the ignition
switch. When the ignition switch is
turned ON next time, however, the
complete sequence of the warning Seat, seatbelt and SRS airbags
1-11
– CONTINUED –
Page 38 of 364
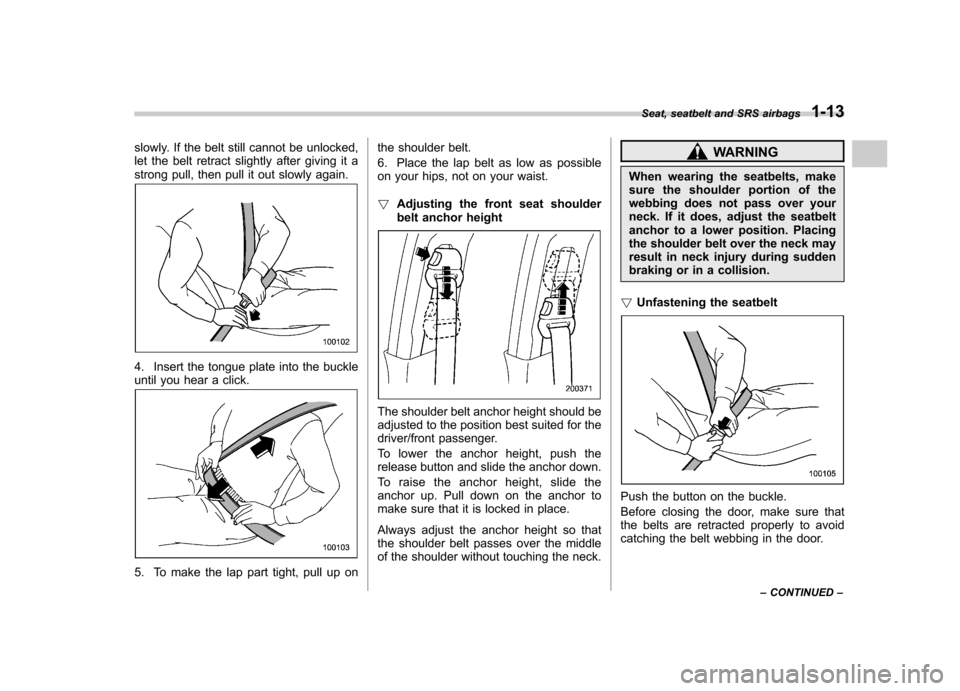
slowly. If the belt still cannot be unlocked,
let the belt retract slightly after giving it a
strong pull, then pull it out slowly again.
4. Insert the tongue plate into the buckle
until you hear a click.
5. To make the lap part tight, pull up onthe shoulder belt.
6. Place the lap belt as low as possible
on your hips, not on your waist. !
Adjusting the front seat shoulder
belt anchor height
The shoulder belt anchor height should be
adjusted to the position best suited for the
driver/front passenger.
To lower the anchor height, push the
release button and slide the anchor down.
To raise the anchor height, slide the
anchor up. Pull down on the anchor to
make sure that it is locked in place.
Always adjust the anchor height so that
the shoulder belt passes over the middle
of the shoulder without touching the neck.
WARNING
When wearing the seatbelts, make
sure the shoulder portion of the
webbing does not pass over your
neck. If it does, adjust the seatbelt
anchor to a lower position. Placing
the shoulder belt over the neck may
result in neck injury during sudden
braking or in a collision.
! Unfastening the seatbelt
Push the button on the buckle.
Before closing the door, make sure that
the belts are retracted properly to avoid
catching the belt webbing in the door. Seat, seatbelt and SRS airbags
1-13
– CONTINUED –
Page 39 of 364
1-14Seat, seatbelt and SRS airbags
! Rear seatbelts (except rear center
seatbelt on Wagon)
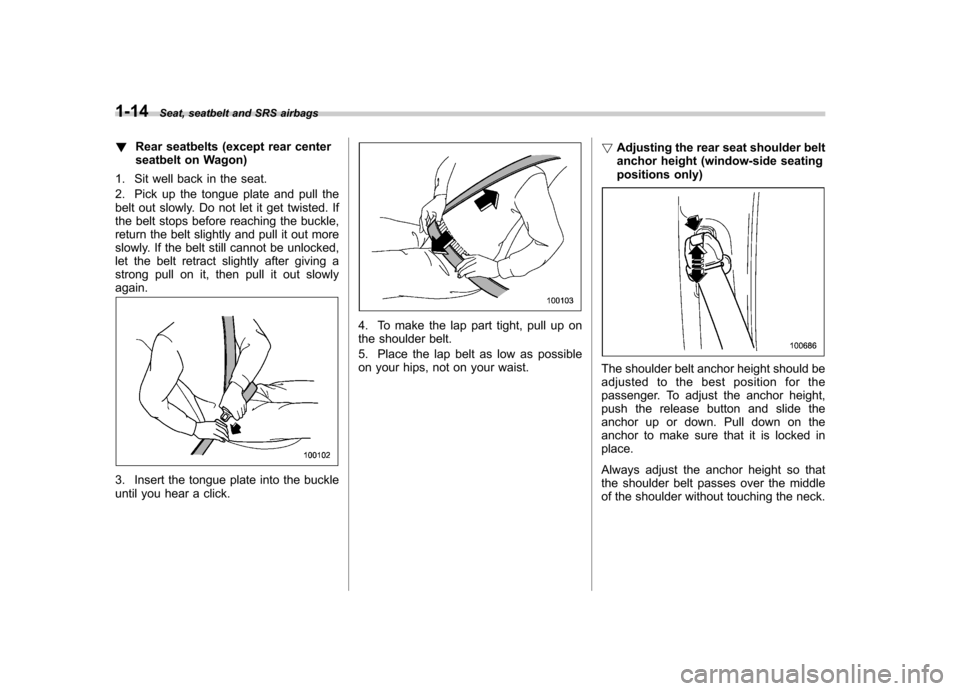
1. Sit well back in the seat.
2. Pick up the tongue plate and pull the
belt out slowly. Do not let it get twisted. If
the belt stops before reaching the buckle,
return the belt slightly and pull it out more
slowly. If the belt still cannot be unlocked,
let the belt retract slightly after giving a
strong pull on it, then pull it out slowlyagain.
3. Insert the tongue plate into the buckle
until you hear a click.
4. To make the lap part tight, pull up on
the shoulder belt.
5. Place the lap belt as low as possible
on your hips, not on your waist. !
Adjusting the rear seat shoulder belt
anchor height (window-side seating
positions only)
The shoulder belt anchor height should be
adjusted to the best position for the
passenger. To adjust the anchor height,
push the release button and slide the
anchor up or down. Pull down on the
anchor to make sure that it is locked inplace.
Always adjust the anchor height so that
the shoulder belt passes over the middle
of the shoulder without touching the neck.
Page 41 of 364
1-16Seat, seatbelt and SRS airbags
WARNING
Be sure to fasten both tongue plates
to the respective buckles. If the
seatbelt is used only as a shoulder
belt (with the connector ’s tongue
plate not fastened to the connec-tor ’s buckle on the right-hand side),
it cannot properly restrain the wear-
er in position in an accident, possi-
bly resulting in serious injury ordeath.
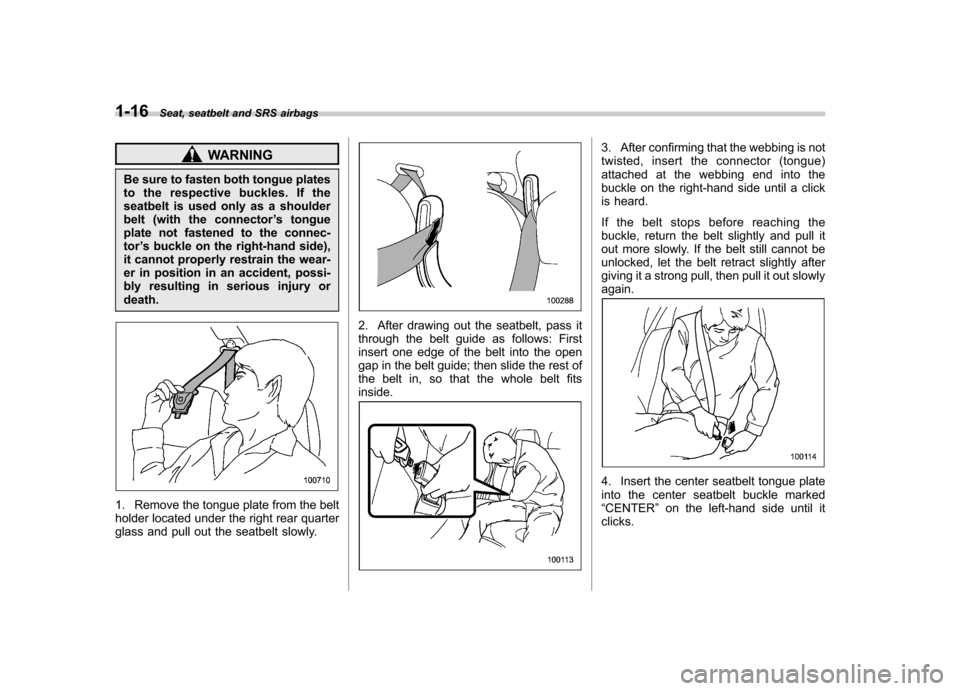
1. Remove the tongue plate from the belt
holder located under the right rear quarter
glass and pull out the seatbelt slowly.
2. After drawing out the seatbelt, pass it
through the belt guide as follows: First
insert one edge of the belt into the open
gap in the belt guide; then slide the rest of
the belt in, so that the whole belt fitsinside.
3. After confirming that the webbing is not
twisted, insert the connector (tongue)
attached at the webbing end into the
buckle on the right-hand side until a click
is heard.
If the belt stops before reaching the
buckle, return the belt slightly and pull it
out more slowly. If the belt still cannot be
unlocked, let the belt retract slightly after
giving it a strong pull, then pull it out slowlyagain.
4. Insert the center seatbelt tongue plate
into the center seatbelt buckle marked“ CENTER ”on the left-hand side until it
clicks.
Page 44 of 364

and warnings could reduce the
effectiveness of the seatbelt and
result in more serious injury in the
event of a collision. .Never use the extender when the
belt itself is long enough to
permit it to be buckled properly.
If removal of heavy clothing is all
that is needed to permit the
seatbelt to be buckled properly,
remove the heavy clothing and
do not use the extender.
. Do not use the extender if the
buckle of the extender rests over
the abdomen.
. Do not let someone else use the
extender. Use of an extender
when it is not needed could
reduce the effectiveness of the
seatbelt and result in more ser-
ious injury in the event of acollision.
. Use the extender only for the
front seatbelts and only for the
model for which it was originally
provided. Never use the extender
for the rear seatbelts or for a
different model. NOTE
When the seatbelt extender is used by
a pregnant passenger, consult a doctor
to get approval in advance.
To connect the extender to the seatbelt,
insert the tongue plate into the seatbelt
buckle so that the
“PRESS ”signs on the
buckle-release buttons of the extender
and the seatbelt are both facing outward
as shown in the diagram. You will hear a
click when the tongue plate locks into thebuckle.
When releasing the seatbelt, press on the
buckle-release button on the extender, not
on the seatbelt. This helps to prevent
damage to the vehicle interior and ex-
tender itself. Front seatbelt pretensioners
The driver
’s and front passenger ’s seat-
belts have a seatbelt pretensioner. The
seatbelt pretensioners are designed to be
activated in the event of an accident
involving a moderate to severe frontalcollision.
The pretensioner sensor also serves as
the frontal SRS airbag sensor. If the
sensor detects a certain predetermined
amount of force during a frontal collision,
the front seatbelt is quickly drawn back in
by the retractor to take up the slack so that
the belt more effectively restrains the front
seat occupant.
When a seatbelt pretensioner is activated,
an operating noise will be heard and a Seat, seatbelt and SRS airbags
1-19
– CONTINUED –
Page 45 of 364
1-20Seat, seatbelt and SRS airbags
small amount of smoke will be released.
These occurrences are normal and not
harmful. This smoke does not indicate a
fire in the vehicle.
Once the seatbelt pretensioner has been
activated, the seatbelt retractor remains
locked. Consequently, the seatbelt can not
be pulled out and retracted and therefore
must be replaced. NOTE .Seatbelt pretensioners are not de-
signed to activate in minor frontal
impacts, in side or rear impacts or in
roll-over accidents.. The driver ’s seat and passenger ’s
seat pretensioners and frontal SRS
airbag operate simultaneously.. Pretensioners are designed to func-
tion on a one-time-only basis. In the
event that a pretensioner is activated,
both the driver ’s and front passenger ’s
seatbelt retractor assemblies must be
replaced only by an authorized
SUBARU dealer. When replacing seat-
belt retractor assemblies, use only
genuine SUBARU parts.. If either front seatbelt does not
retract or cannot be pulled out due to
a malfunction or activation of the
pretensioner, contact your SUBARU
dealer as soon as possible. .
If the front seatbelt retractor assem-
bly or surrounding area has been
damaged, contact your SUBARU dealer
as soon as possible.. When you sell your vehicle, we urge
you to explain to the buyer that it has
seatbelt pretensioners by alerting him
to the contents of this section.
WARNING
. To obtain maximum protection,
the occupants should sit in an
upright position with their seat-
belts properly fastened. Refer tothe “Seatbelts ”section in this
chapter.
. Do not modify, remove or strike
the front seatbelt retractor as-
semblies or surrounding area.
This could result in accidental
activation of the seatbelt preten-
sioners or could make the sys-
tem inoperative, possibly result-
ing in serious injury. Seatbelt
pretensioners have no user-ser-
viceable parts. For required ser-
vicing of front seatbelt retractors
equipped with seatbelt preten-
sioners, see your nearest
SUBARU dealer.
. When discarding front seatbelt retractor assemblies or scrap-
ping the entire vehicle due to
collision damage or for other
reasons, consult your SUBARU
dealer.
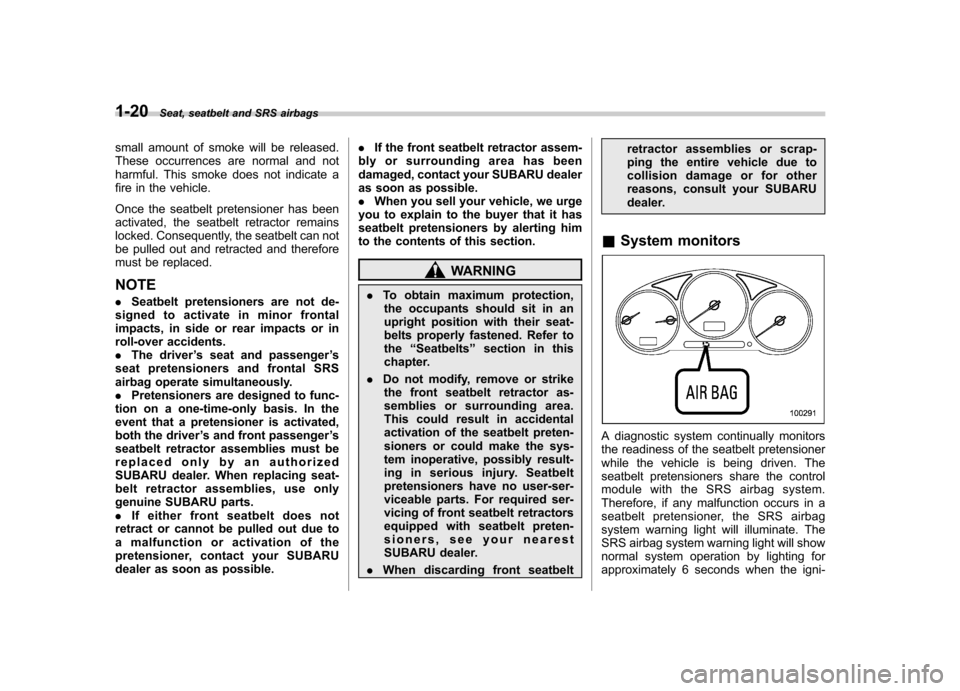
& System monitors
A diagnostic system continually monitors
the readiness of the seatbelt pretensioner
while the vehicle is being driven. The
seatbelt pretensioners share the control
module with the SRS airbag system.
Therefore, if any malfunction occurs in a
seatbelt pretensioner, the SRS airbag
system warning light will illuminate. The
SRS airbag system warning light will show
normal system operation by lighting for
approximately 6 seconds when the igni-