2007 SATURN RELAY ignition
[x] Cancel search: ignitionPage 282 of 570

Do not add any label to a CD, it could get caught
in the CD player. If a CD is recorded on a
personal computer and a description label is
needed, try labeling the top of the recorded CD
with a marking pen.
Notice:If you add any label to a CD, insert
more than one CD into the slot at a time,
or attempt to play scratched or damaged CDs,
you could damage the CD player. When
using the CD player, use only CDs in good
condition without any label, load one CD at a
time, and keep the CD player and the loading
slot free of foreign materials, liquids, and
debris.
If an error appears on the display, see “CD
Messages” later in this section.
M(Load):Press this button to load CDs into the
CD player. This CD player holds up to six CDs.
To insert one CD, do the following:
1. Turn the ignition on.
2. Press and release the load button.
3. When INSET CD # appears on the display,
load a CD. Insert the CD partway into the
slot, label side up. The player pulls the CD in.To insert multiple CDs, do the following:
1. Turn the ignition on.
2. Press and hold the load button for
two seconds.
A beep will sound and LOAD ALL DISC
appears on the display.
3. When INSERT CD # appears on the display,
load a CD. Insert the CD partway into the slot,
label side up. The player pulls the CD in.
Once the CD is loaded, wait for INSERT CD #
to appear on the display, then load the next
CD. The CD player takes up to six CDs. Do not
try to load more than six.
To load more than one CD but less than six,
complete Steps 1 through 3. When �nished loading
CDs, press the load button to cancel the loading
function. The radio begins to play the last CD
loaded.
If more than one CD has been loaded, a number
for each CD appears on the display.
282
ProCarManuals.com
Page 290 of 570

Playing an MP3
Insert a CD partway into the slot, label side up.
The player pulls it in, and READING appears
on the display. The CD should begin playing and
the CD symbol appears on the display.
If the ignition or radio is turned off with a CD in
the player it stays in the player. When the ignition
or radio is turned on, the CD starts to play
where it stopped, if it was the last selected audio
source.
As each new track starts to play, the track number
appears on the display.
The CD player can play the smaller 3 inch (8 cm)
single CDs with an adapter ring. Full-size CDs
and the smaller CDs are loaded in the same
manner.
If playing a CD-R, the sound quality (and playback
performance) may be reduced due to the CD-R
quality, method of recording, the quality of
the music that has been recorded, and the way
the CD-R has been handled. For better playback
performance when home burning audio discs,
use brand named CD media showing the Compact
Disc™, and a burn rate no faster than 12X.There may be an increase in skipping, difficulty in
�nding tracks, and/or difficulty in loading and
ejecting. If these problems occur, check the bottom
surface of the CD. If the surface of the CD is
damaged, such as cracked, broken, or scratched,
the CD will not play properly. If the surface of
the CD is soiled, seeCare of Your CDs and DVDs
on page 355for more information.
If there is no apparent damage, try a known
good CD.
Do not add any label to a CD, it could get caught
in the CD player. If a CD is recorded on a
personal computer and a description label is
needed, try labeling the top of the recorded CD
with a marking pen.
Notice:If you add any label to a CD, insert
more than one CD into the slot at a time, or
attempt to play scratched or damaged CDs, you
could damage the CD player. When using the
CD player, use only CDs in good condition
without any label, load one CD at a time, and
keep the CD player and the loading slot free of
foreign materials, liquids, and debris.
If an error appears on the display, see “CD
Messages” later in this section.
290
ProCarManuals.com
Page 292 of 570

MUTE:Press this button to silence the system.
Press this button again to turn the sound on.
This button is not available on the Radio
with Six-Disc CD.
tSEEKu:Press the left arrow to go to the
start of the current track, if more than 10 seconds
have played. Press the right arrow to go to the
next track. If either arrow is held or pressed more
than once, the player continues moving backward
or forward through the CD.
4(Information):Press this button to display the
artist name and album contained in the ID3 tag.
BAND:Press this button to listen to the radio
when a CD is playing. The inactive CD remains
safely inside the radio for future listening.
CD AUX (Auxiliary):Press this button to play a
CD when listening to the radio. The CD symbol
appears on the display when a CD is loaded.
Y(Eject):Press this button to eject a CD. Eject
may be activated with either the ignition or
radio off.
292
ProCarManuals.com
Page 305 of 570

To use the RSE OSD menu when using a CD or
an MP3, do the following:
Make sure that a CD or an MP3 is loaded in the
RSE system and that the system is not in auxiliary,
then press the display button on the remote
control. Once the menu is on the screen, use the
directional arrows and the enter button to
navigate the screen. This menu will let you select
default preferences for language and playback
settings. To exit this menu, press the display or the
return button on the remote control or wait for
the menu to time out.
Battery Replacement
To change the remote control batteries, do the
following:
1. Slide the battery door, located on the back of
the remote control, down.
2. Replace the two AA batteries in the
compartment. Make sure that they are
installed correctly, using the diagram on the
inside of the battery compartment.
3. Close the battery door.If the remote control is to be stored for a long
period of time, remove the batteries and keep them
in a cool, dry place.
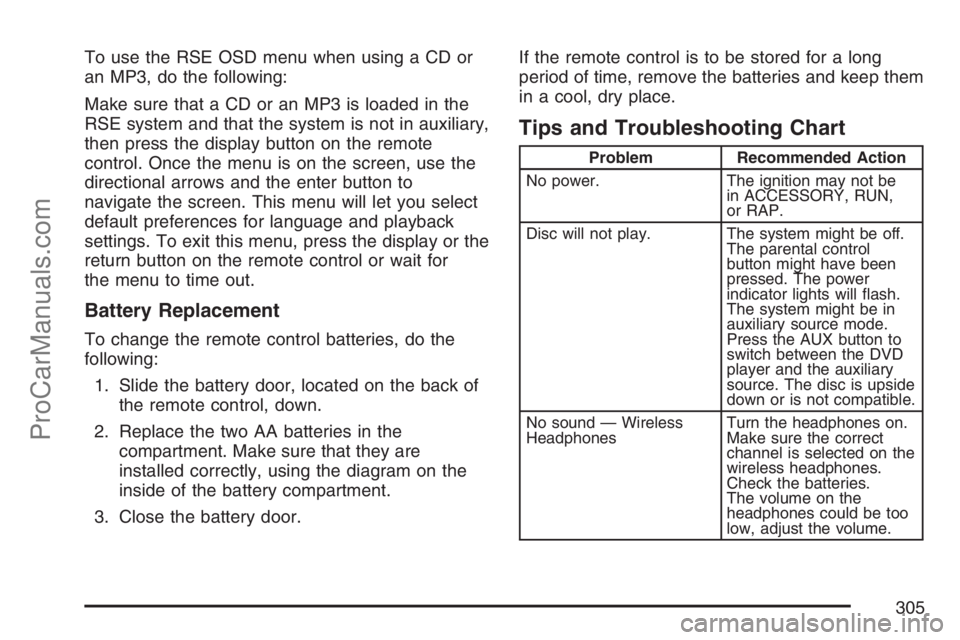
Tips and Troubleshooting Chart
Problem Recommended Action
No power. The ignition may not be
in ACCESSORY, RUN,
or RAP.
Disc will not play. The system might be off.
The parental control
button might have been
pressed. The power
indicator lights will �ash.
The system might be in
auxiliary source mode.
Press the AUX button to
switch between the DVD
player and the auxiliary
source. The disc is upside
down or is not compatible.
No sound — Wireless
HeadphonesTurn the headphones on.
Make sure the correct
channel is selected on the
wireless headphones.
Check the batteries.
The volume on the
headphones could be too
low, adjust the volume.
305
ProCarManuals.com
Page 307 of 570

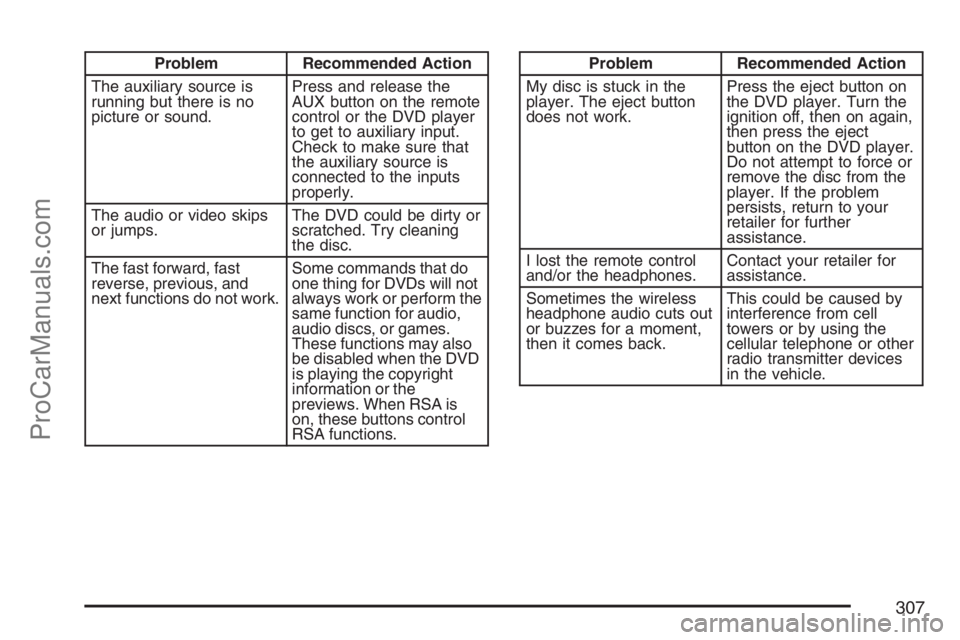
Problem Recommended Action
The auxiliary source is
running but there is no
picture or sound.Press and release the
AUX button on the remote
control or the DVD player
to get to auxiliary input.
Check to make sure that
the auxiliary source is
connected to the inputs
properly.
The audio or video skips
or jumps.The DVD could be dirty or
scratched. Try cleaning
the disc.
The fast forward, fast
reverse, previous, and
next functions do not work.Some commands that do
one thing for DVDs will not
always work or perform the
same function for audio,
audio discs, or games.
These functions may also
be disabled when the DVD
is playing the copyright
information or the
previews. When RSA is
on, these buttons control
RSA functions.Problem Recommended Action
My disc is stuck in the
player. The eject button
does not work.Press the eject button on
the DVD player. Turn the
ignition off, then on again,
then press the eject
button on the DVD player.
Do not attempt to force or
remove the disc from the
player. If the problem
persists, return to your
retailer for further
assistance.
I lost the remote control
and/or the headphones.Contact your retailer for
assistance.
Sometimes the wireless
headphone audio cuts out
or buzzes for a moment,
then it comes back.This could be caused by
interference from cell
towers or by using the
cellular telephone or other
radio transmitter devices
in the vehicle.
307
ProCarManuals.com
Page 321 of 570

Battery Replacement
To change the remote control batteries, do the
following:
1. Slide the battery door, located on the back of
the remote control, down.
2. Replace the two batteries in the compartment.
Make sure that they are installed correctly,
using the diagram on the inside of the battery
compartment.
3. Close the battery door.
If the remote control is to be stored for a long
period of time, remove the batteries and keep them
in a cool, dry place.
Tips and Troubleshooting Chart
Problem Recommended Action
No power. The ignition may not be
in ACCESSORY, RUN,
or RAP.
Disc will not play. The system might be off.
The parental control
button might have been
pressed. The power
indicator lights will �ash.
The system might be in
auxiliary source mode.
Press the DVD AUX
button on the player
faceplate or the AUX
button on the remote to
switch between the DVD
player and the auxiliary
sources. The disc is
upside down or is not
compatible.
No sound — Wireless
HeadphonesTurn the headphones on.
Make sure the correct
channel is selected on the
wireless headphones.
Check the batteries.
The volume on the
headphones could be too
low, adjust the volume.
321
ProCarManuals.com
Page 323 of 570

Problem Recommended Action
The auxiliary source is
running but there is no
picture or sound.Press and release the
AUX button on the remote
control or the DVD AUX
button on the player
faceplate to get to
auxiliary input. Check to
make sure that the
auxiliary source is
connected to the inputs
properly.
The audio or video skips
or jumps.The DVD could be dirty or
scratched. Try cleaning
the disc.
The fast forward, fast
reverse, previous, and
next functions do not work.Some commands that do
one thing for DVDs will not
always work or perform the
same function for audio,
audio discs, or games.
These functions may also
be disabled when the DVD
is playing the copyright
information or the
previews. When RSA is
on, these buttons may
control RSA functions.Problem Recommended Action
My disc is stuck in the
player. The eject button
does not work.Press the eject button on
the DVD player. Turn the
ignition off, then on again,
then press the eject
button on the DVD player.
Do not attempt to force or
remove the disc from the
player. If the problem
persists, return to your
retailer for further
assistance.
I lost the remote control
and/or the headphones.Contact your retailer for
assistance.
Sometimes the wireless
headphone audio cuts out
or buzzes for a moment,
then it comes back.This could be caused by
interference from cell
towers or by using the
cellular telephone or other
radio transmitter devices
in the vehicle.
323
ProCarManuals.com
Page 346 of 570

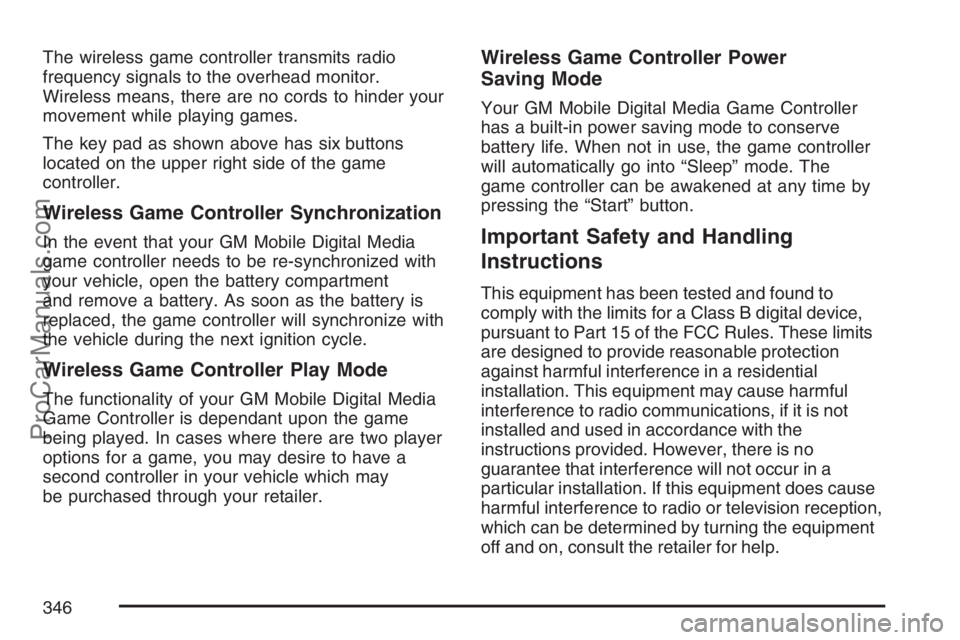
The wireless game controller transmits radio
frequency signals to the overhead monitor.
Wireless means, there are no cords to hinder your
movement while playing games.
The key pad as shown above has six buttons
located on the upper right side of the game
controller.
Wireless Game Controller Synchronization
In the event that your GM Mobile Digital Media
game controller needs to be re-synchronized with
your vehicle, open the battery compartment
and remove a battery. As soon as the battery is
replaced, the game controller will synchronize with
the vehicle during the next ignition cycle.
Wireless Game Controller Play Mode
The functionality of your GM Mobile Digital Media
Game Controller is dependant upon the game
being played. In cases where there are two player
options for a game, you may desire to have a
second controller in your vehicle which may
be purchased through your retailer.
Wireless Game Controller Power
Saving Mode
Your GM Mobile Digital Media Game Controller
has a built-in power saving mode to conserve
battery life. When not in use, the game controller
will automatically go into “Sleep” mode. The
game controller can be awakened at any time by
pressing the “Start” button.
Important Safety and Handling
Instructions
This equipment has been tested and found to
comply with the limits for a Class B digital device,
pursuant to Part 15 of the FCC Rules. These limits
are designed to provide reasonable protection
against harmful interference in a residential
installation. This equipment may cause harmful
interference to radio communications, if it is not
installed and used in accordance with the
instructions provided. However, there is no
guarantee that interference will not occur in a
particular installation. If this equipment does cause
harmful interference to radio or television reception,
which can be determined by turning the equipment
off and on, consult the retailer for help.
346
ProCarManuals.com