Page 209 of 288

209 Car care and technical information
Trunk lid light and taillights,
9-5 SedanBefore changing bulbs in the trunk, you
must first release the trim at the foot of the
trunk. This involves removing the handle
and the three trim fasteners (studs).
1 Unscrew the handle on the inside of the
tailgate.
2 Using the peg in the top of the screw-
driver handle, push in the button in the
center of the studs.
3 Remove the studs.
Changing bulbs
1 Squeeze together the silver plastic lug
and the electrical connection and with-
draw the lamp holder.
2 The bulb has a bayonet fitting. Press in
the bulb and twist it counterclockwise.
3 Change the bulb.Refitting the trim
1 Reset the studs by pushing back the
center buttons so that they protrude by
0.2 inch (5 mm).
2 Insert the studs through the trim and tail-
gate panel. Press the center buttons in,
flush with the collar.
3 Screw the handle back onto the trunk.
IB3909
IB518
95_U S _M 07.book Page 209 Friday, June 9, 2006 8:58 AM
ProCarManuals.com
Page 210 of 288
210 Car care and technical informationHigh-mounted stop lights,
9-5 SedanThe bulbs can be accessed after the panel
in the rear headlining has been removed.
1 Remove the panel by carefully pushing
in the two clips, one at the time.
2 Release the bulb holder, which is
retained by a clip at either end.
3 Withdraw the bulb gently straight back.
4 Push in the new bulb.
5 Refit the bulb holder.
6 Replace the panel by carefully pushing
the panel towards the headlining so that
the two clips engage their respective
slot.
Rear lights clusters,
9-5 SportCombi1 Open the tailgate.
2 Remove the two screws securing the
light cluster to the body.
3
2
2
3
1
IB519
High-mounted stop lights1 Panel
2 Retaining clips
3 Bulbs
IB3911
95_U S _M 07.book Page 210 Friday, June 9, 2006 8:58 AM
ProCarManuals.com
Page 211 of 288
211 Car care and technical information
3 Remove the two screws securing the
light cluster to the body.
4 Pull the light cluster rearwards and
angle it outwards (it is seated quite
firmly).
5 Release the fastener from the body.
Reinsert the fastener into the groove in
the light cluster. Press in the fastener
until you hear a click.
6 Take out the bulb holder.
7 Press in the bulb and twist it counter-
clockwise.
8 Change the bulb.
9 Check that the new bulb works.Reassembly:
1 Align the fastener with the hole in the
body.
2 Press the lamp unit home into the body
until you hear a click.
3 Fit the screws.
IB3912
IB3913
95_U S _M 07.book Page 211 Friday, June 9, 2006 8:58 AM
ProCarManuals.com
Page 212 of 288
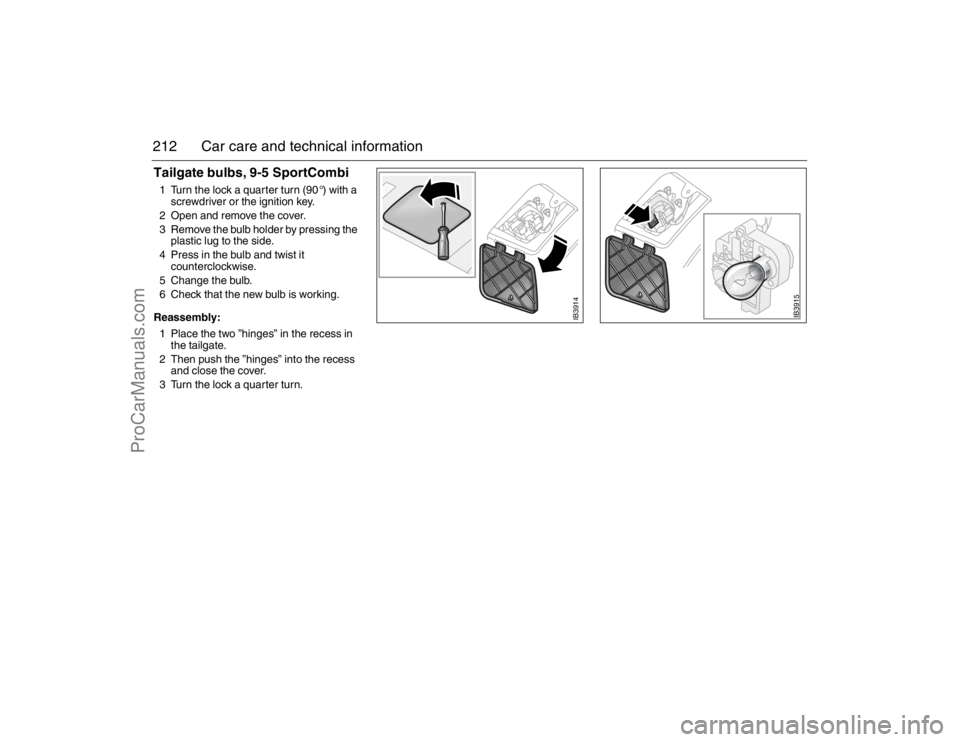
212 Car care and technical informationTailgate bulbs, 9-5 SportCombi1 Turn the lock a quarter turn (90 °) with a
screwdriver or the ignition key.
2 Open and remove the cover.
3 Remove the bulb holder by pressing the
plastic lug to the side.
4 Press in the bulb and twist it
counterclockwise.
5 Change the bulb.
6 Check that the new bulb is working.
Reassembly:
1 Place the two ”hinges” in the recess in
the tailgate.
2 Then push the ”hinges” into the recess
and close the cover.
3 Turn the lock a quarter turn.
IB3914
IB3915
95_U S _M 07.book Page 212 Friday, June 9, 2006 8:58 AM
ProCarManuals.com
Page 213 of 288

213 Car care and technical information
License-plate lightThe lens is not screwed in place. It is held in
place with snaps.
1 One of the short sides of the lens con-
tains a recess for a small screwdriver.
Insert a screwdriver and prise out the
lens.
2 Fit the new bulb.
3 When refitting the lens, the short side
without the screwdriver recess should
be inserted first.
Side direction indicators 1 Slide the lamp fitting forward and pull out
the back.
2 Remove the bulb.
3 Change the bulb.
On refitting, make sure that the spring in the
lamp fitting engages the edge of the open-
ing in the body panel.
Courtesy lights (front doors and
floor) and luggage-compartment
lighting 1 Insert a screwdriver carefully into the
slot in the end of the lamp fitting. Ease
the fitting off to gain access to the bulb.
2 Bend out one of the contacts and
remove the bulb.
3 Change the bulb.
On refitting, insert the connector-end of the
lamp fitting first.
IB522
IB3922
95_U S _M 07.book Page 213 Friday, June 9, 2006 8:58 AM
ProCarManuals.com
Page 214 of 288
214 Car care and technical informationDome light, front1 Ease the leading edge of the glass out
of the overhead panel.
2 Release one of the contacts and remove
the bulb.
3 Fit the new bulb.
Dome light, rear1 Remove the entire overhead panel:
ease out the trailing end first, and then
both front edges.
2 Fit the new bulb.
Glove-compartment illumination1 Insert a small screwdriver in the slot in
the end of the lamp fitting and ease it out
to gain access to the bulb.
2 Bend out one of the contacts and
remove the bulb.
3 Fit the new bulb.
On refitting, insert the connector-end of the
lamp fitting first.Other bulbs If any other bulbs need changing, you are
advised to take the car to a workshop. We
recommend that you contact an authorized
Saab dealer.
IB524
IB525
IB523
95_U S _M 07.book Page 214 Friday, June 9, 2006 8:58 AM
ProCarManuals.com
Page 215 of 288
215 Car care and technical information
Bulb tableA special kit containing spare bulbs and fuses is available as an
accessory from your Saab dealer. A storage space for this is pro-
vided adjacent to the toolkit and jack, under the panel in the luggage
compartment.# Cap Wattage
1 H7 55 Headlight
2 H8 35 Fog light
3 P21W 21 Reversing lamp; rear fog lamp; rear direc-
tion indicator
4 P21/5W 21/5 Stop/tail lamp
5 R10W 10 Dome light; courtesy lights; glove com-
partment; luggage compartment
6 R5W 5 Safety belt reminder; license-plate lighting
7 Xenon
w9U6 Reading light, overhead panel
8 T4W 4 Reading light, rear
9WY5W/
W5W5 Side indicators (yellow);/ high-mounted
stop light (9-5 Sedan); parking lights
10 W2W 1.2 SwitchesNOTICEOnly fit lamps of the specified rating. Lamps of the wrong wattage
could damage the wiring harness and electronics.
12345
678910
IB4095
95_U S _M 07.book Page 215 Friday, June 9, 2006 8:58 AM
ProCarManuals.com
Page 216 of 288

216 Car care and technical informationFuses
The fuses are housed in two fuse panels:
one at the end of the instrument panel on the
driver’s side, and one under the hood.
To check if a fuse has blown, first remove it
from the panel (see below). If the filament is
broken, the fuse has blown.
A special tool for removing fuses is provided
at the bottom of the fuse panel at the end of
the instrument panel. Simply push the tool
onto the fuse, squeeze and remove the
fuse.
WARNING
To avoid the risk of short-circuiting and/or
fire breaking out in the electrical system,
the following advice should be heeded:
Always consult a workshop before
modifying or adding any electrical
equipment. We recommend that you
contact an authorized Saab dealer.
Failure to do so can result in the elec-
trical system being damaged.
Never replace a fuse with one having
a higher/lower rating than specified
(see page 218). The color of the fuse
indicates its amperage.
If the same fuse blows repeatedly,
have the electrical system checked by
a workshop. We recommend that you
contact an authorized Saab dealer.
If a MAXI fuse blows, it means that
there is a major fault in the electrical
system. Have the car checked by a
workshop. We recommend that you
contact an authorized Saab dealer.
IB527
Fuse panel in instrument panel
IB1794
Fuse box under the hood
IB144
Sound fuse / Blown fuse
95_U S _M 07.book Page 216 Friday, June 9, 2006 8:58 AM
ProCarManuals.com